Literature/Product Sheet
Page 1
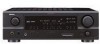
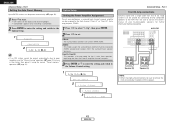
... for the Surround Back channel speaker to give you more details on the generation of the iPod and the version of the AVR-1707. s Dual Channel Surround Back Power Amp for 7.1 Surround The AVR-1707 is connected to the dedicated ...Setup function, to achieve the most advanced surround playback formats • DTS 96/24 Decoding for DVD-Video • DTS-ES Discrete 6.1 and Matrix 6.1 • DTS NEO:6 • Dolby Digital EX • Dolby Pro Logic IIx s DENON DSP Surround Modes Add Listening Excitement Put yourself in the front for enhanced listening enjoyment. A/V Receiver AVR-1707...
... for the Surround Back channel speaker to give you more details on the generation of the iPod and the version of the AVR-1707. s Dual Channel Surround Back Power Amp for 7.1 Surround The AVR-1707 is connected to the dedicated ...Setup function, to achieve the most advanced surround playback formats • DTS 96/24 Decoding for DVD-Video • DTS-ES Discrete 6.1 and Matrix 6.1 • DTS NEO:6 • Dolby Digital EX • Dolby Pro Logic IIx s DENON DSP Surround Modes Add Listening Excitement Put yourself in the front for enhanced listening enjoyment. A/V Receiver AVR-1707...
Owners Manual - English
Page 4
... mode function Storing the settings in the Browse mode 34 Viewing still pictures and videos (only for choosing the DENON AVR-1707 AV Surround Receiver. ENGLISH Thank you review the contents of this product is provided with home theater sources such as DVD, as...33 Playing the iPod 34 Listening to setup flow 7 Speaker layout [Basic layout 7 Speaker connections 8 Connecting a DVD player and monitor 9 Auto Setup q Connecting a microphone 10 w Before performing the Auto Setup procedure 10 e Switching the front speaker 10 r Starting Auto Setup 11 Error messages 12 Connecting Other ...
... mode function Storing the settings in the Browse mode 34 Viewing still pictures and videos (only for choosing the DENON AVR-1707 AV Surround Receiver. ENGLISH Thank you review the contents of this product is provided with home theater sources such as DVD, as...33 Playing the iPod 34 Listening to setup flow 7 Speaker layout [Basic layout 7 Speaker connections 8 Connecting a DVD player and monitor 9 Auto Setup q Connecting a microphone 10 w Before performing the Auto Setup procedure 10 e Switching the front speaker 10 r Starting Auto Setup 11 Error messages 12 Connecting Other ...
Owners Manual - English
Page 5
... America model only 1 e Service station list 1 r Remote control unit (RC-1048 1 t R6P/AA batteries 2 y AM loop antenna 1 u FM indoor antenna 1 i Setup microphone (DM-S205) (Approx. 23-5/8 ft / 6 m) ..........1 r t y u i Pay attention to turn off the power operation button or unplug the cord when you...Mode 45 Advanced Setup - Part 2 Speaker Setup Setting the Speaker Configuration 45, 46 Setting the Subwoofer Mode Setup 46 Setting the Distance 46, 47 Setting the Crossover Frequency 47 Setting the Test Tone 47 Operating the remote control unit Operating DENON audio components 48...
... America model only 1 e Service station list 1 r Remote control unit (RC-1048 1 t R6P/AA batteries 2 y AM loop antenna 1 u FM indoor antenna 1 i Setup microphone (DM-S205) (Approx. 23-5/8 ft / 6 m) ..........1 r t y u i Pay attention to turn off the power operation button or unplug the cord when you...Mode 45 Advanced Setup - Part 2 Speaker Setup Setting the Speaker Configuration 45, 46 Setting the Subwoofer Mode Setup 46 Setting the Distance 46, 47 Setting the Crossover Frequency 47 Setting the Test Tone 47 Operating the remote control unit Operating DENON audio components 48...
Owners Manual - English
Page 7
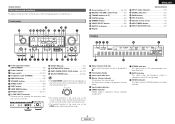
... o TUNED indicator This lights when an FM/AM broadcast has been received. 4 ENGLISH MODE/SURR. The Setup item number is displayed at w. t Input mode indicators y ZONE2 indicator ZONE2 mode is selected in System Setup. PARA button····(22, 29) !5 SELECT/ENTER...q w e r y u i o !0 !1 !2 !4 !5 !6 q w e q Power operation button (ON/STANDBY 10) w Power indicator 10) e Power switch 10, 37) r Headphones jack (PHONES 20) t ANALOG button 19) y SPEAKER buttons 10, 37) u ZONE2 button 36) i SHIFT button 31) o USER MODE buttons 33) !0 PRESET buttons 30, 31) !1 V.
... o TUNED indicator This lights when an FM/AM broadcast has been received. 4 ENGLISH MODE/SURR. The Setup item number is displayed at w. t Input mode indicators y ZONE2 indicator ZONE2 mode is selected in System Setup. PARA button····(22, 29) !5 SELECT/ENTER...q w e r y u i o !0 !1 !2 !4 !5 !6 q w e q Power operation button (ON/STANDBY 10) w Power indicator 10) e Power switch 10, 37) r Headphones jack (PHONES 20) t ANALOG button 19) y SPEAKER buttons 10, 37) u ZONE2 button 36) i SHIFT button 31) o USER MODE buttons 33) !0 PRESET buttons 30, 31) !1 V.
Owners Manual - English
Page 8
... 9, 15) r AUDIO OUT terminals 9, 15) t Speaker terminals 8, 18, 43) y Power supply cord 18) u AC outlets 18) i COMPONENT VIDEO terminals 9) o VIDEO/S-VIDEO terminals 9) !0 DOCK CONTROL jack 17) !1 AUDIO IN terminals 9) !2 XM terminal 16) !3 ANTENNA terminals 16) !4 REMOTE CONTROL jacks 17) System buttons 50, 51) VIDEO SELECT/SETUP button 33, 50) Cursor buttons ·...
... 9, 15) r AUDIO OUT terminals 9, 15) t Speaker terminals 8, 18, 43) y Power supply cord 18) u AC outlets 18) i COMPONENT VIDEO terminals 9) o VIDEO/S-VIDEO terminals 9) !0 DOCK CONTROL jack 17) !1 AUDIO IN terminals 9) !2 XM terminal 16) !3 ANTENNA terminals 16) !4 REMOTE CONTROL jacks 17) System buttons 50, 51) VIDEO SELECT/SETUP button 33, 50) Cursor buttons ·...
Owners Manual - English
Page 10
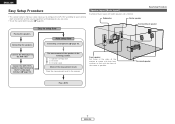
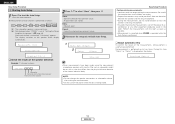
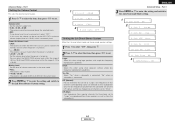
...; To set the sound field manually ( page 45). Auto setup flow Connecting the speakers. Store the measurement result in the listening position. 1) Speaker Configuration 2) Distance 3) Channel Level Check of the screen as flush with eight speakers and a monitor. Connect the AVR-1707's monitor output terminal to setup flow Speaker layout [Basic layout] Example of basic layout with the...
...; To set the sound field manually ( page 45). Auto setup flow Connecting the speakers. Store the measurement result in the listening position. 1) Speaker Configuration 2) Distance 3) Channel Level Check of the screen as flush with eight speakers and a monitor. Connect the AVR-1707's monitor output terminal to setup flow Speaker layout [Basic layout] Example of basic layout with the...
Owners Manual - English
Page 11
...making connections, also refer to the operating instructions of the speaker cable come in amplifier. ENGLISH Easy Setup Procedure ¢ Connections • With the AVR-1707, up to ten speakers can be connected for the set to cool off and ... circuit is cut off the power and contact a DENON service center. Also check the wiring of time with >). IN Center speaker >< Surround speakers (L) (R) > < (L) (R) >< Front speakers (B) (L) (R) >< Front speakers (A) (L) (R) > < Surround back speakers When using speakers with an impedance below the designated value (for example...
...making connections, also refer to the operating instructions of the speaker cable come in amplifier. ENGLISH Easy Setup Procedure ¢ Connections • With the AVR-1707, up to ten speakers can be connected for the set to cool off and ... circuit is cut off the power and contact a DENON service center. Also check the wiring of time with >). IN Center speaker >< Surround speakers (L) (R) > < (L) (R) >< Front speakers (B) (L) (R) >< Front speakers (A) (L) (R) > < Surround back speakers When using speakers with an impedance below the designated value (for example...

Owners Manual - English
Page 13
...not possible to measure properly if there are no obstacles. Easy Setup Procedure D H F G [ON/SOURCE] [MODE SELECTOR 1] D H F G ENGLISH Easy Setup Procedure Auto Setup w Before performing the Auto Setup procedure The AVR-1707's auto setup use the attached microphone to measure the acoustic properties in the room... 1] to the maximum or Low pass filter off before performing the Auto Setup procedure. Check that there are any obstacles between the speakers and microphone. Microphone Place the setup microphone's sound receptor at the height of the ears in this function off...
...not possible to measure properly if there are no obstacles. Easy Setup Procedure D H F G [ON/SOURCE] [MODE SELECTOR 1] D H F G ENGLISH Easy Setup Procedure Auto Setup w Before performing the Auto Setup procedure The AVR-1707's auto setup use the attached microphone to measure the acoustic properties in the room... 1] to the maximum or Low pass filter off before performing the Auto Setup procedure. Check that there are any obstacles between the speakers and microphone. Microphone Place the setup microphone's sound receptor at the height of the ears in this function off...
Owners Manual - English
Page 14
...Measure again. After each channel is performed as follows: FL FR 1 2 C SW SL SR SBL SBR 1: The subwoofer speaker is measured twice. 2: Not displayed when "ZONE2" is measured, "Calculating" appears. Store: Store the checked measurement values.... Measure:FL Cancel: Cancel the checked measurement values. 3 Disconnect the setup mic to select "Store", then press F. The display switches to the speaker check display automatically. 2 Press D H to finish Auto Setup. ENGLISH Easy Setup Procedure r Starting Auto Setup 1 Press F to start the Auto Setup. • Start the measurements.
...Measure again. After each channel is performed as follows: FL FR 1 2 C SW SL SR SBL SBR 1: The subwoofer speaker is measured twice. 2: Not displayed when "ZONE2" is measured, "Calculating" appears. Store: Store the checked measurement values.... Measure:FL Cancel: Cancel the checked measurement values. 3 Disconnect the setup mic to select "Store", then press F. The display switches to the speaker check display automatically. 2 Press D H to finish Auto Setup. ENGLISH Easy Setup Procedure r Starting Auto Setup 1 Press F to start the Auto Setup. • Start the measurements.
Owners Manual - English
Page 15
Be sure to select the items, then press F. Example Caution:SP None F L Caution :Phase F L / R C a u t i o n Overload Press D H to turn off the AVR-1707's power before checking the speaker connections. Please check the following matters, reset the pertinent items, and measure again. Easy Setup Procedure Error messages An error message is displayed if the measurements could not be completed automatically due to the speaker layout, the measuring environment, etc.
Be sure to select the items, then press F. Example Caution:SP None F L Caution :Phase F L / R C a u t i o n Overload Press D H to turn off the AVR-1707's power before checking the speaker connections. Please check the following matters, reset the pertinent items, and measure again. Easy Setup Procedure Error messages An error message is displayed if the measurements could not be completed automatically due to the speaker layout, the measuring environment, etc.

Owners Manual - English
Page 29
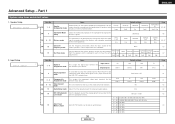
...Flag) (With no Flag) DOLBY DIGITAL (5.1ch) E E E E E E 4 E C E C E C E E E E E E C E C E 4 E C E E E E E E E E E E E E E E E E E E E E E E E E E E E E E E E E E E C C 4 4 C C C C E E E E E E E E E E E E E E E E NOTE : *1: This mode is not available when the Surround Back speaker setup is set to "None". *2: This mode is not available when the Surround Back speaker setup is set to "1sp" or "None". DOLBY DIGITAL (3, 4, 5ch) E E E E E E E E E C 4 C C E E E E E E E E DOLBY DIGITAL (2ch) DVD-AUDIO DVD-Audio DVD...
...Flag) (With no Flag) DOLBY DIGITAL (5.1ch) E E E E E E 4 E C E C E C E E E E E E C E C E 4 E C E E E E E E E E E E E E E E E E E E E E E E E E E E E E E E E E E E C C 4 4 C C C C E E E E E E E E E E E E E E E E NOTE : *1: This mode is not available when the Surround Back speaker setup is set to "None". *2: This mode is not available when the Surround Back speaker setup is set to "1sp" or "None". DOLBY DIGITAL (3, 4, 5ch) E E E E E E E E E C 4 C C E E E E E E E E DOLBY DIGITAL (2ch) DVD-AUDIO DVD-Audio DVD...

Owners Manual - English
Page 30
... DIGITAL EX (With Flag) (With no Flag) DOLBY DIGITAL (5.1ch) C C C C C C C C C *1 C C C C C C C C C C C C C C C C C C C C C C C C C C C C C C C C C C C C C C C C C C C C C C C C C C C C C C C C C C C C C C C 4 4 C 4 : Mode selectable in default status C : Selectable mode E : Non-selectable mode C C C C NOTE : *1: If the Surround Back speaker setup is set to "None", then "5CH STEREO" is displayed.
... DIGITAL EX (With Flag) (With no Flag) DOLBY DIGITAL (5.1ch) C C C C C C C C C *1 C C C C C C C C C C C C C C C C C C C C C C C C C C C C C C C C C C C C C C C C C C C C C C C C C C C C C C C C C C C C C C C 4 4 C 4 : Mode selectable in default status C : Selectable mode E : Non-selectable mode C C C C NOTE : *1: If the Surround Back speaker setup is set to "None", then "5CH STEREO" is displayed.
Owners Manual - English
Page 41
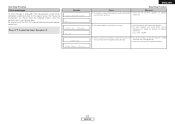
... sources. Small Yes Small Surround Back Sp. Speaker Setup Speaker Setup Item No. Small / 2sp Page 45, 46 7 8 ~ 15 Subwoofer Mode Setup Distance mode Select the method of playback of the analog signal that the sound output from the speakers and subwoofer according to any input terminals on the AVR-1707 and play them. 6 ~ 8 9 ~ 12 13 Component In...
... sources. Small Yes Small Surround Back Sp. Speaker Setup Speaker Setup Item No. Small / 2sp Page 45, 46 7 8 ~ 15 Subwoofer Mode Setup Distance mode Select the method of playback of the analog signal that the sound output from the speakers and subwoofer according to any input terminals on the AVR-1707 and play them. 6 ~ 8 9 ~ 12 13 Component In...

Owners Manual - English
Page 42
... On Lev. = LAST Mute Lev. = FULL OFF Advanced Setup - Part 1 Page 43 44 44 Auto Surround Mode = ON 45 39 ENGLISH Main 5 ~ 11 2ch Direct/Stereo mode Make the 2-channel direct mode and stereo mode speaker settings. 12 Auto Surround mode Set whether or not to the... front channel ("Front A" or "Front B") for the input signal. ENGLISH Advanced Setup - Part 1 3. Option Setup Option Setup Item No. 1 Power Amp Assignment mode Items To suit your...
... On Lev. = LAST Mute Lev. = FULL OFF Advanced Setup - Part 1 Page 43 44 44 Auto Surround Mode = ON 45 39 ENGLISH Main 5 ~ 11 2ch Direct/Stereo mode Make the 2-channel direct mode and stereo mode speaker settings. 12 Auto Surround mode Set whether or not to the... front channel ("Front A" or "Front B") for the input signal. ENGLISH Advanced Setup - Part 1 3. Option Setup Option Setup Item No. 1 Power Amp Assignment mode Items To suit your...
Owners Manual - English
Page 43
... names in this unit ( page 38, 39). Advanced Setup - Part 1 About the front display The AVR-1707 is equipped with an alpha numeric front panel display that can also be used to check and adjust settings. To cancel the system setup mode, press SYSTEM SETUP again. 1 *System Setup 2 Speaker Setup 3 1 Front L a r g e 5 40 ENGLISH For the contents of a system...
... names in this unit ( page 38, 39). Advanced Setup - Part 1 About the front display The AVR-1707 is equipped with an alpha numeric front panel display that can also be used to check and adjust settings. To cancel the system setup mode, press SYSTEM SETUP again. 1 *System Setup 2 Speaker Setup 3 1 Front L a r g e 5 40 ENGLISH For the contents of a system...

Owners Manual - English
Page 45
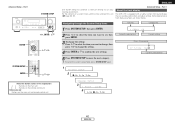
... subwoofer terminal. 2 Press ENTER or H to enter the setting and switch to the Audio Delay setting. 1 9 DVD:Conv OFF 2 1 3 A . ENGLISH Advanced Setup - IN Subwoofer Level setting. 1 13A.Delay 200ms 2 14EXT.In SW +15 Advanced Setup - D e l a y 0 m s Setting the Audio Delay Adjust the time delay between the video and audio signals. 1 Press F G to set .
... subwoofer terminal. 2 Press ENTER or H to enter the setting and switch to the Audio Delay setting. 1 9 DVD:Conv OFF 2 1 3 A . ENGLISH Advanced Setup - IN Subwoofer Level setting. 1 13A.Delay 200ms 2 14EXT.In SW +15 Advanced Setup - D e l a y 0 m s Setting the Audio Delay Adjust the time delay between the video and audio signals. 1 Press F G to set .
Owners Manual - English
Page 46
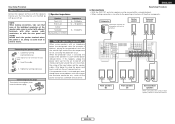
... biamp playback, ZONE2. 2 Press ENTER to enter the setting and switch to the Option Setup. 1 S e a r c h C O M P L E T E D 2 • If an FM station cannot be played by connecting bi-amp compatible speakers to set. AVR-1707 Speaker [R] Speaker [L] NOTE: • When making bi-amp connections, be assigned to the front channel ("Front A" or "Front B") for further information before proceeding...
... biamp playback, ZONE2. 2 Press ENTER to enter the setting and switch to the Option Setup. 1 S e a r c h C O M P L E T E D 2 • If an FM station cannot be played by connecting bi-amp compatible speakers to set. AVR-1707 Speaker [R] Speaker [L] NOTE: • When making bi-amp connections, be assigned to the front channel ("Front A" or "Front B") for further information before proceeding...
Owners Manual - English
Page 47
... of -80 to +18 dB (and ZONE2 volume level within the range of output. 1 2 Limit -10dB Advanced Setup - Power On Volume Level: • LAST: The volume set when the AVR-1707 was last used is stored in the memory and set a volume limit, select "OFF". LFE+Main: Low frequencies from...to the 2ch Direct/Stereo Custom setting. 4 Mute F U L L 2 5 2ch Cstm O F F Setting the 2ch Direct/Stereo Custom Make the 2-channel direct mode and stereo mode speaker settings. 1 Press F to select "ON", then press H. 2 Press D H to select the item, then press F G to set to +18 dB). Large: Select this when ...
... of -80 to +18 dB (and ZONE2 volume level within the range of output. 1 2 Limit -10dB Advanced Setup - Power On Volume Level: • LAST: The volume set when the AVR-1707 was last used is stored in the memory and set a volume limit, select "OFF". LFE+Main: Low frequencies from...to the 2ch Direct/Stereo Custom setting. 4 Mute F U L L 2 5 2ch Cstm O F F Setting the 2ch Direct/Stereo Custom Make the 2-channel direct mode and stereo mode speaker settings. 1 Press F to select "ON", then press H. 2 Press D H to select the item, then press F G to set to +18 dB). Large: Select this when ...

Owners Manual - English
Page 48
... with sufficient low frequency playback capability can better handle deep bass than most main and surround speakers, and the system's overall performance will be actually used at last for surround playback. 1 Press F G to the Speaker Setup. 1 12AutoSurr. The surround mode used for the three types of Dolby Digital, DTS or...Buttons on the main unit [ ] : Buttons on the remote control unit Button name only : Buttons on the main unit and remote control unit 45 ENGLISH Speaker Setup • If the "Auto Setup" procedure has already been performed, there is set to "No", "Front" is input.
... with sufficient low frequency playback capability can better handle deep bass than most main and surround speakers, and the system's overall performance will be actually used at last for surround playback. 1 Press F G to the Speaker Setup. 1 12AutoSurr. The surround mode used for the three types of Dolby Digital, DTS or...Buttons on the main unit [ ] : Buttons on the remote control unit Button name only : Buttons on the main unit and remote control unit 45 ENGLISH Speaker Setup • If the "Auto Setup" procedure has already been performed, there is set to "No", "Front" is input.

Owners Manual - English
Page 49
Setting the Subwoofer Mode Setup Select the method of playback of the subwoofer for playing the low bass signals. 1 Press F G to set for the Crossover Frequency) signals. LFE+Main: Low frequencies from speaker channels that loudspeaker only. FL C FR SW SL... try comparing the sound at the below the frequency set . Part 2 Advanced Setup - The low frequencies played from the speakers and subwoofer according to the Crossover Frequency setting. 1 8 FL 1 5 f t 15 SW 1 2 f t 2 16Cr.Over 80Hz 46 ENGLISH Part 2 1 Speaker Setup 2 1 Front L a r g e 6 Subwoofer Yes 3 7 SW ...
Setting the Subwoofer Mode Setup Select the method of playback of the subwoofer for playing the low bass signals. 1 Press F G to set for the Crossover Frequency) signals. LFE+Main: Low frequencies from speaker channels that loudspeaker only. FL C FR SW SL... try comparing the sound at the below the frequency set . Part 2 Advanced Setup - The low frequencies played from the speakers and subwoofer according to the Crossover Frequency setting. 1 8 FL 1 5 f t 15 SW 1 2 f t 2 16Cr.Over 80Hz 46 ENGLISH Part 2 1 Speaker Setup 2 1 Front L a r g e 6 Subwoofer Yes 3 7 SW ...


