Literature/Product Sheet
Page 2
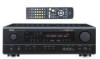
...; Acclaimed Customization Feature As with all of DENON's high-grade A/V receiver, the AVR-1603 lets you adjust delay times and other parameters so that automatically remembers the surround mode you last used for selected DENON models, along with terminal cover. *Design and... (W) x 5.8" (H) x 16.4" (D) Weight 10.4 kg, 22.9 lbs Front panel with remote control codes from digital sources such as CD. • Front Panel Inputs The AVR-1603's front panel includes 1 set of DTS Technology. DENON ELECTRONICS. VCR, CDR/TAPE 1 Digital (Optical) Output OPTICAL X 1 • Video Inputs 4...
...; Acclaimed Customization Feature As with all of DENON's high-grade A/V receiver, the AVR-1603 lets you adjust delay times and other parameters so that automatically remembers the surround mode you last used for selected DENON models, along with terminal cover. *Design and... (W) x 5.8" (H) x 16.4" (D) Weight 10.4 kg, 22.9 lbs Front panel with remote control codes from digital sources such as CD. • Front Panel Inputs The AVR-1603's front panel includes 1 set of DTS Technology. DENON ELECTRONICS. VCR, CDR/TAPE 1 Digital (Optical) Output OPTICAL X 1 • Video Inputs 4...
Owners Manual
Page 4
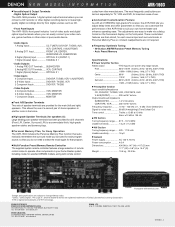
...~126 2 ACCESSORIES Check that the following parts are included in addition to the main unit: q Operating instructions 1 w Warranty 1 e Service station list 1 r Remote control unit (RC-941 1 t R6P/AA batteries 2 y AM loop antenna 1 u FM indoor antenna 1 r t y u 1 BEFORE USING Pay attention ... from the actual set for choosing the DENON A/V Surround receiver. As this instructions in a safe place. AUX terminal The AVR-1604/684's front panel is provided with an immense array of your favorite music sources. AUX terminal. Using the Remote Control Unit 16 ⁄0 Setting up ...
...~126 2 ACCESSORIES Check that the following parts are included in addition to the main unit: q Operating instructions 1 w Warranty 1 e Service station list 1 r Remote control unit (RC-941 1 t R6P/AA batteries 2 y AM loop antenna 1 u FM indoor antenna 1 r t y u 1 BEFORE USING Pay attention ... from the actual set for choosing the DENON A/V Surround receiver. As this instructions in a safe place. AUX terminal The AVR-1604/684's front panel is provided with an immense array of your favorite music sources. AUX terminal. Using the Remote Control Unit 16 ⁄0 Setting up ...
Owners Manual
Page 6
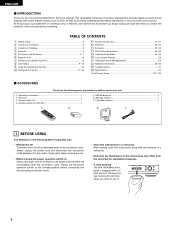
... 35) @2 Master volume indicator (VOLUME LEVEL 34) @3 Display @4 Preset station select buttons 51, 53) @5 BAND button 52) @6 SIGNAL indicators 34) @7 INPUT mode indicators 34) @8 Remote control sensor (REMOTE SENSOR 16) @9 Power operation indicator (ON/STANDBY) #0 INPUT SELECTOR knob 33) 6 IN button 33, 36) i DOLBY/DTS SURROUND button 37, 39, 43) o 5CH/6CH...
... 35) @2 Master volume indicator (VOLUME LEVEL 34) @3 Display @4 Preset station select buttons 51, 53) @5 BAND button 52) @6 SIGNAL indicators 34) @7 INPUT mode indicators 34) @8 Remote control sensor (REMOTE SENSOR 16) @9 Power operation indicator (ON/STANDBY) #0 INPUT SELECTOR knob 33) 6 IN button 33, 36) i DOLBY/DTS SURROUND button 37, 39, 43) o 5CH/6CH...
Owners Manual
Page 7
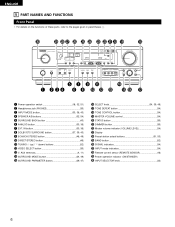
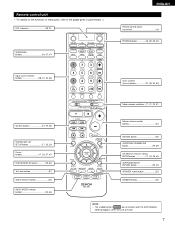
...; For details on the functions of these parts, refer to the pages given in parentheses ( ). LED (indicator 28, 31) SURROUND buttons 34, 37, 47) ENGLISH Remote control signal transmitter 16) POWER buttons 18, 28~30, 32) Input source selector buttons 28~31, 33, 39) Tuner system/ System buttons 27, 30, 52..., 38, 40) SURROUND BACK/ RETURN button 29, 43) SPEAKER select button 32) DIMMER button 35) NOTE: • The shaded buttons do not function with the AVR-1604/684. (Nothing happens when they are pressed.) 7
...; For details on the functions of these parts, refer to the pages given in parentheses ( ). LED (indicator 28, 31) SURROUND buttons 34, 37, 47) ENGLISH Remote control signal transmitter 16) POWER buttons 18, 28~30, 32) Input source selector buttons 28~31, 33, 39) Tuner system/ System buttons 27, 30, 52..., 38, 40) SURROUND BACK/ RETURN button 29, 43) SPEAKER select button 32) DIMMER button 35) NOTE: • The shaded buttons do not function with the AVR-1604/684. (Nothing happens when they are pressed.) 7
Owners Manual
Page 8
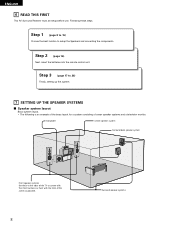
ENGLISH 6 READ THIS FIRST This AV Surround Receiver must be setup before use. Step 2 (page 16) Next, insert the batteries into the remote control unit. Step 1 (page 8 to 15) Choose the best location to 26) Finally, setting up the system. 7 SETTING UP THE SPEAKER SYSTEMS 2 Speaker system layout ...
ENGLISH 6 READ THIS FIRST This AV Surround Receiver must be setup before use. Step 2 (page 16) Next, insert the batteries into the remote control unit. Step 1 (page 8 to 15) Choose the best location to 26) Finally, setting up the system. 7 SETTING UP THE SPEAKER SYSTEMS 2 Speaker system layout ...

Owners Manual
Page 9
... this terminal. • Use 75 Ω/ohms cable pin cords (sold separately) for coaxial connections. • Use optical cables (sold separately room-to-room remote control unit (DENON RC-616, 617 or 618) is switched between the MAIN ROOM and ANOTHER ROOM, the remotecontrollable devices in the main room can be generated...
... this terminal. • Use 75 Ω/ohms cable pin cords (sold separately) for coaxial connections. • Use optical cables (sold separately room-to-room remote control unit (DENON RC-616, 617 or 618) is switched between the MAIN ROOM and ANOTHER ROOM, the remotecontrollable devices in the main room can be generated...

Owners Manual
Page 16
...lid. Avoid touching the leaked material or letting it with clothing, etc. Approx. 23 feet/7 m 30° 30° NOTES: • The remote control unit can be replaced as quickly as possible when the time comes. • Even if less than a year has passed, replace the batteries with... NOTES: • Use only R6P/AA batteries for replacement. • Be sure the polarities are obstacles between the remote control unit and the remote control sensor, if the remote control sensor is exposed to direct sunlight or other devices emitting pulse-type noise nearby may result in contact with a ...
...lid. Avoid touching the leaked material or letting it with clothing, etc. Approx. 23 feet/7 m 30° 30° NOTES: • The remote control unit can be replaced as quickly as possible when the time comes. • Even if less than a year has passed, replace the batteries with... NOTES: • Use only R6P/AA batteries for replacement. • Be sure the polarities are obstacles between the remote control unit and the remote control sensor, if the remote control sensor is exposed to direct sunlight or other devices emitting pulse-type noise nearby may result in contact with a ...
Owners Manual
Page 18
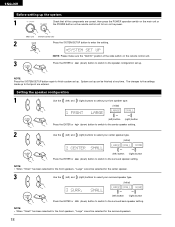
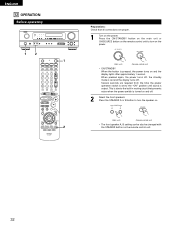
...1 Check that point are correct, then press the POWER operation switch on the main unit or the POWER button on the remote control unit to turn on the power. (Main unit) (Remote control unit) 2 Press the SYSTEM SETUP button to enter the setting. *SYSTEM SET UP NOTE: Please make sure the... "AUDIO" position of the slide switch on the remote control unit. 3 Press the ENTER or (down) button to switch to the speaker configuration set up. NOTE: • When "Small" has been selected for...
...1 Check that point are correct, then press the POWER operation switch on the main unit or the POWER button on the remote control unit to turn on the power. (Main unit) (Remote control unit) 2 Press the SYSTEM SETUP button to enter the setting. *SYSTEM SET UP NOTE: Please make sure the... "AUDIO" position of the slide switch on the remote control unit. 3 Press the ENTER or (down) button to switch to the speaker configuration set up. NOTE: • When "Small" has been selected for...
Owners Manual
Page 23
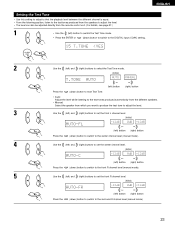
Setting the Test Tone • Use this setting to adjust to that the playback level between the different channel is equal. • From the listening position, listen to the test tones produced from the speakers to adjust the level. • The level can also be adjusted directly from the remote control unit. (For details, see page 37.) 1 • Use the (left) button to switch the Test Tone mode. • Press the ENTER or (down) button to switch to the DIGITAL input (COAX) setting. 15 T.TONE
Setting the Test Tone • Use this setting to adjust to that the playback level between the different channel is equal. • From the listening position, listen to the test tones produced from the speakers to adjust the level. • The level can also be adjusted directly from the remote control unit. (For details, see page 37.) 1 • Use the (left) button to switch the Test Tone mode. • Press the ENTER or (down) button to switch to the DIGITAL input (COAX) setting. 15 T.TONE
Owners Manual
Page 27
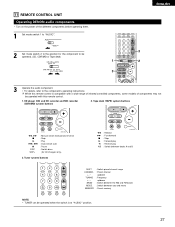
...FM bands MODE : Switch between decks A and B SHIFT : Switch preset channel range CHANNEL : Preset channel +, - 11 REMOTE CONTROL UNIT Operating DENON audio components • Turn on the power of components may not be operated when the switch is compatible with a wide range... the different components before operating them. 1 Set mode switch 1 to "AUDIO". 2 Set mode switch 2 to the position for CD changers only) 3. While this remote control. 1. Tuner system buttons 6 : Rewind 7 : Fast-forward 2 : Stop 1 : Forward play 0 : Reverse play A/B : Switch between auto and mono...
...FM bands MODE : Switch between decks A and B SHIFT : Switch preset channel range CHANNEL : Preset channel +, - 11 REMOTE CONTROL UNIT Operating DENON audio components • Turn on the power of components may not be operated when the switch is compatible with a wide range... the different components before operating them. 1 Set mode switch 1 to "AUDIO". 2 Set mode switch 2 to the position for CD changers only) 3. While this remote control. 1. Tuner system buttons 6 : Rewind 7 : Fast-forward 2 : Stop 1 : Forward play 0 : Reverse play A/B : Switch between auto and mono...
Owners Manual
Page 28
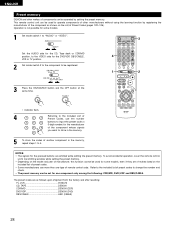
...Preset Codes, use more than one component only among the following: CDR/MD, DVD/VDP and DBS/CABLE. To avoid accidental operation, cover the remote control unit's transmitting window while setting the preset memory. • Depending on the model and year of manufacture, this function cannot be used ... by registering the manufacturer of the component as follows upon shipment from the factory and after resetting: TV, VCR HITACHI CD, TAPE DENON CDR/MD DENON (CDR) DVD/VDP DENON (DVD) DBS/CABLE ABC (CABLE) 28 NOTES: • The signals for the pressed buttons are of makes listed on the...
...Preset Codes, use more than one component only among the following: CDR/MD, DVD/VDP and DBS/CABLE. To avoid accidental operation, cover the remote control unit's transmitting window while setting the preset memory. • Depending on the model and year of manufacture, this function cannot be used ... by registering the manufacturer of the component as follows upon shipment from the factory and after resetting: TV, VCR HITACHI CD, TAPE DENON CDR/MD DENON (CDR) DVD/VDP DENON (DVD) DBS/CABLE ABC (CABLE) 28 NOTES: • The signals for the pressed buttons are of makes listed on the...
Owners Manual
Page 29
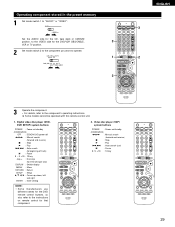
Digital video disc player (DVD, DVD SETUP) system buttons POWER : Power on/standby (ON/SOURCE) OFF : DENON DVD power off 6,7 : Manual search (forward and reverse) 2 : Stop 1 : Play 8,9 : Auto search (to beginning of track) 3 : Pause 0 ~ 9, +10 : 10 key skip + : Disc ... SETUP : Setup •, ª, 0, 1 : Cursor up, down, left and right ENTER : Enter setting NOTE: • Some manufacturers use different names for the DVD remote control buttons, so also refer to "AUDIO" or "VIDEO". Video disc player (VDP) system buttons POWER : Power on/standby (ON/SOURCE) 6,7 : Manual search (forward and...
Digital video disc player (DVD, DVD SETUP) system buttons POWER : Power on/standby (ON/SOURCE) OFF : DENON DVD power off 6,7 : Manual search (forward and reverse) 2 : Stop 1 : Play 8,9 : Auto search (to beginning of track) 3 : Pause 0 ~ 9, +10 : 10 key skip + : Disc ... SETUP : Setup •, ª, 0, 1 : Cursor up, down, left and right ENTER : Enter setting NOTE: • Some manufacturers use different names for the DVD remote control buttons, so also refer to "AUDIO" or "VIDEO". Video disc player (VDP) system buttons POWER : Power on/standby (ON/SOURCE) 6,7 : Manual search (forward and...
Owners Manual
Page 32
... required from the time the power operation switch is turned on and off . Press the SPEAKER A or B button to turn the speaker on. (Main unit) (Remote control unit) • The front speaker A, B setting can be also be changed with the SPEAKER button on the power. (Main unit...) (Remote control unit) • ON/STANDBY When the button is output. Press the ON/STANDBY button on the main unit or ON/SOURCE button on the remote control unit to turn on the...
... required from the time the power operation switch is turned on and off . Press the SPEAKER A or B button to turn the speaker on. (Main unit) (Remote control unit) • The front speaker A, B setting can be also be changed with the SPEAKER button on the power. (Main unit...) (Remote control unit) • ON/STANDBY When the button is output. Press the ON/STANDBY button on the main unit or ON/SOURCE button on the remote control unit to turn on the...
Owners Manual
Page 33
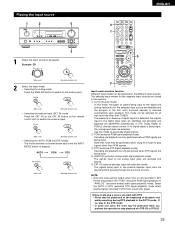
... playback and while searching during DTS playback in the this unit's surround decoder is detected, the signals input to the analog input. (Main unit) (Remote control unit) • Selecting the external input (EXT. If no digital signal is pressed. Playing the input source 1 2 5 3 1 ENGLISH... 3 5 1 Select the input source to play Dolby Digital signals. Use this mode to switch the external input. (Main unit) (Remote control unit) • Selecting the AUTO, PCM and DTS modes The mode switches as shown below each time the INPUT MODE button is being ...
... playback and while searching during DTS playback in the this unit's surround decoder is detected, the signals input to the analog input. (Main unit) (Remote control unit) • Selecting the external input (EXT. If no digital signal is pressed. Playing the input source 1 2 5 3 1 ENGLISH... 3 5 1 Select the input source to play Dolby Digital signals. Use this mode to switch the external input. (Main unit) (Remote control unit) • Selecting the AUTO, PCM and DTS modes The mode switches as shown below each time the INPUT MODE button is being ...

Owners Manual
Page 34
...the volume cannot be adjusted up to -12 dB in steps of these lights, depending on the master volume level display. (Main unit) (Remote control unit) The volume can be decreased to up to "18 dB - (Maximum value of the volume to be adjusted selected, turn the ... as described on the selected component. • For operating instructions, refer to "DTS". ENGLISH 3 Select the play mode. Example: Stereo (Main unit) (Remote control unit) To select the surround mode while adjusting the surround parameters, tone defeat or tone control, press the surround mode button then operate the...
...the volume cannot be adjusted up to -12 dB in steps of these lights, depending on the master volume level display. (Main unit) (Remote control unit) The volume can be decreased to up to "18 dB - (Maximum value of the volume to be adjusted selected, turn the ... as described on the selected component. • For operating instructions, refer to "DTS". ENGLISH 3 Select the play mode. Example: Stereo (Main unit) (Remote control unit) To select the surround mode while adjusting the surround parameters, tone defeat or tone control, press the surround mode button then operate the...

Owners Manual
Page 35
...8226; Muting will also be switched to check the 2 unit's operating status (Main unit) (Remote control unit) while playing a source by pressing the main unit's DIMMER button repeatedly. (Main unit) (Remote control unit) BRIGHT MEDIUM DIM OFF 1 1 21 35 In addition, 1 the display can ... connected. The display brightness changes in four steps (bright, medium, dim and off when headphones are also displayed on (Main unit) (Remote control unit) 1 the display. PHONES ENGLISH NOTE: To prevent hearing loss, do not raise the volume level excessively when using the video...
...8226; Muting will also be switched to check the 2 unit's operating status (Main unit) (Remote control unit) while playing a source by pressing the main unit's DIMMER button repeatedly. (Main unit) (Remote control unit) BRIGHT MEDIUM DIM OFF 1 1 21 35 In addition, 1 the display can ... connected. The display brightness changes in four steps (bright, medium, dim and off when headphones are also displayed on (Main unit) (Remote control unit) 1 the display. PHONES ENGLISH NOTE: To prevent hearing loss, do not raise the volume level excessively when using the video...

Owners Manual
Page 36
... unit) Once this mode. • If the subwoofer output level seems to high, set to the desired input mode. (See page 33.) (Main unit) (Remote control unit) • When the input mode is output to "ON". Press the EXT. IN), the play mode (DIRECT, STEREO, DOLBY/DTS SURROUND, 5/6CH STEREO ...
... unit) Once this mode. • If the subwoofer output level seems to high, set to the desired input mode. (See page 33.) (Main unit) (Remote control unit) • When the input mode is output to "ON". Press the EXT. IN), the play mode (DIRECT, STEREO, DOLBY/DTS SURROUND, 5/6CH STEREO ...
Owners Manual
Page 37
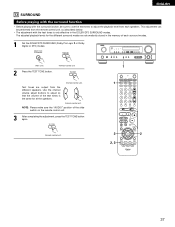
Use the channel volume adjust buttons to adjust the playback level from the different speakers. This adjustment can be performed from the remote control unit, as (described) below. • The adjustment with the surround function, be sure to use the test tones to ... unit) NOTE: Please make sure the "AUDIO" position of the slide switch on the remote control unit. 3 After completing the adjustment, press the TEST TONE button again. (Remote control unit) 1 1 2 2 2, 3 37 ENGLISH 13 SURROUND Before playing with the surround function • Before playing with the test tones...
Use the channel volume adjust buttons to adjust the playback level from the different speakers. This adjustment can be performed from the remote control unit, as (described) below. • The adjustment with the surround function, be sure to use the test tones to ... unit) NOTE: Please make sure the "AUDIO" position of the slide switch on the remote control unit. 3 After completing the adjustment, press the TEST TONE button again. (Remote control unit) 1 1 2 2 2, 3 37 ENGLISH 13 SURROUND Before playing with the surround function • Before playing with the test tones...
Owners Manual
Page 38
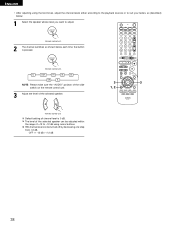
...to suit your tastes, as (described) below. 1 Select the speaker whose level you want to adjust. (Remote control unit) 2 The channel switches as shown below each time the button is pressed. (Remote control unit) FL CNTR FR SR SB SW SL NOTE: Please make sure the "AUDIO" position of the... slide switch on the remote control unit. 3 Adjust the level of the selected speaker. (Remote control unit) Default setting of channel level is 0 ...
...to suit your tastes, as (described) below. 1 Select the speaker whose level you want to adjust. (Remote control unit) 2 The channel switches as shown below each time the button is pressed. (Remote control unit) FL CNTR FR SR SB SW SL NOTE: Please make sure the "AUDIO" position of the... slide switch on the remote control unit. 3 Adjust the level of the selected speaker. (Remote control unit) Default setting of channel level is 0 ...
Owners Manual
Page 39
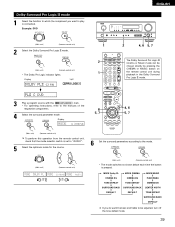
... SURROUND BACK DEFAULT If you want the bass and trable to be chosen directly by pressing the CINEMA or MUSIC button on the remote control unit during playback in the Dolby Surround Pro Logic II mode. 3 Play a program source with the mark. • For...instructions, refer to the manuals of the respective components. 4 Select the surround parameter mode. Example: DVD (Main unit) (Remote control unit) 2 Select the Dolby Surround Pro Logic II mode. (Main unit) (Remote control unit) • The Dolby Pro Logic indicator lights. Display Light 1 2 1 ENGLISH 2 4, 6 5, 7 The...
... SURROUND BACK DEFAULT If you want the bass and trable to be chosen directly by pressing the CINEMA or MUSIC button on the remote control unit during playback in the Dolby Surround Pro Logic II mode. 3 Play a program source with the mark. • For...instructions, refer to the manuals of the respective components. 4 Select the surround parameter mode. Example: DVD (Main unit) (Remote control unit) 2 Select the Dolby Surround Pro Logic II mode. (Main unit) (Remote control unit) • The Dolby Pro Logic indicator lights. Display Light 1 2 1 ENGLISH 2 4, 6 5, 7 The...


