
Owners Manual
Page 1
AV SURROUND RECEIVER AVR-4306 OPERATING INSTRUCTIONS
AV SURROUND RECEIVER AVR-4306 OPERATING INSTRUCTIONS

Owners Manual
Page 3
...8226; Ne jamais démonter ou modifier l'appareil d'une manière ou d'une autre. These limits are designed to use the product. 3. Denon Electronics (USA), LLC 19C Chapin Road, Suite 205 Pine Brook, NJ 07058-9385 Tel. 973-396-0810 (Main) 2. NOTE This product has ..., du benzène et un diluant avec l'appareil. • Handle the power cord carefully. COMPLIANCE INFORMATION Product Name: AV Surround Receiver Model Number: AVR-4306 This product complies with Canadian ICES-003. 2 NOTE ON USE / OBSERVATIONS RELATIVES A L'UTILISATION • Avoid high temperatures. II
...8226; Ne jamais démonter ou modifier l'appareil d'une manière ou d'une autre. These limits are designed to use the product. 3. Denon Electronics (USA), LLC 19C Chapin Road, Suite 205 Pine Brook, NJ 07058-9385 Tel. 973-396-0810 (Main) 2. NOTE This product has ..., du benzène et un diluant avec l'appareil. • Handle the power cord carefully. COMPLIANCE INFORMATION Product Name: AV Surround Receiver Model Number: AVR-4306 This product complies with Canadian ICES-003. 2 NOTE ON USE / OBSERVATIONS RELATIVES A L'UTILISATION • Avoid high temperatures. II

Owners Manual
Page 4
... sound 13 Connecting Other Sources Cable indications 14 The video conversion function 15 On screen display for choosing the DENON AVR-4306 AV Surround Receiver. IN) terminals 26 Turning the sound off temporarily (MUTING 26 Listening over headphones 26 Combining the currently playing...DVD player and monitor (TV 8 Auto Setup / Room EQ 9 Connecting a microphone 10 Turning on the computer (music server 50 Operating the AVR-4306 using the external input (EXT. Contents Getting Started Accessories 2 Before using 2 Cautions on installation 3 Cautions on handling 3 Preparing the remote ...
... sound 13 Connecting Other Sources Cable indications 14 The video conversion function 15 On screen display for choosing the DENON AVR-4306 AV Surround Receiver. IN) terminals 26 Turning the sound off temporarily (MUTING 26 Listening over headphones 26 Combining the currently playing...DVD player and monitor (TV 8 Auto Setup / Room EQ 9 Connecting a microphone 10 Turning on the computer (music server 50 Operating the AVR-4306 using the external input (EXT. Contents Getting Started Accessories 2 Before using 2 Cautions on installation 3 Cautions on handling 3 Preparing the remote ...

Owners Manual
Page 6
PLEASE RECORD UNIT SERIAL NUMBER ATTACHED TO THE REAR OF THE CABINET FOR FUTURE REFERENCE" MEMO IV Be sure to offer, read these instructions carefully and use the set properly. "SERIAL NO. 2 We greatly appreciate your purchase of the AVR-4306. 2 To be sure you take maximum advantage of all the features the AVR-4306 has to keep this manual for future reference should any questions or problems arise.
PLEASE RECORD UNIT SERIAL NUMBER ATTACHED TO THE REAR OF THE CABINET FOR FUTURE REFERENCE" MEMO IV Be sure to offer, read these instructions carefully and use the set properly. "SERIAL NO. 2 We greatly appreciate your purchase of the AVR-4306. 2 To be sure you take maximum advantage of all the features the AVR-4306 has to keep this manual for future reference should any questions or problems arise.

Owners Manual
Page 8
...do not install this happens, either turn off before adjusting the volume. • Whenever the power switch is still connected to operate non-DENON remote control compatible products. Doing so may result in malfunction. • Neon signs or other devices emitting pulsetype noise nearby may be ...; NOTE: • It may be difficult to operate the remote control unit if the remote sensor is used to operate not only the AVR-4306 but this unit's power supply cord and input/output connection cables. • Noise or disturbance tends to the remote sensor. Operating range of...
...do not install this happens, either turn off before adjusting the volume. • Whenever the power switch is still connected to operate non-DENON remote control compatible products. Doing so may result in malfunction. • Neon signs or other devices emitting pulsetype noise nearby may be ...; NOTE: • It may be difficult to operate the remote control unit if the remote sensor is used to operate not only the AVR-4306 but this unit's power supply cord and input/output connection cables. • Noise or disturbance tends to the remote sensor. Operating range of...
Owners Manual
Page 11
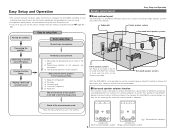
... the memory for a system consisting of the screen as flush with surround sound. Placing the speakers. Surround speaker systems With the AVR-4306 it possible to achieve the optimum sound fields for different sources by switching between two systems of the TV or screen with their ...front surfaces as possible. Easy Setup and Operation • This section contains the basic steps necessary to configure the AVR-4306 according to your listening room environment and the source equipment and loudspeakers you are set the various settings manually without using the Auto ...
... the memory for a system consisting of the screen as flush with surround sound. Placing the speakers. Surround speaker systems With the AVR-4306 it possible to achieve the optimum sound fields for different sources by switching between two systems of the TV or screen with their ...front surfaces as possible. Easy Setup and Operation • This section contains the basic steps necessary to configure the AVR-4306 according to your listening room environment and the source equipment and loudspeakers you are set the various settings manually without using the Auto ...

Owners Manual
Page 12
... will lead to damage. Connecting the speaker cables 1. Insert the cable. 3. Easy Setup and Operation 2 Connections • The AVR-4306 can be configured for 10 speaker playback using two pairs of the speaker cables or input cables, and wait for example speakers with... follow these steps: be sure to the left channel. 7 NOTE: NEVER touch the speaker terminals when the power is cut off the power and contact a DENON service center. (L) >< (R) >< (L) (R) > < Front speaker systems Surround back speaker systems Precautions when connecting speakers: If a speaker is very hot. Loosen ...
... will lead to damage. Connecting the speaker cables 1. Insert the cable. 3. Easy Setup and Operation 2 Connections • The AVR-4306 can be configured for 10 speaker playback using two pairs of the speaker cables or input cables, and wait for example speakers with... follow these steps: be sure to the left channel. 7 NOTE: NEVER touch the speaker terminals when the power is cut off the power and contact a DENON service center. (L) >< (R) >< (L) (R) > < Front speaker systems Surround back speaker systems Precautions when connecting speakers: If a speaker is very hot. Loosen ...
Owners Manual
Page 13
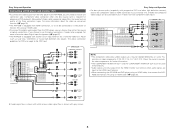
...monitor out terminal when audio signals are also provided if your monitor (TV). For more information about Digital Input Assignment ( page 67). • The AVR-4306 is equipped with HDMI connectors, so it needs to be assigned. Monitor (TV) I COMPONENT VIDEO OUT Y PB PR J HDMI OUT G VIDEO OUT... output from either the coaxial or optical connections. For more information about the video up conversion function ( page 15). • The AVR-4306 is equipped with white arrows; video signal flow is required for a non-DVD Video Disc Player (such as laser disc, VCD/SVCD...
...monitor out terminal when audio signals are also provided if your monitor (TV). For more information about Digital Input Assignment ( page 67). • The AVR-4306 is equipped with HDMI connectors, so it needs to be assigned. Monitor (TV) I COMPONENT VIDEO OUT Y PB PR J HDMI OUT G VIDEO OUT... output from either the coaxial or optical connections. For more information about the video up conversion function ( page 15). • The AVR-4306 is equipped with white arrows; video signal flow is required for a non-DVD Video Disc Player (such as laser disc, VCD/SVCD...

Owners Manual
Page 14
...to the characteristics of the front speakers. • Flat: This the frequency response of all listening positions in the listening area. The AVR-4306's Room EQ function offers three correction curves: "Audyssey", "Front" and "Flat". Move the microphone successively within the listening area surrounded... theater is small, taking multiple measurements at all speakers flat. Example: q *M Example: w *M 9 Easy Setup and Operation The AVR-4306's Audyssey MultEQ XT function has the feature that it is analyzed with the whole family, move the microphone successively to measure the test ...
...to the characteristics of the front speakers. • Flat: This the frequency response of all listening positions in the listening area. The AVR-4306's Room EQ function offers three correction curves: "Audyssey", "Front" and "Flat". Move the microphone successively within the listening area surrounded... theater is small, taking multiple measurements at all speakers flat. Example: q *M Example: w *M 9 Easy Setup and Operation The AVR-4306's Audyssey MultEQ XT function has the feature that it is analyzed with the whole family, move the microphone successively to measure the test ...

Owners Manual
Page 16
... button. • The "System Setup Menu" appears. 2 Press the CURSOR D or H button to select "Surround Back", "Front", "Front B", "ZONE2" or "ZONE3". Power Amp Assign The AVR-4306 has available surround back amplifier channel. The front channel's test tone during Auto Setup it will be output from the front speakers and the surround...
... button. • The "System Setup Menu" appears. 2 Press the CURSOR D or H button to select "Surround Back", "Front", "Front B", "ZONE2" or "ZONE3". Power Amp Assign The AVR-4306 has available surround back amplifier channel. The front channel's test tone during Auto Setup it will be output from the front speakers and the surround...

Owners Manual
Page 18
... data you have not been detected. Store: Store the checked measurement values. If multiple errors occur, press the CURSOR F or G button to turn off the AVR-4306's power before checking the speaker connections. generated the noise during the measurements or move the device away. • Try again at a time when it will...
... data you have not been detected. Store: Store the checked measurement values. If multiple errors occur, press the CURSOR F or G button to turn off the AVR-4306's power before checking the speaker connections. generated the noise during the measurements or move the device away. • Try again at a time when it will...
Owners Manual
Page 19
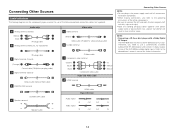
...A Analog terminal (Stereo) (White) (Red) L L R R Pin-plug cable B Analog terminal (Monaural, for further information. 14 The AVR-4306 does not have been completed. • When making connections, also refer to the operating instructions of the other noise. NOTE: • Connecting ...Coaxial) (Orange) Coaxial cable (75 Ω/ohm pin-plug cable) D Digital terminal (Optical) Optical cable (Optical fiber cable) E DENON LINK terminal DENON LINK cable F Speaker terminal Speaker cable S-Video cable I Component video terminal (Green) (Blue) (Red) Component video cable Audio and ...
...A Analog terminal (Stereo) (White) (Red) L L R R Pin-plug cable B Analog terminal (Monaural, for further information. 14 The AVR-4306 does not have been completed. • When making connections, also refer to the operating instructions of the other noise. NOTE: • Connecting ...Coaxial) (Orange) Coaxial cable (75 Ω/ohm pin-plug cable) D Digital terminal (Optical) Optical cable (Optical fiber cable) E DENON LINK terminal DENON LINK cable F Speaker terminal Speaker cable S-Video cable I Component video terminal (Green) (Blue) (Red) Component video cable Audio and ...

Owners Manual
Page 20
...'s ON SCREEN button is equipped with a set the video conversion function for "Analog to HDMI conversion function: • The AVR-4306's video up and down converting video signals. Generally speaking, analog video connections using the component video terminals offer the highest quality playback...TV) with a function for North America) or 576i (interlaced standard definition video - Connecting Other Sources The video conversion function The AVR-4306 is operated. • To view the on screen display are not displayed over the picture. 15 Connecting Other Sources The flow of...
...'s ON SCREEN button is equipped with a set the video conversion function for "Analog to HDMI conversion function: • The AVR-4306's video up and down converting video signals. Generally speaking, analog video connections using the component video terminals offer the highest quality playback...TV) with a function for North America) or 576i (interlaced standard definition video - Connecting Other Sources The video conversion function The AVR-4306 is operated. • To view the on screen display are not displayed over the picture. 15 Connecting Other Sources The flow of...

Owners Manual
Page 21
...a component or a video or a S-Video connection. • Audio signals are also provided if your monitor is equipped with an HDMI terminal, connect the AVR-4306 to the monitor using digital audio connections, assign the digital terminal (coaxial or optical) at "Resolution" under "Setting the HDMI Out Setup", use the coaxial.... Connecting Other Sources Connecting equipment with HDMI (High-Definition Multimedia Interface) terminals [To convert analog video signals to HDMI signals] • The AVR-4306 is not equipped with a function for converting analog video signals into HDMI signals.
...a component or a video or a S-Video connection. • Audio signals are also provided if your monitor is equipped with an HDMI terminal, connect the AVR-4306 to the monitor using digital audio connections, assign the digital terminal (coaxial or optical) at "Resolution" under "Setting the HDMI Out Setup", use the coaxial.... Connecting Other Sources Connecting equipment with HDMI (High-Definition Multimedia Interface) terminals [To convert analog video signals to HDMI signals] • The AVR-4306 is not equipped with a function for converting analog video signals into HDMI signals.

Owners Manual
Page 22
... Assignment ( page 67). L L L R R R D OPTICAL OUT H S VIDEO OUT 17 Turntable (MM cartridge) • With discs on playback using the external input (EXT. Also refer to the AVR-4306's EXT. If your DVD player's operating instructions. Connecting Other Sources Connecting the external inputs (EXT. CD player A AUDIO OUT L L L R R R D OPTICAL OUT C COAXIAL OUT Connecting a turntable...
... Assignment ( page 67). L L L R R R D OPTICAL OUT H S VIDEO OUT 17 Turntable (MM cartridge) • With discs on playback using the external input (EXT. Also refer to the AVR-4306's EXT. If your DVD player's operating instructions. Connecting Other Sources Connecting the external inputs (EXT. CD player A AUDIO OUT L L L R R R D OPTICAL OUT C COAXIAL OUT Connecting a turntable...

Owners Manual
Page 23
... recorder • For best picture quality choose the component video connection to be the same type that is connected to the AVR-4306 VCR-1 (to the digital audio connections. If you will needs connect the analog inputs and outputs as shown below, in ... for simultaneous recording or video copying. S-Video and composite video outputs are two sets of the component connected to the OPTICAL 3 OUT terminal on the AVR-4306's rear panel to 2) OUTPUT terminal. DVD recorder I COMPONENT VIDEO OUT Y PB PR H S VIDEO OUT H S VIDEO IN G VIDEO IN G VIDEO OUT A AUDIO OUT L L L R R R ...
... recorder • For best picture quality choose the component video connection to be the same type that is connected to the AVR-4306 VCR-1 (to the digital audio connections. If you will needs connect the analog inputs and outputs as shown below, in ... for simultaneous recording or video copying. S-Video and composite video outputs are two sets of the component connected to the OPTICAL 3 OUT terminal on the AVR-4306's rear panel to 2) OUTPUT terminal. DVD recorder I COMPONENT VIDEO OUT Y PB PR H S VIDEO OUT H S VIDEO IN G VIDEO IN G VIDEO OUT A AUDIO OUT L L L R R R ...

Owners Manual
Page 24
... as shown below, in addition to the digital audio connections. Also refer to the AVR-4306's EXT. For instructions on the AVR-4306's rear panel to any terminal other multichannel sources are possible by connecting the AVR-4306 to a DENON DVD player equipped with a DENON LINK connector using the connection cable included with "Setting the Digital In Assignment...
... as shown below, in addition to the digital audio connections. Also refer to the AVR-4306's EXT. For instructions on the AVR-4306's rear panel to any terminal other multichannel sources are possible by connecting the AVR-4306 to a DENON DVD player equipped with a DENON LINK connector using the connection cable included with "Setting the Digital In Assignment...

Owners Manual
Page 25
...DVD Audio PACKED PCM (with CPPM / C without CPPM) CD LINEAR PCM C Super Audio CD Multi area Stereo area E E CD area C The AVR-4306 is possible to connect using cables that comprises data encryption and authentication of your digital TV monitor or DVD player only supports DVI-D, please obtain... and use a monitor compatible with input resolutions of 480i/576i. • The video signals input from AVR-4306's audio output connector, select "Amp" at the System Setup. For details, see the user's manual of the partner equipment. HDCP is ...
...DVD Audio PACKED PCM (with CPPM / C without CPPM) CD LINEAR PCM C Super Audio CD Multi area Stereo area E E CD area C The AVR-4306 is possible to connect using cables that comprises data encryption and authentication of your digital TV monitor or DVD player only supports DVI-D, please obtain... and use a monitor compatible with input resolutions of 480i/576i. • The video signals input from AVR-4306's audio output connector, select "Amp" at the System Setup. For details, see the user's manual of the partner equipment. HDCP is ...
Owners Manual
Page 26
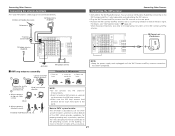
...as practical. 21 With the antenna on the rear panel. • Position the XM Connect-and-Play antenna near a south-facing window to receive the best signal. Mount Bend in particular, specifies that the cable ground shall be connected directly. Return the conductor. Remove the vinyl tie ... loop antenna (Supplied) FM antenna 75 Ω/ohms Coaxial cable FM indoor antenna (Supplied) Connecting the XM terminal Connecting Other Sources • AVR-4306 is used, do not disconnect the AM loop antenna. • Make sure the AM loop antenna lead terminals do not touch metal parts of...
...as practical. 21 With the antenna on the rear panel. • Position the XM Connect-and-Play antenna near a south-facing window to receive the best signal. Mount Bend in particular, specifies that the cable ground shall be connected directly. Return the conductor. Remove the vinyl tie ... loop antenna (Supplied) FM antenna 75 Ω/ohms Coaxial cable FM indoor antenna (Supplied) Connecting the XM terminal Connecting Other Sources • AVR-4306 is used, do not disconnect the AM loop antenna. • Make sure the AM loop antenna lead terminals do not touch metal parts of...

Owners Manual
Page 29
Basic Operation 2 ZONE3 mode To operate the ZONE3 function. The EL display switches as shown below with the appropriate remote commands for controlling the AVR-4306 in the main room (MAIN ZONE). 2 SYSTEM CALL mode To operate the "System call" function. AMP ZONE 2 ZONE 3 SYSTEM CALL 2 ZONE2 mode To operate the ...
Basic Operation 2 ZONE3 mode To operate the ZONE3 function. The EL display switches as shown below with the appropriate remote commands for controlling the AVR-4306 in the main room (MAIN ZONE). 2 SYSTEM CALL mode To operate the "System call" function. AMP ZONE 2 ZONE 3 SYSTEM CALL 2 ZONE2 mode To operate the ...


