XPS 27 2720 Owners Manual
Page 5
20 Removing the Hard Drive 35 Prerequisites 35 Procedure 35 21 Replacing the Hard Drive 37 Procedure 37 Postrequisites 37 22 Removing the Hard-Drive Cage 38 Prerequisites 38 Procedure 38 23 Replacing the Hard-Drive Cage 39 Procedure 39 Postrequisites 39 24 Removing the I/O Panel 40 Prerequisites 40 Procedure 40 25 Replacing the I/O Panel 41 Procedure 41 Postrequisites 41 26 Removing...
20 Removing the Hard Drive 35 Prerequisites 35 Procedure 35 21 Replacing the Hard Drive 37 Procedure 37 Postrequisites 37 22 Removing the Hard-Drive Cage 38 Prerequisites 38 Procedure 38 23 Replacing the Hard-Drive Cage 39 Procedure 39 Postrequisites 39 24 Removing the I/O Panel 40 Prerequisites 40 Procedure 40 25 Replacing the I/O Panel 41 Procedure 41 Postrequisites 41 26 Removing...
XPS 27 2720 Owners Manual
Page 22
... the steps in "After Working Inside Your Computer" on page 13. 22 | Replacing the Stand Procedure 1 Insert the tab at dell.com/regulatory_compliance. Replacing the Stand WARNING: Before working inside your computer, read the safety information that shipped with the screw holes on the hard-drive cage. 3 Replace the screws that secure the stand to the...
... the steps in "After Working Inside Your Computer" on page 13. 22 | Replacing the Stand Procedure 1 Insert the tab at dell.com/regulatory_compliance. Replacing the Stand WARNING: Before working inside your computer, read the safety information that shipped with the screw holes on the hard-drive cage. 3 Replace the screws that secure the stand to the...

XPS 27 2720 Owners Manual
Page 37
... straps with the screw holes on the hard drive and replace the screws that shipped with the slots on the hard-drive cage, and then gently press down the hard-drive assembly. For additional safety best practices information, see the Regulatory Compliance Homepage at dell.com/regulatory_compliance. Postrequisites 1 Replace the stand. See "Replacing the Back Cover" on page 18. 3 Follow...
... straps with the screw holes on the hard drive and replace the screws that shipped with the slots on the hard-drive cage, and then gently press down the hard-drive assembly. For additional safety best practices information, see the Regulatory Compliance Homepage at dell.com/regulatory_compliance. Postrequisites 1 Replace the stand. See "Replacing the Back Cover" on page 18. 3 Follow...
XPS 27 2720 Owners Manual
Page 39
... Your Computer" on page 13. For additional safety best practices information, see the Regulatory Compliance Homepage at dell.com/regulatory_compliance. See "Replacing the Back Cover" on page 18. 4 Follow the instructions in "Replacing the Hard Drive" on page 37. 2 Replace the stand. Postrequisites 1 Follow step 2 to the middle cover. After working inside your computer, follow the...
... Your Computer" on page 13. For additional safety best practices information, see the Regulatory Compliance Homepage at dell.com/regulatory_compliance. See "Replacing the Back Cover" on page 18. 4 Follow the instructions in "Replacing the Hard Drive" on page 37. 2 Replace the stand. Postrequisites 1 Follow step 2 to the middle cover. After working inside your computer, follow the...
XPS 27 2720 Owners Manual
Page 52
...practices information, see the Regulatory Compliance Homepage at dell.com/regulatory_compliance. Postrequisites 1 Replace the system-board shield. See "Replacing the Back Cover" on page 18. 3 Follow the instructions in "After Working Inside Your Computer" on page 32. 2 Replace the back cover. After working inside your computer...processor heat-sink fan under the tab on the hard-drive cage and align the screw holes on the processor heat-sink fan with your computer and follow the instructions in "Before You Begin" on page 11. Replacing the Processor Heat-Sink Fan WARNING: Before working ...
...practices information, see the Regulatory Compliance Homepage at dell.com/regulatory_compliance. Postrequisites 1 Replace the system-board shield. See "Replacing the Back Cover" on page 18. 3 Follow the instructions in "After Working Inside Your Computer" on page 32. 2 Replace the back cover. After working inside your computer...processor heat-sink fan under the tab on the hard-drive cage and align the screw holes on the processor heat-sink fan with your computer and follow the instructions in "Before You Begin" on page 11. Replacing the Processor Heat-Sink Fan WARNING: Before working ...

XPS 27 2720 Owners Manual
Page 84
...3 Remove the stand. Removing the Middle Cover WARNING: Before working inside your computer, read the safety information that two people remove and replace the middle cover while the components are attached to it . It is heavy when the components are attached to it . See "Removing...best practices information, see the Regulatory Compliance Homepage at dell.com/regulatory_compliance. See "Removing the Converter Board" on page 23. 16 Follow the instructions from step 1 to step 3 in "Before You Begin" on page 11. See"Removing the Hard-Drive Cage" on page 38. 6 Follow the instructions...
...3 Remove the stand. Removing the Middle Cover WARNING: Before working inside your computer, read the safety information that two people remove and replace the middle cover while the components are attached to it . It is heavy when the components are attached to it . See "Removing...best practices information, see the Regulatory Compliance Homepage at dell.com/regulatory_compliance. See "Removing the Converter Board" on page 23. 16 Follow the instructions from step 1 to step 3 in "Before You Begin" on page 11. See"Removing the Hard-Drive Cage" on page 38. 6 Follow the instructions...
XPS 27 2720 Owners Manual
Page 88
... Drive" on page 27. 12 Replace the hard-drive cage. See "Replacing the Back Cover" on page 18. 17 Follow the instructions in "Replacing the I /O panel. Postrequisites 1 Follow the instructions from step 1 to step 3 in "Replacing the Hard Drive" on page 37. 14 Replace the stand. See "Replacing the Processor Heat-Sink" on page 34. 5 Replace the processor heat-sink. See"Replacing the Hard-Drive...
... Drive" on page 27. 12 Replace the hard-drive cage. See "Replacing the Back Cover" on page 18. 17 Follow the instructions in "Replacing the I /O panel. Postrequisites 1 Follow the instructions from step 1 to step 3 in "Replacing the Hard Drive" on page 37. 14 Replace the stand. See "Replacing the Processor Heat-Sink" on page 34. 5 Replace the processor heat-sink. See"Replacing the Hard-Drive...
XPS 27 2720 Owners Manual
Page 92
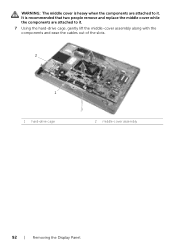
It is heavy when the components are attached to it . 7 Using the hard-drive cage, gently lift the middle-cover assembly along with the components and ease the cables out of the slots. 2 1 1 hard-drive cage 2 middle-cover assembly 92 | Removing the Display Panel WARNING: The middle cover is recommended that two people remove and replace the middle cover while the components are attached to it .
It is heavy when the components are attached to it . 7 Using the hard-drive cage, gently lift the middle-cover assembly along with the components and ease the cables out of the slots. 2 1 1 hard-drive cage 2 middle-cover assembly 92 | Removing the Display Panel WARNING: The middle cover is recommended that two people remove and replace the middle cover while the components are attached to it .
XPS 27 2720 Owners Manual
Page 96
...additional safety best practices information, see the Regulatory Compliance Homepage at dell.com/regulatory_compliance. It is heavy when the components are attached to it . WARNING: The middle cover is recommended that two people remove and replace the middle cover while the components are attached to the display... Align the screw holes on the display brackets with the screw holes on the display panel. 2 Replace the screws that secure the display brackets to it . 8 Using the hard-drive cage, align the bottom of the middle-cover assembly with the display bezel and lower the middle-...
...additional safety best practices information, see the Regulatory Compliance Homepage at dell.com/regulatory_compliance. It is heavy when the components are attached to it . WARNING: The middle cover is recommended that two people remove and replace the middle cover while the components are attached to the display... Align the screw holes on the display brackets with the screw holes on the display panel. 2 Replace the screws that secure the display brackets to it . 8 Using the hard-drive cage, align the bottom of the middle-cover assembly with the display bezel and lower the middle-...
Me and My Dell
Page 76
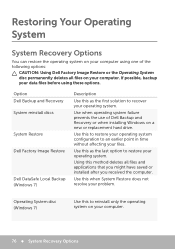
Using this as the last option to an earlier point in time without affecting your data files before using one of Dell Backup and Recovery or when installing Windows on a new or replacement hard drive. Restoring Your Operating System System Recovery Options You can restore the operating system on your computer using these options. Use when...
Using this as the last option to an earlier point in time without affecting your data files before using one of Dell Backup and Recovery or when installing Windows on a new or replacement hard drive. Restoring Your Operating System System Recovery Options You can restore the operating system on your computer using these options. Use when...


