XPS 27 2720 Owners Manual
Page 8
... 75 51 Replacing the Power-Button Assembly . . . . . 76 Procedure 76 Postrequisites 76 52 Removing the System Board 77 Prerequisites 77 Procedure 78 53 Replacing the System Board 79 Procedure 79 Postrequisites 79 Entering the Service Tag in system setup 80 54 Removing the Side I/O-Board 81 Prerequisites 81 Procedure 82 55 Replacing the Side-I/O Board 83 Procedure 83 Postrequisites 83 56 Removing the Middle Cover 84...
... 75 51 Replacing the Power-Button Assembly . . . . . 76 Procedure 76 Postrequisites 76 52 Removing the System Board 77 Prerequisites 77 Procedure 78 53 Replacing the System Board 79 Procedure 79 Postrequisites 79 Entering the Service Tag in system setup 80 54 Removing the Side I/O-Board 81 Prerequisites 81 Procedure 82 55 Replacing the Side-I/O Board 83 Procedure 83 Postrequisites 83 56 Removing the Middle Cover 84...
XPS 27 2720 Owners Manual
Page 11
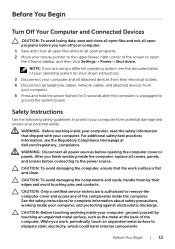
... to remove the computer cover and access any of the components inside the computer, replace all covers, panels, and screws before connecting to the power source. CAUTION: To avoid damaging the computer, ensure that shipped with your computer. While you finish working inside the computer. CAUTION: Only a certified service technician is flat and clean. CAUTION: To avoid damaging the components and cards, handle...
... to remove the computer cover and access any of the components inside the computer, replace all covers, panels, and screws before connecting to the power source. CAUTION: To avoid damaging the computer, ensure that shipped with your computer. While you finish working inside the computer. CAUTION: Only a certified service technician is flat and clean. CAUTION: To avoid damaging the components and cards, handle...
XPS 27 2720 Owners Manual
Page 46
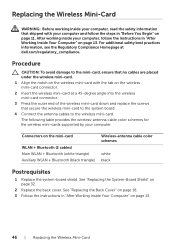
... the instructions in "After Working Inside Your Computer" on the wireless mini-card connector. 2 Insert the wireless mini-card at dell.com/regulatory_compliance. The following table provides the wireless-antenna cable color schemes for the wireless mini-cards supported by your computer. Procedure CAUTION: To avoid damage to the wireless mini-card. Connectors on page 32. 2 Replace the back cover. See "Replacing the System-Board Shield" on the mini-card WLAN + Bluetooth (2 cables...
... the instructions in "After Working Inside Your Computer" on the wireless mini-card connector. 2 Insert the wireless mini-card at dell.com/regulatory_compliance. The following table provides the wireless-antenna cable color schemes for the wireless mini-cards supported by your computer. Procedure CAUTION: To avoid damage to the wireless mini-card. Connectors on page 32. 2 Replace the back cover. See "Replacing the System-Board Shield" on the mini-card WLAN + Bluetooth (2 cables...
XPS 27 2720 Owners Manual
Page 77
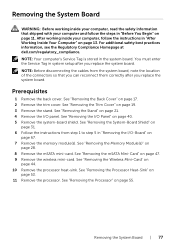
... I/O-Board" on page 67. 7 Remove the memory module(s). See "Removing the mSATA Mini-Card" on page 40. 5 Remove the system-board shield. See "Removing the Wireless Mini-Card" on page 55. NOTE: Your computer's Service Tag is stored in "After Working Inside Your Computer" on page 13. See "Removing the Processor" on page 44. 10 Remove the processor heat-sink. Prerequisites 1 Remove the back cover. Removing the System Board WARNING: Before working inside...
... I/O-Board" on page 67. 7 Remove the memory module(s). See "Removing the mSATA Mini-Card" on page 40. 5 Remove the system-board shield. See "Removing the Wireless Mini-Card" on page 55. NOTE: Your computer's Service Tag is stored in "After Working Inside Your Computer" on page 13. See "Removing the Processor" on page 44. 10 Remove the processor heat-sink. Prerequisites 1 Remove the back cover. Removing the System Board WARNING: Before working inside...
XPS 27 2720 Owners Manual
Page 88
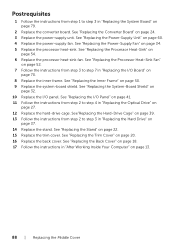
... Board" on page 79. 2 Replace the converter board. See "Replacing the Power-Supply Fan" on page 54. 6 Replace the processor heat-sink fan. See "Replacing the System-Board Shield" on page 22. 15 Replace the trim cover. See "Replacing the Back Cover" on page 18. 17 Follow the instructions in "Replacing the I /O panel. Postrequisites 1 Follow the instructions from step 1 to step 4 in "Replacing the Optical Drive" on page 27. 12 Replace the hard-drive cage. See "Replacing...
... Board" on page 79. 2 Replace the converter board. See "Replacing the Power-Supply Fan" on page 54. 6 Replace the processor heat-sink fan. See "Replacing the System-Board Shield" on page 22. 15 Replace the trim cover. See "Replacing the Back Cover" on page 18. 17 Follow the instructions in "Replacing the I /O panel. Postrequisites 1 Follow the instructions from step 1 to step 4 in "Replacing the Optical Drive" on page 27. 12 Replace the hard-drive cage. See "Replacing...
XPS 27 2720 Owners Manual
Page 104
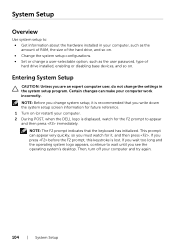
.... 1 Turn on . System Setup Overview Use system setup to appear and then press immediately. This prompt can make your computer. 2 During POST, when the DELL logo is lost. Then, turn off your computer, such as the amount of RAM, the size of the hard drive, and so on. • Change the system setup configurations. • Set or change a user-selectable option, such as the user password, type of hard drive installed, enabling or disabling base devices...
.... 1 Turn on . System Setup Overview Use system setup to appear and then press immediately. This prompt can make your computer. 2 During POST, when the DELL logo is lost. Then, turn off your computer, such as the amount of RAM, the size of the hard drive, and so on. • Change the system setup configurations. • Set or change a user-selectable option, such as the user password, type of hard drive installed, enabling or disabling base devices...
XPS 27 2720 Owners Manual
Page 106
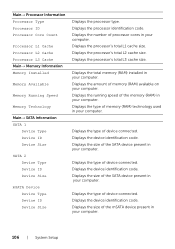
Displays the total memory (RAM) installed in your computer. Displays the running speed of memory (RAM) technology used in your computer. Displays the device identification code. Displays the type of device connected. Displays the device identification code. Displays the type of the memory (RAM) in your computer. Displays the size of processor cores in your computer. Displays the number of the SATA device present in your computer. Displays the type of device connected. Displays the size of memory (RAM) available on your computer. 106 | System Setup Displays ...
Displays the total memory (RAM) installed in your computer. Displays the running speed of memory (RAM) technology used in your computer. Displays the device identification code. Displays the type of device connected. Displays the device identification code. Displays the type of the memory (RAM) in your computer. Displays the size of processor cores in your computer. Displays the number of the SATA device present in your computer. Displays the type of device connected. Displays the size of memory (RAM) available on your computer. 106 | System Setup Displays ...
XPS 27 2720 Owners Manual
Page 108
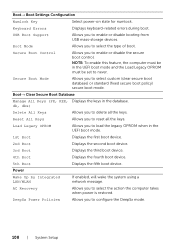
... takes when power is restored. Power Wake Up by Integrated LAN/WLAN If enabled, will wake the system using a network message. Reset All Keys Allows you to enable or disable booting from USB mass-storage devices. AC Recovery Allows you to never. Boot→ Boot Settings Configuration Numlock Key Select power-on state for numlock. Secure Boot Control Allows you to enable or disable the secure boot control. Boot→ Clear Secure Boot Database Manage All Keys (PK, KEK, Displays the keys in the database. Boot Mode Allows...
... takes when power is restored. Power Wake Up by Integrated LAN/WLAN If enabled, will wake the system using a network message. Reset All Keys Allows you to enable or disable booting from USB mass-storage devices. AC Recovery Allows you to never. Boot→ Boot Settings Configuration Numlock Key Select power-on state for numlock. Secure Boot Control Allows you to enable or disable the secure boot control. Boot→ Clear Secure Boot Database Manage All Keys (PK, KEK, Displays the keys in the database. Boot Mode Allows...
XPS 27 2720 Owners Manual
Page 109
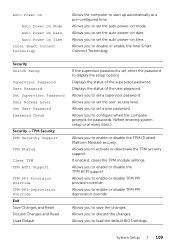
... Override Exit Save Changes and Reset Discard Changes and Reset Load Default If the supervisor password is set the auto power-on date. Allows you to set the user-access level. Allows you to enable or disable TPM PPI provision override. Allows you to enable or disable TPM PPI deprovision override. System Setup | 109 Allows you to display the setup options. Allows you to set , enter the password to set the auto power-on mode.
... Override Exit Save Changes and Reset Discard Changes and Reset Load Default If the supervisor password is set the auto power-on date. Allows you to set the user-access level. Allows you to enable or disable TPM PPI provision override. Allows you to enable or disable TPM PPI deprovision override. System Setup | 109 Allows you to display the setup options. Allows you to set , enter the password to set the auto power-on mode.
XPS 27 2720 Owners Manual
Page 110
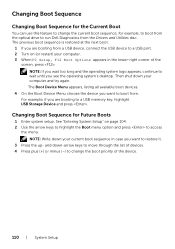
... keys to move through the list of devices. 4 Press plus (+) or minus (-) to change the current boot sequence, for example, to boot from the optical drive to run Dell Diagnostics from a USB device, connect the USB device to a USB port. 2 Turn on page 104. 2 Use the arrow keys to highlight the Boot menu option and press to access the menu. See "Entering System Setup" on (or restart) your computer. 3 When F2 Setup, F12 Boot Options appears in case you see the operating system's desktop...
... keys to move through the list of devices. 4 Press plus (+) or minus (-) to change the current boot sequence, for example, to boot from the optical drive to run Dell Diagnostics from a USB device, connect the USB device to a USB port. 2 Turn on page 104. 2 Use the arrow keys to highlight the Boot menu option and press to access the menu. See "Entering System Setup" on (or restart) your computer. 3 When F2 Setup, F12 Boot Options appears in case you see the operating system's desktop...
Me and My Dell
Page 23
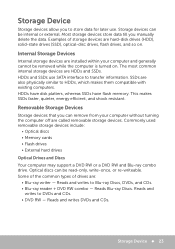
... of the common types of storage devices are HDDs and SSDs. Storage devices can remove from your computer and generally cannot be read-only, write-once, or re-writeable. Most storage devices store data till you can be internal or external. Commonly used removable storage devices include: • Optical discs • Memory cards • Flash drives • External hard drives Optical Drives and Discs Your computer may support a DVD RW or a DVD RW and Blu-ray...
... of the common types of storage devices are HDDs and SSDs. Storage devices can remove from your computer and generally cannot be read-only, write-once, or re-writeable. Most storage devices store data till you can be internal or external. Commonly used removable storage devices include: • Optical discs • Memory cards • Flash drives • External hard drives Optical Drives and Discs Your computer may support a DVD RW or a DVD RW and Blu-ray...
Me and My Dell
Page 27
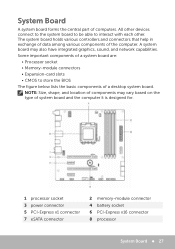
.... All other devices connect to the system board to be able to store the BIOS The figure below lists the basic components of system board and the computer it is designed for. 1 processor socket 3 power connector 5 PCI-Express x1 connector 7 eSATA connector 2 memory-module connector 4 battery socket 6 PCI-Express x16 connector 8 processor System Board 27 NOTE: Size, shape, and location of components may also have integrated graphics, sound, and network capabilities. Some...
.... All other devices connect to the system board to be able to store the BIOS The figure below lists the basic components of system board and the computer it is designed for. 1 processor socket 3 power connector 5 PCI-Express x1 connector 7 eSATA connector 2 memory-module connector 4 battery socket 6 PCI-Express x16 connector 8 processor System Board 27 NOTE: Size, shape, and location of components may also have integrated graphics, sound, and network capabilities. Some...
Me and My Dell
Page 32
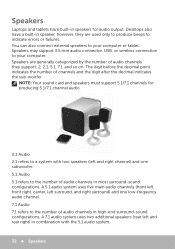
... indicate errors or failures. You can also connect external speakers to a system with the 5.1 audio system. 32 Speakers Desktops also have built-in speakers for producing 5.1/7.1 channel audio. 2.1 Audio 2.1 refers to your computer. Speakers Laptops and tablets have a built-in speaker, however, they support; 2, 2.1, 5.1, 7.1, and so on. Speakers may support 3.5 mm audio connector, USB, or wireless connection to the number of audio channels in most surround-sound configurations. A 7.1 audio system uses two additional speakers (rear left and rear right...
... indicate errors or failures. You can also connect external speakers to a system with the 5.1 audio system. 32 Speakers Desktops also have built-in speakers for producing 5.1/7.1 channel audio. 2.1 Audio 2.1 refers to your computer. Speakers Laptops and tablets have a built-in speaker, however, they support; 2, 2.1, 5.1, 7.1, and so on. Speakers may support 3.5 mm audio connector, USB, or wireless connection to the number of audio channels in most surround-sound configurations. A 7.1 audio system uses two additional speakers (rear left and rear right...
Me and My Dell
Page 37
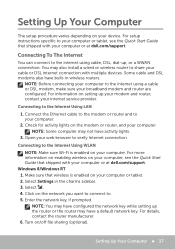
... install a wired or wireless router to the Internet Using WLAN NOTE: Make sure Wi-Fi is enabled on the modem or router, and your web browser to your device. NOTE: Some computer may have a default network key. Connecting to share your cable or DSL internet connection with your computer or tablet. 2. Enter the network key, if prompted. Setting Up Your Computer 37 Click on /off file sharing (optional). Connect the Ethernet cable...
... install a wired or wireless router to the Internet Using WLAN NOTE: Make sure Wi-Fi is enabled on the modem or router, and your web browser to your device. NOTE: Some computer may have a default network key. Connecting to share your cable or DSL internet connection with your computer or tablet. 2. Enter the network key, if prompted. Setting Up Your Computer 37 Click on /off file sharing (optional). Connect the Ethernet cable...
Me and My Dell
Page 39
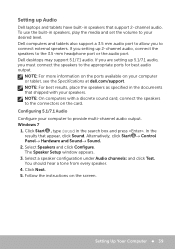
... the instructions on your computer to connect external speakers. Dell desktops may support 5.1/7.1 audio. NOTE: For more information on the ports available on the screen. The Speaker Setup window appears. 3. In the results that support 2‑channel audio. Select a speaker configuration under Audio channels: and click Test. Setting Up Your Computer 39 Click Next. 5. Select Speakers and click Configure. Alternatively, click Start → Control Panel→ Hardware and Sound→ Sound. 2. Dell computers and tablets also support a 3.5 mm audio port to...
... the instructions on your computer to connect external speakers. Dell desktops may support 5.1/7.1 audio. NOTE: For more information on the ports available on the screen. The Speaker Setup window appears. 3. In the results that support 2‑channel audio. Select a speaker configuration under Audio channels: and click Test. Setting Up Your Computer 39 Click Next. 5. Select Speakers and click Configure. Alternatively, click Start → Control Panel→ Hardware and Sound→ Sound. 2. Dell computers and tablets also support a 3.5 mm audio port to...
Me and My Dell
Page 42
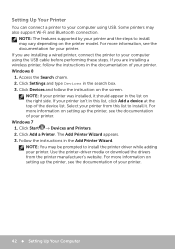
... the instructions in the list on setting up the printer, see the documentation of the device list. NOTE: The features supported by your printer. Windows 8 1. Access the Search charm. 2. The Add Printer Wizard appears. 3. If you are installing a wired printer, connect the printer to your computer using the USB cable before performing these steps. Select your printer. 42 Setting Up Your Computer Click Start → Devices and...
... the instructions in the list on setting up the printer, see the documentation of the device list. NOTE: The features supported by your printer. Windows 8 1. Access the Search charm. 2. The Add Printer Wizard appears. 3. If you are installing a wired printer, connect the printer to your computer using the USB cable before performing these steps. Select your printer. 42 Setting Up Your Computer Click Start → Devices and...

Me and My Dell
Page 57
... the Add a device window, select the device and click Next. NOTE: A passcode may be displayed on your device, see the documentation of Bluetooth on your device is not listed, make sure that you are pairing. On a Dell laptop, turn on . NOTE: If your computer and the device. 5. Using Bluetooth You can connect (pair) Bluetooth devices such as mice, keyboard, headsets, phones, TV, and so on wireless to enable...
... the Add a device window, select the device and click Next. NOTE: A passcode may be displayed on your device, see the documentation of Bluetooth on your device is not listed, make sure that you are pairing. On a Dell laptop, turn on . NOTE: If your computer and the device. 5. Using Bluetooth You can connect (pair) Bluetooth devices such as mice, keyboard, headsets, phones, TV, and so on wireless to enable...

Me and My Dell
Page 70
...provides access to online tools, Dell technical support links, Dell customer support channels, device manager, network connections, system alerts, performance improvement tips, and links to download the software from the Internet when prompted during the installation of file. • Performance and Configuration History - Detailed System Information - View Dell Technical Support options, Customer Support, Tours and Training, Online Tools, Owner's Manual, Warranty Information, FAQs, and so on the Start screen. This utility displays all hardware scans, tests, system changes, critical...
...provides access to online tools, Dell technical support links, Dell customer support channels, device manager, network connections, system alerts, performance improvement tips, and links to download the software from the Internet when prompted during the installation of file. • Performance and Configuration History - Detailed System Information - View Dell Technical Support options, Customer Support, Tours and Training, Online Tools, Owner's Manual, Warranty Information, FAQs, and so on the Start screen. This utility displays all hardware scans, tests, system changes, critical...
Me and My Dell
Page 72
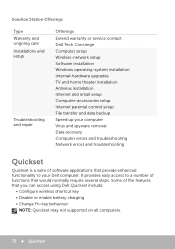
...‑network setup Software installation Windows operating‑system installation Internal‑hardware upgrades TV and home theater installation Antivirus installation Internet and email setup Computer‑accessories setup Internet parental control setup File transfer and data backup Speed up your computer Virus and spyware removal Data recovery Computer errors and troubleshooting Network errors and troubleshooting Quickset Quickset is a suite of functions that you can access using Dell Quickset include: • Configure wireless shortcut key • Disable or enable battery...
...‑network setup Software installation Windows operating‑system installation Internal‑hardware upgrades TV and home theater installation Antivirus installation Internet and email setup Computer‑accessories setup Internet parental control setup File transfer and data backup Speed up your computer Virus and spyware removal Data recovery Computer errors and troubleshooting Network errors and troubleshooting Quickset Quickset is a suite of functions that you can access using Dell Quickset include: • Configure wireless shortcut key • Disable or enable battery...
Me and My Dell
Page 94
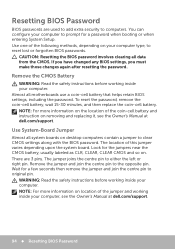
... safety instructions before working inside your computer. Use System‑Board Jumper Almost all motherboards use a coin‑cell battery that helps retain BIOS settings, including the password. There are used to add extra security to computers. You can configure your computer type, to clear CMOS settings along with the BIOS password. Almost all system boards on the location of the jumper and working inside your computer, see the Owner's Manual at dell.com/support. 94 Resetting BIOS Password CAUTION: Resetting the BIOS password involves clearing...
... safety instructions before working inside your computer. Use System‑Board Jumper Almost all motherboards use a coin‑cell battery that helps retain BIOS settings, including the password. There are used to add extra security to computers. You can configure your computer type, to clear CMOS settings along with the BIOS password. Almost all system boards on the location of the jumper and working inside your computer, see the Owner's Manual at dell.com/support. 94 Resetting BIOS Password CAUTION: Resetting the BIOS password involves clearing...


