XPS 27 2720 Owners Manual
Page 5
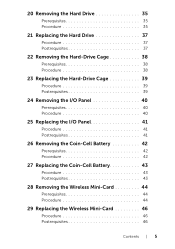
... Prerequisites 35 Procedure 35 21 Replacing the Hard Drive 37 Procedure 37 Postrequisites 37 22 Removing the Hard-Drive Cage 38 Prerequisites 38 Procedure 38 23 Replacing the Hard-Drive Cage 39 Procedure 39 Postrequisites 39 24 Removing the I/O Panel 40 Prerequisites 40 Procedure 40 25 Replacing the I/O Panel 41 Procedure 41 Postrequisites 41 26 ...
... Prerequisites 35 Procedure 35 21 Replacing the Hard Drive 37 Procedure 37 Postrequisites 37 22 Removing the Hard-Drive Cage 38 Prerequisites 38 Procedure 38 23 Replacing the Hard-Drive Cage 39 Procedure 39 Postrequisites 39 24 Removing the I/O Panel 40 Prerequisites 40 Procedure 40 25 Replacing the I/O Panel 41 Procedure 41 Postrequisites 41 26 ...
XPS 27 2720 Owners Manual
Page 14
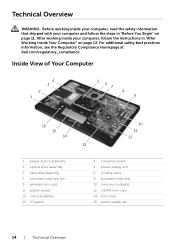
... Begin" on page 13. Inside View of Your Computer 4 3 2 1 5 67 8 9 16 15 14 1 power-button assembly 3 optical-drive assembly 5 hard-drive assembly 7 processor heat-sink fan 9 wireless mini-card 11 system board 13 coin-cell battery 15 I/O panel 10 11 12 13 2 converter board ...trim cover 16 power-supply fan 14 | Technical Overview For additional safety best practices information, see the Regulatory Compliance Homepage at dell.com/regulatory_compliance. Technical Overview WARNING: Before working inside your computer, read the safety information that shipped with your computer, follow...
... Begin" on page 13. Inside View of Your Computer 4 3 2 1 5 67 8 9 16 15 14 1 power-button assembly 3 optical-drive assembly 5 hard-drive assembly 7 processor heat-sink fan 9 wireless mini-card 11 system board 13 coin-cell battery 15 I/O panel 10 11 12 13 2 converter board ...trim cover 16 power-supply fan 14 | Technical Overview For additional safety best practices information, see the Regulatory Compliance Homepage at dell.com/regulatory_compliance. Technical Overview WARNING: Before working inside your computer, read the safety information that shipped with your computer, follow...
XPS 27 2720 Owners Manual
Page 21
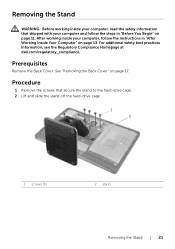
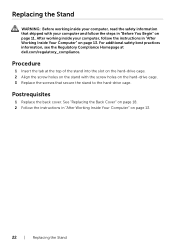
... your computer, read the safety information that secure the stand to the hard-drive cage. 2 Lift and slide the stand off the hard-drive cage. 1 2 1 screws (6) 2 stand Removing the Stand | 21 For additional safety best practices information, see the Regulatory Compliance Homepage at dell.com/regulatory_compliance. See "Removing the Back Cover" on page 17. Procedure...
... your computer, read the safety information that secure the stand to the hard-drive cage. 2 Lift and slide the stand off the hard-drive cage. 1 2 1 screws (6) 2 stand Removing the Stand | 21 For additional safety best practices information, see the Regulatory Compliance Homepage at dell.com/regulatory_compliance. See "Removing the Back Cover" on page 17. Procedure...
XPS 27 2720 Owners Manual
Page 22
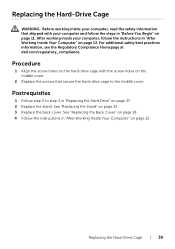
Postrequisites 1 Replace the back cover. Procedure 1 Insert the tab at dell.com/regulatory_compliance. After working inside your computer, follow the steps in "Before You Begin" on page 11. See "Replacing the Back Cover" on page 18. 2 ... practices information, see the Regulatory Compliance Homepage at the top of the stand into the slot on the hard-drive cage. 2 Align the screw holes on the stand with the screw holes on the hard-drive cage. 3 Replace the screws that shipped with your computer and follow the instructions in "After Working Inside Your...
Postrequisites 1 Replace the back cover. Procedure 1 Insert the tab at dell.com/regulatory_compliance. After working inside your computer, follow the steps in "Before You Begin" on page 11. See "Replacing the Back Cover" on page 18. 2 ... practices information, see the Regulatory Compliance Homepage at the top of the stand into the slot on the hard-drive cage. 2 Align the screw holes on the stand with the screw holes on the hard-drive cage. 3 Replace the screws that shipped with your computer and follow the instructions in "After Working Inside Your...

XPS 27 2720 Owners Manual
Page 35
... in Sleep or On state. For additional safety best practices information, see the Regulatory Compliance Homepage at dell.com/regulatory_compliance. Prerequisites 1 Remove the back cover. CAUTION: To avoid data loss, do not remove the hard drive while the computer is in "After Working Inside Your Computer" on page 13. Exercise care when handling...
... in Sleep or On state. For additional safety best practices information, see the Regulatory Compliance Homepage at dell.com/regulatory_compliance. Prerequisites 1 Remove the back cover. CAUTION: To avoid data loss, do not remove the hard drive while the computer is in "After Working Inside Your Computer" on page 13. Exercise care when handling...
XPS 27 2720 Owners Manual
Page 36
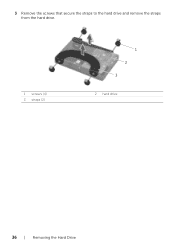
3 Remove the screws that secure the straps to the hard drive and remove the straps from the hard drive. 1 screws (4) 3 straps (2) 1 2 3 2 hard drive 36 | Removing the Hard Drive
3 Remove the screws that secure the straps to the hard drive and remove the straps from the hard drive. 1 screws (4) 3 straps (2) 1 2 3 2 hard drive 36 | Removing the Hard Drive

XPS 27 2720 Owners Manual
Page 37
... the straps with the screw holes on the hard drive and replace the screws that shipped with the slots on the hard-drive cage, and then gently press down the hard-drive assembly. Postrequisites 1 Replace the stand. For additional safety best practices information, see the Regulatory Compliance Homepage at dell.com/regulatory_compliance. After working inside your computer...
... the straps with the screw holes on the hard drive and replace the screws that shipped with the slots on the hard-drive cage, and then gently press down the hard-drive assembly. Postrequisites 1 Replace the stand. For additional safety best practices information, see the Regulatory Compliance Homepage at dell.com/regulatory_compliance. After working inside your computer...
XPS 27 2720 Owners Manual
Page 38
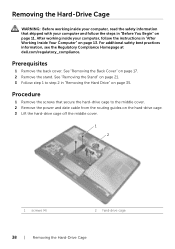
... stand. For additional safety best practices information, see the Regulatory Compliance Homepage at dell.com/regulatory_compliance. See "Removing the Back Cover" on the hard-drive cage. 3 Lift the hard-drive cage off the middle cover. 1 2 1 screws (4) 2 hard-drive cage 38 | Removing the Hard-Drive Cage Removing the Hard-Drive Cage WARNING: Before working inside your computer, read the safety information that...
... stand. For additional safety best practices information, see the Regulatory Compliance Homepage at dell.com/regulatory_compliance. See "Removing the Back Cover" on the hard-drive cage. 3 Lift the hard-drive cage off the middle cover. 1 2 1 screws (4) 2 hard-drive cage 38 | Removing the Hard-Drive Cage Removing the Hard-Drive Cage WARNING: Before working inside your computer, read the safety information that...
XPS 27 2720 Owners Manual
Page 39
...2 Replace the screws that shipped with your computer and follow the instructions in "After Working Inside Your Computer" on page 13. Replacing the Hard-Drive Cage | 39 See "Replacing the Stand" on page 37. 2 Replace the stand. Postrequisites 1 Follow step 2 to the middle cover....your computer, read the safety information that secure the hard-drive cage to step 3 in "After Working Inside Your Computer" on page 13. For additional safety best practices information, see the Regulatory Compliance Homepage at dell.com/regulatory_compliance. After working inside your computer, follow ...
...2 Replace the screws that shipped with your computer and follow the instructions in "After Working Inside Your Computer" on page 13. Replacing the Hard-Drive Cage | 39 See "Replacing the Stand" on page 37. 2 Replace the stand. Postrequisites 1 Follow step 2 to the middle cover....your computer, read the safety information that secure the hard-drive cage to step 3 in "After Working Inside Your Computer" on page 13. For additional safety best practices information, see the Regulatory Compliance Homepage at dell.com/regulatory_compliance. After working inside your computer, follow ...
XPS 27 2720 Owners Manual
Page 51
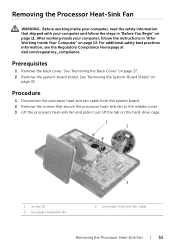
See "Removing the Back Cover" on the hard-drive cage. 1 2 1 screw (3) 3 processor heat-sink fan 3 2 processor heat-sink fan cable Removing the Processor Heat-Sink Fan | 51 Procedure 1 Disconnect the processor heat-sink fan ... computer, follow the steps in "After Working Inside Your Computer" on page 13. For additional safety best practices information, see the Regulatory Compliance Homepage at dell.com/regulatory_compliance. See "Removing the System-Board Shield" on page 11. Prerequisites 1 Remove the back cover. Removing the Processor Heat-Sink Fan WARNING: Before working...
See "Removing the Back Cover" on the hard-drive cage. 1 2 1 screw (3) 3 processor heat-sink fan 3 2 processor heat-sink fan cable Removing the Processor Heat-Sink Fan | 51 Procedure 1 Disconnect the processor heat-sink fan ... computer, follow the steps in "After Working Inside Your Computer" on page 13. For additional safety best practices information, see the Regulatory Compliance Homepage at dell.com/regulatory_compliance. See "Removing the System-Board Shield" on page 11. Prerequisites 1 Remove the back cover. Removing the Processor Heat-Sink Fan WARNING: Before working...
XPS 27 2720 Owners Manual
Page 52
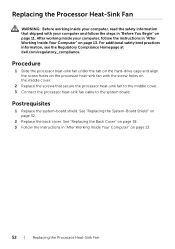
For additional safety best practices information, see the Regulatory Compliance Homepage at dell.com/regulatory_compliance. Procedure 1 Slide the processor heat-sink fan under the tab on the hard-drive cage and align the screw holes on the processor heat-sink fan with your computer and follow the instructions in "After Working Inside Your Computer...
For additional safety best practices information, see the Regulatory Compliance Homepage at dell.com/regulatory_compliance. Procedure 1 Slide the processor heat-sink fan under the tab on the hard-drive cage and align the screw holes on the processor heat-sink fan with your computer and follow the instructions in "After Working Inside Your Computer...

XPS 27 2720 Owners Manual
Page 84
For additional safety best practices information, see the Regulatory Compliance Homepage at dell.com/regulatory_compliance. See "Removing the Trim Cover" on page 31. 9 Remove the inner frame. See "Removing the System-Board Shield" on page 19. 3 Remove the ... "Removing the Stand" on page 21. 4 Follow the instructions from step 1 to it . See "Removing the Processor Heat-Sink Fan" on page 35. 5 Remove the hard-drive cage. See "Removing the Power-Supply Fan" on page 13. After working inside your computer and follow the instructions in "After Working Inside Your Computer...
For additional safety best practices information, see the Regulatory Compliance Homepage at dell.com/regulatory_compliance. See "Removing the Trim Cover" on page 31. 9 Remove the inner frame. See "Removing the System-Board Shield" on page 19. 3 Remove the ... "Removing the Stand" on page 21. 4 Follow the instructions from step 1 to it . See "Removing the Processor Heat-Sink Fan" on page 35. 5 Remove the hard-drive cage. See "Removing the Power-Supply Fan" on page 13. After working inside your computer and follow the instructions in "After Working Inside Your Computer...
XPS 27 2720 Owners Manual
Page 88
... unit. See "Replacing the Processor Heat-Sink Fan" on page 52. 7 Follow the instructions from step 3 to step 7 in "Replacing the Optical Drive" on page 27. 12 Replace the hard-drive cage. See "Replacing the I/O Panel" on page 41. 11 Follow the instructions from step 2 to step 4 in "Replacing the I /O panel. Postrequisites 1 Follow..." on page 60. 4 Replace the power-supply fan. See "Replacing the Power-Supply Unit" on page 34. 5 Replace the processor heat-sink. See"Replacing the Hard-Drive Cage" on page 39. 13 Follow the instructions from step 2 to step 3 in "Replacing the...
... unit. See "Replacing the Processor Heat-Sink Fan" on page 52. 7 Follow the instructions from step 3 to step 7 in "Replacing the Optical Drive" on page 27. 12 Replace the hard-drive cage. See "Replacing the I/O Panel" on page 41. 11 Follow the instructions from step 2 to step 4 in "Replacing the I /O panel. Postrequisites 1 Follow..." on page 60. 4 Replace the power-supply fan. See "Replacing the Power-Supply Unit" on page 34. 5 Replace the processor heat-sink. See"Replacing the Hard-Drive Cage" on page 39. 13 Follow the instructions from step 2 to step 3 in "Replacing the...
XPS 27 2720 Owners Manual
Page 92
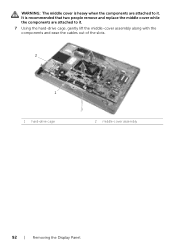
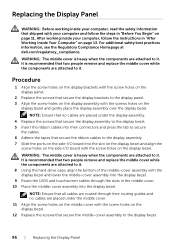
It is heavy when the components are attached to it . 7 Using the hard-drive cage, gently lift the middle-cover assembly along with the components and ease the cables out of the slots. 2 1 1 hard-drive cage 2 middle-cover assembly 92 | Removing the Display Panel WARNING: The middle cover is recommended that two people remove and replace the middle cover while the components are attached to it .
It is heavy when the components are attached to it . 7 Using the hard-drive cage, gently lift the middle-cover assembly along with the components and ease the cables out of the slots. 2 1 1 hard-drive cage 2 middle-cover assembly 92 | Removing the Display Panel WARNING: The middle cover is recommended that two people remove and replace the middle cover while the components are attached to it .
XPS 27 2720 Owners Manual
Page 96
...bezel. NOTE: Ensure that no cables are attached to it . For additional safety best practices information, see the Regulatory Compliance Homepage at dell.com/regulatory_compliance. WARNING: The middle cover is recommended that secure the ribbon cables to the display bezel. 96 | Replacing the Display ... display assembly over the display bezel. WARNING: The middle cover is recommended that secure the display brackets to it . 8 Using the hard-drive cage, align the bottom of the middle-cover assembly with the display bezel and lower the middle-cover assembly into the display bezel. ...
...bezel. NOTE: Ensure that no cables are attached to it . For additional safety best practices information, see the Regulatory Compliance Homepage at dell.com/regulatory_compliance. WARNING: The middle cover is recommended that secure the ribbon cables to the display bezel. 96 | Replacing the Display ... display assembly over the display bezel. WARNING: The middle cover is recommended that secure the display brackets to it . 8 Using the hard-drive cage, align the bottom of the middle-cover assembly with the display bezel and lower the middle-cover assembly into the display bezel. ...
XPS 27 2720 Owners Manual
Page 104
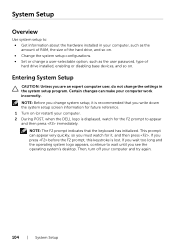
... you write down the system setup screen information for future reference. 1 Turn on (or restart) your computer. 2 During POST, when the DELL logo is displayed, watch for the F2 prompt to appear and then press immediately. NOTE: The F2 prompt indicates that you change system setup,...8226; Change the system setup configurations. • Set or change the settings in your computer, such as the amount of RAM, the size of hard drive installed, enabling or disabling base devices, and so on. System Setup Overview Use system setup to: • Get information about the hardware installed ...
... you write down the system setup screen information for future reference. 1 Turn on (or restart) your computer. 2 During POST, when the DELL logo is displayed, watch for the F2 prompt to appear and then press immediately. NOTE: The F2 prompt indicates that you change system setup,...8226; Change the system setup configurations. • Set or change the settings in your computer, such as the amount of RAM, the size of hard drive installed, enabling or disabling base devices, and so on. System Setup Overview Use system setup to: • Get information about the hardware installed ...
XPS 27 2720 Owners Manual
Page 107
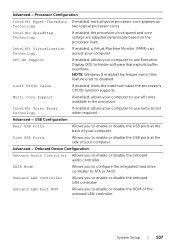
... this feature even if this feature is set to ATA or AHCI. Advanced→ USB Configuration Rear USB Ports Allows you to configure the integrated hard drive controller to disabled. Multi Core Support If enabled, allows your computer. Onboard LAN Controller Allows you to enable or disable the onboard LAN controller. System...
... this feature even if this feature is set to ATA or AHCI. Advanced→ USB Configuration Rear USB Ports Allows you to configure the integrated hard drive controller to disabled. Multi Core Support If enabled, allows your computer. Onboard LAN Controller Allows you to enable or disable the onboard LAN controller. System...
XPS 27 2720 Specifications (Accessibility Compliant)
Page 5
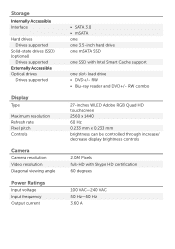
... Pixel pitch Controls Camera Camera resolution Video resolution Diagonal viewing angle Power Ratings Input voltage Input frequency Output current • SATA 3.0 • mSATA one one 3.5-inch hard drive one mSATA SSD one SSD with Skype HD certification 60 degrees 100 VAC-240 VAC 50 Hz-60 Hz 3.60 A RW combo 27-inches WLED Adobe RGB Quad... 60 Hz 0.233 mm x 0.233 mm brightness can be controlled through increase/ decrease display brightness controls 2.0M Pixels full-HD with Intel Smart Cache support one slot-load drive • DVD+/-
... Pixel pitch Controls Camera Camera resolution Video resolution Diagonal viewing angle Power Ratings Input voltage Input frequency Output current • SATA 3.0 • mSATA one one 3.5-inch hard drive one mSATA SSD one SSD with Skype HD certification 60 degrees 100 VAC-240 VAC 50 Hz-60 Hz 3.60 A RW combo 27-inches WLED Adobe RGB Quad... 60 Hz 0.233 mm x 0.233 mm brightness can be controlled through increase/ decrease display brightness controls 2.0M Pixels full-HD with Intel Smart Cache support one slot-load drive • DVD+/-
XPS 27 2720 Specifications (Accessibility Compliant)
Page 6
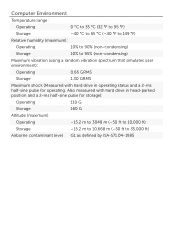
Also measured with hard drive in head-parked position and a 2-ms half-sine pulse for storage): Operating 110 G Storage 160 G Altitude (maximum) Operating -15.2 m to 3048 m (-50 ft to 10,... ft to 95% (non-condensing) Maximum vibration (using a random vibration spectrum that simulates user environment): Operating 0.66 GRMS Storage 1.30 GRMS Maximum shock (Measured with hard drive in operating status and a 2-ms half-sine pulse for operating. Computer Environment Temperature range: Operating 0 °C to 35 °C (32 °F to 95 °F) Storage...
Also measured with hard drive in head-parked position and a 2-ms half-sine pulse for storage): Operating 110 G Storage 160 G Altitude (maximum) Operating -15.2 m to 3048 m (-50 ft to 10,... ft to 95% (non-condensing) Maximum vibration (using a random vibration spectrum that simulates user environment): Operating 0.66 GRMS Storage 1.30 GRMS Maximum shock (Measured with hard drive in operating status and a 2-ms half-sine pulse for operating. Computer Environment Temperature range: Operating 0 °C to 35 °C (32 °F to 95 °F) Storage...
Me and My Dell
Page 23
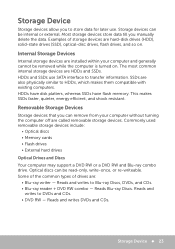
...only, write-once, or re-writeable. Reads and writes DVDs and CDs. Storage Device 23 SSDs are hard‑disk drives (HDD), solid‑state drives (SSD), optical-disc drives, flash drives, and so on . HDDs have disk platters, whereas SSDs have flash memory. Optical discs can remove from your ...HDDs, which makes them compatible with existing computers. Commonly used removable storage devices include: • Optical discs • Memory cards • Flash drives • External hard drives Optical Drives and Discs Your computer may support a DVD RW or a DVD RW and Blu-ray combo...
...only, write-once, or re-writeable. Reads and writes DVDs and CDs. Storage Device 23 SSDs are hard‑disk drives (HDD), solid‑state drives (SSD), optical-disc drives, flash drives, and so on . HDDs have disk platters, whereas SSDs have flash memory. Optical discs can remove from your ...HDDs, which makes them compatible with existing computers. Commonly used removable storage devices include: • Optical discs • Memory cards • Flash drives • External hard drives Optical Drives and Discs Your computer may support a DVD RW or a DVD RW and Blu-ray combo...


