Owner's Manual
Page 4
... Properties 32 2 Optimizing Performance Hyper-Threading 35 Overclocking 35 PCI Express Cards 36 3 Solving Problems Troubleshooting Tips 37 Battery Problems 37 Drive Problems 37 CD and DVD drive problems 38 Hard drive problems 39 E-Mail, Modem, and Internet Problems 39 Error Messages 40 IEEE 1394 Device Problems 41 Keyboard Problems 41 Lockups and Software...
... Properties 32 2 Optimizing Performance Hyper-Threading 35 Overclocking 35 PCI Express Cards 36 3 Solving Problems Troubleshooting Tips 37 Battery Problems 37 Drive Problems 37 CD and DVD drive problems 38 Hard drive problems 39 E-Mail, Modem, and Internet Problems 39 Error Messages 40 IEEE 1394 Device Problems 41 Keyboard Problems 41 Lockups and Software...
Owner's Manual
Page 6
... 79 PCI Cards 80 PCI Express Cards 83 Drives 88 General Installation Guidelines 88 Connecting Drive Cables 89 Hard Drive 90 Removing a Hard Drive 90 Installing a Hard Drive 91 Adding a Second Hard Drive 94 Floppy Drive 95 Removing a Floppy Drive 96 Installing a Floppy Drive 96 CD/DVD Drive 98 Removing a CD/DVD Drive 98 Installing a CD/DVD Drive 99 Processor Airflow Shroud 102 Removing the Processor...
... 79 PCI Cards 80 PCI Express Cards 83 Drives 88 General Installation Guidelines 88 Connecting Drive Cables 89 Hard Drive 90 Removing a Hard Drive 90 Installing a Hard Drive 91 Adding a Second Hard Drive 94 Floppy Drive 95 Removing a Floppy Drive 96 Installing a Floppy Drive 96 CD/DVD Drive 98 Removing a CD/DVD Drive 98 Installing a CD/DVD Drive 99 Processor Airflow Shroud 102 Removing the Processor...

Owner's Manual
Page 11
...other users and technical support • Documentation for my computer • How to use Windows XP • Documentation for my computer • Documentation for devices (such as memory, the hard drive, and the operating system • Customer Care - After you ordered. NOTE: The color... of your CD varies based on page 64. The Dell Support website provides several online tools, including: • Solutions - See "Reinstalling Microsoft® Windows® XP" on the...
...other users and technical support • Documentation for my computer • How to use Windows XP • Documentation for my computer • Documentation for devices (such as memory, the hard drive, and the operating system • Customer Care - After you ordered. NOTE: The color... of your CD varies based on page 64. The Dell Support website provides several online tools, including: • Solutions - See "Reinstalling Microsoft® Windows® XP" on the...

Owner's Manual
Page 17
...Hard Drive" on page 90 for information on the computer. The Intel RAID controller on your computer can be made into RAID level 0 or RAID level 1 volumes. NOTE: RAID levels do not represent a hierarchy. About Serial ATA Drives Your Dell™ Dimension™ XPS computer supports up to ensure that drive... guide in order to three serial ATA hard drives. A RAID level 0 configuration is recommended for high-performance gaming, and a RAID level 1 configuration is recommended for its Dimension computers. However, if four drives are available, Dell offers either RAID level 0 or RAID level...
...Hard Drive" on page 90 for information on the computer. The Intel RAID controller on your computer can be made into RAID level 0 or RAID level 1 volumes. NOTE: RAID levels do not represent a hierarchy. About Serial ATA Drives Your Dell™ Dimension™ XPS computer supports up to ensure that drive... guide in order to three serial ATA hard drives. A RAID level 0 configuration is recommended for high-performance gaming, and a RAID level 1 configuration is recommended for its Dimension computers. However, if four drives are available, Dell offers either RAID level 0 or RAID level...

Owner's Manual
Page 18
... for RAID level 0 segment 1 segment 3 segment 5 hard drive 1 segment 2 segment 4 segment 6 hard drive 2 Another advantage of the drives to store data. For example, if you have 240 GB on which to read data while the other drive is searching for its data redundancy advantages. 18 Setting Up...of writing consecutive segments, or stripes, of the drives. A RAID level 1 configuration sacrifices high data access rates for and reading the next block. Data striping is then duplicated, or mirrored, on the other drive. www.dell.com | support.dell.com RAID Level 0 RAID level 0 uses a ...
... for RAID level 0 segment 1 segment 3 segment 5 hard drive 1 segment 2 segment 4 segment 6 hard drive 2 Another advantage of the drives to store data. For example, if you have 240 GB on which to read data while the other drive is searching for its data redundancy advantages. 18 Setting Up...of writing consecutive segments, or stripes, of the drives. A RAID level 1 configuration sacrifices high data access rates for and reading the next block. Data striping is then duplicated, or mirrored, on the other drive. www.dell.com | support.dell.com RAID Level 0 RAID level 0 uses a ...

Owner's Manual
Page 19
...duplicated segment 2 duplicated segment 3 duplicated segment 4 duplicated segment 5 duplicated segment 6 duplicated hard drive 1 hard drive 2 If a drive failure occurs, subsequent read and write operations are directed to store data. Setting Your Computer to install a hard drive, see page 120). 2 Use the up- and down -arrow keys to highlight RAID... rebuilt using the data from the surviving drive. You must have at least two hard drives installed in this method is duplicated on both drives, two 120-GB RAID level 1 drives collectively have installed the operating system and the...
...duplicated segment 2 duplicated segment 3 duplicated segment 4 duplicated segment 5 duplicated segment 6 duplicated hard drive 1 hard drive 2 If a drive failure occurs, subsequent read and write operations are directed to store data. Setting Your Computer to install a hard drive, see page 120). 2 Use the up- and down -arrow keys to highlight RAID... rebuilt using the data from the surviving drive. You must have at least two hard drives installed in this method is duplicated on both drives, two 120-GB RAID level 1 drives collectively have installed the operating system and the...

Owner's Manual
Page 20
...create the RAID volume. 11 Confirm that the correct volume configuration is displayed on your hard drives when you do not know the average file size, choose 128 as your array,...are prompted to select Exit, and press . 13 Install the operating system (see "Reinstalling Microsoft® Windows® XP" on the RAID volume. and down -arrow keys to enter Intel RAID Option ROM. 3 Use the up -...and down -arrow keys to enter the Intel(R) RAID Option ROM utility. 3 Use the up - www.dell.com | support.dell.com 5 Use the left- and down -arrow keys and space bar to select the two disks you ...
...create the RAID volume. 11 Confirm that the correct volume configuration is displayed on your hard drives when you do not know the average file size, choose 128 as your array,...are prompted to select Exit, and press . 13 Install the operating system (see "Reinstalling Microsoft® Windows® XP" on the RAID volume. and down -arrow keys to enter Intel RAID Option ROM. 3 Use the up -...and down -arrow keys to enter the Intel(R) RAID Option ROM utility. 3 Use the up - www.dell.com | support.dell.com 5 Use the left- and down -arrow keys and space bar to select the two disks you ...

Owner's Manual
Page 21
and down -arrow keys to use the migrating option (see "Reinstalling Microsoft® Windows® XP" on page 24). Setting Up and Using Your Computer 21 and down-arrow keys and space bar to select the two disks you want to ... press . 7 Select the desired capacity for RAID Using the Intel(R) Application Accelerator If you already have one hard drive with the operating system installed on it, and you want to add a second hard drive and reconfigure both drives into an array, but you want to exit the Intel Option ROM utility. NOTE: If your computer...
and down -arrow keys to use the migrating option (see "Reinstalling Microsoft® Windows® XP" on page 24). Setting Up and Using Your Computer 21 and down-arrow keys and space bar to select the two disks you want to ... press . 7 Select the desired capacity for RAID Using the Intel(R) Application Accelerator If you already have one hard drive with the operating system installed on it, and you want to add a second hard drive and reconfigure both drives into an array, but you want to exit the Intel Option ROM utility. NOTE: If your computer...

Owner's Manual
Page 22
...Intel(R) Storage Utility. www.dell.com | support.dell.com Creating a RAID 0 Volume NOTE: When you perform this operation, all data on the RAID drives will be lost . 1 Set your RAID 0 volume, and then click the right arrow. Click a second hard drive until two drives appear in the Selected window,... Follow Microsoft Windows procedures for creating a partition on the new RAID volume. 22 Setting Up and Using Your Computer Click a second hard drive until two drives appear in the Selected window, and then click Next. 5 In the Specify Volume Size window, click the Volume Size desired, and...
...Intel(R) Storage Utility. www.dell.com | support.dell.com Creating a RAID 0 Volume NOTE: When you perform this operation, all data on the RAID drives will be lost . 1 Set your RAID 0 volume, and then click the right arrow. Click a second hard drive until two drives appear in the Selected window,... Follow Microsoft Windows procedures for creating a partition on the new RAID volume. 22 Setting Up and Using Your Computer Click a second hard drive until two drives appear in the Selected window, and then click Next. 5 In the Specify Volume Size window, click the Volume Size desired, and...

Owner's Manual
Page 23
...size. 7 Select the appropriate strip size from which you want to migrate, and click Next. 9 On the Select Member Hard Drive screen, double-click the hard drive to select the member drive to span the stripe array, and click Next. 10 On the Specify Volume Size screen, select the Volume Size you want...data or operating system files that you want to keep on the RAID volume). 8 On the Select Source Hard Drive screen, double-click the hard drive from the drop-down box, select RAID 0 as your source hard drive (it also splits the RAID 1 volume into the Selected box, and then click Next. 5 Click ...
...size. 7 Select the appropriate strip size from which you want to migrate, and click Next. 9 On the Select Member Hard Drive screen, double-click the hard drive to select the member drive to span the stripe array, and click Next. 10 On the Specify Volume Size screen, select the Volume Size you want...data or operating system files that you want to keep on the RAID volume). 8 On the Select Source Hard Drive screen, double-click the hard drive from the drop-down box, select RAID 0 as your source hard drive (it also splits the RAID 1 volume into the Selected box, and then click Next. 5 Click ...

Owner's Manual
Page 24
... Hard Drive: 1 Right-click the spare hard drive icon. 2 Click Reset Hard Drive to mark as a spare hard drive. 3 Click Mark as your computer to RAID-enabled mode (see page 19). 2 Click the Start button and point to All Programs→ Intel(R) Application Accelerator→ Intel Application Accelerator to act as the RAID level. www.dell.com | support.dell.com...
... Hard Drive: 1 Right-click the spare hard drive icon. 2 Click Reset Hard Drive to mark as a spare hard drive. 3 Click Mark as your computer to RAID-enabled mode (see page 19). 2 Click the Start button and point to All Programs→ Intel(R) Application Accelerator→ Intel Application Accelerator to act as the RAID level. www.dell.com | support.dell.com...

Owner's Manual
Page 25
...want to rebuild the RAID 1 volume, and click Rebuild to this time. Transferring Information to a New Computer The Microsoft® Windows® XP operating system provides a Files and Settings Transfer wizard to move data such as: • E-mails • Toolbar settings • Window sizes... data to the new computer over a network or serial connection, or you can manually rebuild the computer's redundancy mirror to a new hard drive by performing the following steps: 1 Click the Start button and point to Programs→ Intel(R) Application Accelerator→ Intel Application Accelerator...
...want to rebuild the RAID 1 volume, and click Rebuild to this time. Transferring Information to a New Computer The Microsoft® Windows® XP operating system provides a Files and Settings Transfer wizard to move data such as: • E-mails • Toolbar settings • Window sizes... data to the new computer over a network or serial connection, or you can manually rebuild the computer's redundancy mirror to a new hard drive by performing the following steps: 1 Click the Start button and point to Programs→ Intel(R) Application Accelerator→ Intel Application Accelerator...
Owner's Manual
Page 29
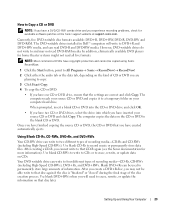
The DVD-writable drives installed in Dell™ computers will need to a temporary folder on your computer hard drive. Once you have finished copying the source CD or DVD, the CD or DVD that you have one CD or DVD drive, ensure that CD-R again (see the Sonic documentation for more information). After creating a... the final stage of recording media-CD-Rs, CD-RWs (including High-Speed CD-RWs), DVD+Rs, and DVD+RWs. Your DVD writable drive can write to record music or permanently store data files. Use blank CD-Rs to two different types of recording media-CD-Rs and CD...
The DVD-writable drives installed in Dell™ computers will need to a temporary folder on your computer hard drive. Once you have finished copying the source CD or DVD, the CD or DVD that you have one CD or DVD drive, ensure that CD-R again (see the Sonic documentation for more information). After creating a... the final stage of recording media-CD-Rs, CD-RWs (including High-Speed CD-RWs), DVD+Rs, and DVD+RWs. Your DVD writable drive can write to record music or permanently store data files. Use blank CD-Rs to two different types of recording media-CD-Rs and CD...

Owner's Manual
Page 31
... a power conservation mode, the Windows desktop is on the hard drive and then completely turning off the computer. NOTICE: If your computer uses when it is restored to the state it was in certain windows. Power Management Overview The Microsoft® Windows® XP power management features can reduce the amount of inactivity...
... a power conservation mode, the Windows desktop is on the hard drive and then completely turning off the computer. NOTICE: If your computer uses when it is restored to the state it was in certain windows. Power Management Overview The Microsoft® Windows® XP power management features can reduce the amount of inactivity...

Owner's Manual
Page 32
... schemes drop-down menu. If you . www.dell.com | support.dell.com To exit from the Power schemes drop-down menu displays the following schemes: • Always On (default) - If the computer's hard drive becomes corrupted, Windows XP recreates the hibernate file automatically. The computer may ...take a short time to exit from batteries for extended periods of the computer memory, Dell creates an appropriately sized hibernate mode file before ...
... schemes drop-down menu. If you . www.dell.com | support.dell.com To exit from the Power schemes drop-down menu displays the following schemes: • Always On (default) - If the computer's hard drive becomes corrupted, Windows XP recreates the hibernate file automatically. The computer may ...take a short time to exit from batteries for extended periods of the computer memory, Dell creates an appropriately sized hibernate mode file before ...

Owner's Manual
Page 33
... Your Computer 33 NOTICE: If you set the monitor to time-out before the monitor does, your computer may appear to time-out before the hard drive. Advanced Tab The Advanced tab allows you to: • Place the power options icon in the Turn off monitor, Turn off the computer. ...Hibernate Tab The Hibernate tab allows you to activate standby mode, activate hibernate mode, or turn off hard disks, System stand by, or System hibernates field, and then select a timeout from the displayed list. Changing the time-out for a scheme field ...
... Your Computer 33 NOTICE: If you set the monitor to time-out before the monitor does, your computer may appear to time-out before the hard drive. Advanced Tab The Advanced tab allows you to: • Place the power options icon in the Turn off monitor, Turn off the computer. ...Hibernate Tab The Hibernate tab allows you to activate standby mode, activate hibernate mode, or turn off hard disks, System stand by, or System hibernates field, and then select a timeout from the displayed list. Changing the time-out for a scheme field ...

Owner's Manual
Page 39
The modem does not operate while it is not available on all computers.) Solving Problems 39 Click the Start button, point to remove the checkmark. Hard drive problems RUN CHECK DISK - 1 Click the Start button and click My Computer. 2 Right-click Local Disk C:. 3 Click Properties. 4 Click the Tools tab. 5 Under Error-checking, ...
The modem does not operate while it is not available on all computers.) Solving Problems 39 Click the Start button, point to remove the checkmark. Hard drive problems RUN CHECK DISK - 1 Click the Start button and click My Computer. 2 Right-click Local Disk C:. 3 Click Properties. 4 Click the Tools tab. 5 Under Error-checking, ...

Owner's Manual
Page 44
... page 67), reconnect the mouse cable as shown on page 115. • Run the Dell Diagnostics (see page 56). www.dell.com | support.dell.com USE A VIRUS-SCANNING PROGRAM TO CHECK THE HARD DRIVE, FLOPPY DISKS, OR CDS SAVE AND CLOSE ANY OPEN FILES OR PROGRAMS AND SHUT DOWN ... that your computer is successfully communicating with the memory. • Ensure that your computer is successfully communicating with the memory. • Run the Dell Diagnostics (see page 56). If necessary, install additional memory (see page 115). • Reseat the memory modules (see page 76) to ensure...
... page 67), reconnect the mouse cable as shown on page 115. • Run the Dell Diagnostics (see page 56). www.dell.com | support.dell.com USE A VIRUS-SCANNING PROGRAM TO CHECK THE HARD DRIVE, FLOPPY DISKS, OR CDS SAVE AND CLOSE ANY OPEN FILES OR PROGRAMS AND SHUT DOWN ... that your computer is successfully communicating with the memory. • Ensure that your computer is successfully communicating with the memory. • Run the Dell Diagnostics (see page 56). If necessary, install additional memory (see page 115). • Reseat the memory modules (see page 76) to ensure...

Owner's Manual
Page 54
...Resolution • If you know works and restart the computer. • If the problem persists or the computer has integrated graphics, contact Dell (see page 77), and then restart the computer. Continue until you have identified a faulty module or reinstalled all modules without error. ... the modules, reinstall one module (see page 131). ABCD Reinstall all power and data cables and restart the computer. A possible floppy or hard drive failure has occurred. Reseat all USB devices, check cable connections, and then restart the computer. = yellow = green = off 54 Advanced ...
...Resolution • If you know works and restart the computer. • If the problem persists or the computer has integrated graphics, contact Dell (see page 77), and then restart the computer. Continue until you have identified a faulty module or reinstalled all modules without error. ... the modules, reinstall one module (see page 131). ABCD Reinstall all power and data cables and restart the computer. A possible floppy or hard drive failure has occurred. Reseat all USB devices, check cable connections, and then restart the computer. = yellow = green = off 54 Advanced ...

Owner's Manual
Page 56
...assistance. check system setup (see page 131). NOTICE: The Dell Diagnostics works only on your hard drive (see page 37) and run the Dell Diagnostics before you contact Dell for the devices installed on Dell™ computers. Suggested Resolution • Ensure that the ... operating condition after POST. None. = yellow = green = off Dell Diagnostics CAUTION: Before you experience a problem with a device (such as the floppy drive or hard drive); Start the Dell Diagnostics from the Dell Dimension ResourceCD. 56 Advanced Troubleshooting When to make sure the boot sequence...
...assistance. check system setup (see page 131). NOTICE: The Dell Diagnostics works only on your hard drive (see page 37) and run the Dell Diagnostics before you contact Dell for the devices installed on Dell™ computers. Suggested Resolution • Ensure that the ... operating condition after POST. None. = yellow = green = off Dell Diagnostics CAUTION: Before you experience a problem with a device (such as the floppy drive or hard drive); Start the Dell Diagnostics from the Dell Dimension ResourceCD. 56 Advanced Troubleshooting When to make sure the boot sequence...


