
Owner's Manual (PDF)
Page 10
22 Processor 101 Prerequisites 101 Removing the Processor 102 Replacing the Processor 103 Postrequisites 106 23 Coin-Cell Battery 107 Prerequisites 107 Removing the Coin-Cell Battery 107 Replacing the Coin-Cell Battery 108 Postrequisites 109 24 Power-Supply Unit 111 Prerequisites 111 Removing the Power-Supply Unit 111 Replacing the Power-Supply Unit 112 Postrequisites 113 10 Contents
22 Processor 101 Prerequisites 101 Removing the Processor 102 Replacing the Processor 103 Postrequisites 106 23 Coin-Cell Battery 107 Prerequisites 107 Removing the Coin-Cell Battery 107 Replacing the Coin-Cell Battery 108 Postrequisites 109 24 Power-Supply Unit 111 Prerequisites 111 Removing the Power-Supply Unit 111 Replacing the Power-Supply Unit 112 Postrequisites 113 10 Contents
Owner's Manual (PDF)
Page 20
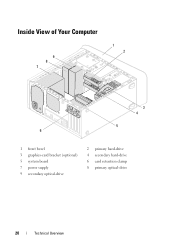
Inside View of Your Computer 9 8 7 1 2 3 4 5 6 1 front bezel 3 graphics-card bracket (optional) 5 system board 7 power supply 9 secondary optical-drive 2 primary hard-drive 4 secondary hard-drive 6 card retention clamp 8 primary optical-drive 20 Technical Overview
Inside View of Your Computer 9 8 7 1 2 3 4 5 6 1 front bezel 3 graphics-card bracket (optional) 5 system board 7 power supply 9 secondary optical-drive 2 primary hard-drive 4 secondary hard-drive 6 card retention clamp 8 primary optical-drive 20 Technical Overview

Owner's Manual (PDF)
Page 111
.... 2 Remove the screws that secure the power supply to the chassis. 3 Press the power supply clamps to release the power supply from the chassis. 4 Slide and lift the power supply away from the system board and the drives. For additional safety best practices information, see the Regulatory Compliance Homepage at dell.com/regulatory_compliance. Power-Supply Unit 111 See "System-Board Components...
.... 2 Remove the screws that secure the power supply to the chassis. 3 Press the power supply clamps to release the power supply from the chassis. 4 Slide and lift the power supply away from the system board and the drives. For additional safety best practices information, see the Regulatory Compliance Homepage at dell.com/regulatory_compliance. Power-Supply Unit 111 See "System-Board Components...

Owner's Manual (PDF)
Page 112
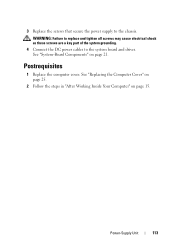
3 2 1 1 screws (4) 3 power supply clamps (2) 2 power supply Replacing the Power-Supply Unit 1 Slide the power supply towards the back of the chassis. 2 Align the screw holes on the power supply with the screw holes on the chassis. 112 Power-Supply Unit
3 2 1 1 screws (4) 3 power supply clamps (2) 2 power supply Replacing the Power-Supply Unit 1 Slide the power supply towards the back of the chassis. 2 Align the screw holes on the power supply with the screw holes on the chassis. 112 Power-Supply Unit
Owner's Manual (PDF)
Page 113
See "System-Board Components" on page 15. See "Replacing the Computer Cover" on page 25. 2 Follow the steps in "After Working Inside Your Computer" on page 21. WARNING: Failure to replace and tighten all screws may cause electrical shock as these screws are a key part of the system grounding. 4 Connect the DC power cables to the chassis. 3 Replace the screws that secure the power supply to the system board and drives. Postrequisites 1 Replace the computer cover. Power-Supply Unit 113
See "System-Board Components" on page 15. See "Replacing the Computer Cover" on page 25. 2 Follow the steps in "After Working Inside Your Computer" on page 21. WARNING: Failure to replace and tighten all screws may cause electrical shock as these screws are a key part of the system grounding. 4 Connect the DC power cables to the chassis. 3 Replace the screws that secure the power supply to the system board and drives. Postrequisites 1 Replace the computer cover. Power-Supply Unit 113


