
Owner's Manual
Page 2
...problem. Trademarks used in this text: Dell, the DELL logo, XPS, H2C, Inspiron, Dell Precision, Dimension, OptiPlex, Latitude, PowerEdge, PowerVault, PowerApp, TravelLite, Strike Zone, and Dell OpenManage are either trademarks or registered trademarks of Dell Inc.; and is subject to either ...and Intel Core 2 Extreme are trademarks of Intel Corporation; Microsoft, Windows, Windows Vista, and the Windows Vista Start button are not applicable. Model DCDO April 2007 P/N NP756 Rev. If you purchased a Dell™ n Series computer, any proprietary interest in the United States ...
...problem. Trademarks used in this text: Dell, the DELL logo, XPS, H2C, Inspiron, Dell Precision, Dimension, OptiPlex, Latitude, PowerEdge, PowerVault, PowerApp, TravelLite, Strike Zone, and Dell OpenManage are either trademarks or registered trademarks of Dell Inc.; and is subject to either ...and Intel Core 2 Extreme are trademarks of Intel Corporation; Microsoft, Windows, Windows Vista, and the Windows Vista Start button are not applicable. Model DCDO April 2007 P/N NP756 Rev. If you purchased a Dell™ n Series computer, any proprietary interest in the United States ...
Owner's Manual
Page 4
... Power Management Options in Windows XP 44 Standby Mode 44 Hibernate Mode 45 Power Options Properties 45 Power Management Options in Windows Vista 47 Sleep Mode 47 Hibernate Mode 47 Configuring Power Management Settings 47 2 Optimizing for Greater Performance 49 Understanding Dual-Graphics Technology 49 Understanding CPU Overclocking 49 3 Dell™ QuickSet 51 4 Troubleshooting...
... Power Management Options in Windows XP 44 Standby Mode 44 Hibernate Mode 45 Power Options Properties 45 Power Management Options in Windows Vista 47 Sleep Mode 47 Hibernate Mode 47 Configuring Power Management Settings 47 2 Optimizing for Greater Performance 49 Understanding Dual-Graphics Technology 49 Understanding CPU Overclocking 49 3 Dell™ QuickSet 51 4 Troubleshooting...
Owner's Manual
Page 5
... Driver Rollback 76 Using the Drivers and Utilities Media 76 Restoring Your Operating System 78 Using Microsoft Windows System Restore 78 Using Dell PC Restore and Dell Factory Image Restore 79 Using the Operating System Media 82 Troubleshooting Software and Hardware Problems 83 5 Removing and Installing Parts 85 Before You Begin 85 ...
... Driver Rollback 76 Using the Drivers and Utilities Media 76 Restoring Your Operating System 78 Using Microsoft Windows System Restore 78 Using Dell PC Restore and Dell Factory Image Restore 79 Using the Operating System Media 82 Troubleshooting Software and Hardware Problems 83 5 Removing and Installing Parts 85 Before You Begin 85 ...

Owner's Manual
Page 10
What Are You Looking For? • How to set up my computer Find It Here Setup Diagram • Service Tag and Express Service Code • Microsoft® Windows® Product Key Label Service Tag and Microsoft Windows Product Key These labels are located on your computer. • Use the Service Tag to identify your computer when you use support.dell.com or contact support. • Enter the Express Service Code to direct your call when contacting support. 10 Finding Information
What Are You Looking For? • How to set up my computer Find It Here Setup Diagram • Service Tag and Express Service Code • Microsoft® Windows® Product Key Label Service Tag and Microsoft Windows Product Key These labels are located on your computer. • Use the Service Tag to identify your computer when you use support.dell.com or contact support. • Enter the Express Service Code to direct your call when contacting support. 10 Finding Information
Owner's Manual
Page 11
...asked questions Dell Support Website - Online discussion with programs and files • How to personalize my desktop Windows Help and Support 1 To access Windows Help and Support: • In Windows XP, click Start and click Help and Support. • In Windows Vista™, click the Windows Vista Start.... 4 Follow the instructions on the screen. depending on your selections. • How to use your Windows™ operating system • How to support.dell.com, select your business segment, and then enter your computer and operating system and installs the updates appropriate...
...asked questions Dell Support Website - Online discussion with programs and files • How to personalize my desktop Windows Help and Support 1 To access Windows Help and Support: • In Windows XP, click Start and click Help and Support. • In Windows Vista™, click the Windows Vista Start.... 4 Follow the instructions on the screen. depending on your selections. • How to use your Windows™ operating system • How to support.dell.com, select your business segment, and then enter your computer and operating system and installs the updates appropriate...

Owner's Manual
Page 14
...the computer. 14 Setting Up and Using Your Computer Failure to install the stand could result in the computer tipping over, potentially resulting in Windows XP" on page 15). The floppy-drive/Media Card Reader and hard drive carriers are not interchangeable. Press to place it into the appropriate ...be installed at all times to indicate different states: • No light - CAUTION: The computer stand should be a problem with your computer (see "Dell Diagnostics" on page 166). NOTE: The hard drive carrier is in system setup (see "System Setup" on page 72). NOTE: The optical drive ...
...the computer. 14 Setting Up and Using Your Computer Failure to install the stand could result in the computer tipping over, potentially resulting in Windows XP" on page 15). The floppy-drive/Media Card Reader and hard drive carriers are not interchangeable. Press to place it into the appropriate ...be installed at all times to indicate different states: • No light - CAUTION: The computer stand should be a problem with your computer (see "Dell Diagnostics" on page 166). NOTE: The hard drive carrier is in system setup (see "System Setup" on page 72). NOTE: The optical drive ...

Owner's Manual
Page 23
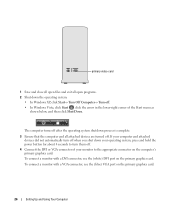
... (blue) connector Connecting a Monitor (Without an Adapter) CAUTION: Before you shut down the operating system: • In Windows XP, click Start→ Turn Off Computer→ Turn off. • In Windows Vista™, click the Windows Vista Start button , click the arrow in the Product Information Guide. Setting Up and Using Your Computer 23...
... (blue) connector Connecting a Monitor (Without an Adapter) CAUTION: Before you shut down the operating system: • In Windows XP, click Start→ Turn Off Computer→ Turn off. • In Windows Vista™, click the Windows Vista Start button , click the arrow in the Product Information Guide. Setting Up and Using Your Computer 23...

Owner's Manual
Page 24
...the operating system shutdown process is required. 1 Save and close all open files and exit all attached devices are turned off . • In Windows Vista, click Start , click the arrow in the Product Information Guide. Connecting a Monitor (With an Adapter) CAUTION: Before you shut down ...the operating system: • In Windows XP, click Start→ Turn Off Computer→ Turn off . 4 Connect the DVI or VGA connector of your monitor to the appropriate connector on ...
...the operating system shutdown process is required. 1 Save and close all open files and exit all attached devices are turned off . • In Windows Vista, click Start , click the arrow in the Product Information Guide. Connecting a Monitor (With an Adapter) CAUTION: Before you shut down ...the operating system: • In Windows XP, click Start→ Turn Off Computer→ Turn off . 4 Connect the DVI or VGA connector of your monitor to the appropriate connector on ...
Owner's Manual
Page 26
... down your operating system, press and hold the power button for about 4 seconds to turn off when you shut down the operating system: • In Windows XP, click Start→ Turn Off Computer→ Turn off . To connect a monitor with a DVI connector, use the (blue) VGA port on the primary... graphics card. primary video card 1 Save and close all open files and exit all attached devices are turned off . • In Windows Vista, click Start , click the arrow in the lower-right corner of your monitor to the appropriate connector on the computer's primary graphics card: ...
... down your operating system, press and hold the power button for about 4 seconds to turn off when you shut down the operating system: • In Windows XP, click Start→ Turn Off Computer→ Turn off . To connect a monitor with a DVI connector, use the (blue) VGA port on the primary... graphics card. primary video card 1 Save and close all open files and exit all attached devices are turned off . • In Windows Vista, click Start , click the arrow in the lower-right corner of your monitor to the appropriate connector on the computer's primary graphics card: ...
Owner's Manual
Page 27
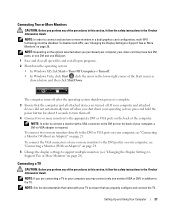
...is complete. 3 Ensure that came with a VGA connector to the DVI port on the options selected when you shut down the operating system: • In Windows XP, click Start→ Turn Off Computer→ Turn off after the operating system shutdown process is required. NOTE: Depending on the back of your computer...or DVI) in the lower-right corner of the Start menu as shown below, and then click Shut Down. The computer turns off . • In Windows Vista, click Start , click the arrow in addition to Support Two or More Monitors" on page 28). NOTE: If you are connecting a TV to ...
...is complete. 3 Ensure that came with a VGA connector to the DVI port on the options selected when you shut down the operating system: • In Windows XP, click Start→ Turn Off Computer→ Turn off after the operating system shutdown process is required. NOTE: Depending on the back of your computer...or DVI) in the lower-right corner of the Start menu as shown below, and then click Shut Down. The computer turns off . • In Windows Vista, click Start , click the arrow in addition to Support Two or More Monitors" on page 28). NOTE: If you are connecting a TV to ...
Owner's Manual
Page 28
... button for your monitors connected and turned on, turn them off. 4 Disconnect the computer and all attached devices are turned off . • In Windows Vista, click Start , click the arrow in a dual graphics card configuration with multi-GPU technology, multi-GPU must be disabled. 1 With your graphics...the lower-right corner of viewable work space. If you do not have an S-video cable, you shut down the operating system: • In Windows XP, click Start→ Turn Off Computer→ Turn off . An S-video cable is complete. 3 Ensure that the computer and all attached devices ...
... button for your monitors connected and turned on, turn them off. 4 Disconnect the computer and all attached devices are turned off . • In Windows Vista, click Start , click the arrow in a dual graphics card configuration with multi-GPU technology, multi-GPU must be disabled. 1 With your graphics...the lower-right corner of viewable work space. If you do not have an S-video cable, you shut down the operating system: • In Windows XP, click Start→ Turn Off Computer→ Turn off . An S-video cable is complete. 3 Ensure that the computer and all attached devices ...
Owner's Manual
Page 33
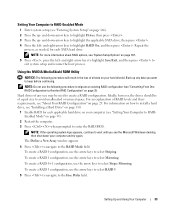
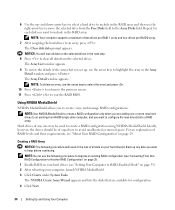
... use the arrow keys to highlight Drives, then press . 3 Press the up any size may be of any data you see the Microsoft Windows desktop, then shut down -arrow keys to select Striping. Using the NVIDIA MediaShield ROM Utility NOTICE: The following procedure to migrate an existing RAID...and Using Your Computer 33 To create a RAID 1 configuration, use the arrow keys to avoid unallocated or unused space. The Define a New Array window appears. 4 Press to navigate to select Mirroring. Back up - and right-arrow keys to exit system setup and resume the boot process. and right...
... use the arrow keys to highlight Drives, then press . 3 Press the up any size may be of any data you see the Microsoft Windows desktop, then shut down -arrow keys to select Striping. Using the NVIDIA MediaShield ROM Utility NOTICE: The following procedure to migrate an existing RAID...and Using Your Computer 33 To create a RAID 1 configuration, use the arrow keys to avoid unallocated or unused space. The Define a New Array window appears. 4 Press to navigate to select Mirroring. Back up - and right-arrow keys to exit system setup and resume the boot process. and right...
Owner's Manual
Page 34
... should be used to create a RAID configuration using NVIDIA MediaShield. 6 Use the up , use the arrow keys to highlight the array in the Array Detail window and press . and down-arrow keys to select a hard drive to include in the loss of equal size to keep before continuing. NOTICE: You will... space. Back up any size may be of all data from the Free Disks field to RAID-Enabled Mode" on page 29. The Array List window appears. 9 To review the details of RAID levels and their requirements, see "Setting Your Computer to the Array Disks field. NOTE: Use NVIDIA MediaShield to...
... should be used to create a RAID configuration using NVIDIA MediaShield. 6 Use the up , use the arrow keys to highlight the array in the Array Detail window and press . and down-arrow keys to select a hard drive to include in the loss of equal size to keep before continuing. NOTICE: You will... space. Back up any size may be of all data from the Free Disks field to RAID-Enabled Mode" on page 29. The Array List window appears. 9 To review the details of RAID levels and their requirements, see "Setting Your Computer to the Array Disks field. NOTE: Use NVIDIA MediaShield to...

Owner's Manual
Page 35
.... 4 Click Next. Setting Up and Using Your Computer 35 The Free Disk Selection window appears. The Clearing System Data window appears. The MediaShield RAID management utility window appears and lists the array along with any other installed hard drives. NOTICE: The Clear... select Striping (RAID 0), Mirroring (RAID 1), Stripe Mirroring (RAID 0+1), or RAID 5. 7 Click Next. The MediaShield RAID management utility window appears and lists any remaining arrays along with any other installed hard drives. Converting From One RAID Configuration to Another RAID Configuration NOTICE: ...
.... 4 Click Next. Setting Up and Using Your Computer 35 The Free Disk Selection window appears. The Clearing System Data window appears. The MediaShield RAID management utility window appears and lists the array along with any other installed hard drives. NOTICE: The Clear... select Striping (RAID 0), Mirroring (RAID 1), Stripe Mirroring (RAID 0+1), or RAID 5. 7 Click Next. The MediaShield RAID management utility window appears and lists any remaining arrays along with any other installed hard drives. Converting From One RAID Configuration to Another RAID Configuration NOTICE: ...

Owner's Manual
Page 36
... want to convert. 3 Click Convert Array in a RAID array fails, you want to select your RAID configuration (Mirroring) in the management utility window. 3 Select Rebuild Array in the (migrated) array by restoring the data to convert an array depends on several factors, such as migrating to... a two-drive RAID 0 configuration; The MediaShield RAID management utility window appears and displays the status of the original configuration. however, the capacity of the resulting array must be equal to or greater than...
... want to convert. 3 Click Convert Array in a RAID array fails, you want to select your RAID configuration (Mirroring) in the management utility window. 3 Select Rebuild Array in the (migrated) array by restoring the data to convert an array depends on several factors, such as migrating to... a two-drive RAID 0 configuration; The MediaShield RAID management utility window appears and displays the status of the original configuration. however, the capacity of the resulting array must be equal to or greater than...

Owner's Manual
Page 37
To format CDs for storing data, to create music CDs, or to rebuild an array. The MediaShield RAID management utility window appears and displays the status of the tray. 3 To close it . 6 Click Next. 7 Click Finish. Using Multimedia NOTICE: Do not press down on the optical ...
To format CDs for storing data, to create music CDs, or to rebuild an array. The MediaShield RAID management utility window appears and displays the status of the tray. 3 To close it . 6 Click Next. 7 Click Finish. Using Multimedia NOTICE: Do not press down on the optical ...
Owner's Manual
Page 40
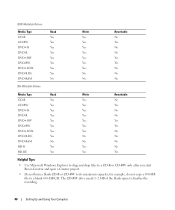
... Yes Yes Yes Yes No No Yes Yes Rewritable No Yes No No Yes Yes No No No No Yes Helpful Tips • Use Microsoft Windows Explorer to drag and drop files to a CD-R or CD-RW only after you start Roxio Creator and open a Creator project. • Do not burn...
... Yes Yes Yes Yes No No Yes Yes Rewritable No Yes No No Yes Yes No No No No Yes Helpful Tips • Use Microsoft Windows Explorer to drag and drop files to a CD-R or CD-RW only after you start Roxio Creator and open a Creator project. • Do not burn...
Owner's Manual
Page 42
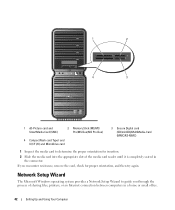
... media card reader until it is completely seated in a home or small office. 42 Setting Up and Using Your Computer Network Setup Wizard The Microsoft Windows operating system provides a Network Setup Wizard to determine the proper orientation for proper orientation, and then try again.
... media card reader until it is completely seated in a home or small office. 42 Setting Up and Using Your Computer Network Setup Wizard The Microsoft Windows operating system provides a Network Setup Wizard to determine the proper orientation for proper orientation, and then try again.

Owner's Manual
Page 43
...click Files and Settings Transfer Wizard. NOTE: Selecting the connection method This computer connects directly to the Internet enables the integrated firewall provided with Windows XP SP1. 4 Complete the checklist and required preparations. 5 Return to → Set up a connection or network. 2 Select an option under.... Transferring Information to a New Computer You can use the wizard from the source computer: 1 On the source computer, insert the Windows XP Operating System CD. 2 On the Welcome to All Programs→ Accessories→ Communications, and then click Network Setup Wizard. 2 ...
...click Files and Settings Transfer Wizard. NOTE: Selecting the connection method This computer connects directly to the Internet enables the integrated firewall provided with Windows XP SP1. 4 Complete the checklist and required preparations. 5 Return to → Set up a connection or network. 2 Select an option under.... Transferring Information to a New Computer You can use the wizard from the source computer: 1 On the source computer, insert the Windows XP Operating System CD. 2 On the Welcome to All Programs→ Accessories→ Communications, and then click Network Setup Wizard. 2 ...
Owner's Manual
Page 44
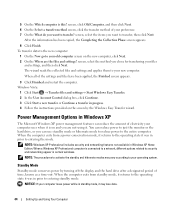
...In the User Account Control dialog box, click Continue. 3 Click Start a new transfer or Continue a transfer in Windows XP Home Edition. NOTE: Windows XP Professional includes security and networking features not available in progress. 4 Follow the instructions provided on the screen by turning ...Now go to your old computer screen on and you want to transfer? When a Windows XP Professional computer is this? NOTICE: If your computer loses power while in Windows XP The Microsoft Windows XP power management features can use standby mode or hibernate mode to reduce power to entering the...
...In the User Account Control dialog box, click Continue. 3 Click Start a new transfer or Continue a transfer in Windows XP Home Edition. NOTE: Windows XP Professional includes security and networking features not available in progress. 4 Follow the instructions provided on the screen by turning ...Now go to your old computer screen on and you want to transfer? When a Windows XP Professional computer is this? NOTICE: If your computer loses power while in Windows XP The Microsoft Windows XP power management features can use standby mode or hibernate mode to reduce power to entering the...


