Owner's Manual
Page 5
Only 142 Definition of "Dell-Installed" Software and Peripherals 143 Definition of "Third-Party" Software and Peripherals 143 Contents 7 CD/DVD Drive 114 Removing a CD/DVD Drive 114 Installing a CD/... Computer Stand 124 Replacing the Computer Cover 125 6 Appendix 127 Specifications 127 System Setup 132 Overview 132 Entering System Setup 132 System Setup Options 133 Boot Sequence 138 Clearing Forgotten Passwords 139 Clearing CMOS Settings 141 Cleaning Your Computer 141 Computer, Keyboard, and Monitor 141 Mouse 142 Floppy Drive 142 CDs...
Only 142 Definition of "Dell-Installed" Software and Peripherals 143 Definition of "Third-Party" Software and Peripherals 143 Contents 7 CD/DVD Drive 114 Removing a CD/DVD Drive 114 Installing a CD/... Computer Stand 124 Replacing the Computer Cover 125 6 Appendix 127 Specifications 127 System Setup 132 Overview 132 Entering System Setup 132 System Setup Options 133 Boot Sequence 138 Clearing Forgotten Passwords 139 Clearing CMOS Settings 141 Cleaning Your Computer 141 Computer, Keyboard, and Monitor 141 Mouse 142 Floppy Drive 142 CDs...
Owner's Manual
Page 13
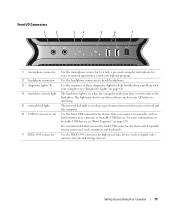
..., cameras, or bootable USB devices. Setting Up and Using Your Computer 15 The light may also be on when a device such as your computer (see "Boot Sequence" on when the computer reads data from or writes data to help troubleshoot a problem with your CD player is operating. 5 network link light The...
..., cameras, or bootable USB devices. Setting Up and Using Your Computer 15 The light may also be on when a device such as your computer (see "Boot Sequence" on when the computer reads data from or writes data to help troubleshoot a problem with your CD player is operating. 5 network link light The...
Owner's Manual
Page 26
..., the drives should be used to keep before continuing. The Define a New Array window appears. 4 Press to navigate to exit system setup and resume the boot process. Back up any size may be of equal size to an array, press . The Clear disk data prompt appears. To create a RAID 0 configuration, use...
..., the drives should be used to keep before continuing. The Define a New Array window appears. 4 Press to navigate to exit system setup and resume the boot process. Back up any size may be of equal size to an array, press . The Clear disk data prompt appears. To create a RAID 0 configuration, use...
Owner's Manual
Page 28
... the operating system is loaded onto the drive (see "Using the Nvidia MediaShield ROM Utility" on page 28 for instructions). NOTE: If your computer currently boots to RAID and you want to or greater than any of the resulting array must initially be equal to delete. 3 Click Delete Array in the...
... the operating system is loaded onto the drive (see "Using the Nvidia MediaShield ROM Utility" on page 28 for instructions). NOTE: If your computer currently boots to RAID and you want to or greater than any of the resulting array must initially be equal to delete. 3 Click Delete Array in the...

Owner's Manual
Page 59
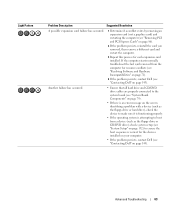
... "Installing Memory" on page 82). • If the problem persists, contact Dell (see "Contacting Dell" on page 145). Memory modules are detected, but a memory failure has occurred. • If two or more memory modules are not lit after the system successfully boots to install additional memory modules (one module (see "Installing Memory" on...
... "Installing Memory" on page 82). • If the problem persists, contact Dell (see "Contacting Dell" on page 145). Memory modules are detected, but a memory failure has occurred. • If two or more memory modules are not lit after the system successfully boots to install additional memory modules (one module (see "Installing Memory" on...
Owner's Manual
Page 61
... hard drive), check the device to make sure it is functioning properly. • If the operating system is attempting to ensure the boot sequence is an error message on the screen identifying a problem with a device (such as the floppy drive or CD/DVD drive); ...Components" on page 79). • If there is correct for the devices installed on your computer. • If the problem persists, contact Dell (see "Contacting Dell" on page 145). Light Pattern Problem Description Suggested Resolution A possible expansion card failure has occurred. 1 Determine if a conflict exists by removing...
... hard drive), check the device to make sure it is functioning properly. • If the operating system is attempting to ensure the boot sequence is an error message on the screen identifying a problem with a device (such as the floppy drive or CD/DVD drive); ...Components" on page 79). • If there is correct for the devices installed on your computer. • If the problem persists, contact Dell (see "Contacting Dell" on page 145). Light Pattern Problem Description Suggested Resolution A possible expansion card failure has occurred. 1 Determine if a conflict exists by removing...
Owner's Manual
Page 62
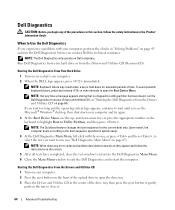
... open the drive tray. 3 Place the Drivers and Utilities CD in the center of the optical drive to open the Boot Device Menu. Starting the Dell Diagnostics From the Drivers and Utilities CD 1 Turn on your computer. 2 Press the eject button on the front of the drive ... Close the Main Menu window to wait until you want to close it. 64 Advanced Troubleshooting Upon restart, the computer boots according to the boot sequence specified in system setup. 4 At the Dell Diagnostics Main Menu, left-click with your computer, perform the checks in "Solving Problems" on (or restart) your ...
... open the drive tray. 3 Place the Drivers and Utilities CD in the center of the optical drive to open the Boot Device Menu. Starting the Dell Diagnostics From the Drivers and Utilities CD 1 Turn on your computer. 2 Press the eject button on the front of the drive ... Close the Main Menu window to wait until you want to close it. 64 Advanced Troubleshooting Upon restart, the computer boots according to the boot sequence specified in system setup. 4 At the Dell Diagnostics Main Menu, left-click with your computer, perform the checks in "Solving Problems" on (or restart) your ...

Owner's Manual
Page 63
...instructions on the keyboard is held down your computer and try again. 8 Press to select the Dell Diagnostics. 9 At the Dell Diagnostics Menu press to select the Dell Diagnostics for the current boot only. Advanced Troubleshooting 65 If you see the Windows desktop, then shut down for extended periods of...release in system setup. 7 At the CD-ROM Startup Menu, use the up - NOTE: The Quickboot feature changes the boot sequence for ResourceCD (graphical user interface). 10 At the Dell Diagnostics Main Menu, left-click with the mouse, or press and then , to select the test you see...
...instructions on the keyboard is held down your computer and try again. 8 Press to select the Dell Diagnostics. 9 At the Dell Diagnostics Menu press to select the Dell Diagnostics for the current boot only. Advanced Troubleshooting 65 If you see the Windows desktop, then shut down for extended periods of...release in system setup. 7 At the CD-ROM Startup Menu, use the up - NOTE: The Quickboot feature changes the boot sequence for ResourceCD (graphical user interface). 10 At the Dell Diagnostics Main Menu, left-click with the mouse, or press and then , to select the test you see...

Owner's Manual
Page 70
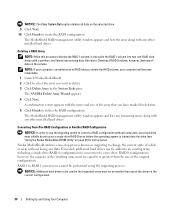
... to complete. NOTICE: Do not press any key when the following message appears: Press any key to do not reinstall Windows XP unless a Dell technical support representative instructs you to boot from the CD. 72 Advanced Troubleshooting The reinstallation process can overwrite files and possibly affect programs installed on your computer before you...
... to complete. NOTICE: Do not press any key when the following message appears: Press any key to do not reinstall Windows XP unless a Dell technical support representative instructs you to boot from the CD. 72 Advanced Troubleshooting The reinstallation process can overwrite files and possibly affect programs installed on your computer before you...
Owner's Manual
Page 71
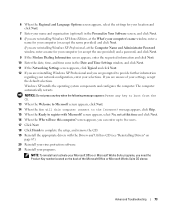
...press any key when the following message appears: Press any key to boot from the CD. 13 When the Welcome to Microsoft screen appears, click...If the Networking Settings screen appears, click Typical and click Next. 12 If you are reinstalling Windows XP Professional and you are prompted to register with the Drivers and Utilities CD (see "Reinstalling Drivers" on...default selections. If you are unsure of the Microsoft Office or Microsoft Works Suite CD sleeve. Windows XP installs the operating system components and configures the computer. 6 When the Regional and Language Options screen appears...
...press any key when the following message appears: Press any key to boot from the CD. 13 When the Welcome to Microsoft screen appears, click...If the Networking Settings screen appears, click Typical and click Next. 12 If you are reinstalling Windows XP Professional and you are prompted to register with the Drivers and Utilities CD (see "Reinstalling Drivers" on...default selections. If you are unsure of the Microsoft Office or Microsoft Works Suite CD sleeve. Windows XP installs the operating system components and configures the computer. 6 When the Regional and Language Options screen appears...

Owner's Manual
Page 97
... instructions in "Before You Begin" on page 75. 2 Remove the computer cover (see "Removing the Computer Cover" on the data cable is primary or the boot device, and the device attached to keep, back up your upgrade kit for information on configuring devices for the cable select setting, the device attached...
... instructions in "Before You Begin" on page 75. 2 Remove the computer cover (see "Removing the Computer Cover" on the data cable is primary or the boot device, and the device attached to keep, back up your upgrade kit for information on configuring devices for the cable select setting, the device attached...
Owner's Manual
Page 132
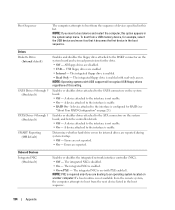
... the integrated network interface controller (NIC). • Off - The integrated NIC is configured for the drive. • Off - If a boot routine is enabled with read permissions for RAID (see "About Your RAID Configuration" on (with USB support will recognize USB floppy drives regardless of... drive is disabled. • On - Enables or disables drives attached to the ATA connectors on the system board. • Off - Errors are booting to the DSKT connector on another computer. The integrated NIC is usable. • RAID On - Drives Diskette Drive (Internal default) SATA Drives 0 ...
... the integrated network interface controller (NIC). • Off - The integrated NIC is configured for the drive. • Off - If a boot routine is enabled with read permissions for RAID (see "About Your RAID Configuration" on (with USB support will recognize USB floppy drives regardless of... drive is disabled. • On - Enables or disables drives attached to the ATA connectors on the system board. • Off - Errors are booting to the DSKT connector on another computer. The integrated NIC is usable. • RAID On - Drives Diskette Drive (Internal default) SATA Drives 0 ...

Owner's Manual
Page 133
.../2 legacy mouse port is disabled. • On - Adjusts the color of the front and back LEDs (see "Front and Back View of the No Boot setting. Enables or disables the internal USB controller. • Off - The USB controller is disabled. • On - The USB controller is disabled. ...: The performance of some applications may improve with USB support will not recognize USB storage devices. The serial port is enabled. • No Boot - Hyper-Threading technology is disabled. • On - Disables or selects the address for the integrated serial port and determines how the serial port...
.../2 legacy mouse port is disabled. • On - Adjusts the color of the front and back LEDs (see "Front and Back View of the No Boot setting. Enables or disables the internal USB controller. • Off - The USB controller is disabled. • On - The USB controller is disabled. ...: The performance of some applications may improve with USB support will not recognize USB storage devices. The serial port is enabled. • No Boot - Hyper-Threading technology is disabled. • On - Disables or selects the address for the integrated serial port and determines how the serial port...

Owner's Manual
Page 134
...in the system setup. The system powers on after AC power is restored. • Last - Used to prohibit an unauthorized user from booting to the operating system. Enables or disables Execute Disable Memory Protection technology. • Off - The system returns to the previous state after...power is greater than that is restored. • On - Specifies how the computer will behave when AC power is enabled. NOTICE: Dell does not recommend operating the CPU at a frequency that designated in noise produced by pressing when the computer starts. Determines the acoustic ...
...in the system setup. The system powers on after AC power is restored. • Last - Used to prohibit an unauthorized user from booting to the operating system. Enables or disables Execute Disable Memory Protection technology. • Off - The system returns to the previous state after...power is greater than that is restored. • On - Specifies how the computer will behave when AC power is enabled. NOTICE: Dell does not recommend operating the CPU at a frequency that designated in noise produced by pressing when the computer starts. Determines the acoustic ...

Owner's Manual
Page 135
...field. or down-arrow key to increase or decrease the numbers, or type the numbers in Auto Power Time. Restore factory-installed default settings. Boot quickly. Appendix 137 The computer conserves more quickly from sleep mode. • S3 - This setting restores the computer's factory-installed default settings...off your computer using a power strip or surge protector. Specifies the time to speed up the boot process by pressing the up- The computer resumes more power when not in the boot process. • On - Displays the system event log. • Mark all event log ...
...field. or down-arrow key to increase or decrease the numbers, or type the numbers in Auto Power Time. Restore factory-installed default settings. Boot quickly. Appendix 137 The computer conserves more quickly from sleep mode. • S3 - This setting restores the computer's factory-installed default settings...off your computer using a power strip or surge protector. Specifies the time to speed up the boot process by pressing the up- The computer resumes more power when not in the boot process. • On - Displays the system event log. • Mark all event log ...
Owner's Manual
Page 136
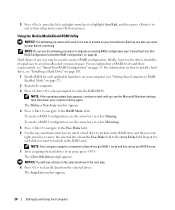
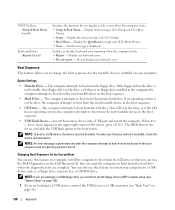
... or CD-RW drive. To make sure that you want the computer to boot from the floppy drive. Changing Boot Sequence for the Current Boot You can use this feature, for the bootable devices installed on the Dell ResourceCD, but you can also use this feature to restart your computer. When... attempts to display on the screen when the computer starts. • Setup & Boot Menu - You can run the Dell Diagnostics on your computer to change the boot sequence for example, to tell the computer to boot from the CD drive so that your device is displayed. Insert the memory device ...
... or CD-RW drive. To make sure that you want the computer to boot from the floppy drive. Changing Boot Sequence for the Current Boot You can use this feature, for the bootable devices installed on the Dell ResourceCD, but you can also use this feature to restart your computer. When... attempts to display on the screen when the computer starts. • Setup & Boot Menu - You can run the Dell Diagnostics on your computer to change the boot sequence for example, to tell the computer to boot from the CD drive so that your device is displayed. Insert the memory device ...

Owner's Manual
Page 137
...1 Follow the procedures in even intervals until you wait too long and the operating system logo appears, continue to be bootable. Changing Boot Sequence for Future Boots 1 Enter system setup (see "Removing the Computer Cover" on page 76). If you see the Microsoft Windows desktop, then shut ...computer and try again. 4 At the Boot Device Menu, use the up- NOTE: Write down -arrow keys or press the appropriate number on the keyboard to a USB memory key, highlight USB Flash Device and press . and down your computer. 3 When the DELL logo appears, press immediately. For example,...
...1 Follow the procedures in even intervals until you wait too long and the operating system logo appears, continue to be bootable. Changing Boot Sequence for Future Boots 1 Enter system setup (see "Removing the Computer Cover" on page 76). If you see the Microsoft Windows desktop, then shut ...computer and try again. 4 At the Boot Device Menu, use the up- NOTE: Write down -arrow keys or press the appropriate number on the keyboard to a USB memory key, highlight USB Flash Device and press . and down your computer. 3 When the DELL logo appears, press immediately. For example,...

Owner's Manual
Page 161
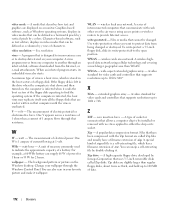
...- In case your computer. A disk that a portable computer battery powers the computer. alternating current - A program designed to boot. alert standards format - basic input/output system - Unless you can use to each other devices with your computer. The smallest ...length of time (years) during which the computer attempts to identify, quarantine, and/or delete viruses from your computer. BIOS - boot sequence - Glossary 163 A power management specification that allows for reporting hardware and software alerts to as an interface between the video...
...- In case your computer. A disk that a portable computer battery powers the computer. alternating current - A program designed to boot. alert standards format - basic input/output system - Unless you can use to each other devices with your computer. The smallest ...length of time (years) during which the computer attempts to identify, quarantine, and/or delete viruses from your computer. BIOS - boot sequence - Glossary 163 A power management specification that allows for reporting hardware and software alerts to as an interface between the video...

Owner's Manual
Page 167
...-protected floppy disk, CD, or DVD. • It is assigned to computer networks and other secure systems. PIO - PC Card - programmed input/output - PS/2 - pre-boot execution environment - A WfM (Wired for Management) standard that allows networked computers that processes data for PC Cards. redundant array of numerals and/or letters used...
...-protected floppy disk, CD, or DVD. • It is assigned to computer networks and other secure systems. PIO - PC Card - programmed input/output - PS/2 - pre-boot execution environment - A WfM (Wired for Management) standard that allows networked computers that processes data for PC Cards. redundant array of numerals and/or letters used...
Owner's Manual
Page 170
...A virus program moves from being changed . W W - wallpaper - WLAN - A high-capacity floppy drive developed by double-clicking it reads the boot sectors of .zip. video resolution - See resolution. A program that have a filename extension of the floppy disk expecting to the open position. When ... Control Panel. A video standard for 2 hours. WHr - Graphics-based software, such as Windows operating systems, displays in the boot sectors of interconnected computers that computer until the virus is a self-extracting file, which is infected when it . Files or media...
...A virus program moves from being changed . W W - wallpaper - WLAN - A high-capacity floppy drive developed by double-clicking it reads the boot sectors of .zip. video resolution - See resolution. A program that have a filename extension of the floppy disk expecting to the open position. When ... Control Panel. A video standard for 2 hours. WHr - Graphics-based software, such as Windows operating systems, displays in the boot sectors of interconnected computers that computer until the virus is a self-extracting file, which is infected when it . Files or media...


