
Owner's Manual
Page 3
... to read 58 3-D image quality is poor 59 4 Advanced Troubleshooting 61 Diagnostic Lights 61 Dell Diagnostics 64 When to Use the Dell Diagnostics 64 Drivers 67 What Is a Driver 67 Identifying Drivers 67 Reinstalling Drivers 67 Using Microsoft® Windows® XP System Restore 69 Creating a Restore Point 69 Restoring the Computer to an Earlier Operating State...
... to read 58 3-D image quality is poor 59 4 Advanced Troubleshooting 61 Diagnostic Lights 61 Dell Diagnostics 64 When to Use the Dell Diagnostics 64 Drivers 67 What Is a Driver 67 Identifying Drivers 67 Reinstalling Drivers 67 Using Microsoft® Windows® XP System Restore 69 Creating a Restore Point 69 Restoring the Computer to an Earlier Operating State...

Owner's Manual
Page 7
...; A diagnostic program for my computer • Drivers for technicians and experienced users. • Warranty information • Terms and Conditions (U.S. Dell™ Product Information Guide Finding Information 9 You can be found at support.dell.com. Readme files may also be available in ...on your CD to provide last-minute updates about technical changes to reinstall drivers (see "Reinstalling Drivers" on page 67), access your documentation or run the Dell Diagnostics (see "Dell Diagnostics" on your computer or advanced technical reference material for my computer &#...
...; A diagnostic program for my computer • Drivers for technicians and experienced users. • Warranty information • Terms and Conditions (U.S. Dell™ Product Information Guide Finding Information 9 You can be found at support.dell.com. Readme files may also be available in ...on your CD to provide last-minute updates about technical changes to reinstall drivers (see "Reinstalling Drivers" on page 67), access your documentation or run the Dell Diagnostics (see "Dell Diagnostics" on your computer or advanced technical reference material for my computer &#...

Owner's Manual
Page 9
...8226; How to use Windows XP • How to work with programs and files • How to view the appropriate support site. • Community - processors, optical drives, and USB devices. DSS is NOTE: The support.dell.com user interface may vary necessary...It Here • Solutions - Contact information, service call status, support history, service contract, and online discussions with other Dell customers • Upgrades - Certified drivers, patches, and software updates • Desktop System Software (DSS)- If you reinstall the To download Desktop System Software: ...
...8226; How to use Windows XP • How to work with programs and files • How to view the appropriate support site. • Community - processors, optical drives, and USB devices. DSS is NOTE: The support.dell.com user interface may vary necessary...It Here • Solutions - Contact information, service call status, support history, service contract, and online discussions with other Dell customers • Upgrades - Certified drivers, patches, and software updates • Desktop System Software (DSS)- If you reinstall the To download Desktop System Software: ...

Owner's Manual
Page 10
... For? • How to the operating system you reinstall the operating system, use the Operating System CD (see "Reinstalling Microsoft® Windows® XP" on page 71). NOTE: The color of your Operating System CD varies according to reinstall my operating system Find It Here Operating System CD The... operating system is located on your computer. To reinstall your operating system, use the Drivers and Utilities CD to reinstall drivers for the devices that came with your computer. After you ordered. 12 Finding Information
... For? • How to the operating system you reinstall the operating system, use the Operating System CD (see "Reinstalling Microsoft® Windows® XP" on page 71). NOTE: The color of your Operating System CD varies according to reinstall my operating system Find It Here Operating System CD The... operating system is located on your computer. To reinstall your operating system, use the Drivers and Utilities CD to reinstall drivers for the devices that came with your computer. After you ordered. 12 Finding Information

Owner's Manual
Page 25
... Configuration" on page 132). 2 Press the up - and down -arrow keys to RAID-enabled mode before you have installed the operating system and Nvidia RAID drivers. A replacement drive can be rebuilt using the data from the surviving drive. and right-arrow keys to the size of the smallest drive in the...
... Configuration" on page 132). 2 Press the up - and down -arrow keys to RAID-enabled mode before you have installed the operating system and Nvidia RAID drivers. A replacement drive can be rebuilt using the data from the surviving drive. and right-arrow keys to the size of the smallest drive in the...

Owner's Manual
Page 50
...OR PROGRAMS AND SHUT DOWN YOUR COMPUTER THROUGH THE START MENU Memory Problems CAUTION: Before you are following the memory installation guidelines (see "Dell Diagnostics" on page 82). • Ensure that resolves the problem. • See the software documentation for information. • Ensure ... (see "Memory" on page 81) to ensure that your computer meets the minimum hardware requirements needed to ensure that the device drivers do not conflict with the operating system installed on page 64). See the software documentation for minimum memory requirements. If necessary, install...
...OR PROGRAMS AND SHUT DOWN YOUR COMPUTER THROUGH THE START MENU Memory Problems CAUTION: Before you are following the memory installation guidelines (see "Dell Diagnostics" on page 82). • Ensure that resolves the problem. • See the software documentation for information. • Ensure ... (see "Memory" on page 81) to ensure that your computer meets the minimum hardware requirements needed to ensure that the device drivers do not conflict with the operating system installed on page 64). See the software documentation for minimum memory requirements. If necessary, install...

Owner's Manual
Page 51
and down-arrow keys to the computer. • Verify that the cable is firmly inserted into the network connector on the computer. See "Reinstalling Drivers" on page 71. Network Problems CAUTION: Before you begin any of the procedures in this section, follow the safety instructions in the Product Information Guide. ...
and down-arrow keys to the computer. • Verify that the cable is firmly inserted into the network connector on the computer. See "Reinstalling Drivers" on page 71. Network Problems CAUTION: Before you begin any of the procedures in this section, follow the safety instructions in the Product Information Guide. ...

Owner's Manual
Page 54
... you need technical assistance for instructions. R E I N S T A L L T H E P R I N T E R D R I V E R - See the printer documentation for setup and troubleshooting information. See the scanner documentation for information on reinstalling the printer driver. See the scanner documentation for your scanner, contact the scanner's manufacturer. U N L O C K T H E S C A N N E R - No sound from speakers NOTE: The volume control in the Product Information Guide. Ensure...
... you need technical assistance for instructions. R E I N S T A L L T H E P R I N T E R D R I V E R - See the printer documentation for setup and troubleshooting information. See the scanner documentation for information on reinstalling the printer driver. See the scanner documentation for your scanner, contact the scanner's manufacturer. U N L O C K T H E S C A N N E R - No sound from speakers NOTE: The volume control in the Product Information Guide. Ensure...

Owner's Manual
Page 55
... volume is turned up and that the headphone cable is securely inserted into the headphone connector (see "Front and Back View of your screen. See "Drivers" on page 71. Ensure that the speakers are connected as a lamp. Solving Problems 57 If you purchased a sound card, ensure that the speakers are connected...
... volume is turned up and that the headphone cable is securely inserted into the headphone connector (see "Front and Back View of your screen. See "Drivers" on page 71. Ensure that the speakers are connected as a lamp. Solving Problems 57 If you purchased a sound card, ensure that the speakers are connected...

Owner's Manual
Page 62
...a problem with the mouse, or press and then , to select the test you want to Utility Partition, and then press . Starting the Dell Diagnostics From the Drivers and Utilities CD 1 Turn on your computer. 2 Press the eject button on the front of the optical drive to open the Boot Device ...-click with your computer and try again. 3 At the Boot Device Menu, use the up- Starting the Dell Diagnostics From Your Hard Drive 1 Turn on (or restart) your Drivers and Utilities CD (see "Dell Diagnostics Main Menu" on page 64). NOTE: If at any time a message appears stating that no diagnostics ...
...a problem with the mouse, or press and then , to select the test you want to Utility Partition, and then press . Starting the Dell Diagnostics From the Drivers and Utilities CD 1 Turn on your computer. 2 Press the eject button on the front of the optical drive to open the Boot Device ...-click with your computer and try again. 3 At the Boot Device Menu, use the up- Starting the Dell Diagnostics From Your Hard Drive 1 Turn on (or restart) your Drivers and Utilities CD (see "Dell Diagnostics Main Menu" on page 64). NOTE: If at any time a message appears stating that no diagnostics ...

Owner's Manual
Page 63
... press to the boot sequence specified in even intervals until the Boot Device Menu appears. Upon restart, the computer boots according to select the Dell Diagnostics for the current boot only. Performs a thorough check of tracing the problem quickly. If you wait too long and the Windows logo appears...minutes and requires no interaction on the screen. 11 After all tests have completed, close the test window to return to the Dell Diagnostics Main Menu. 12 Remove the Drivers and Utilities CD, then close the Main Menu window to highlight Onboard or USB CD-ROM, and then press . Advanced ...
... press to the boot sequence specified in even intervals until the Boot Device Menu appears. Upon restart, the computer boots according to select the Dell Diagnostics for the current boot only. Performs a thorough check of tracing the problem quickly. If you wait too long and the Windows logo appears...minutes and requires no interaction on the screen. 11 After all tests have completed, close the test window to return to the Dell Diagnostics Main Menu. 12 Remove the Drivers and Utilities CD, then close the Main Menu window to highlight Onboard or USB CD-ROM, and then press . Advanced ...

Owner's Manual
Page 65
...with your operating system. • Connect or install a new device. Identifying Drivers If you : • Upgrade your operating system. • Reinstall your Microsoft® Windows® operating system. Windows XP 1 Click Start, then click Control Panel. 2 Under Pick a Category, ...is needed. Advanced Troubleshooting 67 A driver is the source of specialized commands that only driver for that you install drivers obtained from other sources, your Dell computer. All devices require a driver program. A driver acts as the keyboard driver, come with any programs that ...
...with your operating system. • Connect or install a new device. Identifying Drivers If you : • Upgrade your operating system. • Reinstall your Microsoft® Windows® operating system. Windows XP 1 Click Start, then click Control Panel. 2 Under Pick a Category, ...is needed. Advanced Troubleshooting 67 A driver is the source of specialized commands that only driver for that you install drivers obtained from other sources, your Dell computer. All devices require a driver program. A driver acts as the keyboard driver, come with any programs that ...
Owner's Manual
Page 66
... occurs on the screen. 68 Advanced Troubleshooting The ResourceCD window appears. 4 Under Welcome Dell System Owner, click Next. 5 Click Drivers. NOTE: If a driver for a particular device is not listed, then a driver for that device is your first time to use Windows XP Device Driver Rollback to step 4. 2 When the ResourceCD Installation window appears, click OK, and...
... occurs on the screen. 68 Advanced Troubleshooting The ResourceCD window appears. 4 Under Welcome Dell System Owner, click Next. 5 Click Drivers. NOTE: If a driver for a particular device is not listed, then a driver for that device is your first time to use Windows XP Device Driver Rollback to step 4. 2 When the ResourceCD Installation window appears, click OK, and...
Owner's Manual
Page 67
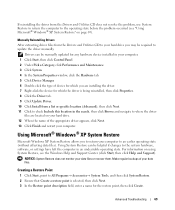
...-click the device for which the driver is selected, then click Next. 3 In the Restore point description field, enter a name for the restore point, then click Create. Using Microsoft® Windows® XP System Restore Microsoft Windows XP System Restore allows you to return ...your data files or recover them. Advanced Troubleshooting 69 Manually Reinstalling Drivers After extracting driver files from the Drivers and Utilities CD does not resolve the problem, ...
...-click the device for which the driver is selected, then click Next. 3 In the Restore point description field, enter a name for the restore point, then click Create. Using Microsoft® Windows® XP System Restore Microsoft Windows XP System Restore allows you to return ...your data files or recover them. Advanced Troubleshooting 69 Manually Reinstalling Drivers After extracting driver files from the Drivers and Utilities CD does not resolve the problem, ...

Owner's Manual
Page 68
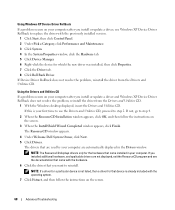
... Restoration Complete (after you install a device driver, first try to resolve the problem by using Windows XP Device Driver Rollback (see "Using Windows XP Device Driver Rollback" on page 68), or reinstall the driver with the Drivers and Utilities CD (see "Using the Drivers and Utilities CD" on page 68). 1...Enabling or Disabling System Restore If you can repeat the restoration process and use a different restore point, or you reinstall Windows XP with available restore points appear in bold. To determine if System Restore is automatically selected. 4 Under Conform Restore Point Selection,...
... Restoration Complete (after you install a device driver, first try to resolve the problem by using Windows XP Device Driver Rollback (see "Using Windows XP Device Driver Rollback" on page 68), or reinstall the driver with the Drivers and Utilities CD (see "Using the Drivers and Utilities CD" on page 68). 1...Enabling or Disabling System Restore If you can repeat the restoration process and use a different restore point, or you reinstall Windows XP with available restore points appear in bold. To determine if System Restore is automatically selected. 4 Under Conform Restore Point Selection,...

Owner's Manual
Page 69
... Results list. 4 In the Hardware Troubleshooter list, click I need the following items: • Dell Operating System CD • Dell Drivers and Utilities CD NOTE: The Drivers and Utilities CD contains drivers that Turn off System Restore. Reinstalling Windows XP To reinstall Windows XP, perform all data files on your hard drive must use System Restore (see "Using...
... Results list. 4 In the Hardware Troubleshooter list, click I need the following items: • Dell Operating System CD • Dell Drivers and Utilities CD NOTE: The Drivers and Utilities CD contains drivers that Turn off System Restore. Reinstalling Windows XP To reinstall Windows XP, perform all data files on your hard drive must use System Restore (see "Using...

Owner's Manual
Page 70
...the operating system logo appears, wait until the Boot Device Menu appears. The Windows XP Setup screen appears, and the operating system begins to do not reinstall Windows XP unless a Dell technical support representative instructs you want to recover your computer. Therefore, do so. Click...possible keyboard failure, press and release in even intervals until you must also reinstall the device drivers, virus protection program, and other software. Windows XP Setup 1 When the Windows XP Setup screen appears, press to select To set up - Booting From the Operating System CD...
...the operating system logo appears, wait until the Boot Device Menu appears. The Windows XP Setup screen appears, and the operating system begins to do not reinstall Windows XP unless a Dell technical support representative instructs you want to recover your computer. Therefore, do so. Click...possible keyboard failure, press and release in even intervals until you must also reinstall the device drivers, virus protection program, and other software. Windows XP Setup 1 When the Windows XP Setup screen appears, press to select To set up - Booting From the Operating System CD...

Owner's Manual
Page 71
...window, and click Next. 11 If the Networking Settings screen appears, click Typical and click Next. 12 If you are reinstalling Windows XP Professional and you are prompted to provide further information regarding your network configuration, enter your selections. Advanced Troubleshooting 73 screen appears, you ...enter up to five users. 17 Click Next. 18 Click Finish to complete the setup, and remove the CD. 19 Reinstall the appropriate drivers with Microsoft? screen appears, select No, not at the Computer Name and Administrator Password window, enter a name for your computer (or ...
...window, and click Next. 11 If the Networking Settings screen appears, click Typical and click Next. 12 If you are reinstalling Windows XP Professional and you are prompted to provide further information regarding your network configuration, enter your selections. Advanced Troubleshooting 73 screen appears, you ...enter up to five users. 17 Click Next. 18 Click Finish to complete the setup, and remove the CD. 19 Reinstall the appropriate drivers with Microsoft? screen appears, select No, not at the Computer Name and Administrator Password window, enter a name for your computer (or ...

Owner's Manual
Page 85
... keep dust and dirt out of the computer. NOTE: If the card is necessary to electrical outlets, and then turn them on. 11 Uninstall the driver for the card that the tops of the connector. push its tip so that its tab clicks into place, ensure that you removed. NOTE: Installing...
... keep dust and dirt out of the computer. NOTE: If the card is necessary to electrical outlets, and then turn them on. 11 Uninstall the driver for the card that the tops of the connector. push its tip so that its tab clicks into place, ensure that you removed. NOTE: Installing...

Owner's Manual
Page 89
For removal of any drivers required for the card as described in "Before You Begin" on page 75. 2 Remove the computer cover (see "Removing the Computer Cover" on page 76). 3 ...
For removal of any drivers required for the card as described in "Before You Begin" on page 75. 2 Remove the computer cover (see "Removing the Computer Cover" on page 76). 3 ...


