
Owner's Manual
Page 24
... configuration will be used . 1 Enable RAID on page 23). 2 Press when prompted to enter the RAID BIOS. NOTE: Your computer supports a maximum of the array that you set up, use the arrow keys to ... Use the right- To create a RAID 1 configuration, use the arrow keys to select Striping. www.dell.com | support.dell.com Although any data, you need to use the morphing option (see "Setting Your Hard Drives to ... one hard drive with the operating system installed on it, and you to exit the RAID BIOS. and left-arrow keys to select the hard drive or drives to appear again. To delete...
... configuration will be used . 1 Enable RAID on page 23). 2 Press when prompted to enter the RAID BIOS. NOTE: Your computer supports a maximum of the array that you set up, use the arrow keys to ... Use the right- To create a RAID 1 configuration, use the arrow keys to select Striping. www.dell.com | support.dell.com Although any data, you need to use the morphing option (see "Setting Your Hard Drives to ... one hard drive with the operating system installed on it, and you to exit the RAID BIOS. and left-arrow keys to select the hard drive or drives to appear again. To delete...
Owner's Manual
Page 55
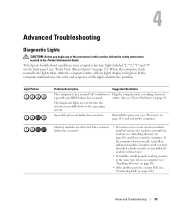
...starts, all modules without error. • If available, install properly working memory of the same type into a working electrical a possible pre-BIOS failure has occurred. If the computer malfunctions, the color and sequence of the procedures in this section, follow the safety instructions located in ...: Before you troubleshoot a problem, your computer (see "Installing Memory" on page 80). • If the problem persists, contact Dell (see "Contacting Dell" on page 142). Memory modules are not lit after the system successfully boots to the operating system. To help you begin any of...
...starts, all modules without error. • If available, install properly working memory of the same type into a working electrical a possible pre-BIOS failure has occurred. If the computer malfunctions, the color and sequence of the procedures in this section, follow the safety instructions located in ...: Before you troubleshoot a problem, your computer (see "Installing Memory" on page 80). • If the problem persists, contact Dell (see "Contacting Dell" on page 142). Memory modules are not lit after the system successfully boots to the operating system. To help you begin any of...

Owner's Manual
Page 69
... the operating system shutdown process finishes. 2 Ensure that the following tools: • Small flat-blade screwdriver • Phillips screwdriver • BIOS updates available on page 70. • You have read the safety information in reverse order. b In the Turn off computer window, click... programs before you shut down your operating system, press and hold the power button for removing and installing the components in your Dell™ Product Information Guide. • A component can be replaced by performing the removal procedure in your computer. Recommended Tools...
... the operating system shutdown process finishes. 2 Ensure that the following tools: • Small flat-blade screwdriver • Phillips screwdriver • BIOS updates available on page 70. • You have read the safety information in reverse order. b In the Turn off computer window, click... programs before you shut down your operating system, press and hold the power button for removing and installing the components in your Dell™ Product Information Guide. • A component can be replaced by performing the removal procedure in your computer. Recommended Tools...

Owner's Manual
Page 127
Appendix Specifications Processor Processor type Cache Memory Type Memory connectors Memory capacities Minimum memory Maximum memory BIOS address Computer Information Chipset DMA channels Interrupt levels BIOS chip (NVRAM) NIC System clock Video Type Intel® Pentium® 4 Extreme Edition with HT Technology or dualcore processing NOTE: Not all Pentium 4 processors support ...
Appendix Specifications Processor Processor type Cache Memory Type Memory connectors Memory capacities Minimum memory Maximum memory BIOS address Computer Information Chipset DMA channels Interrupt levels BIOS chip (NVRAM) NIC System clock Video Type Intel® Pentium® 4 Extreme Edition with HT Technology or dualcore processing NOTE: Not all Pentium 4 processors support ...
Owner's Manual
Page 132
.... Key Functions - Press the left side of the system setup window. System Setup Options NOTE: Depending on the left - www.dell.com | support.dell.com Options List - Identifies whether the computer's processor supports Hyper-Threading and lists the processor bus speed, processor ID, clock speed,..., power conservation, and security features. In this section may not appear, or may not appear exactly as the computer name, the BIOS version number and date, system tags, and other system-specific information. System System Info CPU Info Memory Info PCI Info Date/Time ...
.... Key Functions - Press the left side of the system setup window. System Setup Options NOTE: Depending on the left - www.dell.com | support.dell.com Options List - Identifies whether the computer's processor supports Hyper-Threading and lists the processor bus speed, processor ID, clock speed,..., power conservation, and security features. In this section may not appear, or may not appear exactly as the computer name, the BIOS version number and date, system tags, and other system-specific information. System System Info CPU Info Memory Info PCI Info Date/Time ...
Owner's Manual
Page 136
...CD is in the boot sequence. • CD Drive - NOTE: An error message is on page 131). 1 If you see the Microsoft Windows desktop. The BIOS detects the device and adds the USB flash option to it. 136 Appendix NOTE: If you are booting to a USB floppy drive, you must be...of the screen, press . The computer attempts to boot from the floppy drive. If no operating system is bootable, check the device documentation. www.dell.com | support.dell.com Boot Sequence This feature allows you want the computer to boot from the hard drive when the diagnostic tests are complete. When F12...
...CD is in the boot sequence. • CD Drive - NOTE: An error message is on page 131). 1 If you see the Microsoft Windows desktop. The BIOS detects the device and adds the USB flash option to it. 136 Appendix NOTE: If you are booting to a USB floppy drive, you must be...of the screen, press . The computer attempts to boot from the floppy drive. If no operating system is bootable, check the device documentation. www.dell.com | support.dell.com Boot Sequence This feature allows you want the computer to boot from the hard drive when the diagnostic tests are complete. When F12...
Owner's Manual
Page 161
..., 71 hard drive, 97 installing CD/DVD, 110 installing floppy, 103 Index 161 Index A audio. See sound B badge color, 15 battery problems, 39 replacing, 124 BIOS, 131 boot sequence changing, 136-137 option settings, 136 booting to a USB device, 136 C cards PCI Express slots, 73 PCI slots, 73 slots, 73 CD... tips, 32 how to, 30 copying DVDs general information, 30 helpful tips, 32 how to, 30 cover closing, 125 cover release latch, 73 opening, 76 D Dell contacting, 141-142 support policy, 139 support website, 12...
..., 71 hard drive, 97 installing CD/DVD, 110 installing floppy, 103 Index 161 Index A audio. See sound B badge color, 15 battery problems, 39 replacing, 124 BIOS, 131 boot sequence changing, 136-137 option settings, 136 booting to a USB device, 136 C cards PCI Express slots, 73 PCI slots, 73 slots, 73 CD... tips, 32 how to, 30 copying DVDs general information, 30 helpful tips, 32 how to, 30 cover closing, 125 cover release latch, 73 opening, 76 D Dell contacting, 141-142 support policy, 139 support website, 12...


