
Owner's Manual
Page 3
... Up and Using Your Computer Opening the Drive Door 15 Changing the Front-Panel Light Color 15 Using a Media Card Reader (Optional 17 Connecting Monitors 18 Connecting a Monitor to a PCI Express Graphics Card Dual Configuration 18 Connecting Two Monitors 18 Connecting a TV 20 Changing the Display Settings to Support Two Monitors 20 About Serial ATA Drives 21 About Your RAID Configuration 21 RAID Level 0 Configuration 21 RAID Level 1 Configuration 22 Configuring Your Hard Drives for RAID 23 Creating an Array using the Nvidia MediaShield ROM Utility 23 Using Nvidia MediaShield...
... Up and Using Your Computer Opening the Drive Door 15 Changing the Front-Panel Light Color 15 Using a Media Card Reader (Optional 17 Connecting Monitors 18 Connecting a Monitor to a PCI Express Graphics Card Dual Configuration 18 Connecting Two Monitors 18 Connecting a TV 20 Changing the Display Settings to Support Two Monitors 20 About Serial ATA Drives 21 About Your RAID Configuration 21 RAID Level 0 Configuration 21 RAID Level 1 Configuration 22 Configuring Your Hard Drives for RAID 23 Creating an Array using the Nvidia MediaShield ROM Utility 23 Using Nvidia MediaShield...
Owner's Manual
Page 6
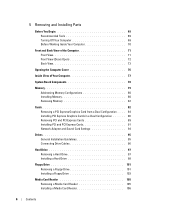
... the Computer Cover 76 Inside View of Your Computer 77 System Board Components 78 Memory 79 Addressing Memory Configurations 80 Installing Memory 80 Removing Memory 82 Cards 82 Removing a PCI Express Graphics Card from a Dual Configuration . . . . 84 Installing PCI Express Graphics Cards in a Dual Configuration 86 Removing PCI and PCI Express Cards 89 Installing PCI and PCI Express Cards 91 Network Adapter and Sound Card Settings 94 Drives 95 General Installation Guidelines 95 Connecting Drive Cables 96 Hard Drive 97 Removing a Hard Drive 97 Installing a Hard Drive 98 Floppy...
... the Computer Cover 76 Inside View of Your Computer 77 System Board Components 78 Memory 79 Addressing Memory Configurations 80 Installing Memory 80 Removing Memory 82 Cards 82 Removing a PCI Express Graphics Card from a Dual Configuration . . . . 84 Installing PCI Express Graphics Cards in a Dual Configuration 86 Removing PCI and PCI Express Cards 89 Installing PCI and PCI Express Cards 91 Network Adapter and Sound Card Settings 94 Drives 95 General Installation Guidelines 95 Connecting Drive Cables 96 Hard Drive 97 Removing a Hard Drive 97 Installing a Hard Drive 98 Floppy...
Owner's Manual
Page 12
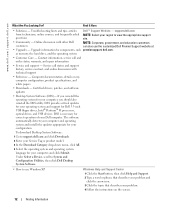
... language for Dell 3.5-inch USB floppy drives, Intel® Pentium® M processors, optical drives, and USB devices. Under Select a Device, scroll to System and Configuration Utilities, then click Dell Desktop System Software. • How to support.dell.com and click Downloads. 2 Enter your computer and operating system and installs the updates appropriate for components, such premier.support. Online discussion with technical support • Reference - Upgrade information for your problem. 4 Follow the instructions on my computer configuration, product specifications, and...
... language for Dell 3.5-inch USB floppy drives, Intel® Pentium® M processors, optical drives, and USB devices. Under Select a Device, scroll to System and Configuration Utilities, then click Dell Desktop System Software. • How to support.dell.com and click Downloads. 2 Enter your computer and operating system and installs the updates appropriate for components, such premier.support. Online discussion with technical support • Reference - Upgrade information for your problem. 4 Follow the instructions on my computer configuration, product specifications, and...

Owner's Manual
Page 19
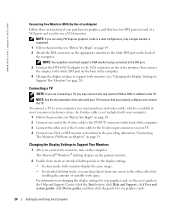
... these instructions if you are connecting two monitors with DVI connectors to the two optional DVI ports on your computer, or if you are using PCI Express graphics cards in a dual configuration, only a single monitor is supported. 1 Follow the procedures in "Connecting Two Monitors (With the Use of an Adapter)" on your computer. If your monitor has a DVI connector, use the (optional) blue VGA port on page 20. NOTE: If you are connecting one monitor with a VGA connector...
... these instructions if you are connecting two monitors with DVI connectors to the two optional DVI ports on your computer, or if you are using PCI Express graphics cards in a dual configuration, only a single monitor is supported. 1 Follow the procedures in "Connecting Two Monitors (With the Use of an Adapter)" on your computer. If your monitor has a DVI connector, use the (optional) blue VGA port on page 20. NOTE: If you are connecting one monitor with a VGA connector...
Owner's Manual
Page 20
... Support Center (click the Start button, click Help and Support, click User and system guides, click Device guides, and then click the guide for your TV. 4 Connect one VGA or DVI monitor as described in the preceding subsection, "Connecting Two Monitors (Without an Adapter)" on the back of viewable work space. Connecting a TV NOTE: If you are using PCI Express graphics cards in addition to use a VGA monitor. NOTE: Your graphics card must purchase an S-video cable, which is supported...
... Support Center (click the Start button, click Help and Support, click User and system guides, click Device guides, and then click the guide for your TV. 4 Connect one VGA or DVI monitor as described in the preceding subsection, "Connecting Two Monitors (Without an Adapter)" on the back of viewable work space. Connecting a TV NOTE: If you are using PCI Express graphics cards in addition to use a VGA monitor. NOTE: Your graphics card must purchase an S-video cable, which is supported...

Owner's Manual
Page 30
... cannot be copied using too much memory and preventing DVD playback, adjust the display properties. 1 Click the Start button and click Control Panel. 2 Under Pick a category, click Appearance and Themes. 3 Under Pick a task..., click Change the screen resolution. 4 In the Display Properties window, click and drag the bar in Screen resolution to change the setting to 800 by country. The DVD-writable drives installed in Dell computers can also...
... cannot be copied using too much memory and preventing DVD playback, adjust the display properties. 1 Click the Start button and click Control Panel. 2 Under Pick a category, click Appearance and Themes. 3 Under Pick a task..., click Change the screen resolution. 4 In the Display Properties window, click and drag the bar in Screen resolution to change the setting to 800 by country. The DVD-writable drives installed in Dell computers can also...
Owner's Manual
Page 53
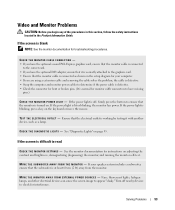
...M O V E T H E M O N I G H T S - Fans, fluorescent lights, halogen lamps, and other electrical devices can cause the screen image to appear "shaky." Turn off , firmly press the button to ensure that the monitor is turned on the setup diagram for monitor cable connectors to have missing pins.) C H E C K T H E M O N I T O R P O W E R L I N G S - If the power light is difficult to read C H E C K T H E M O N I T O R S E T T I G H T - Ensure that the electrical outlet is working by testing it is correctly attached to the graphics card. • Ensure that the monitor cable...
...M O V E T H E M O N I G H T S - Fans, fluorescent lights, halogen lamps, and other electrical devices can cause the screen image to appear "shaky." Turn off , firmly press the button to ensure that the monitor is turned on the setup diagram for monitor cable connectors to have missing pins.) C H E C K T H E M O N I T O R P O W E R L I N G S - If the power light is difficult to read C H E C K T H E M O N I T O R S E T T I G H T - Ensure that the electrical outlet is working by testing it is correctly attached to the graphics card. • Ensure that the monitor cable...
Owner's Manual
Page 61
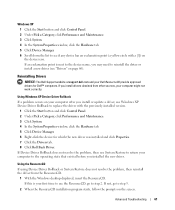
... problem, then use System Restore to return your first time to use Windows XP Device Driver Rollback to reinstall the driver or install a new driver (see if any device has an exclamation point (a yellow circle with the previously installed version. 1 Click the Start button and click Control Panel. 2 Under Pick a Category, click Performance and Maintenance. 3 Click System. 4 In the System Properties window, click the Hardware tab. 5 Click Device Manager. 6 Right-click the device for Dell...
... problem, then use System Restore to return your first time to use Windows XP Device Driver Rollback to reinstall the driver or install a new driver (see if any device has an exclamation point (a yellow circle with the previously installed version. 1 Click the Start button and click Control Panel. 2 Under Pick a Category, click Performance and Maintenance. 3 Click System. 4 In the System Properties window, click the Hardware tab. 5 Click Device Manager. 6 Right-click the device for Dell...

Owner's Manual
Page 62
...; Windows® XP System Restore The Microsoft® Windows® XP operating system provides System Restore to allow you see the Windows desktop, reinsert the ResourceCD. 5 At the Welcome Dell System Owner screen, click Next. NOTICE: Make regular backups of device for which you are not displayed, exit the ResourceCD program. If you installed additional hardware, the drivers for information on the screen. For drivers information, see "Windows Help and Support Center" on...
...; Windows® XP System Restore The Microsoft® Windows® XP operating system provides System Restore to allow you see the Windows desktop, reinsert the ResourceCD. 5 At the Welcome Dell System Owner screen, click Next. NOTICE: Make regular backups of device for which you are not displayed, exit the ResourceCD program. If you installed additional hardware, the drivers for information on the screen. For drivers information, see "Windows Help and Support Center" on...
Owner's Manual
Page 74
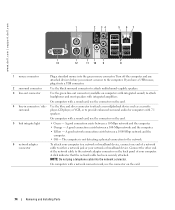
... attach headphones and most speakers with 7.1 speakers. On computers with a network connector card, use the connector on the card. 74 Removing and Installing Parts A good network connection exists between a 1000-Mbps network and the computer. • Off - Turn off the computer and any attached devices before you have a USB mouse, plug it into a USB connector. 2 surround connector Use the black surround connector to attach multichannel-capable speakers. 3 line-out connector Use the green line-out connector (available on computers...
... attach headphones and most speakers with 7.1 speakers. On computers with a network connector card, use the connector on the card. 74 Removing and Installing Parts A good network connection exists between a 1000-Mbps network and the computer. • Off - Turn off the computer and any attached devices before you have a USB mouse, plug it into a USB connector. 2 surround connector Use the black surround connector to attach multichannel-capable speakers. 3 line-out connector Use the green line-out connector (available on computers...
Owner's Manual
Page 78
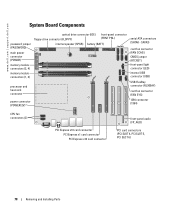
... connector (USB) USB FlexBay connector (FLEXBAY) card fan connector (FAN SYS) 1394 connector (1394) CPU fan connectors (2) PCI Express x16 card connector PCI Express x1 card connector PCI Express x16 card connector front-panel audio (FP_AUD) PCI card connectors (PCI SLOT 4, PCI SLOT 5, PCI SLOT 6) 78 Removing and Installing Parts www.dell.com | support.dell.com System Board Components password jumper (PASSWORD) main power connector (POWER) memory module connectors (2, 4) memory module connectors (1, 3) processor and heat-sink connector power connector (POWER12V) optical drive connector...
... connector (USB) USB FlexBay connector (FLEXBAY) card fan connector (FAN SYS) 1394 connector (1394) CPU fan connectors (2) PCI Express x16 card connector PCI Express x1 card connector PCI Express x16 card connector front-panel audio (FP_AUD) PCI card connectors (PCI SLOT 4, PCI SLOT 5, PCI SLOT 6) 78 Removing and Installing Parts www.dell.com | support.dell.com System Board Components password jumper (PASSWORD) main power connector (POWER) memory module connectors (2, 4) memory module connectors (1, 3) processor and heat-sink connector power connector (POWER12V) optical drive connector...
Owner's Manual
Page 89
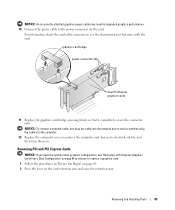
... degraded graphics performance. 10 Connect the power cable to electrical outlets, and then turn them on. Removing PCI and PCI Express Cards NOTICE: If you have the optional dual-graphics configuration, see the documentation that it completely covers the connector tabs. graphics card bridge power connectors (2) dual-PCI Express graphics cards 11 Replace the graphics card bridge, pressing firmly so that came with the card. Removing and Installing Parts 89 NOTICE: To connect a network cable, first plug the cable into the network port or device and then plug the cable...
... degraded graphics performance. 10 Connect the power cable to electrical outlets, and then turn them on. Removing PCI and PCI Express Cards NOTICE: If you have the optional dual-graphics configuration, see the documentation that it completely covers the connector tabs. graphics card bridge power connectors (2) dual-PCI Express graphics cards 11 Replace the graphics card bridge, pressing firmly so that came with the card. Removing and Installing Parts 89 NOTICE: To connect a network cable, first plug the cable into the network port or device and then plug the cable...
Owner's Manual
Page 91
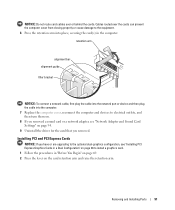
... Installing Parts 91 Installing PCI and PCI Express Cards NOTICE: If you have or are upgrading to the optional dual-graphics configuration, see "Network Adapter and Sound Card Settings" on page 94. 9 Uninstall the driver for the card that you removed a sound card or a network adapter, see "Installing PCI Express Graphics Cards in a Dual Configuration" on page 86 to install a graphics card. 1 Follow the procedures in the computer. retention arm alignment bar alignment guide filler bracket NOTICE: To connect a network cable, first plug the cable into the network port or device...
... Installing Parts 91 Installing PCI and PCI Express Cards NOTICE: If you have or are upgrading to the optional dual-graphics configuration, see "Network Adapter and Sound Card Settings" on page 94. 9 Uninstall the driver for the card that you removed a sound card or a network adapter, see "Installing PCI Express Graphics Cards in a Dual Configuration" on page 86 to install a graphics card. 1 Follow the procedures in the computer. retention arm alignment bar alignment guide filler bracket NOTICE: To connect a network cable, first plug the cable into the network port or device...
Owner's Manual
Page 94
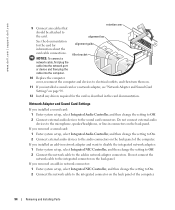
... the card cable connections. NOTICE: To connect a network cable, first plug the cable into the network port or device and then plug the cable into the computer. If you installed a sound card or a network adapter, see "Network Adapter and Sound Card Settings" on page 94. 12 Install any cables that should be attached to the microphone, speaker/headphone, or line-in connectors on the back panel. If you removed an add-in network adapter connectors. If you removed a sound card: 1 Enter system setup, select Integrated Audio Controller, and then change the setting...
... the card cable connections. NOTICE: To connect a network cable, first plug the cable into the network port or device and then plug the cable into the computer. If you installed a sound card or a network adapter, see "Network Adapter and Sound Card Settings" on page 94. 12 Install any cables that should be attached to the microphone, speaker/headphone, or line-in connectors on the back panel. If you removed an add-in network adapter connectors. If you removed a sound card: 1 Enter system setup, select Integrated Audio Controller, and then change the setting...
Owner's Manual
Page 132
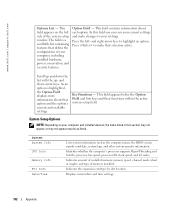
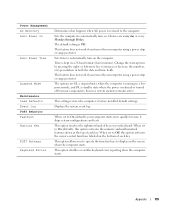
... the expansion card type by slot location. and right-arrow keys to make changes to your computer, including installed hardware, power conservation, and security features. This field appears below the Option Field and lists keys and their functions within the active system setup field. Displays current date and time settings. 132 Appendix www.dell.com | support.dell.com Options List - Indicates amount of installed memory, memory speed, channel mode (dual or single), and type of the system setup window. This...
... the expansion card type by slot location. and right-arrow keys to make changes to your computer, including installed hardware, power conservation, and security features. This field appears below the Option Field and lists keys and their functions within the active system setup field. Displays current date and time settings. 132 Appendix www.dell.com | support.dell.com Options List - Indicates amount of installed memory, memory speed, channel mode (dual or single), and type of the system setup window. This...
Owner's Manual
Page 135
... option disables or enables keyboard error reporting when the computer starts. Change the start-up time by pressing the right- This option allows you turn on your computer using a power strip or surge protector. Time is Off. Displays the system event log. When set to automatically turn off your keyboard. Appendix 135 This feature does not work if you turn on the bottom of each key. This setting restores the computer's factory-installed default settings. Sets...
... option disables or enables keyboard error reporting when the computer starts. Change the start-up time by pressing the right- This option allows you turn on your computer using a power strip or surge protector. Time is Off. Displays the system event log. When set to automatically turn off your keyboard. Appendix 135 This feature does not work if you turn on the bottom of each key. This setting restores the computer's factory-installed default settings. Sets...
Owner's Manual
Page 136
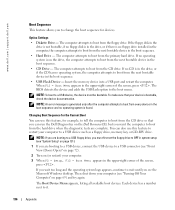
... to the boot menu. The BIOS detects the device and adds the USB flash option to boot from the primary hard drive. Changing Boot Sequence for the Current Boot You can run the Dell Diagnostics on (or restart) your device is found. Each device has a number next to boot from the CD drive so that your computer. 3 When F2 = Setup, F12 = Boot Menu appears in the upper-right corner of the screen, press . Option Settings • Diskette Drive - The...
... to the boot menu. The BIOS detects the device and adds the USB flash option to boot from the primary hard drive. Changing Boot Sequence for the Current Boot You can run the Dell Diagnostics on (or restart) your device is found. Each device has a number next to boot from the CD drive so that your computer. 3 When F2 = Setup, F12 = Boot Menu appears in the upper-right corner of the screen, press . Option Settings • Diskette Drive - The...
Owner's Manual
Page 161
... sound B badge color, 15 battery problems, 39 replacing, 124 BIOS, 131 boot sequence changing, 136-137 option settings, 136 booting to a USB device, 136 C cards PCI Express slots, 73 PCI slots, 73 slots, 73 CD operating system, 13 CD/DVD drive installing, 110 problems, 40 removing, 109 CD-RW drive problems, 41 CDs, 30 playing, 28 Check Disk, 41 CMOS settings clearing, 138 color changing, 15 computer components inside, 77 crashes, 45-46 inside view, 77 restore to previous state, 62 stops responding, 45 connectors...
... sound B badge color, 15 battery problems, 39 replacing, 124 BIOS, 131 boot sequence changing, 136-137 option settings, 136 booting to a USB device, 136 C cards PCI Express slots, 73 PCI slots, 73 slots, 73 CD operating system, 13 CD/DVD drive installing, 110 problems, 40 removing, 109 CD-RW drive problems, 41 CDs, 30 playing, 28 Check Disk, 41 CMOS settings clearing, 138 color changing, 15 computer components inside, 77 crashes, 45-46 inside view, 77 restore to previous state, 62 stops responding, 45 connectors...

Owner's Manual
Page 163
... connect VGA, 18-20 connecting, 18 connecting two, 19-20 display settings, 20 dual monitors, 18 extended desktop mode, 20 hard to read , 53 problems, 53 motherboard. See system board mouse problems, 47 N network Network Setup Wizard, 32 problems, 48 Network Setup Wizard, 32 newlink CreateArray, 25 O operating system CD, 13 reinstalling, 13 reinstalling Windows XP, 64 Operating System CD, 13 P password clearing, 137 jumper, 137 playing CDs, 28 playing DVDs, 28 power button, 71 connector, 73 conserving, 33 hibernate mode, 33, 35 managing, 33 options...
... connect VGA, 18-20 connecting, 18 connecting two, 19-20 display settings, 20 dual monitors, 18 extended desktop mode, 20 hard to read , 53 problems, 53 motherboard. See system board mouse problems, 47 N network Network Setup Wizard, 32 problems, 48 Network Setup Wizard, 32 newlink CreateArray, 25 O operating system CD, 13 reinstalling, 13 reinstalling Windows XP, 64 Operating System CD, 13 P password clearing, 137 jumper, 137 playing CDs, 28 playing DVDs, 28 power button, 71 connector, 73 conserving, 33 hibernate mode, 33, 35 managing, 33 options...
Owner's Manual
Page 164
... board, 78 system board components, 78 System Restore, 62 system setup, 131 entering, 131 options, 132 screens, 131 T technical support policy, 139 transferring information to a new computer, 28 troubleshooting Dell Diagnostics, 58 diagnostic lights, 55 Hardware Troubleshooter, 64 Help and Support Center, 12 restore to previous state, 62 tips, 39 TV connect to computer, 18 U USB booting to devices, 136 connectors, 72 V video problems, 53 volume adjusting, 52 164 Index problems (continued) video and monitor, 53 volume adjusting, 52 processor fans, 73 type...
... board, 78 system board components, 78 System Restore, 62 system setup, 131 entering, 131 options, 132 screens, 131 T technical support policy, 139 transferring information to a new computer, 28 troubleshooting Dell Diagnostics, 58 diagnostic lights, 55 Hardware Troubleshooter, 64 Help and Support Center, 12 restore to previous state, 62 tips, 39 TV connect to computer, 18 U USB booting to devices, 136 connectors, 72 V video problems, 53 volume adjusting, 52 164 Index problems (continued) video and monitor, 53 volume adjusting, 52 processor fans, 73 type...


