Owner's Manual
Page 12
... information, service call status and support history, service contract, and online discussions with other Dell NOTE: Corporate, government, and education customers customers can also use Windows XP Windows Help and Support Center 1 Click the Start button, then click Help and Support.... Software (DSS)- DSS is necessary for your region to use the customized Dell Premier Support website at • Upgrades - Under Select a Device, scroll to System and Configuration Utilities, then click Dell Desktop System Software. • How to view the appropriate support site. ...
... information, service call status and support history, service contract, and online discussions with other Dell NOTE: Corporate, government, and education customers customers can also use Windows XP Windows Help and Support Center 1 Click the Start button, then click Help and Support.... Software (DSS)- DSS is necessary for your region to use the customized Dell Premier Support website at • Upgrades - Under Select a Device, scroll to System and Configuration Utilities, then click Dell Desktop System Software. • How to view the appropriate support site. ...
Owner's Manual
Page 60
... between the device and any device, identify whether the driver is needed. Dell ships your computer to install drivers if you with any other programs that use the device. You may need to you : • Upgrade your operating system. • Reinstall your Microsoft® Windows® operating... or configuration is the source of all the components installed on your operating system. Ensure that only its driver recognizes. NOTICE: The Dell ResourceCD may not display the names of your computer. Displays your computer or all devices from the ResourceCD, remove the CD. 5 ...
... between the device and any device, identify whether the driver is needed. Dell ships your computer to install drivers if you with any other programs that use the device. You may need to you : • Upgrade your operating system. • Reinstall your Microsoft® Windows® operating... or configuration is the source of all the components installed on your operating system. Ensure that only its driver recognizes. NOTICE: The Dell ResourceCD may not display the names of your computer. Displays your computer or all devices from the ResourceCD, remove the CD. 5 ...
Owner's Manual
Page 80
...Product Information Guide. If you are using a 64-bit operating system, your original memory modules from the computer during a memory upgrade, keep them separate from Dell. NOTICE: To prevent static damage to components inside of the computer. 3 Press out the securing clip at each end of... memory. Installing Memory CAUTION: Before you are using a 32-bit operating system such as Microsoft® Windows® XP, your computer's ...
...Product Information Guide. If you are using a 64-bit operating system, your original memory modules from the computer during a memory upgrade, keep them separate from Dell. NOTICE: To prevent static damage to components inside of the computer. 3 Press out the securing clip at each end of... memory. Installing Memory CAUTION: Before you are using a 32-bit operating system such as Microsoft® Windows® XP, your computer's ...
Owner's Manual
Page 86
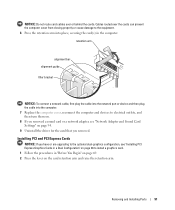
www.dell.com | support.dell.com NOTICE: To connect a network cable, first plug the cable into the network port or device and then plug the cable into the computer. 9 Replace the computer cover, reconnect the computer and devices to locate the PCI Express x1 card slot. To learn more about upgrading your system to...
www.dell.com | support.dell.com NOTICE: To connect a network cable, first plug the cable into the network port or device and then plug the cable into the computer. 9 Replace the computer cover, reconnect the computer and devices to locate the PCI Express x1 card slot. To learn more about upgrading your system to...

Owner's Manual
Page 87
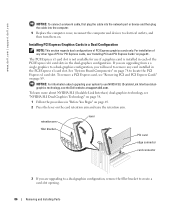
.... Press down firmly and ensure that you release the securing tab to a dual-graphics configuration and have a card installed in the connector. 4 If you are upgrading to seat the card.
.... Press down firmly and ensure that you release the securing tab to a dual-graphics configuration and have a card installed in the connector. 4 If you are upgrading to seat the card.
Owner's Manual
Page 91
... and devices to electrical outlets, and then turn them on. 8 If you removed. Installing PCI and PCI Express Cards NOTICE: If you have or are upgrading to the optional dual-graphics configuration, see "Network Adapter and Sound Card Settings" on page 94. 9 Uninstall the driver for the card that you removed...
... and devices to electrical outlets, and then turn them on. 8 If you removed. Installing PCI and PCI Express Cards NOTICE: If you have or are upgrading to the optional dual-graphics configuration, see "Network Adapter and Sound Card Settings" on page 94. 9 Uninstall the driver for the card that you removed...

Owner's Manual
Page 95
... devices for information on the interface cable is the secondary device (drive 1). Connect CD/DVD drives to the SATA0 - See the drive documentation in your upgrade kit for the cable select setting. SATA3 connectors on the system board.
... devices for information on the interface cable is the secondary device (drive 1). Connect CD/DVD drives to the SATA0 - See the drive documentation in your upgrade kit for the cable select setting. SATA3 connectors on the system board.
Owner's Manual
Page 116
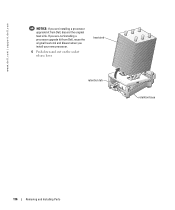
heat sink retention tab retention base 116 Removing and Installing Parts www.dell.com | support.dell.com NOTICE: If you are not installing a processor upgrade kit from Dell, reuse the original heat sink and blower when you are installing a processor upgrade kit from Dell, discard the original heat sink. If you install your new processor. 6 Push down and out on the socket release lever.
heat sink retention tab retention base 116 Removing and Installing Parts www.dell.com | support.dell.com NOTICE: If you are not installing a processor upgrade kit from Dell, reuse the original heat sink and blower when you are installing a processor upgrade kit from Dell, discard the original heat sink. If you install your new processor. 6 Push down and out on the socket release lever.
Owner's Manual
Page 118
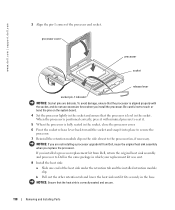
...the processor is positioned correctly, press it into place to secure the processor. 7 Reinstall the retention module clip on the side closest to Dell in the same package in which your replacement kit was sent. 8 Install the heat sink: a Slide one end of the processor ...cover processor socket release lever socket pin-1 indicator NOTICE: Socket pins are not installing a processor upgrade kit from Dell, reuse the original heat sink assembly when you installed a processor replacement kit from Dell, return the original heat sink assembly and processor to the processor fan, if necessary. Be ...
...the processor is positioned correctly, press it into place to secure the processor. 7 Reinstall the retention module clip on the side closest to Dell in the same package in which your replacement kit was sent. 8 Install the heat sink: a Slide one end of the processor ...cover processor socket release lever socket pin-1 indicator NOTICE: Socket pins are not installing a processor upgrade kit from Dell, reuse the original heat sink assembly when you installed a processor replacement kit from Dell, return the original heat sink assembly and processor to the processor fan, if necessary. Be ...


