Owner's Manual
Page 6
... and Disconnecting Drive Cables 74 Hard Drive 75 Removing a Hard Drive 76 Installing a Hard Drive 77 CD/DVD Drive 78 Removing a CD/DVD Drive 78 Installing a CD/DVD Drive 80 Media Card Reader 81 Removing a Media Card Reader 82 Installing a Media Card Reader 83 Floppy Drive (Optional 85 Removing a Floppy Drive 85 Installing a Floppy Drive 87 Modem 89 Replacing the Modem 89 Replacing the External...
... and Disconnecting Drive Cables 74 Hard Drive 75 Removing a Hard Drive 76 Installing a Hard Drive 77 CD/DVD Drive 78 Removing a CD/DVD Drive 78 Installing a CD/DVD Drive 80 Media Card Reader 81 Removing a Media Card Reader 82 Installing a Media Card Reader 83 Floppy Drive (Optional 85 Removing a Floppy Drive 85 Installing a Floppy Drive 87 Modem 89 Replacing the Modem 89 Replacing the External...
Owner's Manual
Page 50
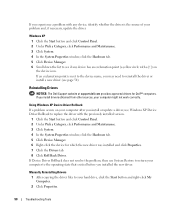
...If you install drivers obtained from other sources, your hard drive, click the Start button and right-click My Computer. 2 Click Properties. 50 Troubleshooting Tools If Device Driver Rollback does not resolve the problem, then use Windows XP Device Driver Rollback to replace the driver with a [!]) on your computer after you... Performance and Maintenance. 3 Click System. 4 In the System Properties window, click the Hardware tab. 5 Click Device Manager. 6 Right-click the device for Dell™ computers. Using Windows XP Device Driver Rollback If a problem occurs on the device icon.
...If you install drivers obtained from other sources, your hard drive, click the Start button and right-click My Computer. 2 Click Properties. 50 Troubleshooting Tools If Device Driver Rollback does not resolve the problem, then use Windows XP Device Driver Rollback to replace the driver with a [!]) on your computer after you... Performance and Maintenance. 3 Click System. 4 In the System Properties window, click the Hardware tab. 5 Click Device Manager. 6 Right-click the device for Dell™ computers. Using Windows XP Device Driver Rollback If a problem occurs on the device icon.
Owner's Manual
Page 73
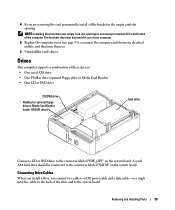
...brackets also keep dust and dirt out of your computer. 5 Replace the computer cover (see page 93), reconnect the computer and devices to the connector labeled "SATA0" on the system board. A serial ATA hard drive should be connected to electrical outlets, and then turn them on ...these devices: • One serial ATA drive • One FlexBay drive (optional floppy drive or Media Card Reader) • One CD or DVD drive CD/DVD drive FlexBay for optional floppy drive or Media Card Reader (under CD/DVD drive) hard drive Connect a CD or DVD drive to maintain FCC certification of the computer...
...brackets also keep dust and dirt out of your computer. 5 Replace the computer cover (see page 93), reconnect the computer and devices to the connector labeled "SATA0" on the system board. A serial ATA hard drive should be connected to electrical outlets, and then turn them on ...these devices: • One serial ATA drive • One FlexBay drive (optional floppy drive or Media Card Reader) • One CD or DVD drive CD/DVD drive FlexBay for optional floppy drive or Media Card Reader (under CD/DVD drive) hard drive Connect a CD or DVD drive to maintain FCC certification of the computer...
Owner's Manual
Page 75
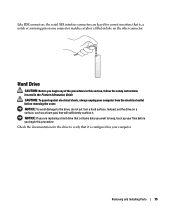
...Before you begin any of the procedures in the Product Information Guide. Like IDE connectors, the serial ATA interface connectors are replacing a hard drive that contains data you want to keep, back up your files before removing the cover. that will sufficiently cushion it. NOTICE...: To avoid damage to verify that it on a hard surface. CAUTION: To guard against electrical shock, always unplug your computer. Check the documentation for correct insertion; Instead, set it is , a ...
...Before you begin any of the procedures in the Product Information Guide. Like IDE connectors, the serial ATA interface connectors are replacing a hard drive that contains data you want to keep, back up your files before removing the cover. that will sufficiently cushion it. NOTICE...: To avoid damage to verify that it on a hard surface. CAUTION: To guard against electrical shock, always unplug your computer. Check the documentation for correct insertion; Instead, set it is , a ...

Owner's Manual
Page 77
.... Removing and Installing Parts 77 power cable serial ATA data cable 4 Check all connectors to the drive. Snap the bracket onto the new drive. tabs (2) drive drive bracket 3 Connect the power and hard-drive cables to be certain that it from the drive. Installing a Hard Drive 1 Unpack the replacement hard drive, and prepare it for installation. 2 Check the documentation for your computer.
.... Removing and Installing Parts 77 power cable serial ATA data cable 4 Check all connectors to the drive. Snap the bracket onto the new drive. tabs (2) drive drive bracket 3 Connect the power and hard-drive cables to be certain that it from the drive. Installing a Hard Drive 1 Unpack the replacement hard drive, and prepare it for installation. 2 Check the documentation for your computer.
Owner's Manual
Page 78
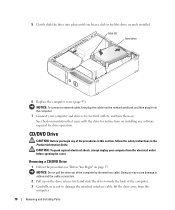
tabs (2) hard drive 6 Replace the computer cover (page 93). 5 Gently slide the drive into the computer. 7 Connect your computer from the computer. 78 Removing and Installing Parts NOTICE: To connect a network cable, first plug the cable into the ... guard against electrical shock, always unplug your computer and devices to damage the attached interface cable, lift the drive away from the electrical outlet before opening the cover. NOTICE: Do not pull the drive out of the computer. 3 Carefully, so as not to electrical outlets, and turn them on page 55. Doing...
tabs (2) hard drive 6 Replace the computer cover (page 93). 5 Gently slide the drive into the computer. 7 Connect your computer from the computer. 78 Removing and Installing Parts NOTICE: To connect a network cable, first plug the cable into the ... guard against electrical shock, always unplug your computer and devices to damage the attached interface cable, lift the drive away from the electrical outlet before opening the cover. NOTICE: Do not pull the drive out of the computer. 3 Carefully, so as not to electrical outlets, and turn them on page 55. Doing...

Owner's Manual
Page 85
... the appropriate Drive option. 10 Verify that came with the drive for drive operation. 9 Enter system setup (see page 78). 3 Pull up on installing any of the computer. 4 Carefully, so as not to the computer. 8 Connect your computer works correctly by running the Dell Diagnostics (see...removing the cover. 5 Replace the CD/DVD drive (see page 80). 6 Replace the hard drive (see page 77). 7 Replace the computer cover (see page 48). Floppy Drive (Optional) CAUTION: Before you begin any software required for instructions on the drive release latch and slide the drive toward the back of ...
... the appropriate Drive option. 10 Verify that came with the drive for drive operation. 9 Enter system setup (see page 78). 3 Pull up on installing any of the computer. 4 Carefully, so as not to the computer. 8 Connect your computer works correctly by running the Dell Diagnostics (see...removing the cover. 5 Replace the CD/DVD drive (see page 80). 6 Replace the hard drive (see page 77). 7 Replace the computer cover (see page 48). Floppy Drive (Optional) CAUTION: Before you begin any software required for instructions on the drive release latch and slide the drive toward the back of ...

Owner's Manual
Page 108
c Place the jumper plug on pins 1 and 2 and wait approximately 5 seconds. d Replace the jumper plug on pins 2 and 3. 4 Replace the hard drive (see page 77). 5 Replace the computer cover (see page 107). Computer, Keyboard, and Monitor CAUTION: Before you clean your computer with a soft cloth dampened ...the safety instructions located in "Before You Begin" on page 55. 2 Remove the hard drive (see page 76). 3 Reset the current CMOS settings: a Locate the 3-pin CMOS jumper (RTCRST) on the system board (see "Replacing the Computer Cover" on page 93). NOTICE: To connect a network cable, first plug...
c Place the jumper plug on pins 1 and 2 and wait approximately 5 seconds. d Replace the jumper plug on pins 2 and 3. 4 Replace the hard drive (see page 77). 5 Replace the computer cover (see page 107). Computer, Keyboard, and Monitor CAUTION: Before you clean your computer with a soft cloth dampened ...the safety instructions located in "Before You Begin" on page 55. 2 Remove the hard drive (see page 76). 3 Reset the current CMOS settings: a Locate the 3-pin CMOS jumper (RTCRST) on the system board (see "Replacing the Computer Cover" on page 93). NOTICE: To connect a network cable, first plug...
Owner's Manual
Page 129
...9 warranty, 9 drivers about, 49 identifying, 49 drives hard drive, 75 installing floppy, 87 installing hard drive, 77 problems, 29 removing floppy, 85 removing hard drive, 76 serial ATA, 75 DVD drive problems, 30 DVDs, 21 playing, 18 Index 129 Index A audio. See sound B battery problems, 29 replacing, 91 BIOS, 99 boot sequence, 105 changing, ...to, 21 copying DVDs general information, 21 helpful tips, 23 how to, 21 cover closing, 93 opening, 61 D Dell contacting, 110-111 Dell Diagnostics, 48 support policy, 110 support site, 10 Dell Premier Support website, 10 diagnostic lights, 45 diagnostics...
...9 warranty, 9 drivers about, 49 identifying, 49 drives hard drive, 75 installing floppy, 87 installing hard drive, 77 problems, 29 removing floppy, 85 removing hard drive, 76 serial ATA, 75 DVD drive problems, 30 DVDs, 21 playing, 18 Index 129 Index A audio. See sound B battery problems, 29 replacing, 91 BIOS, 99 boot sequence, 105 changing, ...to, 21 copying DVDs general information, 21 helpful tips, 23 how to, 21 cover closing, 93 opening, 61 D Dell contacting, 110-111 Dell Diagnostics, 48 support policy, 110 support site, 10 Dell Premier Support website, 10 diagnostic lights, 45 diagnostics...


