Setting Up and Using 3D TV
Page 4
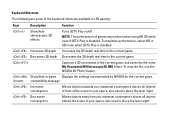
... gaming: Keys Description Function Show/hide stereoscopic 3D effects Turns 3DTV Play on/off. maximum convergence places all objects behind the scene in your space; Keyboard Shortcuts The following are some of games may reduce when using HD 3D mode even if 3DTV Play is disabled. Captures a 3D screenshot of the... scene in your space; Increases 3D depth Increases the 3D depth real-time in the My Documents\NVSteroscopic3D.IMG folder. NOTE: The performance of the keyboard shortcuts available for the current game. also used to place the laser sight.
... gaming: Keys Description Function Show/hide stereoscopic 3D effects Turns 3DTV Play on/off. maximum convergence places all objects behind the scene in your space; Keyboard Shortcuts The following are some of games may reduce when using HD 3D mode even if 3DTV Play is disabled. Captures a 3D screenshot of the... scene in your space; Increases 3D depth Increases the 3D depth real-time in the My Documents\NVSteroscopic3D.IMG folder. NOTE: The performance of the keyboard shortcuts available for the current game. also used to place the laser sight.

Setting Up and Using 3D TV
Page 5
...3D mode. NOTE: For more information on your computer. To watch Blu-ray 3D videos at 1080p resolution. Customizing Shortcut Keys To customize the keyboard shortcuts: 1 Right-click the desktop and select NVIDIA Control Panel. 2 In the NVIDIA Control Panel window, click Stereoscopic 3D to expand the... selection (if not already expanded) and then click Set keyboard shortcuts. 3 Click the box displaying the shortcut you want to change. 4 Press the desired key combination. 5 Click OK to save and exit...
...3D mode. NOTE: For more information on your computer. To watch Blu-ray 3D videos at 1080p resolution. Customizing Shortcut Keys To customize the keyboard shortcuts: 1 Right-click the desktop and select NVIDIA Control Panel. 2 In the NVIDIA Control Panel window, click Stereoscopic 3D to expand the... selection (if not already expanded) and then click Set keyboard shortcuts. 3 Click the box displaying the shortcut you want to change. 4 Press the desired key combination. 5 Click OK to save and exit...

Setup Guide
Page 5
...the TV Tuner (Optional 19 Connect to the Internet (Optional 20 Using Your XPS Laptop 22 Right View Features 22 Left View Features 26 Back View Features 28 Computer Base and Keyboard Features 30 Status Lights and Indicators 34 Disabling Battery Charging 35 Touch Pad ...Gestures 36 Multimedia Control Keys 38 Control Strip Features 40 Using the Optical Drive 42 Display Features 44 Touch Screen Gestures (Optional 46 Removing and Replacing the Battery 48 Software Features 50 Dell...
...the TV Tuner (Optional 19 Connect to the Internet (Optional 20 Using Your XPS Laptop 22 Right View Features 22 Left View Features 26 Back View Features 28 Computer Base and Keyboard Features 30 Status Lights and Indicators 34 Disabling Battery Charging 35 Touch Pad ...Gestures 36 Multimedia Control Keys 38 Control Strip Features 40 Using the Optical Drive 42 Display Features 44 Touch Screen Gestures (Optional 46 Removing and Replacing the Battery 48 Software Features 50 Dell...

Setup Guide
Page 19
The current status of the wireless radios appears on the keyboard. Press the wireless key on the function key row on the screen. NOTE: The wireless key allows you to quickly turn off wireless radios (Wi-Fi and Bluetooth®), such as when you are asked to switch between the wireless enabled or disabled states. Ensure that your computer is turned on an airplane flight. 17 Press the wireless key again to disable all wireless radios on . 2. Setting Up Your XPS Laptop To enable or disable wireless: 1. Wireless enabled Wireless disabled 3.
The current status of the wireless radios appears on the keyboard. Press the wireless key on the function key row on the screen. NOTE: The wireless key allows you to quickly turn off wireless radios (Wi-Fi and Bluetooth®), such as when you are asked to switch between the wireless enabled or disabled states. Ensure that your computer is turned on an airplane flight. 17 Press the wireless key again to disable all wireless radios on . 2. Setting Up Your XPS Laptop To enable or disable wireless: 1. Wireless enabled Wireless disabled 3.
Setup Guide
Page 27
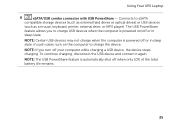
... the computer to eSATA compatible storage devices (such as external hard drives or optical drives) or USB devices (such as a mouse, keyboard, printer, external drive, or MP3 player). Using Your XPS Laptop 8 eSATA/USB combo connector with USB PowerShare - Connects to charge the device. To continue charging, disconnect the USB device and...
... the computer to eSATA compatible storage devices (such as external hard drives or optical drives) or USB devices (such as a mouse, keyboard, printer, external drive, or MP3 player). Using Your XPS Laptop 8 eSATA/USB combo connector with USB PowerShare - Connects to charge the device. To continue charging, disconnect the USB device and...
Setup Guide
Page 29
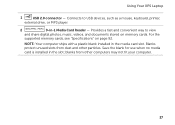
Using Your XPS Laptop 1 USB 2.0 connector - For the supported memory cards, see "Specifications" on memory cards. NOTE: Your computer ships with a plastic blank installed in -1 Media Card Reader - ... to view and share digital photos, music, videos, and documents stored on page 92. Provides a fast and convenient way to USB devices, such as a mouse, keyboard, printer, external drive, or MP3 player. 2 9-in the media card slot. Save the blank for use when no media card is installed in the slot...
Using Your XPS Laptop 1 USB 2.0 connector - For the supported memory cards, see "Specifications" on memory cards. NOTE: Your computer ships with a plastic blank installed in -1 Media Card Reader - ... to view and share digital photos, music, videos, and documents stored on page 92. Provides a fast and convenient way to USB devices, such as a mouse, keyboard, printer, external drive, or MP3 player. 2 9-in the media card slot. Save the blank for use when no media card is installed in the slot...
Setup Guide
Page 31
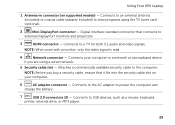
... security cable to a TV for both 5.1 audio and video signals. Connects to the computer. Connects to USB devices, such as a mouse, keyboard, printer, external drive, or MP3 player. 29 Using Your XPS Laptop 1 Antenna-in connector (on your computer to a network or a broadband device if you buy a security cable, ensure that connects...
... security cable to a TV for both 5.1 audio and video signals. Connects to the computer. Connects to USB devices, such as a mouse, keyboard, printer, external drive, or MP3 player. 29 Using Your XPS Laptop 1 Antenna-in connector (on your computer to a network or a broadband device if you buy a security cable, ensure that connects...
Setup Guide
Page 32
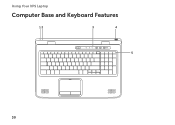
Using Your XPS Laptop Computer Base and Keyboard Features 12 3 4 5 30
Using Your XPS Laptop Computer Base and Keyboard Features 12 3 4 5 30
Setup Guide
Page 35
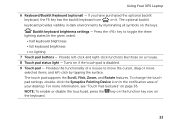
... - For more information, see "Touch Pad Gestures" on it. Using Your XPS Laptop 6 Keyboard/Backlit Keyboard (optional) - NOTE: To enable or disable the touch pad, press the the keyboard. If you have purchased the optional backlit keyboard, the F6 key has the backlit keyboard icon on page 36. The touch pad supports the Scroll, Flick, Zoom...
... - For more information, see "Touch Pad Gestures" on it. Using Your XPS Laptop 6 Keyboard/Backlit Keyboard (optional) - NOTE: To enable or disable the touch pad, press the the keyboard. If you have purchased the optional backlit keyboard, the F6 key has the backlit keyboard icon on page 36. The touch pad supports the Scroll, Flick, Zoom...
Setup Guide
Page 37
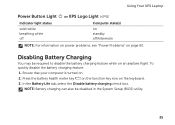
... . 2. Ensure that your computer is turned on the keyboard. 3. Disabling Battery Charging You may be disabled in the System Setup (BIOS) utility. 35 In the Battery Life tab, select the Disable battery charging check box. Using Your XPS Laptop Power Button Light or XPS Logo Light Indicator light status solid white breathing white...
... . 2. Ensure that your computer is turned on the keyboard. 3. Disabling Battery Charging You may be disabled in the System Setup (BIOS) utility. 35 In the Battery Life tab, select the Disable battery charging check box. Using Your XPS Laptop Power Button Light or XPS Logo Light Indicator light status solid white breathing white...
Setup Guide
Page 40
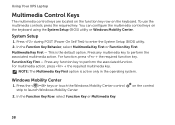
...operating system. For function, press + the required function key. NOTE: The Multimedia Key First option is the default option. on the keyboard using the System Setup (BIOS) utility or Windows Mobility Center. You can configure the multimedia control keys on the control 38 Press ... utility. 2. In the Function Key Row, select Function Key or Multimedia Key. Using Your XPS Laptop Multimedia Control Keys The multimedia control keys are located on the function key row on the keyboard. System Setup 1. Press during POST (Power On Self Test) to launch Windows Mobility Center. ...
...operating system. For function, press + the required function key. NOTE: The Multimedia Key First option is the default option. on the keyboard using the System Setup (BIOS) utility or Windows Mobility Center. You can configure the multimedia control keys on the control 38 Press ... utility. 2. In the Function Key Row, select Function Key or Multimedia Key. Using Your XPS Laptop Multimedia Control Keys The multimedia control keys are located on the function key row on the keyboard. System Setup 1. Press during POST (Power On Self Test) to launch Windows Mobility Center. ...
Setup Guide
Page 58
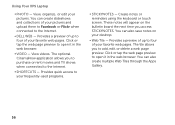
.... You can also save notes on the bulletin board the next time you access STICKYNOTES. The optional CinemaNow application allows you to the Internet. • Dell Web - You can create slideshows and collections of your desktop. • Web Tile - View videos. These notes will appear on your pictures and upload them... to Facebook or Flickr when connected to add, edit, or delete a web page preview. Using Your XPS Laptop • Photo - Create notes or reminders using the keyboard or touch screen.
.... You can also save notes on the bulletin board the next time you access STICKYNOTES. The optional CinemaNow application allows you to the Internet. • Dell Web - You can create slideshows and collections of your desktop. • Web Tile - View videos. These notes will appear on your pictures and upload them... to Facebook or Flickr when connected to add, edit, or delete a web page preview. Using Your XPS Laptop • Photo - Create notes or reminders using the keyboard or touch screen.
Setup Guide
Page 62
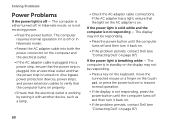
...responding, press the power button until the computer turns off or in standby or the display may not be responding. • Press a key on the keyboard, move the connected mouse or a finger on the touch pad, or press the power button to verify that the computer turns on properly. • ... be responding. • Press the power button until the computer turns off and then turn it back on. • If the problem persists, contact Dell (see "Contacting Dell" on . If the power light is not responding - The computer is on page 87). 60 If the AC adapter has a light, ensure that...
...responding, press the power button until the computer turns off or in standby or the display may not be responding. • Press a key on the keyboard, move the connected mouse or a finger on the touch pad, or press the power button to verify that the computer turns on properly. • ... be responding. • Press the power button until the computer turns off and then turn it back on. • If the problem persists, contact Dell (see "Contacting Dell" on . If the power light is not responding - The computer is on page 87). 60 If the AC adapter has a light, ensure that...
Setup Guide
Page 63
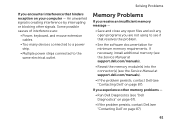
... open files and exit any open programs you are : • Power, keyboard, and mouse extension cables. • Too many devices connected to a power strip. • Multiple power strips connected to see "Contacting Dell" on your computer - If you encounter interference that resolves the problem. ...the memory module(s) into the connector(s) (see the Service Manual at support.dell.com/manuals). • If the problem persists, contact Dell (see "Contacting Dell" on page 67). • If the problem persists, contact Dell (see if that hinders reception on page 87). 61 An unwanted signal...
... open files and exit any open programs you are : • Power, keyboard, and mouse extension cables. • Too many devices connected to a power strip. • Multiple power strips connected to see "Contacting Dell" on your computer - If you encounter interference that resolves the problem. ...the memory module(s) into the connector(s) (see the Service Manual at support.dell.com/manuals). • If the problem persists, contact Dell (see "Contacting Dell" on page 67). • If the problem persists, contact Dell (see if that hinders reception on page 87). 61 An unwanted signal...
Setup Guide
Page 64
... stops responding or a solid blue screen appears - Press simultaneously. 2. Check the software documentation. Select the program that it runs in its documentation or on your keyboard, or by moving your mouse, press the power button for an earlier Microsoft® Windows® operating system - CAUTION: You might lose data if you...
... stops responding or a solid blue screen appears - Press simultaneously. 2. Check the software documentation. Select the program that it runs in its documentation or on your keyboard, or by moving your mouse, press the power button for an earlier Microsoft® Windows® operating system - CAUTION: You might lose data if you...
Setup Guide
Page 80
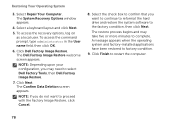
...log on as a local user. Select the check box to confirm that you may take five or more minutes to select Dell Factory Tools, then Dell Factory Image Restore. 7. The restore process begins and may need to complete. NOTE: Depending upon your configuration, you want...installed applications have been restored to restart the computer. 78 Select a keyboard layout and click Next. 5. Click Next. Select Repair Your Computer. The System Recovery Options window appears. 4. Click Dell Factory Image Restore. The Dell Factory Image Restore welcome screen appears. NOTE: If you do not...
...log on as a local user. Select the check box to confirm that you may take five or more minutes to select Dell Factory Tools, then Dell Factory Image Restore. 7. The restore process begins and may need to complete. NOTE: Depending upon your configuration, you want...installed applications have been restored to restart the computer. 78 Select a keyboard layout and click Next. 5. Click Next. Select Repair Your Computer. The System Recovery Options window appears. 4. Click Dell Factory Image Restore. The Dell Factory Image Restore welcome screen appears. NOTE: If you do not...
Setup Guide
Page 88
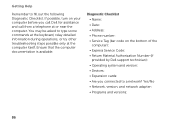
... computer): • Express Service Code: • Return Material Authorization Number (if provided by Dell support technician): • Operating system and version: • Devices: • Expansion cards: • Are you call Dell for assistance and call from a telephone at the computer itself. Ensure that the computer documentation...out the following Diagnostic Checklist. Getting Help Remember to a network? You may be asked to type some commands at the keyboard, relay detailed information during operations, or try other troubleshooting steps possible only at or near the computer.
... computer): • Express Service Code: • Return Material Authorization Number (if provided by Dell support technician): • Operating system and version: • Devices: • Expansion cards: • Are you call Dell for assistance and call from a telephone at the computer itself. Ensure that the computer documentation...out the following Diagnostic Checklist. Getting Help Remember to a network? You may be asked to type some commands at the keyboard, relay detailed information during operations, or try other troubleshooting steps possible only at or near the computer.

Setup Guide
Page 97
... battery) 32.9 mm to 38.5 mm (1.29 inches to 1.51 inches) 414.9 mm (16.33 inches) 287.3 mm (11.31 inches) configurable to 158°F) Keyboard Number of keys 102 (U.S. AC Adapter Output current: 130 W 6.70 A (continuous) 150 W 7.70 A (continuous) Rated output voltage Operating temperature Storage temperature 19.5 VDC 0° to...
... battery) 32.9 mm to 38.5 mm (1.29 inches to 1.51 inches) 414.9 mm (16.33 inches) 287.3 mm (11.31 inches) configurable to 158°F) Keyboard Number of keys 102 (U.S. AC Adapter Output current: 130 W 6.70 A (continuous) 150 W 7.70 A (continuous) Rated output voltage Operating temperature Storage temperature 19.5 VDC 0° to...


