Re-imaging guide for Windows
Page 3
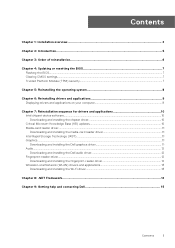
...3: Order of reinstallation 6 Chapter 4: Updating or resetting the BIOS 7 Flashing the BIOS...7 Clearing CMOS settings...7 Trusted Platform Module (TPM) security...7 Chapter 5: Reinstalling the operating system 8 Chapter 6: Reinstalling drivers and applications 9 Displaying drivers and applications on your computer 9 Chapter 7: Reinstallation sequence for drivers and applications 10 Intel chipset device software...10 Downloading and installing the chipset driver...10 Critical Microsoft Knowledge Base (KB) updates...10 Media-card reader driver...11 Downloading and installing the media-card...
...3: Order of reinstallation 6 Chapter 4: Updating or resetting the BIOS 7 Flashing the BIOS...7 Clearing CMOS settings...7 Trusted Platform Module (TPM) security...7 Chapter 5: Reinstalling the operating system 8 Chapter 6: Reinstalling drivers and applications 9 Displaying drivers and applications on your computer 9 Chapter 7: Reinstallation sequence for drivers and applications 10 Intel chipset device software...10 Downloading and installing the chipset driver...10 Critical Microsoft Knowledge Base (KB) updates...10 Media-card reader driver...11 Downloading and installing the media-card...
Re-imaging guide for Windows
Page 4
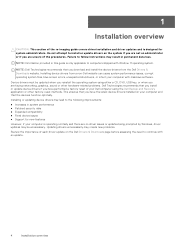
... guide covers driver installation and driver updates and is only applicable to follow instructions may result in this guide is designed for new features However, if your computer is operating normally and there are no driver issues or updates being prompted by Windows, driver updates may create new problems. Review the importance of the procedures. Updating drivers unnecessarily may be updated when you reinstall the operating system using the Dell Backup and Recovery application or other hardware-related problems. Dell...
... guide covers driver installation and driver updates and is only applicable to follow instructions may result in this guide is designed for new features However, if your computer is operating normally and there are no driver issues or updates being prompted by Windows, driver updates may create new problems. Review the importance of the procedures. Updating drivers unnecessarily may be updated when you reinstall the operating system using the Dell Backup and Recovery application or other hardware-related problems. Dell...
Re-imaging guide for Windows
Page 6
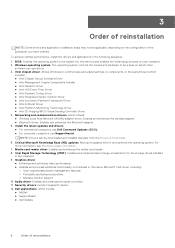
...; Dell Update 6 Order of the computer you have ordered. Install the latest updates and drivers: ● For commercial computers, use Dell Command Updates (DCU). ● For consumer computers, use SupportAssist. Intel chipset driver: Allows Windows to communicate and adjust settings on components on the system board which include: ● Wireless Local Area Network (WLAN) adapter driver: Enables and enhances the wireless adapter. ● Bluetooth driver: Enables and enhances the Bluetooth adapter. 5. Critical Microsoft Knowledge Base (KB) updates: Microsoft updates that fix...
...; Dell Update 6 Order of the computer you have ordered. Install the latest updates and drivers: ● For commercial computers, use Dell Command Updates (DCU). ● For consumer computers, use SupportAssist. Intel chipset driver: Allows Windows to communicate and adjust settings on components on the system board which include: ● Wireless Local Area Network (WLAN) adapter driver: Enables and enhances the wireless adapter. ● Bluetooth driver: Enables and enhances the Bluetooth adapter. 5. Critical Microsoft Knowledge Base (KB) updates: Microsoft updates that fix...
Re-imaging guide for Windows
Page 7
... not have the Service Tag, use the auto-detect feature or manually browse for it cannot be accessed by the operating system. ● Disabled: The BIOS will reset the BIOS to enable and configure the TPM: Steps 1. Save the settings and exit. Click Product support, enter the Service Tag of the BIOS for your computer model. 4. After the download is displayed on the screen. Double-click the BIOS update file icon and...
... not have the Service Tag, use the auto-detect feature or manually browse for it cannot be accessed by the operating system. ● Disabled: The BIOS will reset the BIOS to enable and configure the TPM: Steps 1. Save the settings and exit. Click Product support, enter the Service Tag of the BIOS for your computer model. 4. After the download is displayed on the screen. Double-click the BIOS update file icon and...
Re-imaging guide for Windows
Page 10
... the Windows operating system on your computer. For video capture or streaming, users can also be manually downloaded and installed from third-party providers. no additional webcam-driver installation is required. Intel chipset device software The Windows operating system may have to manually browse for drivers and applications Install the drivers in the following sequence. Turn on the computer. 2. KB updates are automatically downloaded and installed when Windows Updates are encountering issues with a specific device. release...
... the Windows operating system on your computer. For video capture or streaming, users can also be manually downloaded and installed from third-party providers. no additional webcam-driver installation is required. Intel chipset device software The Windows operating system may have to manually browse for drivers and applications Install the drivers in the following sequence. Turn on the computer. 2. KB updates are automatically downloaded and installed when Windows Updates are encountering issues with a specific device. release...
Re-imaging guide for Windows
Page 11
... to www.dell.com/support. Click Drivers & Downloads, and expand Find drivers. 5. Media-card reader driver The Windows operating system does not include the media-card reader driver. Install the Realtek driver that is already installed, changing the SATA/NVMe settings in the event of a hard-drive failure, and supports the configuration of multiple features, including: ● Configuration and maintenance of your computer. 2. Downloading and installing the media-card reader driver Steps 1. In the Search support field, enter the Service Tag, Serial Number, Service Request, Model, or...
... to www.dell.com/support. Click Drivers & Downloads, and expand Find drivers. 5. Media-card reader driver The Windows operating system does not include the media-card reader driver. Install the Realtek driver that is already installed, changing the SATA/NVMe settings in the event of a hard-drive failure, and supports the configuration of multiple features, including: ● Configuration and maintenance of your computer. 2. Downloading and installing the media-card reader driver Steps 1. In the Search support field, enter the Service Tag, Serial Number, Service Request, Model, or...
Owners Manual
Page 3
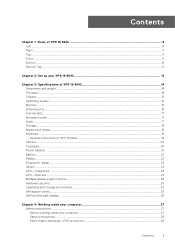
......15 Operating system...15 Memory...16 External ports...16 Internal slots...17 Wireless module...17 Audio...17 Storage...18 Media-card reader...18 Keyboard...19 Keyboard shortcuts of XPS 16 9640...19 Camera...20 Touchpad...20 Power adapter...21 Battery...22 Display...22 Fingerprint reader...23 Sensor ...24 GPU-Integrated...24 GPU-Discrete...24 Multiple display support matrix...24 Hardware security...25 Operating and storage environment...25 Dell support policy...26 Dell low blue light display...26 Chapter 4: Working inside your computer 27 Safety instructions...27 Before working...
......15 Operating system...15 Memory...16 External ports...16 Internal slots...17 Wireless module...17 Audio...17 Storage...18 Media-card reader...18 Keyboard...19 Keyboard shortcuts of XPS 16 9640...19 Camera...20 Touchpad...20 Power adapter...21 Battery...22 Display...22 Fingerprint reader...23 Sensor ...24 GPU-Integrated...24 GPU-Discrete...24 Multiple display support matrix...24 Hardware security...25 Operating and storage environment...25 Dell support policy...26 Dell low blue light display...26 Chapter 4: Working inside your computer 27 Safety instructions...27 Before working...
Owners Manual
Page 4
... of XPS 16 9640...31 Chapter 5: Removing and installing Field Replaceable Units (FRUs 34 Base cover...34 Removing the base cover...34 Installing the base cover...37 Battery...39 Rechargeable Li-ion battery precautions...39 Removing the battery...40 Installing the battery...41 Battery cable...42 Removing the battery cable...42 Installing the battery cable...43 Fan...44 Removing the GPU fan...44 Installing the GPU fan...45 Removing the CPU fan...46 Installing the CPU fan...47 Solid-state drive...48 Removing the solid-state drive...48 Installing the...
... of XPS 16 9640...31 Chapter 5: Removing and installing Field Replaceable Units (FRUs 34 Base cover...34 Removing the base cover...34 Installing the base cover...37 Battery...39 Rechargeable Li-ion battery precautions...39 Removing the battery...40 Installing the battery...41 Battery cable...42 Removing the battery cable...42 Installing the battery cable...43 Fan...44 Removing the GPU fan...44 Installing the GPU fan...45 Removing the CPU fan...46 Installing the CPU fan...47 Solid-state drive...48 Removing the solid-state drive...48 Installing the...
Owners Manual
Page 5
... Time Boot menu...84 System setup options...85 Updating the BIOS...101 Updating the BIOS in Windows...101 Updating the BIOS using the USB drive in Windows 101 Updating the BIOS from the F12 One Time Boot menu 102 System and setup password...102 Assigning a System Setup password...103 Deleting or changing an existing system setup password 103 Clearing BIOS (System Setup) and System passwords 104 Chapter 8: Troubleshooting...105 Handling swollen rechargeable Li-ion batteries...105 Locate the Service Tag or Express Service Code of your Dell...
... Time Boot menu...84 System setup options...85 Updating the BIOS...101 Updating the BIOS in Windows...101 Updating the BIOS using the USB drive in Windows 101 Updating the BIOS from the F12 One Time Boot menu 102 System and setup password...102 Assigning a System Setup password...103 Deleting or changing an existing system setup password 103 Clearing BIOS (System Setup) and System passwords 104 Chapter 8: Troubleshooting...105 Handling swollen rechargeable Li-ion batteries...105 Locate the Service Tag or Express Service Code of your Dell...
Owners Manual
Page 7
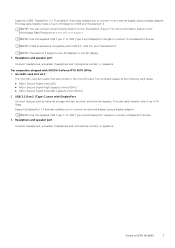
...Micro Secure Digital Extended Capacity (microSDXC) 2. Supports DisplayPort 1.4 and also enables you to connect to an external display using a display adapter. USB 3.2 Gen 2 (Type-C) port with DisplayPort Connect devices such as external storage devices, printers, and external displays. NOTE: Thunderbolt 4 supports two 4K displays or one 8K display. 3. Supports USB4, DisplayPort 2.1, Thunderbolt 4 and also enables you to connect an external display using a display adapter. Headphone and speaker port Connect headphones, a headset (headphone and microphone combo), or speakers.
...Micro Secure Digital Extended Capacity (microSDXC) 2. Supports DisplayPort 1.4 and also enables you to connect to an external display using a display adapter. USB 3.2 Gen 2 (Type-C) port with DisplayPort Connect devices such as external storage devices, printers, and external displays. NOTE: Thunderbolt 4 supports two 4K displays or one 8K display. 3. Supports USB4, DisplayPort 2.1, Thunderbolt 4 and also enables you to connect an external display using a display adapter. Headphone and speaker port Connect headphones, a headset (headphone and microphone combo), or speakers.
Owners Manual
Page 13
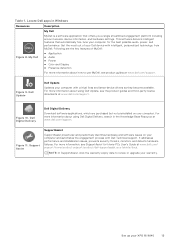
... Windows Resources Description My Dell MyDell is a software application that automatically fine-tune your XPS 16 9640 13 Locate Dell apps in the Knowledge Base Resource at www.dell.com/support. My Dell ● Application ● Audio ● Power ● Color and Display ● Presence detection For more information about using Dell Update, see the product guides and third-party license documents at www.dell.com/ support/home/product-support/product/dell...
... Windows Resources Description My Dell MyDell is a software application that automatically fine-tune your XPS 16 9640 13 Locate Dell apps in the Knowledge Base Resource at www.dell.com/support. My Dell ● Application ● Audio ● Power ● Color and Display ● Presence detection For more information about using Dell Update, see the product guides and third-party license documents at www.dell.com/ support/home/product-support/product/dell...
Owners Manual
Page 22
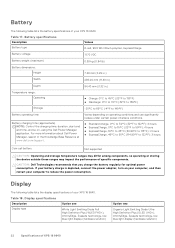
...; ExpressCharge, 46°C to 50°C (114.80°F to 122°F): 3 hours Coin-cell battery Not supported CAUTION: Operating and storage temperature ranges may differ among components, so operating or storing the device outside these ranges may impact the performance of your XPS 16 9640. Varies depending on , using the Dell Power Manager application. Battery The following table lists the display specifications of XPS 16 9640 Table 17.
...; ExpressCharge, 46°C to 50°C (114.80°F to 122°F): 3 hours Coin-cell battery Not supported CAUTION: Operating and storage temperature ranges may differ among components, so operating or storing the device outside these ranges may impact the performance of your XPS 16 9640. Varies depending on , using the Dell Power Manager application. Battery The following table lists the display specifications of XPS 16 9640 Table 17.
Owners Manual
Page 28
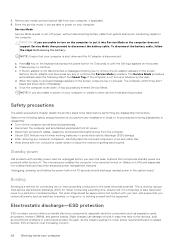
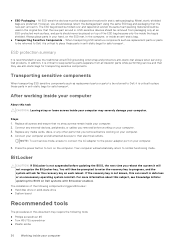
... as expansion cards, processors, memory DIMMs, and system boards. Slight charges can damage circuits in advance by using a field service electrostatic discharge (ESD) kit. 5. a. Press any media card and optical disk from system board prior conducting repairs in Removing the battery. Unplugging, pressing, and holding the power button for connecting two or more grounding conductors to continue. CAUTION: If you are powered while turned off power, without disconnecting battery cable from...
... as expansion cards, processors, memory DIMMs, and system boards. Slight charges can damage circuits in advance by using a field service electrostatic discharge (ESD) kit. 5. a. Press any media card and optical disk from system board prior conducting repairs in Removing the battery. Unplugging, pressing, and holding the power button for connecting two or more grounding conductors to continue. CAUTION: If you are powered while turned off power, without disconnecting battery cable from...
Owners Manual
Page 30
... to turn on top of the following tools: ● Phillips screwdriver #0 ● Torx #5 (T5) screwdriver ● Plastic scribe 30 Working inside your computer About this subject, see Knowledge Article: updating the BIOS on your computer. 4. Press the power button to place these parts in static-safe packaging. Replace any media cards, discs, or any external devices, peripherals, or cables you removed before working on Dell systems with BitLocker enabled...
... to turn on top of the following tools: ● Phillips screwdriver #0 ● Torx #5 (T5) screwdriver ● Plastic scribe 30 Working inside your computer About this subject, see Knowledge Article: updating the BIOS on your computer. 4. Press the power button to place these parts in static-safe packaging. Replace any media cards, discs, or any external devices, peripherals, or cables you removed before working on Dell systems with BitLocker enabled...
Owners Manual
Page 88
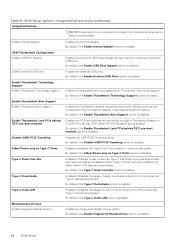
... the external ports of audio inputs and outputs from USB mass storage devices that are connected through a Thunderbolt adapter to run the PCIe devices UEFI Option ROM (if present) during BIOS Preboot. By default, the Video/Power only on the configuration ordered, the microphone setup option may not be used during preboot. By default, the Type-C Dock LAN option is disabled. Enable Thunderbolt Technology Support Enable Thunderbolt Technology Support Enables the associated ports and adapters for Thunderbolt Technology support. By default, the Enable Thunderbolt Boot Support option is...
... the external ports of audio inputs and outputs from USB mass storage devices that are connected through a Thunderbolt adapter to run the PCIe devices UEFI Option ROM (if present) during BIOS Preboot. By default, the Video/Power only on the configuration ordered, the microphone setup option may not be used during preboot. By default, the Type-C Dock LAN option is disabled. Enable Thunderbolt Technology Support Enable Thunderbolt Technology Support Enables the associated ports and adapters for Thunderbolt Technology support. By default, the Enable Thunderbolt Boot Support option is...

Owners Manual
Page 90
... still supporting heavy use during peak power usage hours. By default, the WLAN option enabled. By default, the Control WLAN Radio option is enabled. Use the table Custom Charge Start and Custom Charge Stop, to a specified work day. 90 BIOS Setup Battery settings are reenabled. Wireless Radio Control Control WLAN Radio Enables to sense the connection of each day. Table 34. BIOS Setup options-Connection menu Connection Wireless Device Enable WLAN Enables or disables the internal WLAN device. BIOS Setup options-Display menu (continued) Display Hybrid...
... still supporting heavy use during peak power usage hours. By default, the WLAN option enabled. By default, the Control WLAN Radio option is enabled. Use the table Custom Charge Start and Custom Charge Stop, to a specified work day. 90 BIOS Setup Battery settings are reenabled. Wireless Radio Control Control WLAN Radio Enables to sense the connection of each day. Table 34. BIOS Setup options-Connection menu Connection Wireless Device Enable WLAN Enables or disables the internal WLAN device. BIOS Setup options-Display menu (continued) Display Hybrid...

Owners Manual
Page 91
... on Dell USB-C Dock When enabled, connecting a Dell USB-C Dock wakes the computer from entering Sleep (S3) mode in the operating system. Block Sleep Enables or disables the computer from Standby, Hibernate, and Power Off. By default, the Power On Lid Open option is disabled. BIOS Setup options-Security menu Security TPM 2.0 Security The Trusted Platform Module (TPM) provides various cryptographic services which serve as BitLocker, Virtual Secure Mode, remote Attestation. USB Wake Support Wake on battery during peak power...
... on Dell USB-C Dock When enabled, connecting a Dell USB-C Dock wakes the computer from entering Sleep (S3) mode in the operating system. Block Sleep Enables or disables the computer from Standby, Hibernate, and Power Off. By default, the Power On Lid Open option is disabled. BIOS Setup options-Security menu Security TPM 2.0 Security The Trusted Platform Module (TPM) provides various cryptographic services which serve as BitLocker, Virtual Secure Mode, remote Attestation. USB Wake Support Wake on battery during peak power...
Owners Manual
Page 96
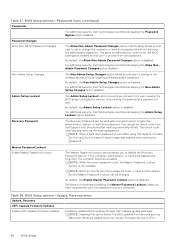
...-Admin Setup Changes option disabled. NOTE: When an internal hard drive password is overridden using this option blocks the BIOS updates from Dell Support over the BIOS settings but enables an end user to disable the Recovery Password feature. Password Changes Allow Non-Admin Password Changes The Allow Non-Admin Password Changes option in BIOS setup allows an end user to set , it must first be cleared before Master Password Lockout can get an unlock code from services such as Microsoft Windows Update and Linux Vendor Firmware Service (LVFS). 96 BIOS Setup This...
...-Admin Setup Changes option disabled. NOTE: When an internal hard drive password is overridden using this option blocks the BIOS updates from Dell Support over the BIOS settings but enables an end user to disable the Recovery Password feature. Password Changes Allow Non-Admin Password Changes The Allow Non-Admin Password Changes option in BIOS setup allows an end user to set , it must first be cleared before Master Password Lockout can get an unlock code from services such as Microsoft Windows Update and Linux Vendor Firmware Service (LVFS). 96 BIOS Setup This...
Owners Manual
Page 97
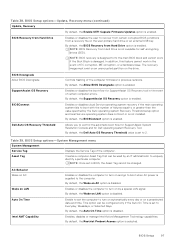
... feature cannot work if the Boot Block is enabled. Enables or disables the computer to Everyday, Weekdays, or Selected Days. This option can be configured only if the Auto On Time is not available for self-encrypting drives (SED). BIOS Setup 97 BIOS Recovery from Hard Drive Enables or disables the user to recover from certain corrupted BIOS conditions from Hard Drive option is set to turn on the user primary hard drive or an external USB key. NOTE: BIOS recovery is...
... feature cannot work if the Boot Block is enabled. Enables or disables the computer to Everyday, Weekdays, or Selected Days. This option can be configured only if the Auto On Time is not available for self-encrypting drives (SED). BIOS Setup 97 BIOS Recovery from Hard Drive Enables or disables the user to recover from certain corrupted BIOS conditions from Hard Drive option is set to turn on the user primary hard drive or an external USB key. NOTE: BIOS recovery is...
Owners Manual
Page 102
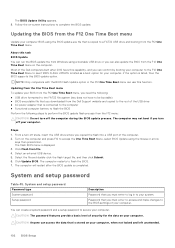
... Submit. 6. System and setup password Password type System password Setup password Description Password that is stored on the computer. The flash BIOS menu is listed, then the BIOS supports this function. Click Flash from the F12 One Time Boot menu. The BIOS Update Utility appears. 8. Turn on your computer. Follow the on-screen instructions to flash the BIOS. 7. The computer may not boot if you must enter to access and make changes to access the One Time Boot Menu, select BIOS Update using a bootable USB drive or you can...
... Submit. 6. System and setup password Password type System password Setup password Description Password that is stored on the computer. The flash BIOS menu is listed, then the BIOS supports this function. Click Flash from the F12 One Time Boot menu. The BIOS Update Utility appears. 8. Turn on your computer. Follow the on-screen instructions to flash the BIOS. 7. The computer may not boot if you must enter to access and make changes to access the One Time Boot Menu, select BIOS Update using a bootable USB drive or you can...


