Setup Guide
Page 5
...Set Up 3D TV (Optional 16 Connect to the Internet (Optional 18 Using Your XPS Laptop 20 Right View Features 20 Left View Features 22 Back View Features 26 Computer Base and Keyboard Features 28 Touch Pad Gestures 32 Multimedia Control Keys 36 Display Features 38 Status Lights ...and Indicators 40 Disabling Battery Charging 42 Using the Optical Drive 43 Software Features 44 NVIDIA 3DTV Play 45 NVIDIA Optimus Technology 48 Dell DataSafe Online Backup 50 Dell Stage ...
...Set Up 3D TV (Optional 16 Connect to the Internet (Optional 18 Using Your XPS Laptop 20 Right View Features 20 Left View Features 22 Back View Features 26 Computer Base and Keyboard Features 28 Touch Pad Gestures 32 Multimedia Control Keys 36 Display Features 38 Status Lights ...and Indicators 40 Disabling Battery Charging 42 Using the Optical Drive 43 Software Features 44 NVIDIA 3DTV Play 45 NVIDIA Optimus Technology 48 Dell DataSafe Online Backup 50 Dell Stage ...
Setup Guide
Page 15
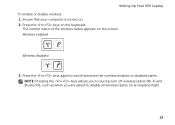
NOTE: Pressing the keys allows you to quickly turn off wireless radios (Wi-Fi and Bluetooth), such as when you are asked to switch between the wireless enabled or disabled states. Press the keys again to disable all wireless radios on the screen. Press the keys on . 2. Ensure that your computer is turned on the keyboard. Wireless enabled Wireless disabled 3. The current status of the wireless radios appears on an airplane flight. 13 Setting Up Your XPS Laptop To enable or disable wireless: 1.
NOTE: Pressing the keys allows you to quickly turn off wireless radios (Wi-Fi and Bluetooth), such as when you are asked to switch between the wireless enabled or disabled states. Press the keys again to disable all wireless radios on the screen. Press the keys on . 2. Ensure that your computer is turned on the keyboard. Wireless enabled Wireless disabled 3. The current status of the wireless radios appears on an airplane flight. 13 Setting Up Your XPS Laptop To enable or disable wireless: 1.

Setup Guide
Page 25
...such as external hard drives or optical drives) or USB devices (such as a mouse, keyboard, printer, external drive, or MP3 player). To continue charging, disconnect the USB device and connect ...it again. You can purchase the VGA/DVI cable and the miniDsiplayPort adapter at www.dell.com. 3 eSATA/USB combo connector with a monitor, only the video signal is powered ... the computer is read. 2 Mini-DisplayPort connector - Connects to charge the device. Using Your XPS Laptop 1 HDMI connector - NOTE: When used with USB PowerShare - Digital interface standard connector that...
...such as external hard drives or optical drives) or USB devices (such as a mouse, keyboard, printer, external drive, or MP3 player). To continue charging, disconnect the USB device and connect ...it again. You can purchase the VGA/DVI cable and the miniDsiplayPort adapter at www.dell.com. 3 eSATA/USB combo connector with a monitor, only the video signal is powered ... the computer is read. 2 Mini-DisplayPort connector - Connects to charge the device. Using Your XPS Laptop 1 HDMI connector - NOTE: When used with USB PowerShare - Digital interface standard connector that...

Setup Guide
Page 27
.... Each light indicates approximately 20% of the total battery charge. 7 Battery status indicator button - Provides a fast and convenient way to USB devices, such as a mouse, keyboard, printer, external drive, or MP3 player; Blanks protect unused slots from other particles. Turns on page 80. provide faster data transmission between your computer. 6 Battery... documents stored on memory cards. blanks from dust and other computers may not fit your computer and USB devices. 5 9-in-1 Media Card Reader - Using Your XPS Laptop 4 USB 3.0 connectors (2) -
.... Each light indicates approximately 20% of the total battery charge. 7 Battery status indicator button - Provides a fast and convenient way to USB devices, such as a mouse, keyboard, printer, external drive, or MP3 player; Blanks protect unused slots from other particles. Turns on page 80. provide faster data transmission between your computer. 6 Battery... documents stored on memory cards. blanks from dust and other computers may not fit your computer and USB devices. 5 9-in-1 Media Card Reader - Using Your XPS Laptop 4 USB 3.0 connectors (2) -
Setup Guide
Page 30
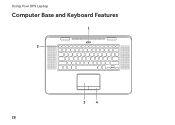
Using Your XPS Laptop Computer Base and Keyboard Features 1 2 3 4 28
Using Your XPS Laptop Computer Base and Keyboard Features 1 2 3 4 28
Setup Guide
Page 33
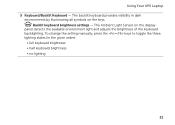
To change the setting manually, press the keys to toggle the three lighting states (in dark environments by illuminating all symbols on the display panel detects the available environment light and adjusts the brightness of the keyboard backlighting. The Ambient Light Sensor on the keys. The backlit keyboard provides visibility in the given order): • full keyboard brightness • half keyboard brightness • no lighting 31 Backlit keyboard brightness settings - Using Your XPS Laptop 5 Keyboard/Backlit Keyboard -
To change the setting manually, press the keys to toggle the three lighting states (in dark environments by illuminating all symbols on the display panel detects the available environment light and adjusts the brightness of the keyboard backlighting. The Ambient Light Sensor on the keys. The backlit keyboard provides visibility in the given order): • full keyboard brightness • half keyboard brightness • no lighting 31 Backlit keyboard brightness settings - Using Your XPS Laptop 5 Keyboard/Backlit Keyboard -
Setup Guide
Page 38
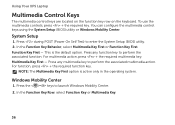
... On Self Test) to launch Windows Mobility Center. 2. Function Key First - For function, press + the required function key. System Setup 1. Multimedia Key First - Using Your XPS Laptop Multimedia Control Keys The multimedia control keys are located on the function key row on the...
... On Self Test) to launch Windows Mobility Center. 2. Function Key First - For function, press + the required function key. System Setup 1. Multimedia Key First - Using Your XPS Laptop Multimedia Control Keys The multimedia control keys are located on the function key row on the...
Setup Guide
Page 41
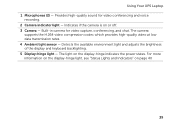
... - Detects the available environment light and adjusts the brightness of the display and keyboard backlighting. 5 Display-hinge light - The light on or off. 3 Camera - Indicates if the camera is on the display-hinge indicates the power states. Using Your XPS Laptop 1 Microphones (2) - The camera supports the H.264 video compression codec which provides...
... - Detects the available environment light and adjusts the brightness of the display and keyboard backlighting. 5 Display-hinge light - The light on or off. 3 Camera - Indicates if the camera is on the display-hinge indicates the power states. Using Your XPS Laptop 1 Microphones (2) - The camera supports the H.264 video compression codec which provides...
Setup Guide
Page 44
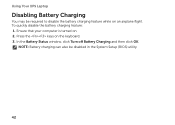
Press the keys on . 2. In the Battery Status window, click Turn off Battery Charging and then click OK. NOTE: Battery charging can also be required to disable the battery charging feature while on an airplane flight. To quickly disable the battery charging feature: 1. Ensure that your computer is turned on the keyboard. 3. Using Your XPS Laptop Disabling Battery Charging You may be disabled in the System Setup (BIOS) utility. 42
Press the keys on . 2. In the Battery Status window, click Turn off Battery Charging and then click OK. NOTE: Battery charging can also be required to disable the battery charging feature while on an airplane flight. To quickly disable the battery charging feature: 1. Ensure that your computer is turned on the keyboard. 3. Using Your XPS Laptop Disabling Battery Charging You may be disabled in the System Setup (BIOS) utility. 42
Setup Guide
Page 45
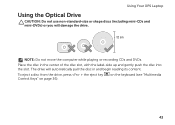
Using Your XPS Laptop Using the Optical Drive CAUTION: Do not use non-standard-size or shape discs (including mini-CDs and mini‑DVDs) or you will automatically pull the disc in the center of the disc slot, with the label-side up and gently push the disc into the slot. The drive will damage the drive. 12 cm NOTE: Do not move the computer while playing or recording CDs and DVDs. on page 36). Place the disc in and begin reading its content. To eject a disc from the drive, press + the eject key Control Keys" on the keyboard (see "Multimedia 43
Using Your XPS Laptop Using the Optical Drive CAUTION: Do not use non-standard-size or shape discs (including mini-CDs and mini‑DVDs) or you will automatically pull the disc in the center of the disc slot, with the label-side up and gently push the disc into the slot. The drive will damage the drive. 12 cm NOTE: Do not move the computer while playing or recording CDs and DVDs. on page 36). Place the disc in and begin reading its content. To eject a disc from the drive, press + the eject key Control Keys" on the keyboard (see "Multimedia 43
Setup Guide
Page 48
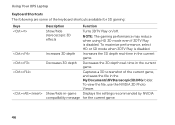
...depth real-time in the current game. To view the file, use the NVIDIA 3D Photo Viewer. Captures a 3D screenshot of the keyboard shortcuts available for the current game. 46 Show/hide in-game Displays the settings recommended by NVIDIA compatibility message for 3D gaming: Keys ...Description Function Show/hide stereoscopic 3D effects Turns 3DTV Play on/off. Using Your XPS Laptop Keyboard Shortcuts The following are some of the current game, and saves the file in the My Documents\NVSteroscopic3D.IMG folder. NOTE: The...
...depth real-time in the current game. To view the file, use the NVIDIA 3D Photo Viewer. Captures a 3D screenshot of the keyboard shortcuts available for the current game. 46 Show/hide in-game Displays the settings recommended by NVIDIA compatibility message for 3D gaming: Keys ...Description Function Show/hide stereoscopic 3D effects Turns 3DTV Play on/off. Using Your XPS Laptop Keyboard Shortcuts The following are some of the current game, and saves the file in the My Documents\NVSteroscopic3D.IMG folder. NOTE: The...

Setup Guide
Page 49
Customizing Shortcut Keys To customize the keyboard shortcuts: 1. Click the box displaying the shortcut you want to save and exit. 47 Press the desired key combination. 5. Right-click the desktop and select ... window, click Stereoscopic 3D to place the laser sight. also used to expand the selection (if not already expanded) and then click Set keyboard shortcuts. 3. Using Your XPS Laptop Increases convergence Decreases convergence Moves objects towards you ; maximum convergence places all objects behind the scene in your space; Moves objects away from...
Customizing Shortcut Keys To customize the keyboard shortcuts: 1. Click the box displaying the shortcut you want to save and exit. 47 Press the desired key combination. 5. Right-click the desktop and select ... window, click Stereoscopic 3D to place the laser sight. also used to expand the selection (if not already expanded) and then click Set keyboard shortcuts. 3. Using Your XPS Laptop Increases convergence Decreases convergence Moves objects towards you ; maximum convergence places all objects behind the scene in your space; Moves objects away from...

Setup Guide
Page 57
..., press the power button until the computer turns off , in standby or the display may not be responding. • Press a key on the keyboard, move the connected mouse or a finger on the touch pad, or press the power button to verify that the computer turns on properly. •...the electrical outlet is breathing white - If the power light is working by testing it back on. • If the problem persists, contact Dell (see "Contacting Dell" on page 77). Also bypass power protection devices, power strips, and power extension cables to resume normal operation. • If the display ...
..., press the power button until the computer turns off , in standby or the display may not be responding. • Press a key on the keyboard, move the connected mouse or a finger on the touch pad, or press the power button to verify that the computer turns on properly. •...the electrical outlet is breathing white - If the power light is working by testing it back on. • If the problem persists, contact Dell (see "Contacting Dell" on page 77). Also bypass power protection devices, power strips, and power extension cables to resume normal operation. • If the display ...

Setup Guide
Page 58
...receive an insufficient memory message - • Save and close any open files and exit any open programs you are : • Power, keyboard, and mouse extension cables. • Too many devices connected to a power strip. • Multiple power strips connected to see if ...connector(s) (see the Service Manual at support.dell.com/manuals). • If the problem persists, contact Dell (see "Contacting Dell" on page 77). An unwanted signal is creating interference by interrupting or blocking other memory problems - • Run Dell Diagnostics (see "Dell Diagnostics" on page 61). • ...
...receive an insufficient memory message - • Save and close any open files and exit any open programs you are : • Power, keyboard, and mouse extension cables. • Too many devices connected to a power strip. • Multiple power strips connected to see if ...connector(s) (see the Service Manual at support.dell.com/manuals). • If the problem persists, contact Dell (see "Contacting Dell" on page 77). An unwanted signal is creating interference by interrupting or blocking other memory problems - • Run Dell Diagnostics (see "Dell Diagnostics" on page 61). • ...
Setup Guide
Page 59
... operating system. 57 If necessary, uninstall and then reinstall the program. If a program crashes repeatedly - Ensure that it runs in its documentation or on your keyboard, or by moving your computer. If a program stops responding - NOTE: Software usually includes installation instructions in an environment similar to the electrical outlet. CAUTION: You...
... operating system. 57 If necessary, uninstall and then reinstall the program. If a program crashes repeatedly - Ensure that it runs in its documentation or on your keyboard, or by moving your computer. If a program stops responding - NOTE: Software usually includes installation instructions in an environment similar to the electrical outlet. CAUTION: You...

Setup Guide
Page 64
...message appears "Do you want to run the failed test, press . then, shut down the error code(s) that appear on the screen and contact Dell (see the Microsoft Windows desktop; Select Diagnostics from the boot menu and press . 4. If a device fails a test, the test stops and ...; To re-run the remaining memory tests? If you see "Contacting Dell" on (or restart) your computer. 62 Using Support Tools Starting Dell ePSA Diagnostics Enhanced Pre-boot System Assessment (ePSA) tests devices such as the system board, keyboard, display, memory, hard drive, and so on the screen. Turn ...
...message appears "Do you want to run the failed test, press . then, shut down the error code(s) that appear on the screen and contact Dell (see the Microsoft Windows desktop; Select Diagnostics from the boot menu and press . 4. If a device fails a test, the test stops and ...; To re-run the remaining memory tests? If you see "Contacting Dell" on (or restart) your computer. 62 Using Support Tools Starting Dell ePSA Diagnostics Enhanced Pre-boot System Assessment (ePSA) tests devices such as the system board, keyboard, display, memory, hard drive, and so on the screen. Turn ...

Setup Guide
Page 71
...hard drive and restore the system software to proceed with the Factory Image Restore, click Cancel. Select Repair Your Computer. The Dell Factory Image Restore welcome screen appears. The Confirm Data Deletion screen appears. The System Recovery Options window appears. 4. NOTE: ...If you want to the factory condition, then click Next. Select a keyboard layout and click Next. 5. Click Dell Factory Image Restore. A message appears when the operating system and factory-installed applications have been restored to restart the computer...
...hard drive and restore the system software to proceed with the Factory Image Restore, click Cancel. Select Repair Your Computer. The Dell Factory Image Restore welcome screen appears. The Confirm Data Deletion screen appears. The System Recovery Options window appears. 4. NOTE: ...If you want to the factory condition, then click Next. Select a keyboard layout and click Next. 5. Click Dell Factory Image Restore. A message appears when the operating system and factory-installed applications have been restored to restart the computer...

Setup Guide
Page 78
.... Yes /No • Network, version, and network adapter: • Programs and versions: 76 Getting Help Remember to type some commands at the keyboard, relay detailed information during operations, or try other troubleshooting steps possible only at or near the computer. If possible, turn on the bottom of the... computer): • Express Service Code: • Return Material Authorization Number (if provided by Dell support technician): • Operating system and version: • Devices: • Expansion cards: • Are you call...
.... Yes /No • Network, version, and network adapter: • Programs and versions: 76 Getting Help Remember to type some commands at the keyboard, relay detailed information during operations, or try other troubleshooting steps possible only at or near the computer. If possible, turn on the bottom of the... computer): • Express Service Code: • Return Material Authorization Number (if provided by Dell support technician): • Operating system and version: • Devices: • Expansion cards: • Are you call...

Setup Guide
Page 87
and Canada); 87 (Europe); 90 (Japan); 87 (Brazil) Layout QWERTY/AZERTY/Kanji Touch Pad X/Y position resolution (graphics table mode) Size: 240 cpi Width 100 mm (3.94 inches) Height 53.15 mm (2.09 inches) Specifications Physical Height Width Depth Weight (with 8-cell battery) 24.4 mm (0.96 inches) 385.2 mm (15.16 inches) 260 mm (10.23 inches) configurable to less than 2.57 kg (5.68 lb) 85 Keyboard (Backlit) Number of keys 86 (U.S.
and Canada); 87 (Europe); 90 (Japan); 87 (Brazil) Layout QWERTY/AZERTY/Kanji Touch Pad X/Y position resolution (graphics table mode) Size: 240 cpi Width 100 mm (3.94 inches) Height 53.15 mm (2.09 inches) Specifications Physical Height Width Depth Weight (with 8-cell battery) 24.4 mm (0.96 inches) 385.2 mm (15.16 inches) 260 mm (10.23 inches) configurable to less than 2.57 kg (5.68 lb) 85 Keyboard (Backlit) Number of keys 86 (U.S.


