Manual
Page 4
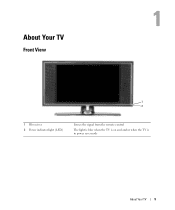
About Your TV Front View 1 2 1 IR receiver 2 Power indicator light (LED) Senses the signal from the remote control The light is blue when the TV is on and amber when the TV is in power save mode About Your TV 5
About Your TV Front View 1 2 1 IR receiver 2 Power indicator light (LED) Senses the signal from the remote control The light is blue when the TV is on and amber when the TV is in power save mode About Your TV 5
Manual
Page 5
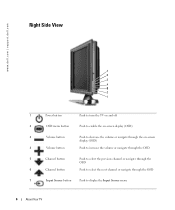
www.dell.com | support.dell.com Right Side View 7 6 5 4 3 2 1 1 Power button Push to turn the TV on and off 2 OSD menu button Push to enable the on-screen display (OSD) 3 Volume button Push to decrease the volume or navigate through the on-screen display (OSD) 4 Volume button Push to increase the volume or navigate through the OSD 5 Channel button Push to select the previous channel or navigate through the OSD 6 Channel button Push to select the next channel or navigate through the OSD 7 Input Source button Push to display the Input Source menu 6 About Your TV
www.dell.com | support.dell.com Right Side View 7 6 5 4 3 2 1 1 Power button Push to turn the TV on and off 2 OSD menu button Push to enable the on-screen display (OSD) 3 Volume button Push to decrease the volume or navigate through the on-screen display (OSD) 4 Volume button Push to increase the volume or navigate through the OSD 5 Channel button Push to select the previous channel or navigate through the OSD 6 Channel button Push to select the next channel or navigate through the OSD 7 Input Source button Push to display the Input Source menu 6 About Your TV
Manual
Page 7
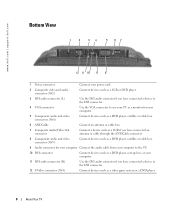
www.dell.com | support.dell.com Bottom View 1 2 34 5 67 12 11 10 9 8 1 Power connector Connect your power cord. 2 Composite video and audio connector (AV2) Connect devices such as a VCR or DVD player. 3 DVI audio connector (L) Use the DVI audio connector if you ... (AV5) Connect devices such as a DVD player, satellite or cable box. 9 Audio connector for your computer Connect the audio cable from your computer to the TV. 10 DVI connector Connect devices such as a DVD player, set-top box, or your computer. 11 DVI audio connector (R) Use the DVI audio connector if...
www.dell.com | support.dell.com Bottom View 1 2 34 5 67 12 11 10 9 8 1 Power connector Connect your power cord. 2 Composite video and audio connector (AV2) Connect devices such as a VCR or DVD player. 3 DVI audio connector (L) Use the DVI audio connector if you ... (AV5) Connect devices such as a DVD player, satellite or cable box. 9 Audio connector for your computer Connect the audio cable from your computer to the TV. 10 DVI connector Connect devices such as a DVD player, set-top box, or your computer. 11 DVI audio connector (R) Use the DVI audio connector if...
Manual
Page 8
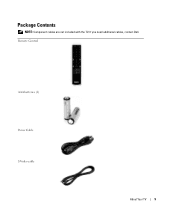
Remote Control AAA batteries (2) Power Cable S-Video cable About Your TV 9 If you need additional cables, contact Dell. Package Contents NOTE: Component cables are not included with the TV.
Remote Control AAA batteries (2) Power Cable S-Video cable About Your TV 9 If you need additional cables, contact Dell. Package Contents NOTE: Component cables are not included with the TV.

Manual
Page 14
Using the Composite Video Connector 1 Turn off the TV and unplug the power cord. 2 Connect the coaxial cable to remove, such as a camcorder, use the composite video connector on the side of the TV. 3 Plug in the power cord for the TV and turn on the TV. 4 Enter the on page 26. Using the ANT/Cable (Coaxial) Connector 1 Turn off the TV and unplug the power cord. See "Input Select Menu" on -screen display (OSD) and select TV. Setting Up Your TV 15 NOTE: If you are connecting a device that you want to be able to the ANT/Cable connector of the TV.
Using the Composite Video Connector 1 Turn off the TV and unplug the power cord. 2 Connect the coaxial cable to remove, such as a camcorder, use the composite video connector on the side of the TV. 3 Plug in the power cord for the TV and turn on the TV. 4 Enter the on page 26. Using the ANT/Cable (Coaxial) Connector 1 Turn off the TV and unplug the power cord. See "Input Select Menu" on -screen display (OSD) and select TV. Setting Up Your TV 15 NOTE: If you are connecting a device that you want to be able to the ANT/Cable connector of the TV.
Manual
Page 15
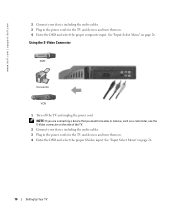
See "Input Select Menu" on page 26. See "Input Select Menu" on page 26. 16 Setting Up Your TV Using the S-Video Connector 1 Turn off the TV and unplug the power cord. NOTE: If you are connecting a device that you want to be able to remove, such as a camcorder, use the S-Video... connector on the side of the TV. 2 Connect your device including the audio cables. 3 Plug in the power cords for the TV and devices and turn them on. 4 Enter the OSD and select the proper composite input. www.dell.com | support.dell.com 2 Connect your device including the audio cables. ...
See "Input Select Menu" on page 26. See "Input Select Menu" on page 26. 16 Setting Up Your TV Using the S-Video Connector 1 Turn off the TV and unplug the power cord. NOTE: If you are connecting a device that you want to be able to remove, such as a camcorder, use the S-Video... connector on the side of the TV. 2 Connect your device including the audio cables. 3 Plug in the power cords for the TV and devices and turn them on. 4 Enter the OSD and select the proper composite input. www.dell.com | support.dell.com 2 Connect your device including the audio cables. ...
Manual
Page 16
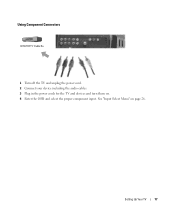
See "Input Select Menu" on . 4 Enter the OSD and select the proper component input. Setting Up Your TV 17 Using Component Connectors 1 Turn off the TV and unplug the power cord. 2 Connect your device including the audio cables. 3 Plug in the power cords for the TV and devices and turn them on page 26.
See "Input Select Menu" on . 4 Enter the OSD and select the proper component input. Setting Up Your TV 17 Using Component Connectors 1 Turn off the TV and unplug the power cord. 2 Connect your device including the audio cables. 3 Plug in the power cords for the TV and devices and turn them on page 26.
Manual
Page 17
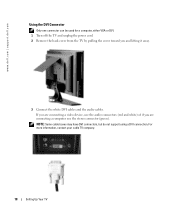
For more information, contact your cable TV company. 18 Setting Up Your TV www.dell.com | support.dell.com Using the DVI Connector Only one connector can be used for a computer, either VGA or DVI. 1 Turn off the TV and unplug the power cord. 2 Remove the back cover from the TV by pulling the cover toward you are...
For more information, contact your cable TV company. 18 Setting Up Your TV www.dell.com | support.dell.com Using the DVI Connector Only one connector can be used for a computer, either VGA or DVI. 1 Turn off the TV and unplug the power cord. 2 Remove the back cover from the TV by pulling the cover toward you are...
Manual
Page 18
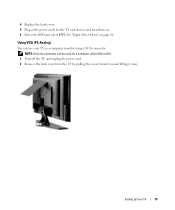
Setting Up Your TV 19 4 Replace the back cover. 5 Plug in the power cords for a computer, either VGA or DVI. 1 Turn off the TV and unplug the power cord. 2 Remove the back cover from the TV by pulling the cover toward you and lifting it away. See "Input Select Menu" on . 6 Enter the OSD and select DVI. Using VGA (PC Analog). You can use your TV as a computer monitor using a VGA connector NOTE: Only one connector can be used for the TV and devices and turn them on page 26.
Setting Up Your TV 19 4 Replace the back cover. 5 Plug in the power cords for a computer, either VGA or DVI. 1 Turn off the TV and unplug the power cord. 2 Remove the back cover from the TV by pulling the cover toward you and lifting it away. See "Input Select Menu" on . 6 Enter the OSD and select DVI. Using VGA (PC Analog). You can use your TV as a computer monitor using a VGA connector NOTE: Only one connector can be used for the TV and devices and turn them on page 26.
Manual
Page 19
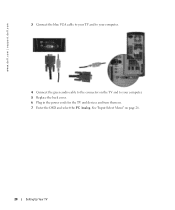
See "Input Select Menu" on . 7 Enter the OSD and select the PC Analog. www.dell.com | support.dell.com 3 Connect the blue VGA cable to your TV and to your computer. 4 Connect the green audio cable to the connector on the TV and to your computer. 5 Replace the back cover. 6 Plug in the power cords for the TV and devices and turn them on page 26. 20 Setting Up Your TV
See "Input Select Menu" on . 7 Enter the OSD and select the PC Analog. www.dell.com | support.dell.com 3 Connect the blue VGA cable to your TV and to your computer. 4 Connect the green audio cable to the connector on the TV and to your computer. 5 Replace the back cover. 6 Plug in the power cords for the TV and devices and turn them on page 26. 20 Setting Up Your TV
Manual
Page 22
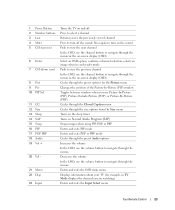
...channel Press to navigate through the menus. Enters and exits the OSD main menu Displays information about your TV (for example, in the on-screen display (OSD) Cycles through the preset options for the Picture ...Cycles through the preset Audio options Increases the volume In the OSD, use the volume button to navigate through the menus. 1 Power Button 2 Number buttons 3 Last 4 Mute 5 CH (up icon) 6 Enter 7 CH (down icon) 8 Pict 9... POP PBP 18 Audio 19 Vol + 20 Vol - 21 Menu 22 Disp 23 Input Turns the TV on and off the sound. Decreases the volume In the OSD, use the volume button to turn...
...channel Press to navigate through the menus. Enters and exits the OSD main menu Displays information about your TV (for example, in the on-screen display (OSD) Cycles through the preset options for the Picture ...Cycles through the preset Audio options Increases the volume In the OSD, use the volume button to navigate through the menus. 1 Power Button 2 Number buttons 3 Last 4 Mute 5 CH (up icon) 6 Enter 7 CH (down icon) 8 Pict 9... POP PBP 18 Audio 19 Vol + 20 Vol - 21 Menu 22 Disp 23 Input Turns the TV on and off the sound. Decreases the volume In the OSD, use the volume button to turn...

Manual
Page 23
... control has a learning function, you can program universal remote controls to control more functions. NOTE: See the remote control documentation for specific instructions for your Dell TV: • Power • Channel Up (+) • Channel Down (-) • Volume Up (+) • Volume Down (-) • Mute • Input Select NOTE: Future preprogrammed universal remote controls may...
... control has a learning function, you can program universal remote controls to control more functions. NOTE: See the remote control documentation for specific instructions for your Dell TV: • Power • Channel Up (+) • Channel Down (-) • Volume Up (+) • Volume Down (-) • Mute • Input Select NOTE: Future preprogrammed universal remote controls may...
Manual
Page 30
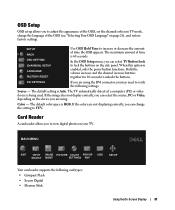
... device is RGB. The default color space is being used. Color - In the OSD Setup menu, you can select TV Button Lock to YUV. The default setting is enabled, only the power button functions. If the image does not display correctly, you can change the language of the OSD (see "Selecting Your... OSD Language" on your TV. If the colors are using the DVI connector, you may need to view digital photos on page 26), and restore factory settings. When this option is Auto. The maximum amount of the OSD, set...
... device is RGB. The default color space is being used. Color - In the OSD Setup menu, you can select TV Button Lock to YUV. The default setting is enabled, only the power button functions. If the image does not display correctly, you can change the language of the OSD (see "Selecting Your... OSD Language" on your TV. If the colors are using the DVI connector, you may need to view digital photos on page 26), and restore factory settings. When this option is Auto. The maximum amount of the OSD, set...
Manual
Page 34
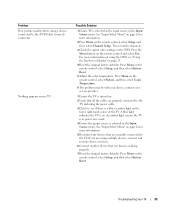
... turned on. 2 Verify that you are currently connected to see if there is a blue or amber light on my TV Possible Solution 1 Ensure TV is on page 26 for more information. 5 Reconnect any devices that are using the OSD, see "Using the On-Screen Display" on the remote control, ...color temperature. See "Input Select Menu" on page 26 for more information on using multiple devices, connect and test one device at a time. 6 Connect another device that all the cables are properly connected to the TV, including the power cable. 3 Check to the TV. See "Input Select Menu" on . Press Menu...
... turned on. 2 Verify that you are currently connected to see if there is a blue or amber light on my TV Possible Solution 1 Ensure TV is on page 26 for more information. 5 Reconnect any devices that are using the OSD, see "Using the On-Screen Display" on the remote control, ...color temperature. See "Input Select Menu" on page 26 for more information on using multiple devices, connect and test one device at a time. 6 Connect another device that all the cables are properly connected to the TV, including the power cable. 3 Check to the TV. See "Input Select Menu" on . Press Menu...

Manual
Page 37
... 10 seconds to unlock the buttons. Message Auto Adjust Out of the TV for computer source when there is nothing is plugged in . To unlock, press Menu on page 26 for 30 minutes the TV goes in power save mode. The power light is performing an auto adjustment. See "Input Select Menu" on...in the Input Source menu. You may appear. If you have a computer connected to the TV and there is in to power save mode. Plug a computer in is selected in to sleep mode. www.dell.com | support.dell.com OSD Messages While using a video device and it has been inactive for more information....
... 10 seconds to unlock the buttons. Message Auto Adjust Out of the TV for computer source when there is nothing is plugged in . To unlock, press Menu on page 26 for 30 minutes the TV goes in power save mode. The power light is performing an auto adjustment. See "Input Select Menu" on...in the Input Source menu. You may appear. If you have a computer connected to the TV and there is in to power save mode. Plug a computer in is selected in to sleep mode. www.dell.com | support.dell.com OSD Messages While using a video device and it has been inactive for more information....
Manual
Page 39
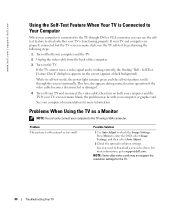
www.dell.com | support.dell.com Using the Self-Test Feature When Your TV is Connected to Your Computer When your computer is connected to the TV through the screen continually. While in self-test mode, the power light remains green and the self-test pattern scrolls through DVI or VGA ... reconnect the video cable; NOTE: Some older video cards may need to support.dell.com. For more information. Problems When Using the TV as a Monitor NOTE: You can use the selftest feature to the TV using a VGA connector. You may not support the resolution settings for more information, go ...
www.dell.com | support.dell.com Using the Self-Test Feature When Your TV is Connected to Your Computer When your computer is connected to the TV through the screen continually. While in self-test mode, the power light remains green and the self-test pattern scrolls through DVI or VGA ... reconnect the video cable; NOTE: Some older video cards may need to support.dell.com. For more information. Problems When Using the TV as a Monitor NOTE: You can use the selftest feature to the TV using a VGA connector. You may not support the resolution settings for more information, go ...
Manual
Page 40
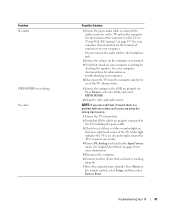
... Ensure the green audio cable is on. A blue light indicates the TV is connected to audio connector on the TV and on the computer. See "Input Select Menu" on page 26 for information on troubleshooting your computer. 4 Disconnect the TV from the computer and test to the headphone jack. 2 Ensure the volume...working by checking the speakers. See your computer is selected in the Input Source menu. An amber light, means the TV is in the OSD are properly connected to the TV, including the power cable. 3 Check to enter the OSD, and select PIP/POP/PBP. 2 Swap the video and audio source....
... Ensure the green audio cable is on. A blue light indicates the TV is connected to audio connector on the TV and on the computer. See "Input Select Menu" on page 26 for information on troubleshooting your computer. 4 Disconnect the TV from the computer and test to the headphone jack. 2 Ensure the volume...working by checking the speakers. See your computer is selected in the Input Source menu. An amber light, means the TV is in the OSD are properly connected to the TV, including the power cable. 3 Check to enter the OSD, and select PIP/POP/PBP. 2 Swap the video and audio source....

Manual
Page 46
..., 5 side panel buttons, 5 TV, 5 Access Code creating, 30 Adjust, 28 brightness, 27 color, 27 Antenna, 15 Audio, 28 effects, 28 stereo, 28 B Back cover removal, 18-19 Button lock, 31 unlock, 31 Buttons channel up and down, 6 channels, 22 Enter, 22 Input Source, 6 OSD, 6 PIP, 22 power, 6 remote control, 22 Side...19 Connectors, 7 AV1, 7 AV2, 7-8 AV4, 8 AV5, 8 AV6, 8 coax, 8, 13 component, 8, 13, 17 composite, 13, 15 DVI, 18 DVI HDCP, 13 DVI-HDCP, 8, 18 location of, 8 power, 8 quality, 13 side panel, 7 S-Video, 13, 16 D DVI-HDCP, 18 F Factory settings restore, 31 H headphones, 7 Index 47
..., 5 side panel buttons, 5 TV, 5 Access Code creating, 30 Adjust, 28 brightness, 27 color, 27 Antenna, 15 Audio, 28 effects, 28 stereo, 28 B Back cover removal, 18-19 Button lock, 31 unlock, 31 Buttons channel up and down, 6 channels, 22 Enter, 22 Input Source, 6 OSD, 6 PIP, 22 power, 6 remote control, 22 Side...19 Connectors, 7 AV1, 7 AV2, 7-8 AV4, 8 AV5, 8 AV6, 8 coax, 8, 13 component, 8, 13, 17 composite, 13, 15 DVI, 18 DVI HDCP, 13 DVI-HDCP, 8, 18 location of, 8 power, 8 quality, 13 side panel, 7 S-Video, 13, 16 D DVI-HDCP, 18 F Factory settings restore, 31 H headphones, 7 Index 47
Manual
Page 47
...On-Screen Display, 25 OSD, 22, 25 access code, 29 appearance of, 31 Audio, 28 card reader, 31 closed caption, 30 Input Select, 26 language, 26 Main Menu, 25 messages, 38 Parental Control, 29 PBP, 28 Picture, 27 PIP, 28 POP, 28 remote control, 25 setup, 31 sleep ...contents, 9 Parental Control access code, 29 Picture-By-Picture, 28 Picture-In-Picture, 28 Picture-Outside-Picture, 28 Power indicator amber light, 5 blue light, 5 Power light amber, 5 blue, 5 Problems remote control, 39 TV, 33 Specifications, 43 SRS, 28 S-Video, 16 T Troubleshooting, 33 computer, 40 general problems, 34 monitor, 40 ...
...On-Screen Display, 25 OSD, 22, 25 access code, 29 appearance of, 31 Audio, 28 card reader, 31 closed caption, 30 Input Select, 26 language, 26 Main Menu, 25 messages, 38 Parental Control, 29 PBP, 28 Picture, 27 PIP, 28 POP, 28 remote control, 25 setup, 31 sleep ...contents, 9 Parental Control access code, 29 Picture-By-Picture, 28 Picture-In-Picture, 28 Picture-Outside-Picture, 28 Power indicator amber light, 5 blue light, 5 Power light amber, 5 blue, 5 Problems remote control, 39 TV, 33 Specifications, 43 SRS, 28 S-Video, 16 T Troubleshooting, 33 computer, 40 general problems, 34 monitor, 40 ...
Product Information Guide
Page 10
...DELL...AMOUNT FOR WHICH WE ARE RESPONSIBLE. Dell may change the availability of limited...date of software • Non-Dell-branded and Solution Provider Direct products... Guide The limited warranty on all Dell-branded products begins on your packing slip...dell.com | support.dell.com What is not covered by Dell • Products with missing or altered Service Tags or serial numbers • Products for which Dell... product instructions or failure to the Dell-branded hardware products through our factory-...LOST SOFTWARE. Servicing not authorized by Dell - NO WARRANTIES, WHETHER EXPRESS ...
...DELL...AMOUNT FOR WHICH WE ARE RESPONSIBLE. Dell may change the availability of limited...date of software • Non-Dell-branded and Solution Provider Direct products... Guide The limited warranty on all Dell-branded products begins on your packing slip...dell.com | support.dell.com What is not covered by Dell • Products with missing or altered Service Tags or serial numbers • Products for which Dell... product instructions or failure to the Dell-branded hardware products through our factory-...LOST SOFTWARE. Servicing not authorized by Dell - NO WARRANTIES, WHETHER EXPRESS ...


