User Manual
Page 1
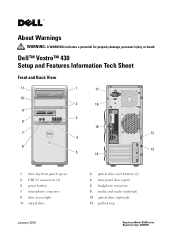
Dell™ Vostro™ 430 Setup and Features Information Tech Sheet Front and Back View 11 1 17 10 2 16 9 3 8 15 7 12 4 6 5 14 13 1 drive bay front panel (open) 3 USB 2.0 connectors (4) 5 power button 7 microphone connector 9 drive access light 11 optical drive 2 optical drive eject buttons (2) 4 front panel door (open) 6 headphone connector 8 media card reader (optional) 10 optical drive...
Dell™ Vostro™ 430 Setup and Features Information Tech Sheet Front and Back View 11 1 17 10 2 16 9 3 8 15 7 12 4 6 5 14 13 1 drive bay front panel (open) 3 USB 2.0 connectors (4) 5 power button 7 microphone connector 9 drive access light 11 optical drive 2 optical drive eject buttons (2) 4 front panel door (open) 6 headphone connector 8 media card reader (optional) 10 optical drive...
User Manual
Page 2
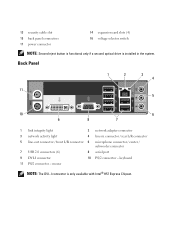
... PS/2 connector - mouse NOTE: The DVI-I connector 10 PS/2 connector - 13 security cable slot 15 back panel connectors 17 power connector 14 expansion card slots (4) 16 voltage selector switch NOTE: Second eject button is functional only if a second optical drive is only available with Intel® H57 Express Chipset. Back Panel 1 2 3 4 11...
... PS/2 connector - mouse NOTE: The DVI-I connector 10 PS/2 connector - 13 security cable slot 15 back panel connectors 17 power connector 14 expansion card slots (4) 16 voltage selector switch NOTE: Second eject button is functional only if a second optical drive is only available with Intel® H57 Express Chipset. Back Panel 1 2 3 4 11...
User Manual
Page 4
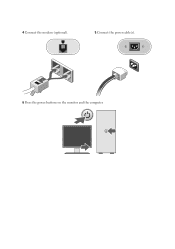
4 Connect the modem (optional). 5 Connect the power cable(s). 6 Press the power buttons on the monitor and the computer.
4 Connect the modem (optional). 5 Connect the power cable(s). 6 Press the power buttons on the monitor and the computer.

