
Quick Start Guide
Page 1
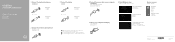
VOSTRO 3800/3900/3900G/3902 Quick Start Guide 1 Connect the keyboard and mouse USB Connector USB 连接器 USB 連接器 Or PS/2 Connector PS/2 连接器 PS/2 連接器 2 Connect the network cable (optional) 3 Connect the display HDMI Connector HDMI 连接器 HDMI 連接器 Or VGA Connector VGA 连接器 VGA 連接器 4 Connect the power cable on your computer and display 6 Finish Windows setup 完成 Windows Windows 設定 ...
VOSTRO 3800/3900/3900G/3902 Quick Start Guide 1 Connect the keyboard and mouse USB Connector USB 连接器 USB 連接器 Or PS/2 Connector PS/2 连接器 PS/2 連接器 2 Connect the network cable (optional) 3 Connect the display HDMI Connector HDMI 连接器 HDMI 連接器 Or VGA Connector VGA 连接器 VGA 連接器 4 Connect the power cable on your computer and display 6 Finish Windows setup 完成 Windows Windows 設定 ...
Quick Start Guide
Page 2
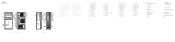
...Vostro 3900/3900G/3902 1. Power button/Power light 3. Headphone connector 9. Line-out connector 17. USB 2.0 連接器 12 13. Line-in connector 19. Security cable slot 21. Mouse connector 23. HDMI 连接器 15. VGA 連接器 16 17 18 19 20 21 22 23 24. Microphone connector 10. Optical-drive/hard-drive bay 24. USB 3.0 連接器 14. Optical-drive (optional) 2. Hard-drive activity light 4. Power-supply diagnostic light 5. Optical-drive eject button 7. Power cable connector 8. Keyboard connector...
...Vostro 3900/3900G/3902 1. Power button/Power light 3. Headphone connector 9. Line-out connector 17. USB 2.0 連接器 12 13. Line-in connector 19. Security cable slot 21. Mouse connector 23. HDMI 连接器 15. VGA 連接器 16 17 18 19 20 21 22 23 24. Microphone connector 10. Optical-drive/hard-drive bay 24. USB 3.0 連接器 14. Optical-drive (optional) 2. Hard-drive activity light 4. Power-supply diagnostic light 5. Optical-drive eject button 7. Power cable connector 8. Keyboard connector...
Dell Vostro 3900/3902 Owners Manual
Page 5
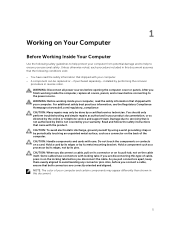
.... 1 Working on Your Computer Before Working Inside Your Computer Use the following conditions exist: • You have connectors with your computer. You should only perform troubleshooting and simple repairs as directed by performing the removal procedure in on the locking tabs before you disconnect the cable. CAUTION: When you finish working inside the computer, replace all power sources before opening the computer cover or panels. For...
.... 1 Working on Your Computer Before Working Inside Your Computer Use the following conditions exist: • You have connectors with your computer. You should only perform troubleshooting and simple repairs as directed by performing the removal procedure in on the locking tabs before you disconnect the cable. CAUTION: When you finish working inside the computer, replace all power sources before opening the computer cover or panels. For...

Dell Vostro 3900/3902 Owners Manual
Page 6
... being scratched. 2. Remove the cover. Shut down a. Select the - Using a mouse: and then select Shut down the operating system: • In Windows 8: - Click Start . 2. or 1. Press and hold the power button for about 6 seconds to prevent the computer cover from their electrical outlets. 5. While you work surface is unplugged to dissipate static electricity, which could harm internal components. Using a touch-enabled device: a. b. Turn off . Turning Off Your...
... being scratched. 2. Remove the cover. Shut down a. Select the - Using a mouse: and then select Shut down the operating system: • In Windows 8: - Click Start . 2. or 1. Press and hold the power button for about 6 seconds to prevent the computer cover from their electrical outlets. 5. While you work surface is unplugged to dissipate static electricity, which could harm internal components. Using a touch-enabled device: a. b. Turn off . Turning Off Your...

Dell Vostro 3900/3902 Owners Manual
Page 7
Connect any external devices, cards, and cables before turning on your computer. 5. CAUTION: To connect a network cable, first plug the cable into the network device and then plug it into the computer. 2. If required, verify that the computer works correctly by running the Dell Diagnostics. 7 Connect your computer and all attached devices to your computer. 3. Replace the cover. Turn on your computer. 1. After Working Inside Your Computer After you complete any replacement procedure, ensure you connect any telephone or network cables to their electrical outlets. 4.
Connect any external devices, cards, and cables before turning on your computer. 5. CAUTION: To connect a network cable, first plug the cable into the network device and then plug it into the computer. 2. If required, verify that the computer works correctly by running the Dell Diagnostics. 7 Connect your computer and all attached devices to your computer. 3. Replace the cover. Turn on your computer. 1. After Working Inside Your Computer After you complete any replacement procedure, ensure you connect any telephone or network cables to their electrical outlets. 4.

Dell Vostro 3900/3902 Owners Manual
Page 11
... from the computer [4]. 4. Remove the screws that secure the hard drive to remove it upwards to the computer. 5. b. Disconnect the SATA cable and power cable from the hard-drive bracket. Connect the SATA cable and the power cable to the hard drive. 11 Remove the screws that secure the hard-drive bracket. 3. Replace the hard drive into its slot in the computer. 4. Lift and remove the hard drive from the hard drive [1] [2]. Install the screws that secure the hard-drive bracket. b. a. Installing the Hard Drive 1.
... from the computer [4]. 4. Remove the screws that secure the hard drive to remove it upwards to the computer. 5. b. Disconnect the SATA cable and power cable from the hard-drive bracket. Connect the SATA cable and the power cable to the hard drive. 11 Remove the screws that secure the hard-drive bracket. 3. Replace the hard drive into its slot in the computer. 4. Lift and remove the hard drive from the hard drive [1] [2]. Install the screws that secure the hard-drive bracket. b. a. Installing the Hard Drive 1.

Dell Vostro 3900/3902 Owners Manual
Page 13
.... Connect the card reader power cable to the chassis. 3. Removing the Memory 1. Follow the procedures in After Working Inside Your Computer. Remove the: • cover • bezel 3. Remove the card reader from the metal clip. Follow the procedures in Before Working Inside Your Computer. 2. Removing the Card Reader 1. Follow the procedures in Before Working Inside Your Computer. 2. a. d. Push the card reader towards the front of the computer. Installing the Card Reader 1. Remove the cover. 13 Disconnect the card reader power cable from...
.... Connect the card reader power cable to the chassis. 3. Removing the Memory 1. Follow the procedures in After Working Inside Your Computer. Remove the: • cover • bezel 3. Remove the card reader from the metal clip. Follow the procedures in Before Working Inside Your Computer. 2. Removing the Card Reader 1. Follow the procedures in Before Working Inside Your Computer. 2. a. d. Push the card reader towards the front of the computer. Installing the Card Reader 1. Remove the cover. 13 Disconnect the card reader power cable from...

Dell Vostro 3900/3902 Owners Manual
Page 20
... the fan cable from the computer. c. Install the cover. 5. Remove the screws that secures the I /O panel and FlyWire cables to the system board. 4. Place the fan on the computer. 2. Installing the Input/Output (I /O panel into its slot on the computer. 2. Slide the I /O) Panel 1. Route the cables through the metal clips. 4. Install the: • bezel • cover 6. Follow the procedures in After Working Inside Your Computer. b. Installing the System Fan 1. Connect the fan cable...
... the fan cable from the computer. c. Install the cover. 5. Remove the screws that secures the I /O panel and FlyWire cables to the system board. 4. Place the fan on the computer. 2. Installing the Input/Output (I /O panel into its slot on the computer. 2. Slide the I /O) Panel 1. Route the cables through the metal clips. 4. Install the: • bezel • cover 6. Follow the procedures in After Working Inside Your Computer. b. Installing the System Fan 1. Connect the fan cable...
Dell Vostro 3900/3902 Owners Manual
Page 24
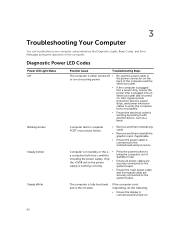
... connected to the motherboard and processor. Ensure all power cables are securely connected to verify the computer turns on properly. 3 Troubleshooting Your Computer You can troubleshoot your computer using indicators like Diagnostic Lights, Beep Codes, and Error Messages during the operation of standby mode. Diagnostic Power LED Codes Power LED Light Status Off Blinking Amber Steady Amber Steady White Possible Cause Troubleshooting Steps The computer is either turned off • or is fully functional and in the power connector...
... connected to the motherboard and processor. Ensure all power cables are securely connected to verify the computer turns on properly. 3 Troubleshooting Your Computer You can troubleshoot your computer using indicators like Diagnostic Lights, Beep Codes, and Error Messages during the operation of standby mode. Diagnostic Power LED Codes Power LED Light Status Off Blinking Amber Steady Amber Steady White Possible Cause Troubleshooting Steps The computer is either turned off • or is fully functional and in the power connector...
Dell Vostro 3900/3902 Owners Manual
Page 25
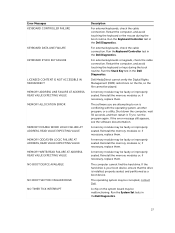
.... The hard drive failed initialization. Enable the Pointing Device option in the Dell Diagnostics. Ensure that you have spelled the command correctly, put spaces in the proper place, and used the correct pathname. Run the hard drive tests in the system setup program. A memory module may be faulty. For an external mouse, check the cable connection. Reinstall the memory modules or, if necessary, replace them . 25 The operation requires a hard drive in the...
.... The hard drive failed initialization. Enable the Pointing Device option in the Dell Diagnostics. Ensure that you have spelled the command correctly, put spaces in the proper place, and used the correct pathname. Run the hard drive tests in the system setup program. A memory module may be faulty. For an external mouse, check the cable connection. Reinstall the memory modules or, if necessary, replace them . 25 The operation requires a hard drive in the...
Dell Vostro 3900/3902 Owners Manual
Page 26
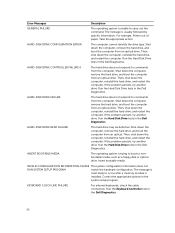
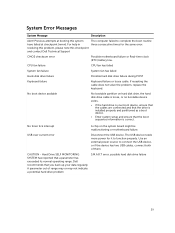
HARD-DISK DRIVE CONFIGURATION ERROR The computer cannot identify the drive type. Then, shut down the computer, reinstall the hard drive, and restart the computer. Run the Hard Disk Drive tests in the Dell Diagnostics. HARD-DISK DRIVE CONTROLLER FAILURE 0 The hard drive does not respond to commands from the computer. If the problem persists, try another drive. Run the Hard Disk Drive tests in the Dell Diagnostics. INVALID CONFIGURATION INFORMATION-PLEASE The system configuration information does not RUN SYSTEM SETUP PROGRAM match the hardware configuration. Run the Keyboard ...
HARD-DISK DRIVE CONFIGURATION ERROR The computer cannot identify the drive type. Then, shut down the computer, reinstall the hard drive, and restart the computer. Run the Hard Disk Drive tests in the Dell Diagnostics. HARD-DISK DRIVE CONTROLLER FAILURE 0 The hard drive does not respond to commands from the computer. If the problem persists, try another drive. Run the Hard Disk Drive tests in the Dell Diagnostics. INVALID CONFIGURATION INFORMATION-PLEASE The system configuration information does not RUN SYSTEM SETUP PROGRAM match the hardware configuration. Run the Keyboard ...
Dell Vostro 3900/3902 Owners Manual
Page 27
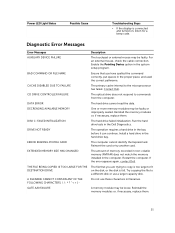
... run is installed, properly seated, and partitioned as a boot device. Reinstall the memory modules or, if necessary, replace them . For external keyboards, check the cable connection. If the error message still appears, see the software documentation. Shut down the computer, wait 30 seconds, and then restart it. A memory module may be faulty or improperly seated. A memory module may be corrupted, contact Dell. Error Messages KEYBOARD CONTROLLER FAILURE KEYBOARD DATA LINE FAILURE KEYBOARD STUCK KEY FAILURE...
... run is installed, properly seated, and partitioned as a boot device. Reinstall the memory modules or, if necessary, replace them . For external keyboards, check the cable connection. If the error message still appears, see the software documentation. Shut down the computer, wait 30 seconds, and then restart it. A memory module may be faulty or improperly seated. A memory module may be corrupted, contact Dell. Error Messages KEYBOARD CONTROLLER FAILURE KEYBOARD DATA LINE FAILURE KEYBOARD STUCK KEY FAILURE...
Dell Vostro 3900/3902 Owners Manual
Page 28
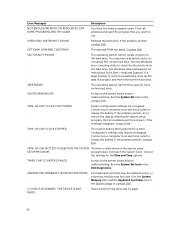
... by entering the system setup program, then immediately exit the program. Run the System Memory tests and the Keyboard Controller test in the contact Dell . If the problem persists, contact Dell. SEEK ERROR The operating system cannot find a specific track on the hard drive. If the problem persists, contact Dell. X:\ IS NOT ACCESSIBLE. You may be loose. Close all windows and open the program that supports the system configuration settings may be malfunctioning. OPERATING SYSTEM...
... by entering the system setup program, then immediately exit the program. Run the System Memory tests and the Keyboard Controller test in the contact Dell . If the problem persists, contact Dell. SEEK ERROR The operating system cannot find a specific track on the hard drive. If the problem persists, contact Dell. X:\ IS NOT ACCESSIBLE. You may be loose. Close all windows and open the program that supports the system configuration settings may be malfunctioning. OPERATING SYSTEM...
Dell Vostro 3900/3902 Owners Manual
Page 29
...data regularly. Use an external power source to function properly. Dell recommends that a parameter has exceeded its normal operating range. No boot device available No bootable partition on the system board might be malfunctioning or motherboard failure. USB over current error Disconnect the USB device. If reseating the cable does not solve the problem, replace the keyboard. CPU fan failure CPU fan has failed System fan failure System fan has failed Hard-disk drive failure Possible hard disk drive failure during POST Keyboard failure Keyboard failure or loose...
...data regularly. Use an external power source to function properly. Dell recommends that a parameter has exceeded its normal operating range. No boot device available No bootable partition on the system board might be malfunctioning or motherboard failure. USB over current error Disconnect the USB device. If reseating the cable does not solve the problem, replace the keyboard. CPU fan failure CPU fan has failed System fan failure System fan has failed Hard-disk drive failure Possible hard disk drive failure during POST Keyboard failure Keyboard failure or loose...
Dell Vostro 3900/3902 Owners Manual
Page 30
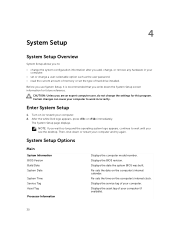
...'s internal clock. Turn on (or restart) your computer to work incorrectly. Enter System Setup 1. CAUTION: Unless you are an expert computer user, do not change a user-selectable option such as the user password. • read the current amount of memory or set the type of your computer. System Setup Options Main System Information BIOS Version Build Date System Date System Time Service Tag Asset Tag Processor Information Displays the computer model number. Displays...
...'s internal clock. Turn on (or restart) your computer to work incorrectly. Enter System Setup 1. CAUTION: Unless you are an expert computer user, do not change a user-selectable option such as the user password. • read the current amount of memory or set the type of your computer. System Setup Options Main System Information BIOS Version Build Date System Date System Time Service Tag Asset Tag Processor Information Displays the computer model number. Displays...
Dell Vostro 3900/3902 Owners Manual
Page 31
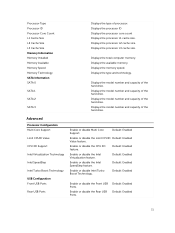
... the type and technology. Displays the model number and capacity of the hard drive. Advanced Processor Configuration Multi Core Support Limit CPUID Value CPU XD Support Intel Virtualization Technology Intel SpeedStep Intel Turbo Boost Technology USB Configuration Front USB Ports Rear USB Ports Enable or disable Multi Core Support. Default: Enabled Enable or disable Intel Turbo Boost Technology. Default: Enabled Default: Enabled 31 Displays the memory speed. Default: Enabled Enable or disable the Intel Virtualization feature. Enable or disable the Rear USB Ports. Displays the...
... the type and technology. Displays the model number and capacity of the hard drive. Advanced Processor Configuration Multi Core Support Limit CPUID Value CPU XD Support Intel Virtualization Technology Intel SpeedStep Intel Turbo Boost Technology USB Configuration Front USB Ports Rear USB Ports Enable or disable Multi Core Support. Default: Enabled Enable or disable Intel Turbo Boost Technology. Default: Enabled Default: Enabled 31 Displays the memory speed. Default: Enabled Enable or disable the Intel Virtualization feature. Enable or disable the Rear USB Ports. Displays the...
Dell Vostro 3900/3902 Owners Manual
Page 32
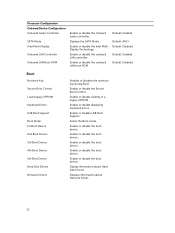
... LAN boot ROM. Enable or disable the Secure Boot Control. Enable or disable the boot device. Enable or Disable USB Boot Support. Display information about Hard Disk Drivers Displays information about Network Drives 32 Default: Enabled Default: AHCI Default: Disabled Default: Enabled Default: Disabled Boot Numlock Key Secure Boot Control Load Legacy OPROM Keyboard Errors USB Boot Support Boot Mode 1st Boot Device 2nd Boot Device 3rd Boot Device 4th Boot Device 5th Boot Device Hard Disk Drivers Network Drivers Enables of a legacy OPROM Enable or disable displaying keyboard errors...
... LAN boot ROM. Enable or disable the Secure Boot Control. Enable or disable the boot device. Enable or Disable USB Boot Support. Display information about Hard Disk Drivers Displays information about Network Drives 32 Default: Enabled Default: AHCI Default: Disabled Default: Enabled Default: Disabled Boot Numlock Key Secure Boot Control Load Legacy OPROM Keyboard Errors USB Boot Support Boot Mode 1st Boot Device 2nd Boot Device 3rd Boot Device 4th Boot Device 5th Boot Device Hard Disk Drivers Network Drivers Enables of a legacy OPROM Enable or disable displaying keyboard errors...
Dell Vostro 3900/3902 Owners Manual
Page 33
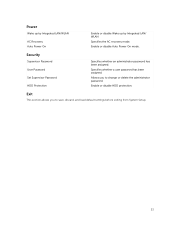
.... Enable or disable HDD protection. Power Wake up by Integrated LAN/WLAN AC Recovery Auto Power On Enable or disable Wake up by Integrated LAN/ WLAN Specifies the AC recovery mode. Exit This section allows you to save, discard, and load default settings before exiting from System Setup. 33 Security Supervisor Password User Password Set Supervisor Password HDD Protection Specifies whether an administrator password has been assigned. Allows you to change or delete the administrator password. Enable...
.... Enable or disable HDD protection. Power Wake up by Integrated LAN/WLAN AC Recovery Auto Power On Enable or disable Wake up by Integrated LAN/ WLAN Specifies the AC recovery mode. Exit This section allows you to save, discard, and load default settings before exiting from System Setup. 33 Security Supervisor Password User Password Set Supervisor Password HDD Protection Specifies whether an administrator password has been assigned. Allows you to change or delete the administrator password. Enable...

Dell Vostro 3900/3902 Owners Manual
Page 35
... BIOS chip (NVRAM) Expansion Bus Bus speed: PCI Express SATA USB Cards PCIe x16 PCIe x1 PCI Drives Externally accessible: 5.25 inch drive bays Internally accessible: 3.5 inch drive bays External Connectors Audio: Back panel Front Panel Network USB: Front panel Back panel PS 2 Video Intel H81 8M SPI Flash ROM PCIe 2.0 at speeds upto 5.0 GT/s 0,1 SATA Gen 3 at 6 GB/s and 2,3 SATA Gen 2 at 3 GB/s 80 Mbps Vostro 3800 one half-height card up to two half-height cards one half height card Vostro 3900 series...
... BIOS chip (NVRAM) Expansion Bus Bus speed: PCI Express SATA USB Cards PCIe x16 PCIe x1 PCI Drives Externally accessible: 5.25 inch drive bays Internally accessible: 3.5 inch drive bays External Connectors Audio: Back panel Front Panel Network USB: Front panel Back panel PS 2 Video Intel H81 8M SPI Flash ROM PCIe 2.0 at speeds upto 5.0 GT/s 0,1 SATA Gen 3 at 6 GB/s and 2,3 SATA Gen 2 at 3 GB/s 80 Mbps Vostro 3800 one half-height card up to two half-height cards one half height card Vostro 3900 series...
Dell Vostro 3900/3902 Owners Manual
Page 36
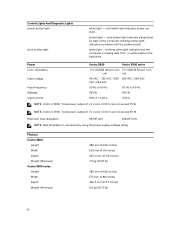
... from, or writing data to the hard drive. blinking amber light indicates a problem with the system board. Control Lights And Diagnostic Lights power button light drive activity light white light - blinking white light indicates that the computer is calculated by state of +5 V and +3.30 V can not exceed 75 W NOTE: Vostro V 3900 :Total power output of the computer; Physical Vostro 3800: Height Width Depth Weight (Minimum) Vostro 3900 series: Height Width Depth Weight (Minimum...
... from, or writing data to the hard drive. blinking amber light indicates a problem with the system board. Control Lights And Diagnostic Lights power button light drive activity light white light - blinking white light indicates that the computer is calculated by state of +5 V and +3.30 V can not exceed 75 W NOTE: Vostro V 3900 :Total power output of the computer; Physical Vostro 3800: Height Width Depth Weight (Minimum) Vostro 3900 series: Height Width Depth Weight (Minimum...


