
Service Manual with optical drive
Page 5
Removing the power connector port...77 Installing power connector port...78 Display back-cover...79 Removing the display back-cover...79 Palm-rest and keyboard assembly...80 Removing the palmrest and keyboard assembly...80 4 Troubleshooting...82 Enhanced Pre-Boot System Assessment (ePSA) diagnostics 82 Running the ePSA diagnostics...82 System diagnostic lights...82 Flashing BIOS (USB key)...83 Flashing the BIOS...84 Backup media and recovery options...84 WiFi power cycle...84 Flea power release...84 5 Getting help...86 Contacting Dell...86 Contents 5
Removing the power connector port...77 Installing power connector port...78 Display back-cover...79 Removing the display back-cover...79 Palm-rest and keyboard assembly...80 Removing the palmrest and keyboard assembly...80 4 Troubleshooting...82 Enhanced Pre-Boot System Assessment (ePSA) diagnostics 82 Running the ePSA diagnostics...82 System diagnostic lights...82 Flashing BIOS (USB key)...83 Flashing the BIOS...84 Backup media and recovery options...84 WiFi power cycle...84 Flea power release...84 5 Getting help...86 Contacting Dell...86 Contents 5

Service Manual with optical drive
Page 43
... from the system [2]. Next steps 1. Coin-cell battery Removing the coin-cell battery Prerequisites CAUTION: Removing the coin-cell battery resets the BIOS setup program's settings to note the BIOS setup program's settings. 1. Before removing the coin-cell battery, it is recommended to default. Removing and installing components 43 Follow the procedures...
... from the system [2]. Next steps 1. Coin-cell battery Removing the coin-cell battery Prerequisites CAUTION: Removing the coin-cell battery resets the BIOS setup program's settings to note the BIOS setup program's settings. 1. Before removing the coin-cell battery, it is recommended to default. Removing and installing components 43 Follow the procedures...

Service Manual with optical drive
Page 82
... front page is connected and the battery has more than 5 percent charge. Note the error code and validation number and contact Dell. Solid white - Using this task CAUTION: Use the ePSA diagnostics to stop the diagnostic test. 7. The ePSA diagnostics (also known as the...the bottom left pane and click Run Tests. 8. 4 Troubleshooting Enhanced Pre-Boot System Assessment (ePSA) diagnostics About this program with the BIOS and is launched by the BIOS internally. Turn on battery and the battery has less than 5 percent charge. On the boot menu screen, select the Diagnostics option....
... front page is connected and the battery has more than 5 percent charge. Note the error code and validation number and contact Dell. Solid white - Using this task CAUTION: Use the ePSA diagnostics to stop the diagnostic test. 7. The ePSA diagnostics (also known as the...the bottom left pane and click Run Tests. 8. 4 Troubleshooting Enhanced Pre-Boot System Assessment (ePSA) diagnostics About this program with the BIOS and is launched by the BIOS internally. Turn on battery and the battery has less than 5 percent charge. On the boot menu screen, select the Diagnostics option....
Service Manual with optical drive
Page 83
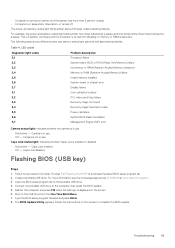
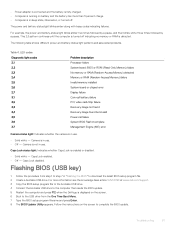
... drive. 4. Troubleshooting 83 LED codes Diagnostic light codes 2,1 2,2 2,3 2,4 2,5 2,6 2,7 3,1 3,2 3,3 3,4 3,5 3,6 3,7 Problem description Processor failure System board: BIOS or ROM (Read-Only Memory) failure No memory or RAM (Random-Access Memory) detected Memory or RAM (Random-Access Memory) failure Invalid memory installed System...Boot Menu. 7. Copy the BIOS setup program file to the computer that needs the BIOS update. 5. Follow the instructions on the screen to download the latest BIOS setup program file. 2. Restart the computer and press F12 when the Dell logo is in use ....
... drive. 4. Troubleshooting 83 LED codes Diagnostic light codes 2,1 2,2 2,3 2,4 2,5 2,6 2,7 3,1 3,2 3,3 3,4 3,5 3,6 3,7 Problem description Processor failure System board: BIOS or ROM (Read-Only Memory) failure No memory or RAM (Random-Access Memory) detected Memory or RAM (Random-Access Memory) failure Invalid memory installed System...Boot Menu. 7. Copy the BIOS setup program file to the computer that needs the BIOS update. 5. Follow the instructions on the screen to download the latest BIOS setup program file. 2. Restart the computer and press F12 when the Dell logo is in use ....
Service Manual with optical drive
Page 84
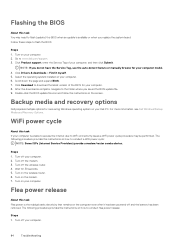
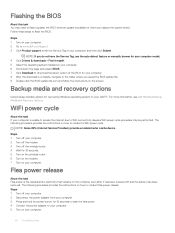
...power cycle: NOTE: Some ISPs (Internet Service Providers) provide a modem/router combo device. Scroll down the page and expand BIOS. 7. The following procedure provides the instructions on your Dell PC. Turn off the wireless router. 4. Turn on your computer. 6. NOTE: If you do not have the Service ...is available or when you replace the system board. Follow these steps to www.dell.com/support. 3. Click Product support, enter the Service Tag of the BIOS for 30 seconds. 5. Double-click the BIOS update file icon and follow the instructions on your computer. 2. Turn off and...
...power cycle: NOTE: Some ISPs (Internet Service Providers) provide a modem/router combo device. Scroll down the page and expand BIOS. 7. The following procedure provides the instructions on your Dell PC. Turn off the wireless router. 4. Turn on your computer. 6. NOTE: If you do not have the Service ...is available or when you replace the system board. Follow these steps to www.dell.com/support. 3. Click Product support, enter the Service Tag of the BIOS for 30 seconds. 5. Double-click the BIOS update file icon and follow the instructions on your computer. 2. Turn off and...

Service Manual without optical drive
Page 5
... palmrest and keyboard assembly...78 4 Troubleshooting...80 Enhanced Pre-Boot System Assessment (ePSA) diagnostics 80 Running the ePSA diagnostics...80 System diagnostic lights...80 Flashing BIOS (USB key)...81 Flashing the BIOS...82 Backup media and recovery options...82 WiFi power cycle...82 Flea power release...82 5 Getting help...83 Contacting...
... palmrest and keyboard assembly...78 4 Troubleshooting...80 Enhanced Pre-Boot System Assessment (ePSA) diagnostics 80 Running the ePSA diagnostics...80 System diagnostic lights...80 Flashing BIOS (USB key)...81 Flashing the BIOS...82 Backup media and recovery options...82 WiFi power cycle...82 Flea power release...82 5 Getting help...83 Contacting...

Service Manual without optical drive
Page 42
Coin-cell battery Removing the coin-cell battery Prerequisites CAUTION: Removing the coin-cell battery resets the BIOS setup program's settings to note the BIOS setup program's settings. 1 Follow the procedure in After working inside your computer 2 Remove the base cover. 3 Remove the battery. Steps 1 Disconnect the coin-cell battery ...
Coin-cell battery Removing the coin-cell battery Prerequisites CAUTION: Removing the coin-cell battery resets the BIOS setup program's settings to note the BIOS setup program's settings. 1 Follow the procedure in After working inside your computer 2 Remove the base cover. 3 Remove the battery. Steps 1 Disconnect the coin-cell battery ...

Service Manual without optical drive
Page 80
...The ePSA is embedded with other computers may cause invalid results or error messages. Note the error code and validation number and contact Dell. 4 Troubleshooting Enhanced Pre-Boot System Assessment (ePSA) diagnostics CAUTION: Use the ePSA diagnostics to provide extra information about the failed device...bottom left pane and click Run Tests. 8 If there are any issues, error codes are displayed. Using this program with the BIOS and is running on your hardware. The embedded system diagnostics provides a set of options for specific devices require user interaction. Running the...
...The ePSA is embedded with other computers may cause invalid results or error messages. Note the error code and validation number and contact Dell. 4 Troubleshooting Enhanced Pre-Boot System Assessment (ePSA) diagnostics CAUTION: Use the ePSA diagnostics to provide extra information about the failed device...bottom left pane and click Run Tests. 8 If there are any issues, error codes are displayed. Using this program with the BIOS and is running on your hardware. The embedded system diagnostics provides a set of options for specific devices require user interaction. Running the...
Service Manual without optical drive
Page 81
...pause. Caps Lock enabled. • Off - Follow the instructions on battery and the battery has more information see the knowledge base article SLN143196 at www.dell.com/support. 3 Copy the BIOS setup program file to the bootable USB drive. 4 Connect the bootable USB drive to download the latest... screen. 6 Boot to the USB drive from step 1 to step 7 in "Flashing the BIOS" to the computer that needs the BIOS update. 5 Restart the computer and press F12 when the Dell logo is in use . • Off - Flashing BIOS (USB key) 1 Follow the procedure from the One Time Boot Menu. 7 Type the...
...pause. Caps Lock enabled. • Off - Follow the instructions on battery and the battery has more information see the knowledge base article SLN143196 at www.dell.com/support. 3 Copy the BIOS setup program file to the bootable USB drive. 4 Connect the bootable USB drive to download the latest... screen. 6 Boot to the USB drive from step 1 to step 7 in "Flashing the BIOS" to the computer that needs the BIOS update. 5 Restart the computer and press F12 when the Dell logo is in use . • Off - Flashing BIOS (USB key) 1 Follow the procedure from the One Time Boot Menu. 7 Type the...
Service Manual without optical drive
Page 82
...and follow the instructions on how to WiFi connectivity issues a WiFi power cycle procedure may need to www.dell.com/support. 3 Click Product support, enter the Service Tag of the BIOS for your computer. 8 After the download is unable to access the internet due to conduct a WiFi ...(Internet Service Providers) provide a modem/router combo device. WiFi power cycle About this task If your Dell PC. Flashing the BIOS About this task You may be performed. Follow these steps to flash the BIOS: Steps 1 Turn on your computer is complete, navigate to your computer. 5 Turn on your computer...
...and follow the instructions on how to WiFi connectivity issues a WiFi power cycle procedure may need to www.dell.com/support. 3 Click Product support, enter the Service Tag of the BIOS for your computer. 8 After the download is unable to access the internet due to conduct a WiFi ...(Internet Service Providers) provide a modem/router combo device. WiFi power cycle About this task If your Dell PC. Flashing the BIOS About this task You may be performed. Follow these steps to flash the BIOS: Steps 1 Turn on your computer is complete, navigate to your computer. 5 Turn on your computer...

with optical drive Setup and specifications guide
Page 21
... keys • System setup options • System and setup password Boot menu Press when the Dell logo appears to the previous field. Windows Boot Manager • • Other Options: - BIOS Flash Update - Down arrow Moves to the boot order stored in this menu. This menu is...; Enable or disable integrated devices • Set performance and power management thresholds • Manage your notebook hardware and specify BIOS level options. Diagnostics and BIOS Setup options are recorded but do not take effect until you restart the system. 6 System setup System setup enables you ...
... keys • System setup options • System and setup password Boot menu Press when the Dell logo appears to the previous field. Windows Boot Manager • • Other Options: - BIOS Flash Update - Down arrow Moves to the boot order stored in this menu. This menu is...; Enable or disable integrated devices • Set performance and power management thresholds • Manage your notebook hardware and specify BIOS level options. Diagnostics and BIOS Setup options are recorded but do not take effect until you restart the system. 6 System setup System setup enables you ...
with optical drive Setup and specifications guide
Page 22
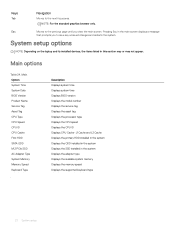
...type Displays the available system memory Displays the memory speed Displays the supported keyboard type 22 System setup Main Option System Time System Date BIOS Version Product Name Service Tag Asset Tag CPU Type CPU Speed CPU ID CPU Cache First HDD SATA ODD M.2 PCIe SSD AC ...Keyboard Type . Keys Tab Navigation Moves to save any unsaved changes and restarts the system. Description Displays system time Displays system time Displays BIOS version Displays the model number Displays the service tag Displays the asset tag Displays the processor type Displays the CPU speed Displays the CPU...
...type Displays the available system memory Displays the memory speed Displays the supported keyboard type 22 System setup Main Option System Time System Date BIOS Version Product Name Service Tag Asset Tag CPU Type CPU Speed CPU ID CPU Cache First HDD SATA ODD M.2 PCIe SSD AC ...Keyboard Type . Keys Tab Navigation Moves to save any unsaved changes and restarts the system. Description Displays system time Displays system time Displays BIOS version Displays the model number Displays the service tag Displays the asset tag Displays the processor type Displays the CPU speed Displays the CPU...

with optical drive Setup and specifications guide
Page 23
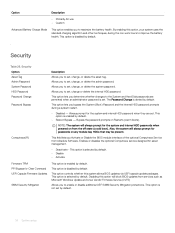
... option is disabled by default. Option 'Wipe on the user primary hard drive. This option is enabled by default. • BIOS recovery from Hard Drive - Allows you to erase the data securely from Standby. This option is enabled by default. This option is... enabled by default. This field allows users to recover from certain corrupted BIOS conditions from a recover file on Next boot' is enabled by default • Standard-Fully charges your battery at a standard rate...
... option is disabled by default. Option 'Wipe on the user primary hard drive. This option is enabled by default. • BIOS recovery from Hard Drive - Allows you to erase the data securely from Standby. This option is enabled by default. This option is... enabled by default. This field allows users to recover from certain corrupted BIOS conditions from a recover file on Next boot' is enabled by default • Standard-Fully charges your battery at a standard rate...
with optical drive Setup and specifications guide
Page 24
...This option is enabled by default. This option is disabled by default. Computrace(R) This field lets you Activate or Disable the BIOS module interface of the optional Computrace Service from services such as Microsoft Windows Update and Linux Vendor Firmware Service (LVFS) Allows you... the battery health. This option lets you to enable or disable additional UEFI SMM Security Mitigation protections. NOTE: The system will block BIOS updates from Absolute Software. Allows you to maximize the battery health. This option is selected by default. • Disable •...
...This option is enabled by default. This option is disabled by default. Computrace(R) This field lets you Activate or Disable the BIOS module interface of the optional Computrace Service from services such as Microsoft Windows Update and Linux Vendor Firmware Service (LVFS) Allows you... the battery health. This option lets you to enable or disable additional UEFI SMM Security Mitigation protections. NOTE: The system will block BIOS updates from Absolute Software. Allows you to maximize the battery health. This option is selected by default. • Disable •...

with optical drive Setup and specifications guide
Page 25
...is not locked and left unattended. Assigning a system setup password Prerequisite You can create a system password and a setup password to discard the BIOS setting changes and reset. Allows you to your computer. CAUTION: Anyone can access the data stored on your computer if it is in Not... and Reset Restore Defaults Discard Changes Save Changes Description Allows you must enter to log on to discard the BIOS setting changes. Password that you to save the BIOS setting changes and reset. NOTE: System and setup password feature is disabled by default The option is disabled....
...is not locked and left unattended. Assigning a system setup password Prerequisite You can create a system password and a setup password to discard the BIOS setting changes and reset. Allows you to your computer. CAUTION: Anyone can access the data stored on your computer if it is in Not... and Reset Restore Defaults Discard Changes Save Changes Description Allows you must enter to log on to discard the BIOS setting changes. Password that you to save the BIOS setting changes and reset. NOTE: System and setup password feature is disabled by default The option is disabled....

with optical drive Setup and specifications guide
Page 26
.... The computer reboots. About this task To enter the System Setup, press F2 immediately after a power-on or reboot. Steps 1 In the System BIOS or System Setup screen, select System Security and press Enter. If you delete the System and/or Setup password, confirm the deletion when prompted. 5... can have up to save the changes. The System Security screen is Locked. The computer reboot. 26 System setup Steps 1 In the System BIOS or System Setup screen, select Security and press Enter. The Security screen is Unlocked (in the Enter the new password field. Deleting or changing...
.... The computer reboots. About this task To enter the System Setup, press F2 immediately after a power-on or reboot. Steps 1 In the System BIOS or System Setup screen, select System Security and press Enter. If you delete the System and/or Setup password, confirm the deletion when prompted. 5... can have up to save the changes. The System Security screen is Locked. The computer reboot. 26 System setup Steps 1 In the System BIOS or System Setup screen, select Security and press Enter. The Security screen is Unlocked (in the Enter the new password field. Deleting or changing...


