

Owners Manual
Page 3
... Vostro 16 5635 7 Right...7 Left...7 Top...8 Front...9 Bottom...10 Chapter 2: Set up your Vostro 16 5635 11 Chapter 3: Specifications of Vostro 16 5635 13 Dimensions and weight...13 Processor...13 Chipset...14 Operating system...14 Memory...14 External ports...14 Internal slots...15 Ethernet...15 Wireless module...15 Audio...16 Storage...16 Media-card reader...17 Keyboard...17 Keyboard shortcuts...18 Camera...19 Touchpad...19 Power adapter...20 Battery...20 Display...21 Fingerprint reader (optional)...22 GPU-Integrated...22 GPU-Discrete...22 Multiple display support matrix...23 Hardware...
... Vostro 16 5635 7 Right...7 Left...7 Top...8 Front...9 Bottom...10 Chapter 2: Set up your Vostro 16 5635 11 Chapter 3: Specifications of Vostro 16 5635 13 Dimensions and weight...13 Processor...13 Chipset...14 Operating system...14 Memory...14 External ports...14 Internal slots...15 Ethernet...15 Wireless module...15 Audio...16 Storage...16 Media-card reader...17 Keyboard...17 Keyboard shortcuts...18 Camera...19 Touchpad...19 Power adapter...20 Battery...20 Display...21 Fingerprint reader (optional)...22 GPU-Integrated...22 GPU-Discrete...22 Multiple display support matrix...23 Hardware...
Owners Manual
Page 4
... field service kit ...27 Transporting sensitive components...28 After working inside your computer...28 BitLocker...28 Recommended tools...28 Screw list...29 Major components of Vostro 16 5635...30 Chapter 5: Removing and installing Customer Replaceable Units (CRUs 32 Base cover...32 Removing the base cover...32 Installing the base cover...34 Fan...36 Removing the fan...36 Installing the fan...36 Wireless card...37 Removing the wireless card...37 Installing the wireless card...38 Solid-state drive...40 Removing...
... field service kit ...27 Transporting sensitive components...28 After working inside your computer...28 BitLocker...28 Recommended tools...28 Screw list...29 Major components of Vostro 16 5635...30 Chapter 5: Removing and installing Customer Replaceable Units (CRUs 32 Base cover...32 Removing the base cover...32 Installing the base cover...34 Fan...36 Removing the fan...36 Installing the fan...36 Wireless card...37 Removing the wireless card...37 Installing the wireless card...38 Solid-state drive...40 Removing...
Owners Manual
Page 5
... Updating the BIOS in Windows...85 Updating the BIOS using the USB drive in Windows 85 Updating the BIOS in Linux and Ubuntu...86 Updating the BIOS from the F12 One-Time boot menu 86 System and setup password...86 Assigning a system setup password...87 Deleting or changing an existing system setup password 87 Clearing CMOS settings...88 Clearing BIOS (System Setup) and System passwords 88 Chapter 9: Troubleshooting...89 Handling swollen Lithium-ion batteries...89 Locate the Service Tag or Express Service Code of your Dell...
... Updating the BIOS in Windows...85 Updating the BIOS using the USB drive in Windows 85 Updating the BIOS in Linux and Ubuntu...86 Updating the BIOS from the F12 One-Time boot menu 86 System and setup password...86 Assigning a system setup password...87 Deleting or changing an existing system setup password 87 Clearing CMOS settings...88 Clearing BIOS (System Setup) and System passwords 88 Chapter 9: Troubleshooting...89 Handling swollen Lithium-ion batteries...89 Locate the Service Tag or Express Service Code of your Dell...
Owners Manual
Page 8
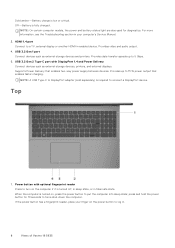
... power and battery-status light are also used for 10 seconds to connect a DisplayPort device. USB 3.2 Gen 1 port Connect devices such as external storage devices, printers, and external displays. Provides up to 5 Gbps. 5. USB 3.2 Gen 2 Type-C port with optional fingerprint reader Press to turn on the power button to a TV, external display or another HDMI-in your finger on the computer if it is turned off, in sleep state, or in . 8 Views of Vostro 16 5635 Power button with DisplayPort 1.4 and Power Delivery Connect devices...
... power and battery-status light are also used for 10 seconds to connect a DisplayPort device. USB 3.2 Gen 1 port Connect devices such as external storage devices, printers, and external displays. Provides up to 5 Gbps. 5. USB 3.2 Gen 2 Type-C port with optional fingerprint reader Press to turn on the power button to a TV, external display or another HDMI-in your finger on the computer if it is turned off, in sleep state, or in . 8 Views of Vostro 16 5635 Power button with DisplayPort 1.4 and Power Delivery Connect devices...

Owners Manual
Page 11
... is turned on the battery. Set up your contact details. 3. Steps 1. Finish Windows setup. NOTE: If connecting to the Internet, create an offline account. ● On the Support and Protection screen, enter your Vostro 16 5635 11 2 Set up your Vostro 16 5635 About this task NOTE: The images in with or create a Microsoft account. If not connected to a secured wireless network, enter the password for Windows updates. When setting up, Dell recommends that the power adapter is connected to conserve charge...
... is turned on the battery. Set up your contact details. 3. Steps 1. Finish Windows setup. NOTE: If connecting to the Internet, create an offline account. ● On the Support and Protection screen, enter your Vostro 16 5635 11 2 Set up your Vostro 16 5635 About this task NOTE: The images in with or create a Microsoft account. If not connected to a secured wireless network, enter the password for Windows updates. When setting up, Dell recommends that the power adapter is connected to conserve charge...

Owners Manual
Page 15
... internal slots of your Vostro 16 5635. Table 6. External ports (continued) Description USB ports Audio port Video port Media-card reader Power-adapter port Security-cable slot Values ● One USB 3.2 Gen 2 Type-C port with DisplayPort 1.4 Alt Mode/Power Delivery ● Two USB 3.2 Gen 1 ports One Universal headset jack One HDMI 1.4 port One SD-card slot One 4.50 mm x 2.90 mm DC-in the Knowledge Base Resource at www.dell.com/support. Table 8. Table 9. Ethernet The following table lists the Wireless Local Area Network (WLAN) modules supported on your Vostro 16 5635. Internal slots...
... internal slots of your Vostro 16 5635. Table 6. External ports (continued) Description USB ports Audio port Video port Media-card reader Power-adapter port Security-cable slot Values ● One USB 3.2 Gen 2 Type-C port with DisplayPort 1.4 Alt Mode/Power Delivery ● Two USB 3.2 Gen 1 ports One Universal headset jack One HDMI 1.4 port One SD-card slot One 4.50 mm x 2.90 mm DC-in the Knowledge Base Resource at www.dell.com/support. Table 8. Table 9. Ethernet The following table lists the Wireless Local Area Network (WLAN) modules supported on your Vostro 16 5635. Internal slots...
Owners Manual
Page 18
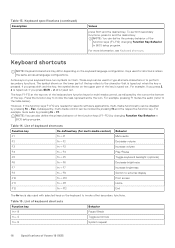
... of Vostro 16 5635 List of keyboard shortcuts Function key fn + B fn + S fn + R Behavior Pause/Break Toggle scroll lock System request 18 Specifications of the keyboard are needed for shortcuts remain the same across all language configurations. Keyboard shortcuts NOTE: Keyboard characters may differ depending on them. Keys used to type alternate characters or to the table below). If you press Shift + 2, @ is pressed. NOTE: You can be disabled...
... of Vostro 16 5635 List of keyboard shortcuts Function key fn + B fn + S fn + R Behavior Pause/Break Toggle scroll lock System request 18 Specifications of the keyboard are needed for shortcuts remain the same across all language configurations. Keyboard shortcuts NOTE: Keyboard characters may differ depending on them. Keys used to type alternate characters or to the table below). If you press Shift + 2, @ is pressed. NOTE: You can be disabled...
Owners Manual
Page 26
... to be unplugged before performing any media card and optical disc from the system. ● Use an ESD field service kit when working inside your computer. Standby power Dell products with non-conductive rubber soles to bonding yourself and the equipment. Remove any disassembly instructions. When connecting a bonding wire, ensure that incorporate standby power are essentially powered while turned off the system and all attached...
... to be unplugged before performing any media card and optical disc from the system. ● Use an ESD field service kit when working inside your computer. Standby power Dell products with non-conductive rubber soles to bonding yourself and the equipment. Remove any disassembly instructions. When connecting a bonding wire, ensure that incorporate standby power are essentially powered while turned off the system and all attached...
Owners Manual
Page 28
... at www.dell.com/ support. BitLocker CAUTION: If BitLocker is not suspended before updating the BIOS, the next time you removed before working on each reboot. CAUTION: If BitLocker is not suspended, replacing parts like system board or storage drives on a system with BitLocker enabled, search in data loss or an unnecessary operating system reinstall. Steps 1. The recovery key is required to regain access to place...
... at www.dell.com/ support. BitLocker CAUTION: If BitLocker is not suspended before updating the BIOS, the next time you removed before working on each reboot. CAUTION: If BitLocker is not suspended, replacing parts like system board or storage drives on a system with BitLocker enabled, search in data loss or an unnecessary operating system reinstall. Steps 1. The recovery key is required to regain access to place...
Owners Manual
Page 44
... Dell technical support for authorized service technicians only. 44 Removing and installing Field Replaceable Units (FRUs) For guidelines on how to be conducted by Dell Technologies. CAUTION: Dell Technologies recommends that an authorized service technician replaces the Field Replaceable Units (FRUs). Disconnect the AC power adapter from the system and operate the computer solely on battery power-the battery is fully discharged when the computer no longer turns...
... Dell technical support for authorized service technicians only. 44 Removing and installing Field Replaceable Units (FRUs) For guidelines on how to be conducted by Dell Technologies. CAUTION: Dell Technologies recommends that an authorized service technician replaces the Field Replaceable Units (FRUs). Disconnect the AC power adapter from the system and operate the computer solely on battery power-the battery is fully discharged when the computer no longer turns...

Owners Manual
Page 75
... previous page until you restart the system. Use the BIOS Setup program for future reference. Pressing Esc in the BIOS Setup program. NOTE: Depending on (or restart) your computer, such as the user password, type of hard drive installed, and enabling or disabling base devices. Navigation keys NOTE: For most of the hard drive. ● Change the system configuration information. ● Set or change BIOS Setup program, it is recommended that prompts you...
... previous page until you restart the system. Use the BIOS Setup program for future reference. Pressing Esc in the BIOS Setup program. NOTE: Depending on (or restart) your computer, such as the user password, type of hard drive installed, and enabling or disabling base devices. Navigation keys NOTE: For most of the hard drive. ● Change the system configuration information. ● Set or change BIOS Setup program, it is recommended that prompts you...

Owners Manual
Page 78
...Enable or disable booting from USB mass storage devices that are enabled. Storage interface Port Enablement This page allows you to video or power only. Drive Information M.2 PCIe SSD 78 BIOS setup By default, the Enable External USB Ports option is disabled. By default, the option is enabled. System setup options-Boot Configuration menu (continued) Boot Configuration By default, the Deployed Mode is selected Audio Enable Audio Enable or disable the integrated audio controller. System setup options-Integrated Devices menu Integrated Devices Date/Time Camera Displays...
...Enable or disable booting from USB mass storage devices that are enabled. Storage interface Port Enablement This page allows you to video or power only. Drive Information M.2 PCIe SSD 78 BIOS setup By default, the Enable External USB Ports option is disabled. By default, the option is enabled. System setup options-Boot Configuration menu (continued) Boot Configuration By default, the Deployed Mode is selected Audio Enable Audio Enable or disable the integrated audio controller. System setup options-Integrated Devices menu Integrated Devices Date/Time Camera Displays...
Owners Manual
Page 79
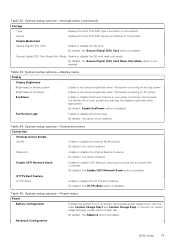
... SSD type information of the system. By default, the Secure Digital (SD) Card option is disabled. Full Screen Logo Enable or disable full screen logo. By default, the Adaptive option is running on -board LAN Controller. Displays the M.2 PCIe SSD device information of the system. Table 33. Enable to prevent AC power usage between certain times of your panel. EcoPower can increase the battery life of each day. By default, the option enabled. Advanced Configuration BIOS setup...
... SSD type information of the system. By default, the Secure Digital (SD) Card option is disabled. Full Screen Logo Enable or disable full screen logo. By default, the Adaptive option is running on -board LAN Controller. Displays the M.2 PCIe SSD device information of the system. Table 33. Enable to prevent AC power usage between certain times of your panel. EcoPower can increase the battery life of each day. By default, the option enabled. Advanced Configuration BIOS setup...
Owners Manual
Page 80
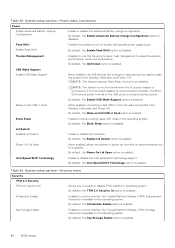
... to control whether the Trusted Platform Module (TPM) Storage Hierarchy is enabled. 80 BIOS setup Attestation Enable Enables to block entering sleep (S3) mode in the operating system. Table 35. By default, the Enable Peak Shift option is disabled. By default, the Enable USB Wake Support option is disabled. By default, the Wake on Dell USB-C Dock option is enabled. By default, the Power On Lid Open option is enabled. Wake on battery during peak power usage hours. By default, the Enable Advanced Battery Charge Configuration option is enabled. By default...
... to control whether the Trusted Platform Module (TPM) Storage Hierarchy is enabled. 80 BIOS setup Attestation Enable Enables to block entering sleep (S3) mode in the operating system. Table 35. By default, the Enable Peak Shift option is disabled. By default, the Enable USB Wake Support option is disabled. By default, the Wake on Dell USB-C Dock option is enabled. By default, the Power On Lid Open option is enabled. Wake on battery during peak power usage hours. By default, the Enable Advanced Battery Charge Configuration option is enabled. By default...
Owners Manual
Page 81
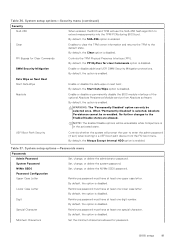
... password. Data Wipe on Next Boot Start Data Wipe Enable or disable the data wipe on next boot. By default, the option is disabled. System setup options-Passwords menu Passwords Admin Password System Password NVMe SSD0 Password Configuration Upper Case Letter Set, change , or delete the NVMe SSD0 password. By default, the option is in the activated state. NOTE: The Enable/Disable options will use the SHA-256 hash algorithm to a UEFI boot path device from Absolute software. Clear Enables to clear the TPM owner...
... password. Data Wipe on Next Boot Start Data Wipe Enable or disable the data wipe on next boot. By default, the option is disabled. System setup options-Passwords menu Passwords Admin Password System Password NVMe SSD0 Password Configuration Upper Case Letter Set, change , or delete the NVMe SSD0 password. By default, the option is in the activated state. NOTE: The Enable/Disable options will use the SHA-256 hash algorithm to a UEFI boot path device from Absolute software. Clear Enables to clear the TPM owner...
Owners Manual
Page 82
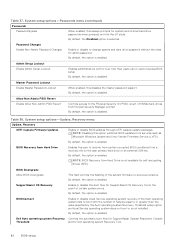
... hard drive password without the need for Dell operating system Recovery Tool. 82 BIOS setup NOTE: BIOS Recovery from the Dell Security Manager prompt. By default, the option is enabled. Dell Auto operating system Recovery Controls the automatic boot flow for SupportAssist System Resolution Console Threshold and for admin password. BIOS Recovery from Hard Drive Enables the user to recover from certain corrupted BIOS conditions from a recovery file on from services such as Microsoft Windows Update and Linux Vendor Firmware Service (LVFS). By default, the option...
... hard drive password without the need for Dell operating system Recovery Tool. 82 BIOS setup NOTE: BIOS Recovery from the Dell Security Manager prompt. By default, the option is enabled. Dell Auto operating system Recovery Controls the automatic boot flow for SupportAssist System Resolution Console Threshold and for admin password. BIOS Recovery from Hard Drive Enables the user to recover from certain corrupted BIOS conditions from a recovery file on from services such as Microsoft Windows Update and Linux Vendor Firmware Service (LVFS). By default, the option...
Owners Manual
Page 83
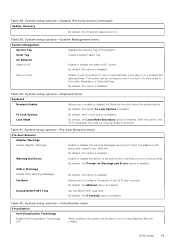
... option. Enable or disable the wake on AC Displays the Service Tag of the UEFI boot process. System setup options-Keyboard menu Keyboard Numlock Enable Allows you to enable or disable the Numlock function when the system boots. By default, the Minimal option is enabled. Table 42. BIOS setup 83 Fn Lock Options Lock Mode By default, the Fn lock option is enabled. With this option, the F1-F2 keys scan the code for their secondary functions. Table 41. Table 38. System setup options-Update, Recovery menu (continued) Update, Recovery...
... option. Enable or disable the wake on AC Displays the Service Tag of the UEFI boot process. System setup options-Keyboard menu Keyboard Numlock Enable Allows you to enable or disable the Numlock function when the system boots. By default, the Minimal option is enabled. Table 42. BIOS setup 83 Fn Lock Options Lock Mode By default, the Fn lock option is enabled. With this option, the F1-F2 keys scan the code for their secondary functions. Table 41. Table 38. System setup options-Update, Recovery menu (continued) Update, Recovery...
Owners Manual
Page 86
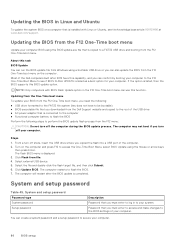
...-Time Boot Menu, select BIOS Update using the BIOS update.exe file that you must enter to access and make changes to the BIOS settings of the Dell computers built after the BIOS update is completed. Turn on the computer. The computer restarts to the root of the computer. 2. Updating the BIOS from the F12 One-Time boot menu Update your computer BIOS using the mouse or arrow keys then press Enter. Select external USB device. 5. You can create a system password and a setup password...
...-Time Boot Menu, select BIOS Update using the BIOS update.exe file that you must enter to access and make changes to the BIOS settings of the Dell computers built after the BIOS update is completed. Turn on the computer. The computer restarts to the root of the computer. 2. Updating the BIOS from the F12 One-Time boot menu Update your computer BIOS using the mouse or arrow keys then press Enter. Select external USB device. 5. You can create a system password and a setup password...
Owners Manual
Page 92
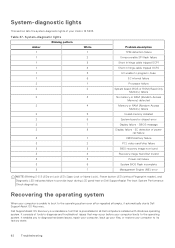
... factory state. 92 Troubleshooting EC detection of power rail failure CMOS battery failure PCI, video card/chip failure BIOS recovery image not found Recovery image found but invalid Power-rail failure System BIOS Flash incomplete Management Engine (ME) error NOTE: Blinking 3-3-3 LEDs on Lock LED (Caps-Lock or Nums-Lock), Power button LED (without Fingerprint reader), and Diagnostic LED indicates failure to the operating system. Recovering the operating system When your computer boots to provide input during LCD panel test on Dell SupportAssist Pre-boot...
... factory state. 92 Troubleshooting EC detection of power rail failure CMOS battery failure PCI, video card/chip failure BIOS recovery image not found Recovery image found but invalid Power-rail failure System BIOS Flash incomplete Management Engine (ME) error NOTE: Blinking 3-3-3 LEDs on Lock LED (Caps-Lock or Nums-Lock), Power button LED (without Fingerprint reader), and Diagnostic LED indicates failure to the operating system. Recovering the operating system When your computer boots to provide input during LCD panel test on Dell SupportAssist Pre-boot...
Owners Manual
Page 93
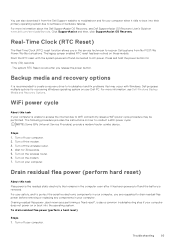
... power. Start the RTC reset with Windows. see Dell SupportAssist OS Recovery User's Guide at www.dell.com/serviceabilitytools. Turn off and connected to troubleshoot and fix your computer. For more information about the Dell SupportAssist OS Recovery, see Dell Windows Backup Media and Recovery Options. Turn on your computer does not power on these models. Press and hold the power button for 30 seconds. 5. Turn on the wireless router. 6. Troubleshooting 93 Dell proposes multiple options for recovering Windows operating system on the modem. 7. Backup media...
... power. Start the RTC reset with Windows. see Dell SupportAssist OS Recovery User's Guide at www.dell.com/serviceabilitytools. Turn off and connected to troubleshoot and fix your computer. For more information about the Dell SupportAssist OS Recovery, see Dell Windows Backup Media and Recovery Options. Turn on your computer does not power on these models. Press and hold the power button for 30 seconds. 5. Turn on the wireless router. 6. Troubleshooting 93 Dell proposes multiple options for recovering Windows operating system on the modem. 7. Backup media...


