
User's Guide
Page 3
... information 7 About your printer 8 Thank you for choosing this printer!...8 Minimizing your printer's environmental impact...8 Finding information about the printer...9 Understanding the parts of the printer...11 Ordering and replacing supplies 13 Replacing ink cartridges...13 Ordering ink cartridges...14 Recycling Dell products...15 Using the printer control panel buttons and menus 16 Using the printer control panel...16 Using...
... information 7 About your printer 8 Thank you for choosing this printer!...8 Minimizing your printer's environmental impact...8 Finding information about the printer...9 Understanding the parts of the printer...11 Ordering and replacing supplies 13 Replacing ink cartridges...13 Ordering ink cartridges...14 Recycling Dell products...15 Using the printer control panel buttons and menus 16 Using the printer control panel...16 Using...
User's Guide
Page 5
Faxing FAQ...73 Networking 80 Installing the printer on a wireless network...80 Advanced wireless setup...84 Networking FAQ...88 Maintaining the printer 98 Maintaining ink cartridges...98 Cleaning the exterior of the printer...99 Cleaning the scanner glass...100 Troubleshooting 101 Before you troubleshoot...101 Using the Service Center to solve printer problems 101 If Troubleshooting does not...
Faxing FAQ...73 Networking 80 Installing the printer on a wireless network...80 Advanced wireless setup...84 Networking FAQ...88 Maintaining the printer 98 Maintaining ink cartridges...98 Cleaning the exterior of the printer...99 Cleaning the scanner glass...100 Troubleshooting 101 Before you troubleshoot...101 Using the Service Center to solve printer problems 101 If Troubleshooting does not...
User's Guide
Page 8
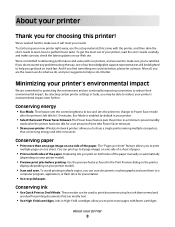
...manually or automatically (depending on your printer model). • Scan and save. By selecting certain printer settings or tasks, you may be able to share a single printer among multiple computers, thus conserving energy and other resources. Wireless/network printers allow you to make sure you'...sides of the paper. About your printer Thank you for presentation. • Use recycled paper. Conserving energy • Eco-Mode. To start using less ink than one page image on one of time (the Power Saver timeout). • Share your printer. To avoid printing multiple copies, ...
...manually or automatically (depending on your printer model). • Scan and save. By selecting certain printer settings or tasks, you may be able to share a single printer among multiple computers, thus conserving energy and other resources. Wireless/network printers allow you to make sure you'...sides of the paper. About your printer Thank you for presentation. • Use recycled paper. Conserving energy • Eco-Mode. To start using less ink than one page image on one of time (the Power Saver timeout). • Share your printer. To avoid printing multiple copies, ...
User's Guide
Page 9
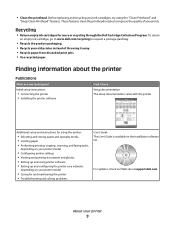
... setup and instructions for and maintaining the printer • Troubleshooting and solving problems User's Guide The User's Guide is available on the installation software CD. To return an empty ink cartridge, go to www.dell.com/recycling to improve the quality of throwing... it here Setup documentation The setup documentation came with the printer. Before replacing and recycling your prints. Recycling • Return empty ink cartridges for ? Finding information about the printer Publications ...
... setup and instructions for and maintaining the printer • Troubleshooting and solving problems User's Guide The User's Guide is available on the installation software CD. To return an empty ink cartridge, go to www.dell.com/recycling to improve the quality of throwing... it here Setup documentation The setup documentation came with the printer. Before replacing and recycling your prints. Recycling • Return empty ink cartridges for ? Finding information about the printer Publications ...
User's Guide
Page 12
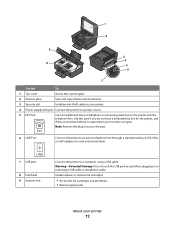
...or remove ink cartridges. • Access the ink cartridges and printhead. • Remove paper jams. About your country or region. Warning-Potential Damage: Do not touch the USB port except when plugging in your printer 12 Use this port if you do not have a dedicated fax line for the printer, and... a USB cable or installation cable. LINE 7 USB port 8 Printhead 9 Scanner unit Connect the printer to send and receive faxes. Note: Remove the plug to access the port. 6 LINE Port Connect the printer to an active telephone line (through a standard wall jack, DSL filter, or VoIP adapter) to...
...or remove ink cartridges. • Access the ink cartridges and printhead. • Remove paper jams. About your country or region. Warning-Potential Damage: Do not touch the USB port except when plugging in your printer 12 Use this port if you do not have a dedicated fax line for the printer, and... a USB cable or installation cable. LINE 7 USB port 8 Printhead 9 Scanner unit Connect the printer to send and receive faxes. Note: Remove the plug to access the port. 6 LINE Port Connect the printer to an active telephone line (through a standard wall jack, DSL filter, or VoIP adapter) to...
User's Guide
Page 13
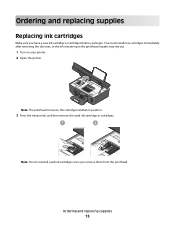
Ordering and replacing supplies Replacing ink cartridges Make sure you have a new ink cartridge or cartridges before you remove them from the printhead. Ordering and replacing supplies 13 Note: The printhead moves to the cartridge installation position. 3 Press the release tab, and then remove the used ink cartridge or cartridges. 1 2 Note: Do not reinstall used ink cartridges once you begin. You must install new cartridges immediately after removing the old ones, or the ink remaining in the printhead nozzles may dry out. 1 Turn on your printer. 2 Open the printer.
Ordering and replacing supplies Replacing ink cartridges Make sure you have a new ink cartridge or cartridges before you remove them from the printhead. Ordering and replacing supplies 13 Note: The printhead moves to the cartridge installation position. 3 Press the release tab, and then remove the used ink cartridge or cartridges. 1 2 Note: Do not reinstall used ink cartridges once you begin. You must install new cartridges immediately after removing the old ones, or the ink remaining in the printhead nozzles may dry out. 1 Turn on your printer. 2 Open the printer.
User's Guide
Page 14
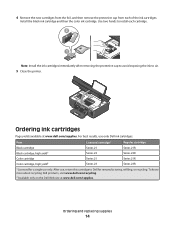
For best results, use only. Ordering ink cartridges Page yields available at www.dell.com/supplies. To know more about recycling Dell products, visit www.dell.com/recycling. 2 Available only on the Dell Web site at www.dell.com/supplies. After use, return this cartridge to air. 5 Close the printer. 4 Remove the new cartridges from the foil, and...
For best results, use only. Ordering ink cartridges Page yields available at www.dell.com/supplies. To know more about recycling Dell products, visit www.dell.com/recycling. 2 Available only on the Dell Web site at www.dell.com/supplies. After use, return this cartridge to air. 5 Close the printer. 4 Remove the new cartridges from the foil, and...
User's Guide
Page 19
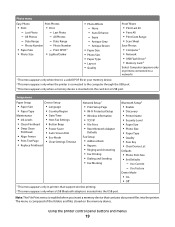
... Size • Language • Paper Type • Country/Region Maintenance • Date/Time • Ink Levels • Host Fax Settings • Clean Printhead • Button Beep • Deep Clean Printhead • Align Printer • Print Test Page • Replace Printhead • Power Saver • Auto Screen Dim •.../Darker • Photo Effects - All Photos - Photo Number - Last Photo - The menu is enabled when you insert a memory device that support wireless printing. 2 This menu appears only when a USB Bluetooth adapter is inserted into the...
... Size • Language • Paper Type • Country/Region Maintenance • Date/Time • Ink Levels • Host Fax Settings • Clean Printhead • Button Beep • Deep Clean Printhead • Align Printer • Print Test Page • Replace Printhead • Power Saver • Auto Screen Dim •.../Darker • Photo Effects - All Photos - Photo Number - Last Photo - The menu is enabled when you insert a memory device that support wireless printing. 2 This menu appears only when a USB Bluetooth adapter is inserted into the...
User's Guide
Page 23
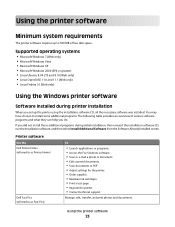
Printer software Use the Dell Printer Home (referred to as Printer Home) Dell Fast Pics (referred to as Fast Pics) To • Launch applications or programs. • Access the Fax Solutions software. • Scan or e-mail a photo ... help you set up to PDF. • Adjust settings for the printer. • Order supplies. • Maintain ink cartridges. • Print a test page. • Register the printer. • Contact technical support. If you did not install these additional programs during printer installation When you do. You may have chosen to install some additional...
Printer software Use the Dell Printer Home (referred to as Printer Home) Dell Fast Pics (referred to as Fast Pics) To • Launch applications or programs. • Access the Fax Solutions software. • Scan or e-mail a photo ... help you set up to PDF. • Adjust settings for the printer. • Order supplies. • Maintain ink cartridges. • Print a test page. • Register the printer. • Contact technical support. If you did not install these additional programs during printer installation When you do. You may have chosen to install some additional...
User's Guide
Page 24
Dell Ink Management System Order ink. Note: This program is installed automatically with the printer software. Using the printer software 24 Use the Fax Setup Utility to as Wireless Setup Utility) • Set up the wireless printer on a wireless network. • Change the wireless settings of the printer that you select File Print with the printer software if the printer has wireless capability. Notes...
Dell Ink Management System Order ink. Note: This program is installed automatically with the printer software. Using the printer software 24 Use the Fax Setup Utility to as Wireless Setup Utility) • Set up the wireless printer on a wireless network. • Change the wireless settings of the printer that you select File Print with the printer software if the printer has wireless capability. Notes...
User's Guide
Page 31
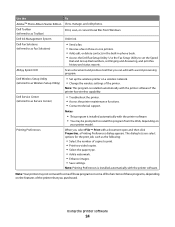
... Select the print quality, the number of copies to print, the type of paper to close any printer software dialogs. Printing basic documents Printing a document 1 Load the paper in the ink cartridges. • Remove each photo as groups of pages (not collated). Collated Not collated Notes: ...• Use the appropriate paper for your print job. • Select a higher print quality for better prints. • Make sure there is enough ink in the printer. 2 Send the print job: a With a document open , click File Print. 2 Click Properties, Preferences, Options, or Setup. 3 ...
... Select the print quality, the number of copies to print, the type of paper to close any printer software dialogs. Printing basic documents Printing a document 1 Load the paper in the ink cartridges. • Remove each photo as groups of pages (not collated). Collated Not collated Notes: ...• Use the appropriate paper for your print job. • Select a higher print quality for better prints. • Make sure there is enough ink in the printer. 2 Send the print job: a With a document open , click File Print. 2 Click Properties, Preferences, Options, or Setup. 3 ...
User's Guide
Page 34
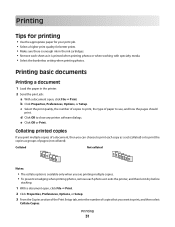
... Paper Size dialog appears. 4 Set the paper size. 5 Select the measurement units to use (inches or millimeters). 6 Click OK to avoid ink smudging. Printing on loading label sheets • Make sure the top of the label sheet. • Use full label sheets. c From the...size that matches the size of the paper (duplexing) manually 1 With a document open , click File Print. Printing labels 1 Load the label sheets in the printer. 2 Send the print job: a With a document open , click File Print. 2 Click Properties, Preferences, Options, or Setup. 3 Click the Advanced tab....
... Paper Size dialog appears. 4 Set the paper size. 5 Select the measurement units to use (inches or millimeters). 6 Click OK to avoid ink smudging. Printing on loading label sheets • Make sure the top of the label sheet. • Use full label sheets. c From the...size that matches the size of the paper (duplexing) manually 1 With a document open , click File Print. Printing labels 1 Load the label sheets in the printer. 2 Send the print job: a With a document open , click File Print. 2 Click Properties, Preferences, Options, or Setup. 3 Click the Advanced tab....

User's Guide
Page 45
... then select Printing Preferences. 5 Select Quick Print as Default Printer. The printer folder opens. 4 Right-click the printer, and then select Pause Printing. Changing the printing mode for printing text-only documents. It uses less ink and is ideal for all print jobs to print photos or ... Enter, or click OK. The printer folder opens. 4 Right-click the printer, and then select Open. The printer folder opens. 4 Right-click the printer, and then select Set as the printing mode. Note: Printing in Draft mode uses less ink and is ideal for a single print job 1 With a document open, ...
... then select Printing Preferences. 5 Select Quick Print as Default Printer. The printer folder opens. 4 Right-click the printer, and then select Pause Printing. Changing the printing mode for printing text-only documents. It uses less ink and is ideal for all print jobs to print photos or ... Enter, or click OK. The printer folder opens. 4 Right-click the printer, and then select Open. The printer folder opens. 4 Right-click the printer, and then select Set as the printing mode. Note: Printing in Draft mode uses less ink and is ideal for a single print job 1 With a document open, ...

User's Guide
Page 78
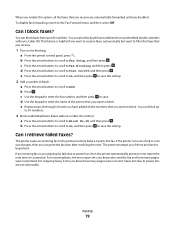
...fax. How do I know that the fax was sent successfully? How do I forward a fax? 1 From the printer control panel, press . 2 Press the arrow buttons to scroll to Fax Setup, and then press . 3 Press ... arrow buttons to choose whether to print the fax activity reports after 40 faxes or on ink and print a report only when a fax job is unsuccessful, then the report also includes the...3 Press the arrow buttons to scroll to Reports, and then press . 4 Press again. 5 To set the printer to print a confirmation page, or transmission report, every time you want to Receive Log, and then press ....
...fax. How do I know that the fax was sent successfully? How do I forward a fax? 1 From the printer control panel, press . 2 Press the arrow buttons to scroll to Fax Setup, and then press . 3 Press ... arrow buttons to choose whether to print the fax activity reports after 40 faxes or on ink and print a report only when a fax job is unsuccessful, then the report also includes the...3 Press the arrow buttons to scroll to Reports, and then press . 4 Press again. 5 To set the printer to print a confirmation page, or transmission report, every time you want to Receive Log, and then press ....
User's Guide
Page 79
... to 50 numbers. 3 Block unidentified faxes (faxes without a Caller ID). If an incoming fax or an outgoing fax fails due to power loss, then the printer automatically prints an error report the next time it . For incoming faxes, the error report lets you know how many pages were not printed. Faxes... Off. c Use the keypad to enter the fax number, and then press to filter the faxes that you receive. 1 Turn on . If the printer runs out of ink or runs out of the person that you receive are not retrievable. a Press the arrow buttons to scroll to block. e Press the arrow buttons...
... to 50 numbers. 3 Block unidentified faxes (faxes without a Caller ID). If an incoming fax or an outgoing fax fails due to power loss, then the printer automatically prints an error report the next time it . For incoming faxes, the error report lets you know how many pages were not printed. Faxes... Off. c Use the keypad to enter the fax number, and then press to filter the faxes that you receive. 1 Turn on . If the printer runs out of ink or runs out of the person that you receive are not retrievable. a Press the arrow buttons to scroll to block. e Press the arrow buttons...
User's Guide
Page 98
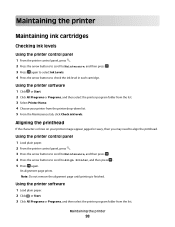
... or Programs, and then select the printer program folder from the printer drop-down list. 5 From the Maintenance tab, click Check ink levels. Using the printer software 1 Click or Start. 2 Click All Programs or Programs, and then select the printer program folder from the list. 3 Select Printer Home. 4 Choose your printer image appear jagged or wavy, then...
... or Programs, and then select the printer program folder from the printer drop-down list. 5 From the Maintenance tab, click Check ink levels. Using the printer software 1 Click or Start. 2 Click All Programs or Programs, and then select the printer program folder from the list. 3 Select Printer Home. 4 Choose your printer image appear jagged or wavy, then...
User's Guide
Page 99
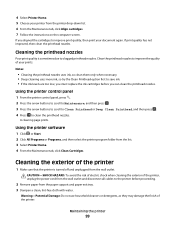
... to scroll to Clean Printhead or Deep Clean Printhead, and then press . 4 Press to clogged printhead nozzles. Cleaning the exterior of the printer. A cleaning page prints. CAUTION-SHOCK HAZARD: To avoid the risk of electric shock when cleaning the exterior of your document again. Clean ...: • Cleaning the printhead nozzles uses ink, so clean them only when necessary. • Deep cleaning uses more ink, so try the Clean Printhead option first to save ink. • If the ink levels are too low, you aligned the cartridges to the printer before you can clean the printhead nozzles....
... to scroll to Clean Printhead or Deep Clean Printhead, and then press . 4 Press to clogged printhead nozzles. Cleaning the exterior of the printer. A cleaning page prints. CAUTION-SHOCK HAZARD: To avoid the risk of electric shock when cleaning the exterior of your document again. Clean ...: • Cleaning the printhead nozzles uses ink, so clean them only when necessary. • Deep cleaning uses more ink, so try the Clean Printhead option first to save ink. • If the ink levels are too low, you aligned the cartridges to the printer before you can clean the printhead nozzles....
User's Guide
Page 100
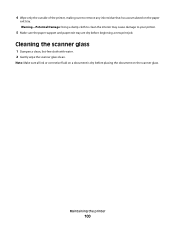
Maintaining the printer 100 Warning-Potential Damage: Using a damp cloth to clean the interior may cause damage to remove any ink residue that has accumulated on a document is dry before beginning a new print job. Cleaning the scanner glass 1 Dampen a clean, lint-free cloth with water. 2 Gently wipe the scanner glass clean. Note: Make sure all ink or corrective fluid on the paper exit tray. 4 Wipe only the outside of the printer, making sure to your printer. 5 Make sure the paper support and paper exit tray are dry before placing the document on the scanner glass.
Maintaining the printer 100 Warning-Potential Damage: Using a damp cloth to clean the interior may cause damage to remove any ink residue that has accumulated on a document is dry before beginning a new print job. Cleaning the scanner glass 1 Dampen a clean, lint-free cloth with water. 2 Gently wipe the scanner glass clean. Note: Make sure all ink or corrective fluid on the paper exit tray. 4 Wipe only the outside of the printer, making sure to your printer. 5 Make sure the paper support and paper exit tray are dry before placing the document on the scanner glass.
User's Guide
Page 101
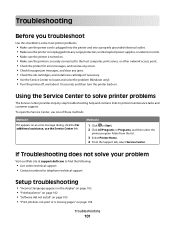
... the printer program folder from the list. 3 Select Printer Home. 4 From the Support tab, select Service Center. If Troubleshooting does not solve your problem Visit our Web site at support.dell.com to...• Make sure the printer is turned on. • Make sure the printer is missing pages" on page 104 Troubleshooting 101 To open the Service Center, use one of these methods: Method ...printer problems: • Make sure the power cord is plugged into the printer and into a properly grounded electrical outlet. • Make sure the printer is not plugged into any jams. • Check the ink...
... the printer program folder from the list. 3 Select Printer Home. 4 From the Support tab, select Service Center. If Troubleshooting does not solve your problem Visit our Web site at support.dell.com to...• Make sure the printer is turned on. • Make sure the printer is missing pages" on page 104 Troubleshooting 101 To open the Service Center, use one of these methods: Method ...printer problems: • Make sure the power cord is plugged into the printer and into a properly grounded electrical outlet. • Make sure the printer is not plugged into any jams. • Check the ink...

User's Guide
Page 104
...2 Gently remove the power supply from the printer, and then reinsert it . 3 Plug the power cord into the back of the following: MAKE SURE THE INK CARTRIDGES ARE INSERTED CORRECTLY 1 Turn the printer on the printer. The USB port is damaged, then use a new one . 2 Firmly plug the square end of... the USB cable into the back of the printer. 3 Firmly plug the rectangular end of the ...
...2 Gently remove the power supply from the printer, and then reinsert it . 3 Plug the power cord into the back of the following: MAKE SURE THE INK CARTRIDGES ARE INSERTED CORRECTLY 1 Turn the printer on the printer. The USB port is damaged, then use a new one . 2 Firmly plug the square end of... the USB cable into the back of the printer. 3 Firmly plug the rectangular end of the ...


