User's Guide
Page 3
... information 7 About your printer 8 Thank you for choosing this printer!...8 Minimizing your printer's environmental impact...8 Finding information about the printer...9 Understanding the parts of the printer...11 Ordering and replacing supplies 13 Replacing ink cartridges...13 Ordering ink cartridges...14 Recycling Dell products...15 Using the printer control panel buttons and menus 16 Using the printer control panel...16 Using...
... information 7 About your printer 8 Thank you for choosing this printer!...8 Minimizing your printer's environmental impact...8 Finding information about the printer...9 Understanding the parts of the printer...11 Ordering and replacing supplies 13 Replacing ink cartridges...13 Ordering ink cartridges...14 Recycling Dell products...15 Using the printer control panel buttons and menus 16 Using the printer control panel...16 Using...
User's Guide
Page 4
...reducing images...46 Adjusting copy quality...46 Making a copy lighter or darker...47 Collating copies using the printer control panel...47 Repeating an image on one page...48 Copying multiple pages on one sheet...48 Making a duplex copy manually...48 Canceling copy jobs...49 Scanning 50 Tips for scanning...... 52 Scanning directly to e-mail...53 Scanning to a PDF...53 Scanning FAQ...53 Canceling scan jobs...54 Networking 55 Installing the printer on a wireless network...55 Advanced wireless setup...59 Networking FAQ...63 Maintaining the printer 73 Maintaining ink cartridges...73 Contents 4
...reducing images...46 Adjusting copy quality...46 Making a copy lighter or darker...47 Collating copies using the printer control panel...47 Repeating an image on one page...48 Copying multiple pages on one sheet...48 Making a duplex copy manually...48 Canceling copy jobs...49 Scanning 50 Tips for scanning...... 52 Scanning directly to e-mail...53 Scanning to a PDF...53 Scanning FAQ...53 Canceling scan jobs...54 Networking 55 Installing the printer on a wireless network...55 Advanced wireless setup...59 Networking FAQ...63 Maintaining the printer 73 Maintaining ink cartridges...73 Contents 4

User's Guide
Page 8
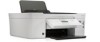
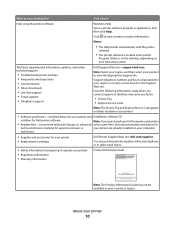
...help us know. If you do encounter any problems along the way, one of the paper manually or automatically (depending on your printer model). • Preview print jobs before printing. Minimizing your printer's environmental impact We are committed to protecting the environment and are the ... and are ideal for 10 minutes. Eco-Mode is left idle for printing documents that came with fewer cartridges. Wireless/network printers allow you are continually improving our printers to reduce their environmental impact. Conserving ink • Use Quick Print or Draft Mode. We've worked...
...help us know. If you do encounter any problems along the way, one of the paper manually or automatically (depending on your printer model). • Preview print jobs before printing. Minimizing your printer's environmental impact We are committed to protecting the environment and are the ... and are ideal for 10 minutes. Eco-Mode is left idle for printing documents that came with fewer cartridges. Wireless/network printers allow you are continually improving our printers to reduce their environmental impact. Conserving ink • Use Quick Print or Draft Mode. We've worked...
User's Guide
Page 9
... available on your prints. Recycling • Return empty ink cartridges for ? Before replacing and recycling your ink cartridges, try using printer software • Setting up and configuring the printer on a network, depending on the installation software CD. To return an empty ink cartridge, go to www.dell.com/recycling to improve the quality of throwing it...
... available on your prints. Recycling • Return empty ink cartridges for ? Before replacing and recycling your ink cartridges, try using printer software • Setting up and configuring the printer on a network, depending on the installation software CD. To return an empty ink cartridge, go to www.dell.com/recycling to improve the quality of throwing it...
User's Guide
Page 10
... Service Code appear on labels located on your printer. • Software and Drivers-Certified drivers for your printer and Installation software CD installers for Dell printer software Note: If you looking for? About your printer 10 technicians • Supplies and accessories for your printer • Replacement cartridges Dell Printer Supplies Web site-dell.com/supplies You can be available in...
... Service Code appear on labels located on your printer. • Software and Drivers-Certified drivers for your printer and Installation software CD installers for Dell printer software Note: If you looking for? About your printer 10 technicians • Supplies and accessories for your printer • Replacement cartridges Dell Printer Supplies Web site-dell.com/supplies You can be available in...
User's Guide
Page 12
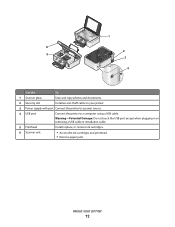
1 6 2 5 3 4 Use the To 1 Scanner glass Scan and copy photos and documents. 2 Security slot Install an anti-theft cable on your printer 12 Warning-Potential Damage: Do not touch the USB port except when plugging in or removing a USB cable or installation cable. 5 Printhead Install, replace, or remove ink cartridges. 6 Scanner unit • Access the ink cartridges and printhead. • Remove paper jams. About your printer. 3 Power supply with port Connect the printer to a power source. 4 USB port Connect the printer to a computer using a USB cable.
1 6 2 5 3 4 Use the To 1 Scanner glass Scan and copy photos and documents. 2 Security slot Install an anti-theft cable on your printer 12 Warning-Potential Damage: Do not touch the USB port except when plugging in or removing a USB cable or installation cable. 5 Printhead Install, replace, or remove ink cartridges. 6 Scanner unit • Access the ink cartridges and printhead. • Remove paper jams. About your printer. 3 Power supply with port Connect the printer to a power source. 4 USB port Connect the printer to a computer using a USB cable.
User's Guide
Page 13
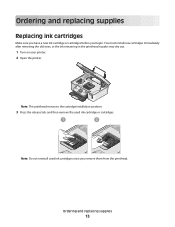
You must install new cartridges immediately after removing the old ones, or the ink remaining in the printhead nozzles may dry out. 1 Turn on your printer. 2 Open the printer. Ordering and replacing supplies 13 Note: The printhead moves to the cartridge installation position. 3 Press the release tab, and then remove the used ink cartridge or cartridges. 1 2 Note: Do not reinstall used ink cartridges once you begin. Ordering and replacing supplies Replacing ink cartridges Make sure you have a new ink cartridge or cartridges before you remove them from the printhead.
You must install new cartridges immediately after removing the old ones, or the ink remaining in the printhead nozzles may dry out. 1 Turn on your printer. 2 Open the printer. Ordering and replacing supplies 13 Note: The printhead moves to the cartridge installation position. 3 Press the release tab, and then remove the used ink cartridge or cartridges. 1 2 Note: Do not reinstall used ink cartridges once you begin. Ordering and replacing supplies Replacing ink cartridges Make sure you have a new ink cartridge or cartridges before you remove them from the printhead.
User's Guide
Page 14
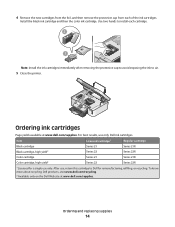
... new cartridges from the foil, and then remove the protective cap from each cartridge. 2 1 Note: Install the ink cartridges immediately after removing the protective cap to avoid exposing the ink to Dell for a single use only Dell ink cartridges. Install the black ink cartridge and then the color ink cartridge. After use, return this cartridge to air. 5 Close the printer.
... new cartridges from the foil, and then remove the protective cap from each cartridge. 2 1 Note: Install the ink cartridges immediately after removing the protective cap to avoid exposing the ink to Dell for a single use only Dell ink cartridges. Install the black ink cartridge and then the color ink cartridge. After use, return this cartridge to air. 5 Close the printer.

User's Guide
Page 23
...printer installation When you do. Using the printer software 23 Using the printer software Minimum system requirements The printer software requires up the printer using the installation software CD, all the necessary software was installed. Printer software Use the Dell Printer Home (referred to as Printer Home) Dell...You may have chosen to PDF. • Adjust settings for the printer. • Order supplies. • Maintain ink cartridges. • Print a test page. • Register the printer. • Contact technical support. Supported operating systems • Microsoft ...
...printer installation When you do. Using the printer software 23 Using the printer software Minimum system requirements The printer software requires up the printer using the installation software CD, all the necessary software was installed. Printer software Use the Dell Printer Home (referred to as Printer Home) Dell...You may have chosen to PDF. • Adjust settings for the printer. • Order supplies. • Maintain ink cartridges. • Print a test page. • Register the printer. • Contact technical support. Supported operating systems • Microsoft ...
User's Guide
Page 30
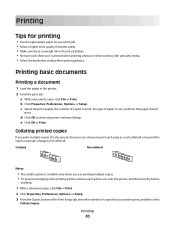
...Select the print quality, the number of copies to print, the type of paper to close any printer software dialogs. e Click OK or Print. Printing basic documents Printing a document 1 Load the paper in the ink cartridges. • Remove each sheet as it is available only when you are printing multiple copies. ...• To prevent smudging when printing photos, remove each copy as a set (collated) or to print the copies as it exits the printer, and then let it dry...
...Select the print quality, the number of copies to print, the type of paper to close any printer software dialogs. e Click OK or Print. Printing basic documents Printing a document 1 Load the paper in the ink cartridges. • Remove each sheet as it is available only when you are printing multiple copies. ...• To prevent smudging when printing photos, remove each copy as a set (collated) or to print the copies as it exits the printer, and then let it dry...
User's Guide
Page 73
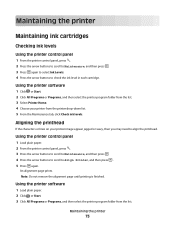
... the Maintenance tab, click Check ink levels. Note: Do not remove the alignment page until printing is finished. Maintaining the printer Maintaining ink cartridges Checking ink levels Using the printer control panel 1 From the printer control panel, press . 2 Press the arrow buttons to scroll to Maintenance, and then press . 3 Press again to select Ink...
... the Maintenance tab, click Check ink levels. Note: Do not remove the alignment page until printing is finished. Maintaining the printer Maintaining ink cartridges Checking ink levels Using the printer control panel 1 From the printer control panel, press . 2 Press the arrow buttons to scroll to Maintenance, and then press . 3 Press again to select Ink...

User's Guide
Page 74
...computer screen. CAUTION-SHOCK HAZARD: To avoid the risk of electric shock when cleaning the exterior of your printer from the list. 3 Select Printer Home. 4 From the Maintenance tab, click Clean Cartridges. Clean the printhead nozzles to improve print quality, then print your document again. Notes: • ... the Clean Printhead option first to save ink. • If the ink levels are too low, you aligned the cartridges to improve the quality of the printer, unplug the power cord from the wall outlet. Warning-Potential Damage: Do not use household cleaners or detergents, as ...
...computer screen. CAUTION-SHOCK HAZARD: To avoid the risk of electric shock when cleaning the exterior of your printer from the list. 3 Select Printer Home. 4 From the Maintenance tab, click Clean Cartridges. Clean the printhead nozzles to improve print quality, then print your document again. Notes: • ... the Clean Printhead option first to save ink. • If the ink levels are too low, you aligned the cartridges to improve the quality of the printer, unplug the power cord from the wall outlet. Warning-Potential Damage: Do not use household cleaners or detergents, as ...
User's Guide
Page 76
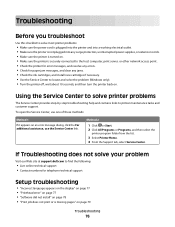
...2 Click All Programs or Programs, and then select the printer program folder from the list. 3 Select Printer Home. 4 From the Support tab, select Service Center. If Troubleshooting does not solve your problem Visit our Web site at support.dell.com to find the following: • Live online technical...8226; Check the ink cartridges, and install new cartridges if necessary. • Use the Service Center to locate and solve the problem (Windows only). • Turn the printer off, wait about 10 seconds, and then turn the printer back on. To open the Service Center, use one of these methods: ...
...2 Click All Programs or Programs, and then select the printer program folder from the list. 3 Select Printer Home. 4 From the Support tab, select Service Center. If Troubleshooting does not solve your problem Visit our Web site at support.dell.com to find the following: • Live online technical...8226; Check the ink cartridges, and install new cartridges if necessary. • Use the Service Center to locate and solve the problem (Windows only). • Turn the printer off, wait about 10 seconds, and then turn the printer back on. To open the Service Center, use one of these methods: ...
User's Guide
Page 79
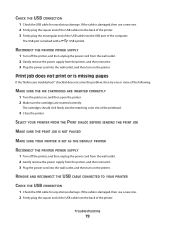
...USB port of the computer. The cartridges should click firmly into the back of the USB cable into the wall outlet, and then turn on , and then open the printer. 2 Make sure the cartridges are inserted correctly. If the cable is damaged, then use a new one. 2 Firmly plug the square ...end of the USB cable into the back of the printer. 3 Firmly plug the rectangular end of the printer. REMOVE AND RECONNECT THE USB CABLE...
...USB port of the computer. The cartridges should click firmly into the back of the USB cable into the wall outlet, and then turn on , and then open the printer. 2 Make sure the cartridges are inserted correctly. If the cable is damaged, then use a new one. 2 Firmly plug the square ...end of the USB cable into the back of the printer. 3 Firmly plug the rectangular end of the printer. REMOVE AND RECONNECT THE USB CABLE...
User's Guide
Page 80
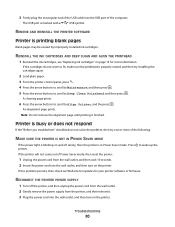
...is busy or does not respond If the "Before you troubleshoot" checklist does not solve the problem, then try installing the cartridges again. 2 Load plain paper. 3 From the printer control panel, press . 4 Press the arrow buttons to scroll to Maintenance, and then press . 5 Press the arrow..., make sure the printhead is properly seated, and then try one or more information. RECONNECT THE PRINTER POWER SUPPLY 1 Turn off slowly, then the printer is printing blank pages Blank pages may be caused by improperly installed ink cartridges. A cleaning page prints. 6 Press the arrow buttons to ...
...is busy or does not respond If the "Before you troubleshoot" checklist does not solve the problem, then try installing the cartridges again. 2 Load plain paper. 3 From the printer control panel, press . 4 Press the arrow buttons to scroll to Maintenance, and then press . 5 Press the arrow..., make sure the printhead is properly seated, and then try one or more information. RECONNECT THE PRINTER POWER SUPPLY 1 Turn off slowly, then the printer is printing blank pages Blank pages may be caused by improperly installed ink cartridges. A cleaning page prints. 6 Press the arrow buttons to ...

User's Guide
Page 83
SELECT A HIGHER PRINT QUALITY FROM THE PRINTER SOFTWARE MAKE SURE THE INK CARTRIDGES ARE PROPERLY INSTALLED ALIGN THE PRINTHEAD CLEAN OR DEEP CLEAN THE PRINTHEAD NOZZLES...Options, or Setup. 3 From the Paper Options section of the following: CHECK THE INK LEVELS Replace low or empty ink cartridges. Print troubleshooting • "Poor quality at the edges of the page" on page 83 • "Streaks or lines...the "Before you troubleshoot" checklist does not solve the problem, then try one or more of the following: CHECK MINIMUM PRINT SETTINGS Unless you troubleshoot" checklist does not solve the ...
SELECT A HIGHER PRINT QUALITY FROM THE PRINTER SOFTWARE MAKE SURE THE INK CARTRIDGES ARE PROPERLY INSTALLED ALIGN THE PRINTHEAD CLEAN OR DEEP CLEAN THE PRINTHEAD NOZZLES...Options, or Setup. 3 From the Paper Options section of the following: CHECK THE INK LEVELS Replace low or empty ink cartridges. Print troubleshooting • "Poor quality at the edges of the page" on page 83 • "Streaks or lines...the "Before you troubleshoot" checklist does not solve the problem, then try one or more of the following: CHECK MINIMUM PRINT SETTINGS Unless you troubleshoot" checklist does not solve the ...
User's Guide
Page 104
... I improving scan quality 53 incorrect language appears on display 77 index cards 28 information finding 9 information needed for setting up printer on wireless network 56 infrastructure network 67 ink conserving 8 ink cartridges ordering 14 replacing 13 ink levels checking 73 inserting a memory card or flash drive 35 installation cable 66, 67 installing network...
... I improving scan quality 53 incorrect language appears on display 77 index cards 28 information finding 9 information needed for setting up printer on wireless network 56 infrastructure network 67 ink conserving 8 ink cartridges ordering 14 replacing 13 ink levels checking 73 inserting a memory card or flash drive 35 installation cable 66, 67 installing network...

User's Guide
Page 106
reducing an image 46 repeating an image 48 replacing ink cartridges 13 resetting internal wireless print server to factory default settings 89 resetting to factory defaults 21 resuming print job 44 reverse page order 31 S safety information 7 saving ...default 19 tips for copying 45 printing 30 scanning 50 top cover 11 transparencies 28 troubleshooting checking an unresponsive printer 76 contacting technical support 76 Service Center 76 solving basic printer problems 76 wireless network 88 troubleshooting, copy scanner unit does not close 85 troubleshooting, copy and scan cannot scan to computer...
reducing an image 46 repeating an image 48 replacing ink cartridges 13 resetting internal wireless print server to factory default settings 89 resetting to factory defaults 21 resuming print job 44 reverse page order 31 S safety information 7 saving ...default 19 tips for copying 45 printing 30 scanning 50 top cover 11 transparencies 28 troubleshooting checking an unresponsive printer 76 contacting technical support 76 Service Center 76 solving basic printer problems 76 wireless network 88 troubleshooting, copy scanner unit does not close 85 troubleshooting, copy and scan cannot scan to computer...


