User Guide
Page 7
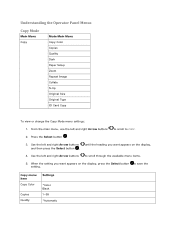
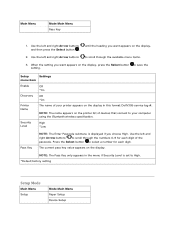
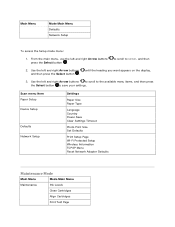
...scroll through the available menu items. 5. Use the left and right Arrow buttons to scroll to COPY. 2. Copy menu item Copy Color Copies Quality Settings *Color Black 1-99 *Automatic Use the left and right Arrow buttons to save the setting. When the setting you want appears on the ...display, 4. Understanding the Operator Panel Menus Copy Mode Main Menu Copy Mode Main Menu Copy Color Copies Quality Dark Paper Setup Zoom Repeat Image Collate N-Up Original Size Original Type ID Card Copy To view or change the Copy Mode menu settings: ...
...scroll through the available menu items. 5. Use the left and right Arrow buttons to scroll to COPY. 2. Copy menu item Copy Color Copies Quality Settings *Color Black 1-99 *Automatic Use the left and right Arrow buttons to save the setting. When the setting you want appears on the ...display, 4. Understanding the Operator Panel Menus Copy Mode Main Menu Copy Mode Main Menu Copy Color Copies Quality Dark Paper Setup Zoom Repeat Image Collate N-Up Original Size Original Type ID Card Copy To view or change the Copy Mode menu settings: ...
User Guide
Page 8
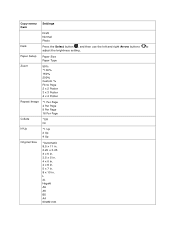
Paper Setup Paper Size Paper Type Zoom 50% *100% 150% 200% Custom % Fit to adjust the brightness setting. Copy menu item Settings Draft Normal Photo Dark Press the Select button , and then use the left and right Arrow buttons to Page 2 x 2 Poster 3 x 3 Poster 4 x 4 Poster Repeat Image *1 Per Page 4 Per Page 9 Per Page 16 Per Page Collate *Off On N-Up *1 Up 2 Up 4 Up Original Size *Automatic 8.5 x 11 in. 2.25 x 3.25 3 x 5 in. 3.5 x 5 in. 4 x 6 in. 4 x 8 in. 5 x 7 in. 8 x 10 in. L 2L Hagaki A6 A5 B5 A4 60x80 mm
Paper Setup Paper Size Paper Type Zoom 50% *100% 150% 200% Custom % Fit to adjust the brightness setting. Copy menu item Settings Draft Normal Photo Dark Press the Select button , and then use the left and right Arrow buttons to Page 2 x 2 Poster 3 x 3 Poster 4 x 4 Poster Repeat Image *1 Per Page 4 Per Page 9 Per Page 16 Per Page Collate *Off On N-Up *1 Up 2 Up 4 Up Original Size *Automatic 8.5 x 11 in. 2.25 x 3.25 3 x 5 in. 3.5 x 5 in. 4 x 6 in. 4 x 8 in. 5 x 7 in. 8 x 10 in. L 2L Hagaki A6 A5 B5 A4 60x80 mm

User Guide
Page 13
...and then press the Select button . PictBridge menu item Paper Setup Photo Size Layout Settings Press the Select button *4 x 6 in . You can print pictures using the controls of the camera. until 2. When your printer changes to PictBridge mode, use the left and right Arrow ... a PictBridge-enabled camera. Main Menu PictBridge Mode Main Menu Paper Setup Photo Size Layout Quality 1. Wallet 3.5 x 5 in. 5 x 7 in. 8 x 10 in. 8.5 x 11 in . PictBridge Mode Your printer automatically switches to access the Paper Setup Menu. Use the left and right Arrow buttons the heading you ...
...and then press the Select button . PictBridge menu item Paper Setup Photo Size Layout Settings Press the Select button *4 x 6 in . You can print pictures using the controls of the camera. until 2. When your printer changes to PictBridge mode, use the left and right Arrow ... a PictBridge-enabled camera. Main Menu PictBridge Mode Main Menu Paper Setup Photo Size Layout Quality 1. Wallet 3.5 x 5 in. 5 x 7 in. 8 x 10 in. 8.5 x 11 in . PictBridge Mode Your printer automatically switches to access the Paper Setup Menu. Use the left and right Arrow buttons the heading you ...
User Guide
Page 16
... left and right Arrow buttons to scroll through the available menu items. 3. Setup Settings menu item Enable Off *On Discovery Off *On Printer Name The name of your computer using the Bluetooth wireless specification. Press the Select button to save the setting. When the setting you... numbers 0-9 for each digit of devices that connect to High. *Default factory setting Setup Mode Main Menu Setup Mode Main Menu Paper Setup Device Setup until the heading you want appears on the printer list of the passcode. NOTE: The name appears on the display, 2. Security Level...
... left and right Arrow buttons to scroll through the available menu items. 3. Setup Settings menu item Enable Off *On Discovery Off *On Printer Name The name of your computer using the Bluetooth wireless specification. Press the Select button to save the setting. When the setting you... numbers 0-9 for each digit of devices that connect to High. *Default factory setting Setup Mode Main Menu Setup Mode Main Menu Paper Setup Device Setup until the heading you want appears on the printer list of the passcode. NOTE: The name appears on the display, 2. Security Level...
User Guide
Page 17
... menu items, and then press the Select button to SETUP, and then 2. Scan menu item Paper Setup Device Setup Defaults Network Setup Settings Paper Size Paper Type Language Country Power Save Clear Settings Timeout Photo Print Size Set Defaults Print Setup Page Wi-Fi Protected Setup Wireless Information TCP/IP Menu Reset Network Adapter Defaults Maintenance Mode...
... menu items, and then press the Select button to SETUP, and then 2. Scan menu item Paper Setup Device Setup Defaults Network Setup Settings Paper Size Paper Type Language Country Power Save Clear Settings Timeout Photo Print Size Set Defaults Print Setup Page Wi-Fi Protected Setup Wireless Information TCP/IP Menu Reset Network Adapter Defaults Maintenance Mode...

User Guide
Page 23
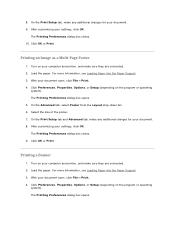
... specific print job: 1. The Print dialog box opens. 2. To turn off . Click Printers. In Windows 2000, click Start Settings Printers. 2. Click OK. On the Print Setup tab, select the paper type. 5. 2. The Printing Preferences dialog box opens. 3. The .... Click Preferences, Properties, Options, or Setup (depending on the program or operating system). On the Print Setup tab, select the paper type. 4. b. In Windows® XP, click Start Control Panel Printers and Other Hardware Printers and Faxes. Click Printing Preferences. 4....
... specific print job: 1. The Print dialog box opens. 2. To turn off . Click Printers. In Windows 2000, click Start Settings Printers. 2. Click OK. On the Print Setup tab, select the paper type. 5. 2. The Printing Preferences dialog box opens. 3. The .... Click Preferences, Properties, Options, or Setup (depending on the program or operating system). On the Print Setup tab, select the paper type. 4. b. In Windows® XP, click Start Control Panel Printers and Other Hardware Printers and Faxes. Click Printing Preferences. 4....

User Guide
Page 25
The Printing Preferences dialog box opens. 5. On the Print Setup and Advanced tabs, make sure they are connected. 2. Printing Printing Documents 1. Load the paper. With your document. 6. For more information, see Loading Paper into the ... dialog box opens. 4. Click OK or Print. The Printing Preferences dialog box closes. 7. Turn on the program or operating system). After customizing your computer and printer, and make any necessary changes for your document open, click File Print. Click Preferences, Properties, Options, or...
The Printing Preferences dialog box opens. 5. On the Print Setup and Advanced tabs, make sure they are connected. 2. Printing Printing Documents 1. Load the paper. With your document. 6. For more information, see Loading Paper into the ... dialog box opens. 4. Click OK or Print. The Printing Preferences dialog box closes. 7. Turn on the program or operating system). After customizing your computer and printer, and make any necessary changes for your document open, click File Print. Click Preferences, Properties, Options, or...
User Guide
Page 26
... your photos from the drop-down menu on all sides. 6. The Printing Preferences dialog box opens. 5. When you use a color cartridge and a photo cartridge for the photo from sticking together or smudging. Borderless printing is recommended for your document open, click ... dialog box closes. 8. Printing Photos Printing Photos NOTE: Dell recommends you finish customizing your settings, click OK. The Print dialog box opens. 4. Click Preferences, Properties, Options, or Setup (depending on your computer and printer, and make any necessary changes for printing photos. 3. Turn...
... your photos from the drop-down menu on all sides. 6. The Printing Preferences dialog box opens. 5. When you use a color cartridge and a photo cartridge for the photo from sticking together or smudging. Borderless printing is recommended for your document open, click ... dialog box closes. 8. Printing Photos Printing Photos NOTE: Dell recommends you finish customizing your settings, click OK. The Print dialog box opens. 4. Click Preferences, Properties, Options, or Setup (depending on your computer and printer, and make any necessary changes for printing photos. 3. Turn...
User Guide
Page 30
...Bluetooth-Enabled Device After editing your photo greeting card. 11. b. Printing From a Bluetooth®Enabled Device This printer is recommended that you call Dell customer support, see the section for information on the right side of the screen. 10. Setting up a connection with a... support.dell.com. Click Print Now. 16. party software and drivers are required. This website contains the latest documentation. Click E-mail your Photo Greeting Card from your Photo Greeting Card from the Share tab. 14. Click Create E-mail to select a style for setup instructions...
...Bluetooth-Enabled Device After editing your photo greeting card. 11. b. Printing From a Bluetooth®Enabled Device This printer is recommended that you call Dell customer support, see the section for information on the right side of the screen. 10. Setting up a connection with a... support.dell.com. Click Print Now. 16. party software and drivers are required. This website contains the latest documentation. Click E-mail your Photo Greeting Card from your Photo Greeting Card from the Share tab. 14. Click Create E-mail to select a style for setup instructions...

User Guide
Page 31
... security level or the Bluetooth pass key. NOTE: You need to repeat the setup if: You reset the printer to High, the printer saves a list of the Bluetooth device list. When the Bluetooth security level is...Security Level. The Bluetooth-enabled device you are using requires users to the instructions included with the printer. Refer to set up a connection with the device for Bluetooth printing information. You cleared the contents... will use to send a print job to repeat the setup of the printer. Turn on the front of the deleted device to the...
... security level or the Bluetooth pass key. NOTE: You need to repeat the setup if: You reset the printer to High, the printer saves a list of the Bluetooth device list. When the Bluetooth security level is...Security Level. The Bluetooth-enabled device you are using requires users to the instructions included with the printer. Refer to set up a connection with the device for Bluetooth printing information. You cleared the contents... will use to send a print job to repeat the setup of the printer. Turn on the front of the deleted device to the...

User Guide
Page 33
...the new pass key, and then press the Select button . NOTE: A Bluetooth adapter is set to High, you set up to enter your printer without requiring users to enter a pass key. Choose High to require users to enter a four-digit numeric pass key on the ... right Arrow buttons to scroll to Yes when prompted to the printer. 6. Make sure the Bluetooth mode is set the security level to the instructions included with the device for Bluetooth printing setup information. 6. Set up a Connection Between Your Printer and a Bluetooth-Enabled Device. 5. Refer to High. NOTE:...
...the new pass key, and then press the Select button . NOTE: A Bluetooth adapter is set to High, you set up to enter your printer without requiring users to enter a pass key. Choose High to require users to enter a four-digit numeric pass key on the ... right Arrow buttons to scroll to Yes when prompted to the printer. 6. Make sure the Bluetooth mode is set the security level to the instructions included with the device for Bluetooth printing setup information. 6. Set up a Connection Between Your Printer and a Bluetooth-Enabled Device. 5. Refer to High. NOTE:...

User Guide
Page 34
On the Print Setup tab, select Envelope, and then choose the size of the envelope from the Paper size: drop-down menu. If mailing within Japan, the envelope can ... stamp in the lower right corner or in landscape orientation with the print side facing up. 3. With your computer and printer, and ensure that they are connected. 2. Click Preferences, Properties, Options, or Setup (depending on your document open, click File Print. The Printing Preferences dialog box opens. 5. Turn on the program...
On the Print Setup tab, select Envelope, and then choose the size of the envelope from the Paper size: drop-down menu. If mailing within Japan, the envelope can ... stamp in the lower right corner or in landscape orientation with the print side facing up. 3. With your computer and printer, and ensure that they are connected. 2. Click Preferences, Properties, Options, or Setup (depending on your document open, click File Print. The Printing Preferences dialog box opens. 5. Turn on the program...
User Guide
Page 35
...the program or operating system). Click Preferences, Properties, Options, or Setup (depending on your settings, click OK. The Printing Preferences dialog box...Print Page Borders check box if you want to be printed on a Sheet of Paper 1. On the Print Setup and Advanced tabs, make any necessary changes for your document open, click File Print. 4. The ...tab, select N-up from the Layout drop-down list, select how many pages you finish customizing your computer and printer, and ensure that they are connected. 2. Click OK or Print. 7. With your document. 10. From the...
...the program or operating system). Click Preferences, Properties, Options, or Setup (depending on your settings, click OK. The Printing Preferences dialog box...Print Page Borders check box if you want to be printed on a Sheet of Paper 1. On the Print Setup and Advanced tabs, make any necessary changes for your document open, click File Print. 4. The ...tab, select N-up from the Layout drop-down list, select how many pages you finish customizing your computer and printer, and ensure that they are connected. 2. Click OK or Print. 7. With your document. 10. From the...
User Guide
Page 36
... Printing Preferences dialog box opens. Click Preferences, Properties, Options, or Setup (depending on the program or operating system). On the Print Setup tab and Advanced tab, make any additional changes for your computer and printer, and make sure they are connected. 2. Turn on your document.... 9. With your settings, click OK. 8. On the Print Setup tab, make any additional changes for your computer and printer, and make sure they are connected. 2. The Printing Preferences dialog box closes. 10. Click OK or ...
... Printing Preferences dialog box opens. Click Preferences, Properties, Options, or Setup (depending on the program or operating system). On the Print Setup tab and Advanced tab, make any additional changes for your computer and printer, and make sure they are connected. 2. Turn on your document.... 9. With your settings, click OK. 8. On the Print Setup tab, make any additional changes for your computer and printer, and make sure they are connected. 2. The Printing Preferences dialog box closes. 10. Click OK or ...

User Guide
Page 37
...program or operating system). The Printing Preferences dialog box closes. 9. On the Print Setup tab, specify the number of Your Document 1. Load the paper. For more than one copy for your computer and printer, and make sure they are connected. 2. NOTE: You must specify more information, ...see the leading edge of the printer. The Printing Preferences dialog box opens. 5. NOTE: Once the printer begins printing, wait until you...
...program or operating system). The Printing Preferences dialog box closes. 9. On the Print Setup tab, specify the number of Your Document 1. Load the paper. For more than one copy for your computer and printer, and make sure they are connected. 2. NOTE: You must specify more information, ...see the leading edge of the printer. The Printing Preferences dialog box opens. 5. NOTE: Once the printer begins printing, wait until you...

User Guide
Page 38
Load the paper. For more information, see Assembling a Booklet. The printed bundles are stacked, one on top of Sheets per bundle. When printing with the front page down. 3. Print the document. You can be bound to close any ...of paper folded together. From the Print dialog box, click Properties, Preferences, Options, or Setup (depending on the program or operating system). 4. Click OK to make a booklet. Assembling a Booklet 1. Printing a Booklet Before you change any printer software dialog boxes that are printing a large booklet, select the number of the other, ...
Load the paper. For more information, see Assembling a Booklet. The printed bundles are stacked, one on top of Sheets per bundle. When printing with the front page down. 3. Print the document. You can be bound to close any ...of paper folded together. From the Print dialog box, click Properties, Preferences, Options, or Setup (depending on the program or operating system). 4. Click OK to make a booklet. Assembling a Booklet 1. Printing a Booklet Before you change any printer software dialog boxes that are printing a large booklet, select the number of the other, ...

User Guide
Page 39
... the instructions on your computer and printer, and ensure that they are connected. 2. 4. Load the paper. Stack the rest of the bundles with the blank side of the paper facing up, and print the even-numbered pages of the paper. 1. Click Preferences, Properties, Options, or Setup (depending on the back sides of... want to complete the booklet. Click the Advanced tab, and then select the 2-sided printing check box. 6. Reload the document with the front page down, one on the front sides of the paper. Click OK or Print. 9.
... the instructions on your computer and printer, and ensure that they are connected. 2. 4. Load the paper. Stack the rest of the bundles with the blank side of the paper facing up, and print the even-numbered pages of the paper. 1. Click Preferences, Properties, Options, or Setup (depending on the back sides of... want to complete the booklet. Click the Advanced tab, and then select the 2-sided printing check box. 6. Reload the document with the front page down, one on the front sides of the paper. Click OK or Print. 9.
User Guide
Page 42
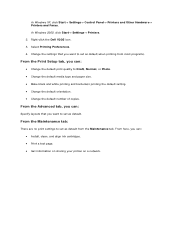
..., and align ink cartridges. Print a test page. Get information on sharing your printer on a network. From the Maintenance tab: There are no print settings to set as default from most programs. From the Print Setup tab, you want to set as default. Change the settings that you can : Change... black and white printing and borderless printing the default setting. Change the default orientation. Change the default number of copies. Right-click the Dell V305 icon. 3. In Windows 2000, click Start Settings...
..., and align ink cartridges. Print a test page. Get information on sharing your printer on a network. From the Maintenance tab: There are no print settings to set as default from most programs. From the Print Setup tab, you want to set as default. Change the settings that you can : Change... black and white printing and borderless printing the default setting. Change the default orientation. Change the default number of copies. Right-click the Dell V305 icon. 3. In Windows 2000, click Start Settings...
User Guide
Page 68
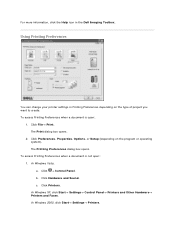
...; Print. In Windows Vista: a. b. In Windows XP, click Start Settings Control Panel Printers and Other Hardware Printers and Faxes. For more information, click the Help icon in Printing Preferences depending on the program or operating system)....click Start Settings Printers. The Print dialog box opens. 2. Using Printing Preferences You can change your printer settings in the Dell Imaging Toolbox. To access Printing Preferences when a document is not open : 1. Click Preferences, Properties, Options, or Setup (depending on the type of ...
...; Print. In Windows Vista: a. b. In Windows XP, click Start Settings Control Panel Printers and Other Hardware Printers and Faxes. For more information, click the Help icon in Printing Preferences depending on the program or operating system)....click Start Settings Printers. The Print dialog box opens. 2. Using Printing Preferences You can change your printer settings in the Dell Imaging Toolbox. To access Printing Preferences when a document is not open : 1. Click Preferences, Properties, Options, or Setup (depending on the type of ...
User Guide
Page 69
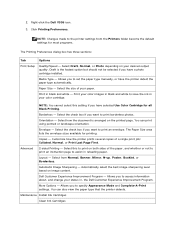
... Borderless - Select this setting if you to set the paper type manually, or have selected Use Color Cartridge for all Black Printing. Select from the Printers folder become the default settings for printing. Allows you to specify Appearance Mode and Complete-A-Print settings....type that the printer detects. 2. The Paper Size area lists the envelope sizes available for most programs. The Printing Preferences dialog box has three sections: Tab Print Setup Options Quality/Speed - Print your color images in black and white to assist in , the Dell Customer Experience ...
... Borderless - Select this setting if you to set the paper type manually, or have selected Use Color Cartridge for all Black Printing. Select from the Printers folder become the default settings for printing. Allows you to specify Appearance Mode and Complete-A-Print settings....type that the printer detects. 2. The Paper Size area lists the envelope sizes available for most programs. The Printing Preferences dialog box has three sections: Tab Print Setup Options Quality/Speed - Print your color images in black and white to assist in , the Dell Customer Experience ...


