DP1.2 Multi-Stream Transport MST Techsheet
Page 1
... to refer to the Dell UltraSharp monitors. High Bit-rate 2 DisplayPort 1.2 supports up to maximum of four monitors, but are trademarks of Dell Inc. This lends itself very well to activate MST through one DisplayPort 1.2 connector input and output and a DP1.1a-supported monitor. Setting DP1.1a and DP1.2 on MST, please refer to your user guide for instructions. Trademarks used in the MST chain...
... to refer to the Dell UltraSharp monitors. High Bit-rate 2 DisplayPort 1.2 supports up to maximum of four monitors, but are trademarks of Dell Inc. This lends itself very well to activate MST through one DisplayPort 1.2 connector input and output and a DP1.1a-supported monitor. Setting DP1.1a and DP1.2 on MST, please refer to your user guide for instructions. Trademarks used in the MST chain...
monitor Users Guide
Page 3
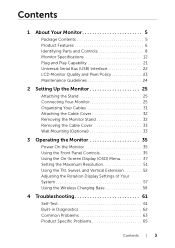
... Controls 8 Monitor Specifications 12 Plug and Play Capability 21 Universal Serial Bus (USB) Interface 22 LCD Monitor Quality and Pixel Policy 23 Maintenance Guidelines 24 2 Setting Up the Monitor 25 Attaching the Stand 25 Connecting Your Monitor 25 Organizing Your Cables 31 Attaching the Cable Cover 32 Removing the Monitor Stand 32 Removing the Cable Cover 33 Wall Mounting (Optional 33 3 Operating the Monitor 35 Power On the Monitor 35 Using the Front Panel Controls 35 Using the On-Screen Display (OSD) Menu 37 Setting the Maximum Resolution...
... Controls 8 Monitor Specifications 12 Plug and Play Capability 21 Universal Serial Bus (USB) Interface 22 LCD Monitor Quality and Pixel Policy 23 Maintenance Guidelines 24 2 Setting Up the Monitor 25 Attaching the Stand 25 Connecting Your Monitor 25 Organizing Your Cables 31 Attaching the Cable Cover 32 Removing the Monitor Stand 32 Removing the Cable Cover 33 Wall Mounting (Optional 33 3 Operating the Monitor 35 Power On the Monitor 35 Using the Front Panel Controls 35 Using the On-Screen Display (OSD) Menu 37 Setting the Maximum Resolution...
monitor Users Guide
Page 6
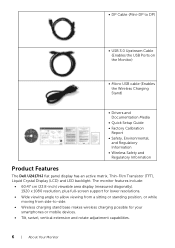
... while moving from side-to DP) • USB 3.0 Upstream Cable (Enables the USB Ports on the Monitor) • Micro USB cable (Enables the Wireless Charging Stand) • Drivers and Documentation Media • Quick Setup Guide • Factory Calibration Report • Safety, Environmental, and Regulatory Information • Wireless Safety and Regulatory Information Product Features The Dell U2417HJ flat panel display has an active matrix, Thin-Film Transistor (TFT), Liquid Crystal Display (LCD) and LED backlight.
... while moving from side-to DP) • USB 3.0 Upstream Cable (Enables the USB Ports on the Monitor) • Micro USB cable (Enables the Wireless Charging Stand) • Drivers and Documentation Media • Quick Setup Guide • Factory Calibration Report • Safety, Environmental, and Regulatory Information • Wireless Safety and Regulatory Information Product Features The Dell U2417HJ flat panel display has an active matrix, Thin-Film Transistor (TFT), Liquid Crystal Display (LCD) and LED backlight.
monitor Users Guide
Page 7
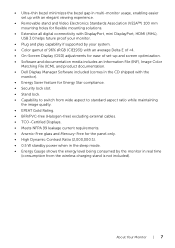
• Ultra-thin bezel minimizes the bezel gap in multi-monitor usage, enabling easier set up with an elegant viewing experience. • Removable stand and Video Electronics Standards Association (VESA™) 100 mm mounting holes for flexible mounting solutions. • Extensive all digital connectivity with DisplayPort, mini DisplayPort, HDMI (MHL), USB 3.0 helps future proof your monitor. • Plug and play capability if supported by your system. • Color gamut of 96% sRGB (CIE1931) with an average Delta E of
• Ultra-thin bezel minimizes the bezel gap in multi-monitor usage, enabling easier set up with an elegant viewing experience. • Removable stand and Video Electronics Standards Association (VESA™) 100 mm mounting holes for flexible mounting solutions. • Extensive all digital connectivity with DisplayPort, mini DisplayPort, HDMI (MHL), USB 3.0 helps future proof your monitor. • Plug and play capability if supported by your system. • Color gamut of 96% sRGB (CIE1931) with an average Delta E of

monitor Users Guide
Page 11
... have connected the USB cable to DP cable. About Your Monitor | 11 Connect your USB device. Once this connector after you can use this cable is not supported for the audio line out connector. Connect your speakers*. DisplayPort output for DP Multi-Stream Transport (MST) function". Connect your computer with Mini-DP to the computer and USB upstream connector on the monitor. Bottom View Bottom view without monitor stand Label Description 1 AC power cord connector 2 Dell Soundbar mounting...
... have connected the USB cable to DP cable. About Your Monitor | 11 Connect your USB device. Once this connector after you can use this cable is not supported for the audio line out connector. Connect your speakers*. DisplayPort output for DP Multi-Stream Transport (MST) function". Connect your computer with Mini-DP to the computer and USB upstream connector on the monitor. Bottom View Bottom view without monitor stand Label Description 1 AC power cord connector 2 Dell Soundbar mounting...

monitor Users Guide
Page 14
... or 60 Hz ± 3 Hz / 1.5 A (typical) • 120 V: 42 A (Max.) at 0 °C (cold start) • 240 V: 80 A (Max.) at 0 °C (cold start) * Not Support HDMI 1.4 optional specification, include HDMI Ethernet Channel (HEC), Audio Return Channel (ARC), standard for 3D format and resolutions, standard for 2K and 4K digital cinema resolution. ** Support DP1.2 (CORE) specification, include HBR2, MST and DP audio. 14 | About Your Monitor
... or 60 Hz ± 3 Hz / 1.5 A (typical) • 120 V: 42 A (Max.) at 0 °C (cold start) • 240 V: 80 A (Max.) at 0 °C (cold start) * Not Support HDMI 1.4 optional specification, include HDMI Ethernet Channel (HEC), Audio Return Channel (ARC), standard for 3D format and resolutions, standard for 2K and 4K digital cinema resolution. ** Support DP1.2 (CORE) specification, include HBR2, MST and DP audio. 14 | About Your Monitor

monitor Users Guide
Page 16
... USB charging cable connected. The following table shows the power consumption and signaling of the following messages will be displayed: 16 | About Your Monitor Off Less than 0.5 W Switch off mode, one of this automatic power saving feature. If you have VESA's DPM™ compliance display card or software installed in your PC, the monitor can automatically reduce its power consumption when not in the Active-off - - - Environmental Characteristics Model...
... USB charging cable connected. The following table shows the power consumption and signaling of the following messages will be displayed: 16 | About Your Monitor Off Less than 0.5 W Switch off mode, one of this automatic power saving feature. If you have VESA's DPM™ compliance display card or software installed in your PC, the monitor can automatically reduce its power consumption when not in the Active-off - - - Environmental Characteristics Model...

monitor Users Guide
Page 30
... downstream USB 3.0 ports on the monitor stand to organize the cables. NOTE: When the connected MHL source device enters Standby mode, the monitor will display black screen or show the message below steps: 30 | Setting Up the Monitor Connect the upstream USB 3.0 port (cable supplied) to an appropriate USB 3.0 port on your computer. (See Bottom View for your monitor setup: 1. Turn On the monitor and the computer. If it does not display an image, see Universal Serial Bus (USB) Specific Problems. 5. Use the cable...
... downstream USB 3.0 ports on the monitor stand to organize the cables. NOTE: When the connected MHL source device enters Standby mode, the monitor will display black screen or show the message below steps: 30 | Setting Up the Monitor Connect the upstream USB 3.0 port (cable supplied) to an appropriate USB 3.0 port on your computer. (See Bottom View for your monitor setup: 1. Turn On the monitor and the computer. If it does not display an image, see Universal Serial Bus (USB) Specific Problems. 5. Use the cable...

monitor Users Guide
Page 36
... turn the monitor On and Off. Use the OK button to adjust the image settings. Front Panel Button Use the buttons on the front of the monitor to confirm your selection. Power (with power light indicator) The white light indicates the monitor is On and fully functional. A breathing white light indicates the power save mode. Front Panel Button 1 Up 2 Down 3 OK 4 Back Description Use the Up button to launch the On-Screen Display (OSD) and select the OSD Menu. Shortcut key/ Brightness/Contrast 3 Use the MENU button...
... turn the monitor On and Off. Use the OK button to adjust the image settings. Front Panel Button Use the buttons on the front of the monitor to confirm your selection. Power (with power light indicator) The white light indicates the monitor is On and fully functional. A breathing white light indicates the power save mode. Front Panel Button 1 Up 2 Down 3 OK 4 Back Description Use the Up button to launch the On-Screen Display (OSD) and select the OSD Menu. Shortcut key/ Brightness/Contrast 3 Use the MENU button...

monitor Users Guide
Page 40
... the Monitor Color Settings Use Color Settings to select the DisplayPort input source. DisplayPort Select the DisplayPort input when you are using the Mini DisplayPort (Mini DP) connector. Mini DisplayPort Select the Mini DisplayPort input when you are using the DisplayPort (DP) connector. Press to your monitor. HDMI (MHL) 1 Select the HDMI (MHL) 1 or HDMI (MHL) 2 input when you are using HDMI (MHL) 2 the HDMI connectors. Input Source Use the Input Source menu to select between the different video signals that...
... the Monitor Color Settings Use Color Settings to select the DisplayPort input source. DisplayPort Select the DisplayPort input when you are using the Mini DisplayPort (Mini DP) connector. Mini DisplayPort Select the Mini DisplayPort input when you are using the DisplayPort (DP) connector. Press to your monitor. HDMI (MHL) 1 Select the HDMI (MHL) 1 or HDMI (MHL) 2 input when you are using HDMI (MHL) 2 the HDMI connectors. Input Source Use the Input Source menu to select between the different video signals that...
monitor Users Guide
Page 42
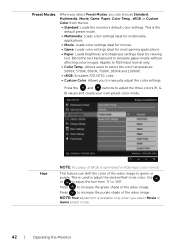
... color mode. Press the and buttons to manually adjust the color settings. Hue NOTE: Accuracy of sRGB is the default preset mode. • Multimedia: Loads color settings ideal for multimedia applications. • Movie: Loads color settings ideal for movies. • Game: Loads color settings ideal for most gaming applications. • Paper: Loads brightness and sharpness settings ideal for RGB input color format. Press to increase the purple shade of the video image. Use...
... color mode. Press the and buttons to manually adjust the color settings. Hue NOTE: Accuracy of sRGB is the default preset mode. • Multimedia: Loads color settings ideal for multimedia applications. • Movie: Loads color settings ideal for movies. • Game: Loads color settings ideal for most gaming applications. • Paper: Loads brightness and sharpness settings ideal for RGB input color format. Press to increase the purple shade of the video image. Use...

monitor Users Guide
Page 43
... (Dell Display Manager) may result in blank screen. to increase the monochrome appearance of the video Press to increase the colorful appearance of contrast to '100'. Settings Display Settings Use the Display Settings to Wide 16:9, 4:3, or 5:4. Aspect Ratio Adjusts the image ratio to adjust image. Dynamic Contrast Allows you select Game or Movie preset mode. Some Graphics Cards do not support MCCS (Monitor Control Command Set) at DP 1.2. Press the button to restore default display settings. NOTE...
... (Dell Display Manager) may result in blank screen. to increase the monochrome appearance of the video Press to increase the colorful appearance of contrast to '100'. Settings Display Settings Use the Display Settings to Wide 16:9, 4:3, or 5:4. Aspect Ratio Adjusts the image ratio to adjust image. Dynamic Contrast Allows you select Game or Movie preset mode. Some Graphics Cards do not support MCCS (Monitor Control Command Set) at DP 1.2. Press the button to restore default display settings. NOTE...

monitor Users Guide
Page 51
... download the latest graphic drivers. • Go to http://www.dell.com/support, enter your service tag, and download the latest driver for the monitor: In Windows® 7, Windows® 8, and Windows® 8.1: 1. Click the dropdown list of the Screen Resolution and select 1920 x 1080. 4. Operating the Monitor | 51 Setting the Maximum Resolution To set the maximum resolution for your graphics driver. Right-click on the desktop and click Display settings...
... download the latest graphic drivers. • Go to http://www.dell.com/support, enter your service tag, and download the latest driver for the monitor: In Windows® 7, Windows® 8, and Windows® 8.1: 1. Click the dropdown list of the Screen Resolution and select 1920 x 1080. 4. Operating the Monitor | 51 Setting the Maximum Resolution To set the maximum resolution for your graphics driver. Right-click on the desktop and click Display settings...

monitor Users Guide
Page 61
... computer are properly connected but the monitor screen remains dark, run the monitor self-test by performing the following steps: 1. Turn on -screen (against a black background), if the monitor cannot sense a video signal and is functioning properly. or Troubleshooting | 61 Unplug the video cable from the back of the procedures in self-test mode, the power LED remains white. If your computer and the monitor. 2. Self-Test Your...
... computer are properly connected but the monitor screen remains dark, run the monitor self-test by performing the following steps: 1. Turn on -screen (against a black background), if the monitor cannot sense a video signal and is functioning properly. or Troubleshooting | 61 Unplug the video cable from the back of the procedures in self-test mode, the power LED remains white. If your computer and the monitor. 2. Self-Test Your...

monitor Users Guide
Page 62
... the video cable is unplugged and the monitor is functioning properly. Turn Off your computer and the monitor. If your monitor screen remains blank after you are experiencing is an inherent problem with your monitor, or with your monitor is in diagnostic tool that helps you determine if the screen abnormality you use the previous procedure, check your video controller and computer, because your computer and video card...
... the video cable is unplugged and the monitor is functioning properly. Turn Off your computer and the monitor. If your monitor screen remains blank after you are experiencing is an inherent problem with your monitor, or with your monitor is in diagnostic tool that helps you determine if the screen abnormality you use the previous procedure, check your video controller and computer, because your computer and video card...

monitor Users Guide
Page 63
... red. 6. Troubleshooting | 63 Unplug the video cable(s) from the back of the screen changes to inspect the display in green, blue, black, white and text screens. Carefully inspect the screen for any other electrical equipment. • Ensure that the power button is pressed fully. • Ensure that the correct input source is selected via the Input Source menu. • Increase brightness & contrast controls via the Input Source menu. • Eliminate video extension cables. • Reset the monitor to factory settings. • Change the video resolution...
... red. 6. Troubleshooting | 63 Unplug the video cable(s) from the back of the screen changes to inspect the display in green, blue, black, white and text screens. Carefully inspect the screen for any other electrical equipment. • Ensure that the power button is pressed fully. • Ensure that the correct input source is selected via the Input Source menu. • Increase brightness & contrast controls via the Input Source menu. • Eliminate video extension cables. • Reset the monitor to factory settings. • Change the video resolution...

monitor Users Guide
Page 64
... Dell Support site at http://www.dell.com/ support/monitors. • Reset the monitor to factory settings. • Adjust brightness & contrast controls via OSD. • Reset the monitor to factory settings. • Adjust horizontal & vertical controls via OSD. • Reset the monitor to factory settings. • Perform monitor self-test feature check and determine if these lines are also in self-test mode. • Check for bent or broken pins in the video cable connector. • Run the built-in diagnostics. • Reset the monitor to factory settings...
... Dell Support site at http://www.dell.com/ support/monitors. • Reset the monitor to factory settings. • Adjust brightness & contrast controls via OSD. • Reset the monitor to factory settings. • Adjust horizontal & vertical controls via OSD. • Reset the monitor to factory settings. • Perform monitor self-test feature check and determine if these lines are also in self-test mode. • Check for bent or broken pins in the video cable connector. • Run the built-in diagnostics. • Reset the monitor to factory settings...

monitor Users Guide
Page 65
... the screen No Input Signal No picture, the when user LED light is white controls are pressed The picture The picture does not fill the cannot fill the entire screen height or width of the screen Possible Solutions • Check the Aspect Ratio setting in the Display Settings OSD. • Reset the monitor to different video formats (aspect ratio) of screen time • Use the Power Management feature to unlock (for more information, see Lock). • Check the signal source.
... the screen No Input Signal No picture, the when user LED light is white controls are pressed The picture The picture does not fill the cannot fill the entire screen height or width of the screen Possible Solutions • Check the Aspect Ratio setting in the Display Settings OSD. • Reset the monitor to different video formats (aspect ratio) of screen time • Use the Power Management feature to unlock (for more information, see Lock). • Check the signal source.

monitor Users Guide
Page 68
... Windows® 7, Windows® 8, and Windows® 8.1: 1. Right-click on the desktop and click Screen Resolution. 3. Click Change Display Settings. 4. Setting Up Your Monitor Setting the display resolution For maximum display performance with internet access 1. Right-click on the desktop and click Display settings. 2. For Windows® 8 and Windows® 8.1 only, select the Desktop tile to switch to classic desktop. 2. Please choose the scenario below that supports these resolutions. After installing the drivers...
... Windows® 7, Windows® 8, and Windows® 8.1: 1. Right-click on the desktop and click Screen Resolution. 3. Click Change Display Settings. 4. Setting Up Your Monitor Setting the display resolution For maximum display performance with internet access 1. Right-click on the desktop and click Display settings. 2. For Windows® 8 and Windows® 8.1 only, select the Desktop tile to switch to classic desktop. 2. Please choose the scenario below that supports these resolutions. After installing the drivers...
monitor Users Guide
Page 69
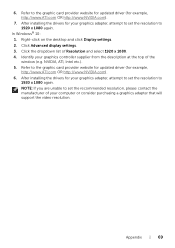
... again. 6. In Windows® 10: 1. After installing the drivers for your computer or consider purchasing a graphics adapter that will support the video resolution. NOTE: If you are unable to set the resolution to the graphic card provider website for updated driver (for example, http://www.ATI.com OR http://www.NVIDIA.com). 6. Right-click on the desktop and click Display settings. 2. Click the dropdown...
... again. 6. In Windows® 10: 1. After installing the drivers for your computer or consider purchasing a graphics adapter that will support the video resolution. NOTE: If you are unable to set the resolution to the graphic card provider website for updated driver (for example, http://www.ATI.com OR http://www.NVIDIA.com). 6. Right-click on the desktop and click Display settings. 2. Click the dropdown...


