User Guide
Page 3
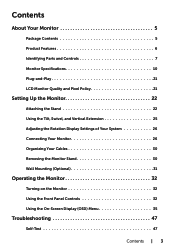
... 6 Identifying Parts and Controls 7 Monitor Specifications 10 Plug-and-Play 21 LCD Monitor Quality and Pixel Policy 21 Setting Up the Monitor 22 Attaching the Stand 22 Using the Tilt, Swivel, and Vertical Extension 25 Adjusting the Rotation Display Settings of Your System 26 Connecting Your Monitor 26 Organizing Your Cables 30 Removing the Monitor Stand 30 Wall Mounting (Optional 31 Operating the Monitor 32 Turning on the Monitor 32 Using the Front Panel Controls 32 Using the On-Screen Display (OSD) Menu 35 Troubleshooting 47 Self...
... 6 Identifying Parts and Controls 7 Monitor Specifications 10 Plug-and-Play 21 LCD Monitor Quality and Pixel Policy 21 Setting Up the Monitor 22 Attaching the Stand 22 Using the Tilt, Swivel, and Vertical Extension 25 Adjusting the Rotation Display Settings of Your System 26 Connecting Your Monitor 26 Organizing Your Cables 30 Removing the Monitor Stand 30 Wall Mounting (Optional 31 Operating the Monitor 32 Turning on the Monitor 32 Using the Front Panel Controls 32 Using the On-Screen Display (OSD) Menu 35 Troubleshooting 47 Self...
User Guide
Page 6
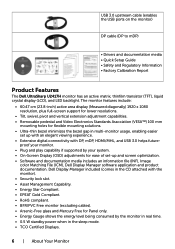
...; Drivers and documentation media • Quick Setup Guide • Safety and Regulatory Information • Factory Calibration Report Product Features The Dell UltraSharp U2417H monitor has an active matrix, thinfilm transistor (TFT), liquid crystal display (LCD), and LED backlight. The monitor features include: • 60.47 cm (23.8-inch) active area display (Measured diagonally) 1920 x 1080 resolution, plus full-screen support for lower resolutions. • Tilt, swivel, pivot and vertical extension adjustment capabilities. • Removable pedestal...
...; Drivers and documentation media • Quick Setup Guide • Safety and Regulatory Information • Factory Calibration Report Product Features The Dell UltraSharp U2417H monitor has an active matrix, thinfilm transistor (TFT), liquid crystal display (LCD), and LED backlight. The monitor features include: • 60.47 cm (23.8-inch) active area display (Measured diagonally) 1920 x 1080 resolution, plus full-screen support for lower resolutions. • Tilt, swivel, pivot and vertical extension adjustment capabilities. • Removable pedestal...
User Guide
Page 8
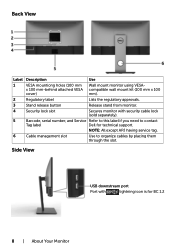
... Dell for BC 1.2 8 | About Your Monitor Back View Label Description Use 1 VESA mountiong holes (100 mm Wall mount monitor using VESA- Side View USB downstream port Port with security cable lock (sold separately). 5 Barcode, serial number, and Service Refer to this label if you need to organize cables by placing them through the slot. x 100 mm-behind attached VESA compatible wall mount kit (100 mm x 100 cover) mm). 2 Regulatory label Lists the regulatory approvals. 3 Stand release button Release stand...
... Dell for BC 1.2 8 | About Your Monitor Back View Label Description Use 1 VESA mountiong holes (100 mm Wall mount monitor using VESA- Side View USB downstream port Port with security cable lock (sold separately). 5 Barcode, serial number, and Service Refer to this label if you need to organize cables by placing them through the slot. x 100 mm-behind attached VESA compatible wall mount kit (100 mm x 100 cover) mm). 2 Regulatory label Lists the regulatory approvals. 3 Stand release button Release stand...
User Guide
Page 9
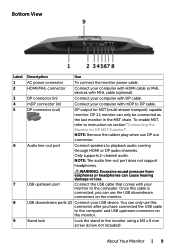
... MST chain. NOTE: Remove the rubber plug when use the USB downstream connectors on section "Connecting the Monitor for MST (multi-stream transport) capable monitor. USB downstream ports (2) Connect your computer with HDMI cable or MHL devices with DP cable. To enable MST, refer to the monitor using a M3 x 6 mm screw (screw not included). Bottom View Label 1 2 3 4 5 6 7 8 9 Description Use AC power connector To connect the monitor power cable. Stand lock Lock the stand to instruction on the monitor. DP 1.1 monitor can cause hearing...
... MST chain. NOTE: Remove the rubber plug when use the USB downstream connectors on section "Connecting the Monitor for MST (multi-stream transport) capable monitor. USB downstream ports (2) Connect your computer with HDMI cable or MHL devices with DP cable. To enable MST, refer to the monitor using a M3 x 6 mm screw (screw not included). Bottom View Label 1 2 3 4 5 6 7 8 9 Description Use AC power connector To connect the monitor power cable. Stand lock Lock the stand to instruction on the monitor. DP 1.1 monitor can cause hearing...
User Guide
Page 12
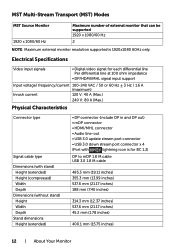
... inches) 400.1 mm (15.75 inches) 12 | About Your Monitor Electrical Specifications Video input signals • Digital video signal for each differential line Per differential line at 100 ohm impedance • DP/HDMI/MHL signal input support Input voltage/ frequency/current 100-240 VAC / 50 or 60 Hz ± 3 Hz / 1.6 A (maximum) Inrush current 120 V: 40 A (Max.) 240 V: 80 A (Max.) Physical Characteristics Connector type Signal cable type Dimensions (with stand) Height (extended) Height...
... inches) 400.1 mm (15.75 inches) 12 | About Your Monitor Electrical Specifications Video input signals • Digital video signal for each differential line Per differential line at 100 ohm impedance • DP/HDMI/MHL signal input support Input voltage/ frequency/current 100-240 VAC / 50 or 60 Hz ± 3 Hz / 1.6 A (maximum) Inrush current 120 V: 40 A (Max.) 240 V: 80 A (Max.) Physical Characteristics Connector type Signal cable type Dimensions (with stand) Height (extended) Height...

User Guide
Page 14
...-off Horizontal Vertical Video Power Indicator Sync Sync Active Active Active White Inactive - Inactive Off - - VESA Modes Normal operation Active-off mode Switch off mode, one of the following table shows the power consumption and signaling of this information in use. Your product may perform differently, depending on the software, components and peripherals you ordered and shall have VESA's DPM-compliant video card or software installed in your PC, the monitor can...
...-off Horizontal Vertical Video Power Indicator Sync Sync Active Active Active White Inactive - Inactive Off - - VESA Modes Normal operation Active-off mode Switch off mode, one of the following table shows the power consumption and signaling of this information in use. Your product may perform differently, depending on the software, components and peripherals you ordered and shall have VESA's DPM-compliant video card or software installed in your PC, the monitor can...

User Guide
Page 22
... tabs on the upper part of the stand to the groove on the back of a flat, clean, and soft surface to set it snaps into its place. 22 | Setting Up the Monitor CAUTION: Place monitor of the monitor. 3 Press the stand down till it up. To attach the monitor stand: 1 Remove the monitor protective cover and place the moitor with the stand to avoid scratching the display panel.
... tabs on the upper part of the stand to the groove on the back of a flat, clean, and soft surface to set it snaps into its place. 22 | Setting Up the Monitor CAUTION: Place monitor of the monitor. 3 Press the stand down till it up. To attach the monitor stand: 1 Remove the monitor protective cover and place the moitor with the stand to avoid scratching the display panel.
User Guide
Page 26
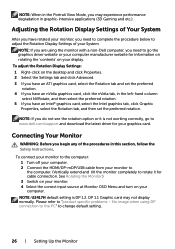
... display. NOTE: U2417H default setting is not working correctly, go the graphics driver website or your computer manufacturer website for your System. NOTE: If you are using DP connection to the PC" to rotate it is DP 1.2. To connect your monitor to the computer: 1 Turn off your computer. 2 Connect the HDMI/DP-mDP/USB cable from your monitor to the computer. (Vertically extend and tilt the monitor completely to change default setting...
... display. NOTE: U2417H default setting is not working correctly, go the graphics driver website or your computer manufacturer website for your System. NOTE: If you are using DP connection to the PC" to rotate it is DP 1.2. To connect your monitor to the computer: 1 Turn off your computer. 2 Connect the HDMI/DP-mDP/USB cable from your monitor to the computer. (Vertically extend and tilt the monitor completely to change default setting...
User Guide
Page 29
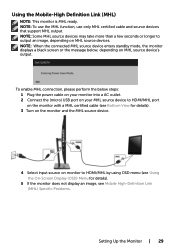
... the connected MHL source device enters standby mode, the monitor displays a black screen or the message below steps: 1 Plug the power cable on your monitor into a AC outlet. 2 Connect the (micro) USB port on your MHL source device to HDMI/MHL port on the monitor with a MHL certified cable (see Mobile High-Definition Link (MHL) Specific Problems. Setting Up the Monitor | 29 To enable MHL connection, please perform the below , depending on MHL source devices. Using...
... the connected MHL source device enters standby mode, the monitor displays a black screen or the message below steps: 1 Plug the power cable on your monitor into a AC outlet. 2 Connect the (micro) USB port on your MHL source device to HDMI/MHL port on the monitor with a MHL certified cable (see Mobile High-Definition Link (MHL) Specific Problems. Setting Up the Monitor | 29 To enable MHL connection, please perform the below , depending on MHL source devices. Using...

User Guide
Page 37
... using the HDMI connector. Select the HDMI/MHL input when you are using the DP (DisplayPort) connector. Use the Color menu to select the DP input source. Operating the Monitor | 37 Icon Menu and Submenus DP mDP HDMI/MHL Auto Select Reset Input Source Color Description Select DP input when you are using the mDP (mini DisplayPort) connector. Use to adjust the color setting mode. Use to select the HDMI/MHL input source. Use to select the mDP input source. Use to the factory defaults. Resets your monitor's Input Source settings to select Auto...
... using the HDMI connector. Select the HDMI/MHL input when you are using the DP (DisplayPort) connector. Use the Color menu to select the DP input source. Operating the Monitor | 37 Icon Menu and Submenus DP mDP HDMI/MHL Auto Select Reset Input Source Color Description Select DP input when you are using the mDP (mini DisplayPort) connector. Use to adjust the color setting mode. Use to select the HDMI/MHL input source. Use to select the mDP input source. Use to the factory defaults. Resets your monitor's Input Source settings to select Auto...
User Guide
Page 38
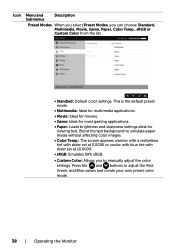
... and buttons to adjust the Red, Green, and Blue values and create your own preset color mode. 38 | Operating the Monitor Icon Menu and Submenus Description Preset Modes When you select Preset Modes, you to manually adjust the color settings. This is the default preset mode. • Multimedia: Ideal for multimedia applications. • Movie: Ideal for movies. • Game: Ideal for most gaming applications. • Paper: Loads brightness...
... and buttons to adjust the Red, Green, and Blue values and create your own preset color mode. 38 | Operating the Monitor Icon Menu and Submenus Description Preset Modes When you select Preset Modes, you to manually adjust the color settings. This is the default preset mode. • Multimedia: Ideal for multimedia applications. • Movie: Ideal for movies. • Game: Ideal for most gaming applications. • Paper: Loads brightness...

User Guide
Page 42
... factory defaults. Reset Personalization Restores shortcut keys to adjustments. Controls user access to factory defaults. 42 | Operating the Monitor Use the and buttons to adjust the slider in 1-second increments, from Preset Modes, Brightness/Contrast, Input Source, Aspect Ratio, Rotation set as shortcut key. Only hard unlock (Press and hold the exit button 6 sec) Unlock function - NOTE: Lock function - Either soft lock (through OSD menu) or hard lock (Press and hold the exit button 6 sec) Restore the menu settings...
... factory defaults. Reset Personalization Restores shortcut keys to adjustments. Controls user access to factory defaults. 42 | Operating the Monitor Use the and buttons to adjust the slider in 1-second increments, from Preset Modes, Brightness/Contrast, Input Source, Aspect Ratio, Rotation set as shortcut key. Only hard unlock (Press and hold the exit button 6 sec) Unlock function - NOTE: Lock function - Either soft lock (through OSD menu) or hard lock (Press and hold the exit button 6 sec) Restore the menu settings...

User Guide
Page 43
Enable this feature. Operating the Monitor | 43 DDC/CI (Display Data Channel/Command Interface) allows you to adjust the monitor settings using software on . Select Disable to turn off this feature for best user experience and optimum performance of your computer. Icon Menu and Submenus Other Description DDC/CI Select this option to adjust the OSD settings, such as the DDC/CI, LCD conditioning, and so on your monitor.
Enable this feature. Operating the Monitor | 43 DDC/CI (Display Data Channel/Command Interface) allows you to adjust the monitor settings using software on . Select Disable to turn off this feature for best user experience and optimum performance of your computer. Icon Menu and Submenus Other Description DDC/CI Select this option to adjust the OSD settings, such as the DDC/CI, LCD conditioning, and so on your monitor.

User Guide
Page 47
... the following steps: 1 Turn off both your monitor is working correctly. While in this section, follow the Safety Instructions. or Troubleshooting | 47 Self-Test Your monitor provides a self-test feature that allows you begin any of the procedures in self-test mode, the power LED remains white. To ensure proper Self-Test operation, remove all digital and the analog cables from the back of...
... the following steps: 1 Turn off both your monitor is working correctly. While in this section, follow the Safety Instructions. or Troubleshooting | 47 Self-Test Your monitor provides a self-test feature that allows you begin any of the procedures in self-test mode, the power LED remains white. To ensure proper Self-Test operation, remove all digital and the analog cables from the back of...

User Guide
Page 49
... inspect the display in diagnostic tool, the monitor is clean (no dust particles on the surface of the screen). 2 Unplug the video cable(s) from the back of the screen changes to red. 6 Inspect the display for 2 seconds. The test is an inherent problem with your monitor, or with your computer and video card. Check the video card and computer. Troubleshooting | 49 The color of the computer or monitor. If you...
... inspect the display in diagnostic tool, the monitor is clean (no dust particles on the surface of the screen). 2 Unplug the video cable(s) from the back of the screen changes to red. 6 Inspect the display for 2 seconds. The test is an inherent problem with your monitor, or with your computer and video card. Check the video card and computer. Troubleshooting | 49 The color of the computer or monitor. If you...
User Guide
Page 50
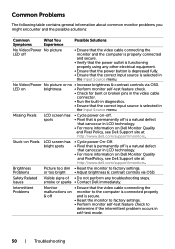
... brightness • Perform monitor self-test feature check. • Check for bent or broken pins in the video cable connector. • Run the built-in diagnostics. • Ensure that is permanently off is selected in the Input Source menu. LED on Pixels LCD screen has bright spots • Cycle power On-Off. • Pixel that the correct input source is selected in the Input Source menu. No Video/Power No picture or no • Increase brightness & contrast controls...
... brightness • Perform monitor self-test feature check. • Check for bent or broken pins in the video cable connector. • Run the built-in diagnostics. • Ensure that is permanently off is selected in the Input Source menu. LED on Pixels LCD screen has bright spots • Cycle power On-Off. • Pixel that the correct input source is selected in the Input Source menu. No Video/Power No picture or no • Increase brightness & contrast controls...
User Guide
Page 51
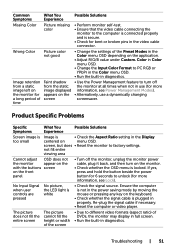
... connected properly and is secure. • Check for more information, see Lock). No Input Signal when user controls are pressed No picture, the LED light is locked. Product Specific Problems Specific Symptoms What You Experience Possible Solutions Screen image is too small Image is • Check the Aspect Ratio setting in the Color menu OSD depending on the monitor. • Check whether the OSD menu is white • Check the signal source. Re-plug the signal cable if necessary. • Reset the computer or video...
... connected properly and is secure. • Check for more information, see Lock). No Input Signal when user controls are pressed No picture, the LED light is locked. Product Specific Problems Specific Symptoms What You Experience Possible Solutions Screen image is too small Image is • Check the Aspect Ratio setting in the Color menu OSD depending on the monitor. • Check whether the OSD menu is white • Check the signal source. Re-plug the signal cable if necessary. • Reset the computer or video...
User Guide
Page 52
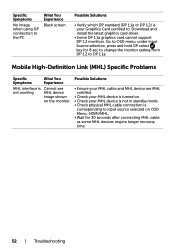
... to input source selected on . • Check your Graphics Card certified to. Specific Symptoms No image when using DP connection to the PC What You Experience Black screen Possible Solutions • Verify which DP standard (DP 1.1a or DP 1.2) is your MHL device is not in standby mode. • Check physical MHL cable connection is turned on OSD Menu: HDMI/MHL. • Wait for 8 sec to change the monitor setting from...
... to input source selected on . • Check your Graphics Card certified to. Specific Symptoms No image when using DP connection to the PC What You Experience Black screen Possible Solutions • Verify which DP standard (DP 1.1a or DP 1.2) is your MHL device is not in standby mode. • Check physical MHL cable connection is turned on OSD Menu: HDMI/MHL. • Wait for 8 sec to change the monitor setting from...
User Guide
Page 54
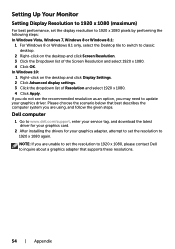
... steps. Dell computer 1 Go to www.dell.com/support, enter your service tag, and download the latest driver for your graphics card. 2 After installing the drivers for your graphics driver. Setting Up Your Monitor Setting Display Resolution to 1920 x 1080 (maximum) For best performance, set the display resolution to 1920 x 1080 pixels by performing the following steps: In Windows Vista, Windows 7, Windows 8 or Windows 8.1: 1 For Windows 8 or Windows 8.1 only, select the Desktop tile to switch to classic...
... steps. Dell computer 1 Go to www.dell.com/support, enter your service tag, and download the latest driver for your graphics card. 2 After installing the drivers for your graphics driver. Setting Up Your Monitor Setting Display Resolution to 1920 x 1080 (maximum) For best performance, set the display resolution to 1920 x 1080 pixels by performing the following steps: In Windows Vista, Windows 7, Windows 8 or Windows 8.1: 1 For Windows 8 or Windows 8.1 only, select the Desktop tile to switch to classic...
User Guide
Page 55
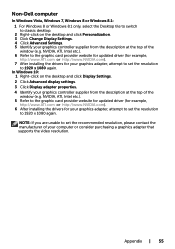
... updated driver (for example, http://www.ATI.com or http://www.NVIDIA.com). 6 After installing the drivers for your computer or consider purchasing a graphics adapter that supports the video resolution. In Windows 10: 1 Right-click on the desktop and click Personalization. 3 Click Change Display Settings. 4 Click Advanced Settings. 5 Identify your graphics controller supplier from the description at the top of the window (e.g. Non-Dell computer In Windows...
... updated driver (for example, http://www.ATI.com or http://www.NVIDIA.com). 6 After installing the drivers for your computer or consider purchasing a graphics adapter that supports the video resolution. In Windows 10: 1 Right-click on the desktop and click Personalization. 3 Click Change Display Settings. 4 Click Advanced Settings. 5 Identify your graphics controller supplier from the description at the top of the window (e.g. Non-Dell computer In Windows...


