Dell™ Technology Guide
Page 82
...of the drive, and then push firmly until the tray is normal and may prevent the operating system from starting. The drive tray cannot eject (for your CD, DVD, or BD software. Try allowing the computer to return to a media drive CLOSE OTHER PROGRAMS C H A N G E...stops. Hard Drive Problems A L L O W T H E C O M P U T E R T O C O O L B E F O R E T U R N I N G I T E S P E E D T O A S L O W E R R A T E - See "Running the Dell Diagnostics" on . See the help files for drives that are not slot-loading) 1 Ensure that the disc is inserted properly. RUN CHECK DISK - 82 Drives...
...of the drive, and then push firmly until the tray is normal and may prevent the operating system from starting. The drive tray cannot eject (for your CD, DVD, or BD software. Try allowing the computer to return to a media drive CLOSE OTHER PROGRAMS C H A N G E...stops. Hard Drive Problems A L L O W T H E C O M P U T E R T O C O O L B E F O R E T U R N I N G I T E S P E E D T O A S L O W E R R A T E - See "Running the Dell Diagnostics" on . See the help files for drives that are not slot-loading) 1 Ensure that the disc is inserted properly. RUN CHECK DISK - 82 Drives...
Dell™ Technology Guide
Page 204
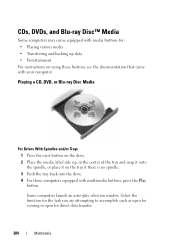
Playing a CD, DVD, or Blu-ray Disc Media For Drives With Spindles and/or Trays 1 Press the eject button on the drive. 2 Place the media, label side up data • Entertainment For instructions on the tray if there is no spindle. 3 Push the ... center of the tray and snap it onto the spindle, or place it on using these buttons see the documentation that came with your computer. CDs, DVDs, and Blu-ray Disc™ Media Some computers may come equipped with media buttons for direct data transfer. 204 Multimedia Some computers launch an...
Playing a CD, DVD, or Blu-ray Disc Media For Drives With Spindles and/or Trays 1 Press the eject button on the drive. 2 Place the media, label side up data • Entertainment For instructions on the tray if there is no spindle. 3 Push the ... center of the tray and snap it onto the spindle, or place it on using these buttons see the documentation that came with your computer. CDs, DVDs, and Blu-ray Disc™ Media Some computers may come equipped with media buttons for direct data transfer. 204 Multimedia Some computers launch an...
Dell™ Technology Guide
Page 205
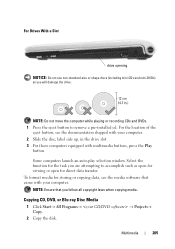
... 205 NOTE: Do not move the computer while playing or recording CDs and DVDs. 1 Press the eject button to accomplish such as you are attempting to remove a pre-installed cd. Select the function for the task you will damage the drive. Copying CD, DVD, or Blu-ray Disc Media 1 Click Start→ ... multimedia buttons, press the Play button. For Drives With a Slot drive opening NOTICE: Do not use non-standard-size or shape discs (including mini-CDs and mini-DVDs) as open for viewing or open for storing or copying data, see the documentation shipped with your computer. 2 Slide the disc,...
... 205 NOTE: Do not move the computer while playing or recording CDs and DVDs. 1 Press the eject button to accomplish such as you are attempting to remove a pre-installed cd. Select the function for the task you will damage the drive. Copying CD, DVD, or Blu-ray Disc Media 1 Click Start→ ... multimedia buttons, press the Play button. For Drives With a Slot drive opening NOTICE: Do not use non-standard-size or shape discs (including mini-CDs and mini-DVDs) as open for viewing or open for storing or copying data, see the documentation shipped with your computer. 2 Slide the disc,...
Dell™ Technology Guide
Page 206
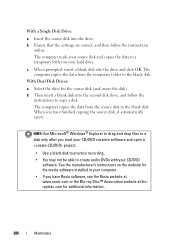
...temporary folder to the blank disk. HINT: Use Microsoft® Windows® Explorer to drag and drop files to a disk only after you start your CD/DVD creation software and open a project. • Use a blank disk to practice recording. • You may not be able to a temporary ...With Dual Disk Drives: a Select the drive for additional information. 206 Multimedia When you have finished copying the source disk, it automatically ejects. The computer reads your source disk and copies the data to create audio DVDs with your hard drive. See the manufacturer's instructions on your...
...temporary folder to the blank disk. HINT: Use Microsoft® Windows® Explorer to drag and drop files to a disk only after you start your CD/DVD creation software and open a project. • Use a blank disk to practice recording. • You may not be able to a temporary ...With Dual Disk Drives: a Select the drive for additional information. 206 Multimedia When you have finished copying the source disk, it automatically ejects. The computer reads your source disk and copies the data to create audio DVDs with your hard drive. See the manufacturer's instructions on your...
Setup Guide
Page 19
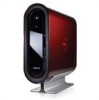
Lights up when the computer starts up and when a disc is flashing. 3 Disc drive eject control - Plays or records only standard-size (12 cm) CDs, and DVDs. Connects to view and share digital photos, music, videos, and documents stored on the ...activity light is in a vertical or a horizontal orientation. Turns on page 5. 6 Headphone connector - To eject a disc gently touch the button. 4 Optical drive - Provides a fast and convenient way to headphones. Using Your Studio Hybrid 2 Hard drive activity light - A flashing light indicates hard drive activity.
Lights up when the computer starts up and when a disc is flashing. 3 Disc drive eject control - Plays or records only standard-size (12 cm) CDs, and DVDs. Connects to view and share digital photos, music, videos, and documents stored on the ...activity light is in a vertical or a horizontal orientation. Turns on page 5. 6 Headphone connector - To eject a disc gently touch the button. 4 Optical drive - Provides a fast and convenient way to headphones. Using Your Studio Hybrid 2 Hard drive activity light - A flashing light indicates hard drive activity.
Setup Guide
Page 22
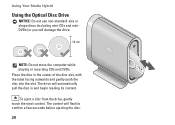
Place the disc in and begin reading its content. To eject a disc from the drive, gently touch the eject control. The drive will automatically pull the disc in the center of the disc slot, with the label facing outwards and gently push the disc into the slot. Using Your Studio Hybrid Using the Optical Disc Drive NOTICE: Do not use non-standard-size or shape discs (including mini-CDs and miniDVDs) or you will flash to confirm a few seconds before ejecting the disc. 20 The control will damage the drive. 12 cm NOTE: Do not move the computer while playing or recording CDs and DVDs.
Place the disc in and begin reading its content. To eject a disc from the drive, gently touch the eject control. The drive will automatically pull the disc in the center of the disc slot, with the label facing outwards and gently push the disc into the slot. Using Your Studio Hybrid Using the Optical Disc Drive NOTICE: Do not use non-standard-size or shape discs (including mini-CDs and miniDVDs) or you will flash to confirm a few seconds before ejecting the disc. 20 The control will damage the drive. 12 cm NOTE: Do not move the computer while playing or recording CDs and DVDs.


