Setup Guide
Page 5
...Set Up the Keyboard and Mouse 10 Connect the Network Cable (Optional 11 Connect the Power Cables for Your Display and Computer 12 Attach the Cable Clip (Optional 12 Windows Vista® Setup 13 Connect to the Internet (Optional 13 Using Your Studio Hybrid 16 Front ...View Features 16 Back View Features 18 Using the Optical Disc Drive 20 Changing the Sleeve 21 Software Features 22 Solving Problems 24 Wireless Mouse or Keyboard Problems 24 Network Problems 25 Power Problems 26 Memory Problems 27 Lockups and Software Problems 28 Using Support Tools 30 Dell...
...Set Up the Keyboard and Mouse 10 Connect the Network Cable (Optional 11 Connect the Power Cables for Your Display and Computer 12 Attach the Cable Clip (Optional 12 Windows Vista® Setup 13 Connect to the Internet (Optional 13 Using Your Studio Hybrid 16 Front ...View Features 16 Back View Features 18 Using the Optical Disc Drive 20 Changing the Sleeve 21 Software Features 22 Solving Problems 24 Wireless Mouse or Keyboard Problems 24 Network Problems 25 Power Problems 26 Memory Problems 27 Lockups and Software Problems 28 Using Support Tools 30 Dell...
Setup Guide
Page 12
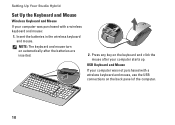
USB Keyboard and Mouse If your computer starts up. NOTE: The keyboard and mouse turn on automatically after your computer was purchased with a wireless keyboard and mouse, use the USB connections on the keyboard and click the mouse after the batteries are inserted. 2. Insert the batteries in the wireless keyboard and mouse. Press any key on the back panel of the computer. 10 Setting Up Your Studio Hybrid Set Up the Keyboard and Mouse Wireless Keyboard and Mouse If your computer was not purchased with a wireless keyboard and mouse: 1.
USB Keyboard and Mouse If your computer starts up. NOTE: The keyboard and mouse turn on automatically after your computer was purchased with a wireless keyboard and mouse, use the USB connections on the keyboard and click the mouse after the batteries are inserted. 2. Insert the batteries in the wireless keyboard and mouse. Press any key on the back panel of the computer. 10 Setting Up Your Studio Hybrid Set Up the Keyboard and Mouse Wireless Keyboard and Mouse If your computer was not purchased with a wireless keyboard and mouse: 1.
Setup Guide
Page 20
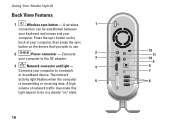
... of your computer to be established between your keyboard and mouse and your computer. A wireless 1 connection can be in a steady "on the back of network traffic may make this light appear to a network 7 or broadband device. Press the sync button on " state. 18 Using Your Studio Hybrid Back View Features 1 Wireless sync button -
... of your computer to be established between your keyboard and mouse and your computer. A wireless 1 connection can be in a steady "on the back of network traffic may make this light appear to a network 7 or broadband device. Press the sync button on " state. 18 Using Your Studio Hybrid Back View Features 1 Wireless sync button -
Setup Guide
Page 21
... cable slot on support.dell.com or when contacting technical support. 10 Line-out or headphone connector - Connects USB devices, such as digital video cameras. 8 S/PDIF connector - Connects to high-speed serial multimedia devices, such as a mouse, keyboard, printer, external drive,... or MP3 player. 7 IEEE 1394 connector - Connects to a lock for use on your computer for a security cable used as an anti-theft device. NOTE: For a monitor without going through optical digital cables. Using Your Studio Hybrid 4 HDMI 1.2...
... cable slot on support.dell.com or when contacting technical support. 10 Line-out or headphone connector - Connects USB devices, such as digital video cameras. 8 S/PDIF connector - Connects to high-speed serial multimedia devices, such as a mouse, keyboard, printer, external drive,... or MP3 player. 7 IEEE 1394 connector - Connects to a lock for use on your computer for a security cable used as an anti-theft device. NOTE: For a monitor without going through optical digital cables. Using Your Studio Hybrid 4 HDMI 1.2...

Setup Guide
Page 26
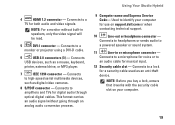
...- Press the wireless sync button at support.dell.com for your computer. CAUTION: Only trained service personnel should remove the computer cover. See the Service Manual on the computer. b. Wireless Mouse or Keyboard Problems If the mouse and keyboard stop communicating with the computer: a. If ...you can not solve your keyboard. 24 Turn on the Dell Support website at the back of your computer and then the wireless...
...- Press the wireless sync button at support.dell.com for your computer. CAUTION: Only trained service personnel should remove the computer cover. See the Service Manual on the computer. b. Wireless Mouse or Keyboard Problems If the mouse and keyboard stop communicating with the computer: a. If ...you can not solve your keyboard. 24 Turn on the Dell Support website at the back of your computer and then the wireless...
Setup Guide
Page 27
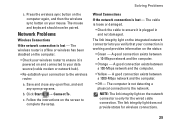
The mouse and keyboard should now be paired. A good connection exists between a 100‑Mbps network and the computer. • Yellow - Click Start → Connect To. The cable is ...
The mouse and keyboard should now be paired. A good connection exists between a 100‑Mbps network and the computer. • Yellow - Click Start → Connect To. The cable is ...

Setup Guide
Page 28
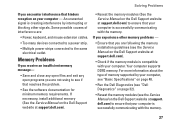
...the power strip is plugged into an electrical outlet and that the light on the AC adapter is on the Dell Support website at support.dell.com). 26 For assistance contact Dell, see the Service Manual on . Solving Problems Power Problems If the power light is off then back on properly...strips, and power extension cables to resume normal operation. If the power light is working by testing it off - Press a key on the keyboard, move the pointer on page 45. The display may have to remove and then reinstall the memory modules (for information on removing and replacing ...
...the power strip is plugged into an electrical outlet and that the light on the AC adapter is on the Dell Support website at support.dell.com). 26 For assistance contact Dell, see the Service Manual on . Solving Problems Power Problems If the power light is off then back on properly...strips, and power extension cables to resume normal operation. If the power light is working by testing it off - Press a key on the keyboard, move the pointer on page 45. The display may have to remove and then reinstall the memory modules (for information on removing and replacing ...
Setup Guide
Page 29
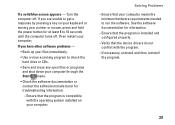
For more information about the type of interference are not using to ensure that hinders reception on the Dell Support website at support. Solving Problems If you are : • Power, keyboard, and mouse extension cables. • Too many devices connected to a power strip. • Multiple power strips connected to ensure that your computer...
For more information about the type of interference are not using to ensure that hinders reception on the Dell Support website at support. Solving Problems If you are : • Power, keyboard, and mouse extension cables. • Too many devices connected to a power strip. • Multiple power strips connected to ensure that your computer...

Setup Guide
Page 30
.... 28 If the computer stops responding - Press simultaneously. 2. Click the program that is designed for at least 8 to get a response by pressing a key on your keyboard or moving your computer. NOTE: Software usually includes installation instructions in an environment similar to the electrical outlet. End the program: 1. The Program Compatibility Wizard...
.... 28 If the computer stops responding - Press simultaneously. 2. Click the program that is designed for at least 8 to get a response by pressing a key on your keyboard or moving your computer. NOTE: Software usually includes installation instructions in an environment similar to the electrical outlet. End the program: 1. The Program Compatibility Wizard...
Setup Guide
Page 31
Solving Problems - Ensure that the device drivers do not conflict with the operating system installed on your keyboard or moving your computer through the Start menu. • Check the software documentation or contact the software manufacturer for troubleshooting information: - Verify that the program ...
Solving Problems - Ensure that the device drivers do not conflict with the operating system installed on your keyboard or moving your computer through the Start menu. • Check the software documentation or contact the software manufacturer for troubleshooting information: - Verify that the program ...
Setup Guide
Page 33
...failure - Possible hard disk drive failure during HDD boot test see "Contacting Dell" on page 45 for assistance. Keyboard failure, loose cable, or lost wireless connection. For wireless keyboard connections, see "Contacting Dell" on page 45 for assistance. Using Support Tools NOTE: If the message ...you could see the Service Manual on the Dell Support website at support.dell.com or see "Contacting Dell" on page 45 for assistance....
...failure - Possible hard disk drive failure during HDD boot test see "Contacting Dell" on page 45 for assistance. Keyboard failure, loose cable, or lost wireless connection. For wireless keyboard connections, see "Contacting Dell" on page 45 for assistance. Using Support Tools NOTE: If the message ...you could see the Service Manual on the Dell Support website at support.dell.com or see "Contacting Dell" on page 45 for assistance....
Setup Guide
Page 39
... Your Computer. 3. Select a keyboard layout and click Next. 5. System Recovery Options 6. The restore process begins and may need to proceed with Factory Image Restore, click Cancel. 8. When the Dell logo appears, press several times to factory condition. 9. Click Dell Factory Image Restore. Click the ...Image Restore 1. Click Next. Any programs or files added since you received your configuration, you want to select Dell Factory Tools, then Dell Factory Image Restore. 7. To access the recovery options, log on . A message appears when the operating system ...
... Your Computer. 3. Select a keyboard layout and click Next. 5. System Recovery Options 6. The restore process begins and may need to proceed with Factory Image Restore, click Cancel. 8. When the Dell logo appears, press several times to factory condition. 9. Click Dell Factory Image Restore. Click the ...Image Restore 1. Click Next. Any programs or files added since you received your configuration, you want to select Dell Factory Tools, then Dell Factory Image Restore. 7. To access the recovery options, log on . A message appears when the operating system ...
Setup Guide
Page 46
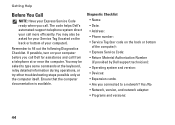
...; Service Tag (bar code on the back or bottom of the computer): • Express Service Code: • Return Material Authorization Number (if provided by Dell support technician): • Operating system and version: • Devices: • Expansion cards: • Are you call. Ensure that the computer documentation is ...available. Getting Help Before You Call NOTE: Have your call more efficiently. Remember to type some commands at the keyboard, relay detailed information during operations, or try other troubleshooting steps possible only at or near the computer.
...; Service Tag (bar code on the back or bottom of the computer): • Express Service Code: • Return Material Authorization Number (if provided by Dell support technician): • Operating system and version: • Devices: • Expansion cards: • Are you call. Ensure that the computer documentation is ...available. Getting Help Before You Call NOTE: Have your call more efficiently. Remember to type some commands at the keyboard, relay detailed information during operations, or try other troubleshooting steps possible only at or near the computer.
Setup Guide
Page 56
Index A AC adapter size and weight 51 specifications 50 airflow, allowing 5 AutoTech 42 B backups creating 23 C cable clip 12 cables, organizing 12 calling Dell 44 card reader 17 CDs, playing and creating 22 54 chipset 49 computer weights and dimensions 50 computer capabilities 22 computer, setting up 5 computer stand 5 vertical and horizonal options 6 connect(ing) cable clip 12 computer stand 6 displays 8 optional network cable 11 power cable 12 to the Internet 13 USB keyboard 10 USB mouse 10
Index A AC adapter size and weight 51 specifications 50 airflow, allowing 5 AutoTech 42 B backups creating 23 C cable clip 12 cables, organizing 12 calling Dell 44 card reader 17 CDs, playing and creating 22 54 chipset 49 computer weights and dimensions 50 computer capabilities 22 computer, setting up 5 computer stand 5 vertical and horizonal options 6 connect(ing) cable clip 12 computer stand 6 displays 8 optional network cable 11 power cable 12 to the Internet 13 USB keyboard 10 USB mouse 10

Setup Guide
Page 57
...keyboard 10 wireless mouse 10 connectors back view 18 conserving energy 23 Contacting Dell online 45 customer service 41 customizing computer sleeve design 21 your desktop 22 your energy settings 23 D damage, avoiding 5 data, backing up 23 DellConnect 41 Dell Diagnostics 33 Dell Factory Image Restore 35 Dell Support Center 30 Dell... support website 47 Dell Technology Guide for futher information 46 Diagnostic Checklist 44 disc drive supported disc ...
...keyboard 10 wireless mouse 10 connectors back view 18 conserving energy 23 Contacting Dell online 45 customer service 41 customizing computer sleeve design 21 your desktop 22 your energy settings 23 D damage, avoiding 5 data, backing up 23 DellConnect 41 Dell Diagnostics 33 Dell Factory Image Restore 35 Dell Support Center 30 Dell... support website 47 Dell Technology Guide for futher information 46 Diagnostic Checklist 44 disc drive supported disc ...
Setup Guide
Page 61
U USB 2.0 back connectors 19 front connectors 17 V ventilation, ensuring 5 vertical stand using or changing 6 W warranty returns 43 Windows, reinstalling 35 Windows Vista® 13 Program Compatibility Wizard 28 reinstalling 38 setup 13 wireless network connection 25 wireless sync button 18 wirless mouse and keyboard reconnecting 24 X xD-Picture Card reader 17 Index 59
U USB 2.0 back connectors 19 front connectors 17 V ventilation, ensuring 5 vertical stand using or changing 6 W warranty returns 43 Windows, reinstalling 35 Windows Vista® 13 Program Compatibility Wizard 28 reinstalling 38 setup 13 wireless network connection 25 wireless sync button 18 wirless mouse and keyboard reconnecting 24 X xD-Picture Card reader 17 Index 59


