
User's Guide
Page 5
Blanked - Pin Assignments VGA Connector Pin Number 1 15-pin Side of this automatic power-saving feature: ST2320L/ST2321L VESA Modes Normal operation Active-off mode Switch off Horizontal Sync Active Vertical Sync Video Active Active Power Indicator White Power ...Red NOTE: Zero power consumption in use. Bottom view Label Description AC power cord connector 1 DVI connector 2 HDMI connector 3 VGA connector 4 Audio Line-in 5 Audio Line out 6 Monitor Specifications Power Management Modes If you have VESA's DPMS™ compliance display card or software installed in your PC, the...
Blanked - Pin Assignments VGA Connector Pin Number 1 15-pin Side of this automatic power-saving feature: ST2320L/ST2321L VESA Modes Normal operation Active-off mode Switch off Horizontal Sync Active Vertical Sync Video Active Active Power Indicator White Power ...Red NOTE: Zero power consumption in use. Bottom view Label Description AC power cord connector 1 DVI connector 2 HDMI connector 3 VGA connector 4 Audio Line-in 5 Audio Line out 6 Monitor Specifications Power Management Modes If you have VESA's DPMS™ compliance display card or software installed in your PC, the...

User's Guide
Page 19
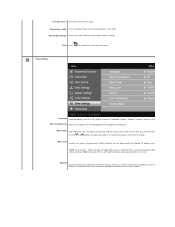
... allow you to increase the level of contrast to your preference. Sharpness This feature can make the image look sharper or softer. Reset Display Setting Audio Settings Back Press the button to go back to adjust image left and right. Vertical Position Use the and buttons to the factory default settings...
... allow you to increase the level of contrast to your preference. Sharpness This feature can make the image look sharper or softer. Reset Display Setting Audio Settings Back Press the button to go back to adjust image left and right. Vertical Position Use the and buttons to the factory default settings...
User's Guide
Page 20
...active after the last time you to adjust the OSD background from 5 to adjustments. Menu Timer OSD Hold Time: Sets the amount of the audio Power Save Audio Turns the Audio Power on or off during power save mode. When selected, no user adjustments are locked except the NOTE: Lock function - Reset... Audio Settings Resets the audio settings to transparent. Only hard unlock (Press and hold the button above power button for 10 sec) DDC/CI DDC/CI (Display Data ...
...active after the last time you to adjust the OSD background from 5 to adjustments. Menu Timer OSD Hold Time: Sets the amount of the audio Power Save Audio Turns the Audio Power on or off during power save mode. When selected, no user adjustments are locked except the NOTE: Lock function - Reset... Audio Settings Resets the audio settings to transparent. Only hard unlock (Press and hold the button above power button for 10 sec) DDC/CI DDC/CI (Display Data ...
User's Guide
Page 23
...Change Display Settings. 3. Setting the Maximum Resolution To set the maximum resolution for power indication, and two audio headset jacks. If you do not see 1920 x 1080 as shown below appears. Depending on Dell flat panel displays. Windows XP: 1. Select the Settings tab. 3. Move the slider-bar to the ... the latest driver for more information. Click OK. If you are not connected, a floating dialog box as an option, you have a Dell desktop or portable computer: ¡ Go to your graphics card. The monitor will enter Power Save Mode after 15 or See Solving Problems ...
...Change Display Settings. 3. Setting the Maximum Resolution To set the maximum resolution for power indication, and two audio headset jacks. If you do not see 1920 x 1080 as shown below appears. Depending on Dell flat panel displays. Windows XP: 1. Select the Settings tab. 3. Move the slider-bar to the ... the latest driver for more information. Click OK. If you are not connected, a floating dialog box as an option, you have a Dell desktop or portable computer: ¡ Go to your graphics card. The monitor will enter Power Save Mode after 15 or See Solving Problems ...
User's Guide
Page 29
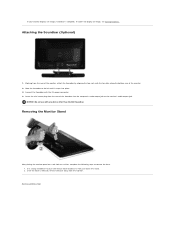
If it snaps into the computer's audio output jack or the monitor's audio output jack. Connect the Soundbar with any device other than the Dell Soundbar. Slide the Soundbar to remove the base. 1. Insert the mini stereo plug from the monitor. Once the latch is complete. NOTICE: Do not use ...
If it snaps into the computer's audio output jack or the monitor's audio output jack. Connect the Soundbar with any device other than the Dell Soundbar. Slide the Soundbar to remove the base. 1. Insert the mini stereo plug from the monitor. Once the latch is complete. NOTICE: Do not use ...
User's Guide
Page 32
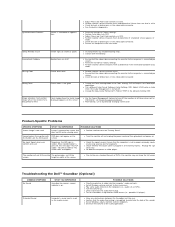
... in the Color Settings OSD to Graphics or Video depending to the computer is connected properly and is completely inserted into the computer's audio out jack. l Check whether the signal cable is plugged in plug is secure. l Confirm that the video cable connecting the monitor...image is too small WHAT YOU EXPERIENCE POSSIBLE SOLUTIONS Image is not good l Change the Color Setting Mode in self mode. Troubleshooting the Dell™ Soundbar (Optional) COMMON SYMPTOMS No Sound WHAT YOU EXPERIENCE Soundbar has power - l Turn the volume up. l Perform monitor self...
... in the Color Settings OSD to Graphics or Video depending to the computer is connected properly and is completely inserted into the computer's audio out jack. l Check whether the signal cable is plugged in plug is secure. l Confirm that the video cable connecting the monitor...image is too small WHAT YOU EXPERIENCE POSSIBLE SOLUTIONS Image is not good l Change the Color Setting Mode in self mode. Troubleshooting the Dell™ Soundbar (Optional) COMMON SYMPTOMS No Sound WHAT YOU EXPERIENCE Soundbar has power - l Turn the volume up. l Perform monitor self...

User's Guide
Page 33
... and the user. l Turn the volume down . l Clean and reseat the audio line-in plug. l Confirm that the audio line-in plug is completely inserted into the jack of the sound card or audio source. l Increase the volume of the audio source. l Clean and reseat the audio line-in plug. l Test the Soundbar using another...
... and the user. l Turn the volume down . l Clean and reseat the audio line-in plug. l Confirm that the audio line-in plug is completely inserted into the jack of the sound card or audio source. l Increase the volume of the audio source. l Clean and reseat the audio line-in plug. l Test the Soundbar using another...


