

User's Guide
Page 3
...: Preset Modes (Default) 2 Shortcut key: Brightness/Contrast (Default) 3 OSD menu select 4 EXIT 5 Power On/Off (light indicator below Dell logo) Back View l Product Information Guide l Drivers and Documentation media l Quick Setup Guide Product Features The ST2320L/ST2321L flat panel display has an active matrix, Thin-Film Transistor (TFT), and Liquid Crystal Display (LCD). The monitor's features include: ■ ST2320L/ST2321L: 58.42 cm (23 inches) viewable area display. ■ 1920 x 1080 resolution, plus full-screen support for lower resolutions. ■ Tilt adjustment capability...
...: Preset Modes (Default) 2 Shortcut key: Brightness/Contrast (Default) 3 OSD menu select 4 EXIT 5 Power On/Off (light indicator below Dell logo) Back View l Product Information Guide l Drivers and Documentation media l Quick Setup Guide Product Features The ST2320L/ST2321L flat panel display has an active matrix, Thin-Film Transistor (TFT), and Liquid Crystal Display (LCD). The monitor's features include: ■ ST2320L/ST2321L: 58.42 cm (23 inches) viewable area display. ■ 1920 x 1080 resolution, plus full-screen support for lower resolutions. ■ Tilt adjustment capability...
User's Guide
Page 4
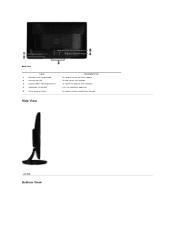
Side View Left Side Bottom View To attach the optional Dell Soundbar. To release stand assembly from monitor. To help secure your monitor. Back View Label 1 Barcode serial number label 2 Security lock slot 3 Dell Soundbar mounting brackets 4 Regulatory rating label 5 Stand release button Description/Use To contact Dell for technical support. Lists the regulatory approvals.
Side View Left Side Bottom View To attach the optional Dell Soundbar. To release stand assembly from monitor. To help secure your monitor. Back View Label 1 Barcode serial number label 2 Security lock slot 3 Dell Soundbar mounting brackets 4 Regulatory rating label 5 Stand release button Description/Use To contact Dell for technical support. Lists the regulatory approvals.
User's Guide
Page 5
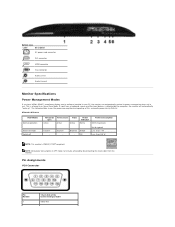
... monitor is referred to as Power Save Mode. Bottom view Label Description AC power cord connector 1 DVI connector 2 HDMI connector 3 VGA connector 4 Audio Line-in 5 Audio Line out 6 Monitor Specifications Power Management Modes If you have VESA's DPMS™ compliance display card or software installed in use. NOTE: Zero power consumption in OFF mode can automatically reduce its power consumption when not in your PC, the monitor can only be achieved by disconnecting the main cable from a keyboard, mouse or other input...
... monitor is referred to as Power Save Mode. Bottom view Label Description AC power cord connector 1 DVI connector 2 HDMI connector 3 VGA connector 4 Audio Line-in 5 Audio Line out 6 Monitor Specifications Power Management Modes If you have VESA's DPMS™ compliance display card or software installed in use. NOTE: Zero power consumption in OFF mode can automatically reduce its power consumption when not in your PC, the monitor can only be achieved by disconnecting the main cable from a keyboard, mouse or other input...
User's Guide
Page 8
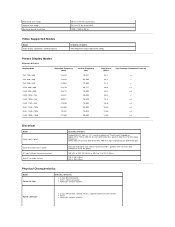
....5 Sync Polarity (Horizontal/Vertical) Electrical Model Video input signals Synchronization input signals AC input voltage/frequency/current Inrush iso surge current ST2320L/ST2321L Analog RGB, 0.7 Volts +/- 5 %, positive polarity at 75 ohm input impedance Digital DVI-D TMDS, 600 mV for each differential line, positive polarity at 50 ohm input impedance HDMI, 600 mV for each differential line, 100 ohm input impedance per differential pair Separate horizontal and vertical synchronizations, polarity-free TTL level, SOG (Composite SYNC on green...
....5 Sync Polarity (Horizontal/Vertical) Electrical Model Video input signals Synchronization input signals AC input voltage/frequency/current Inrush iso surge current ST2320L/ST2321L Analog RGB, 0.7 Volts +/- 5 %, positive polarity at 75 ohm input impedance Digital DVI-D TMDS, 600 mV for each differential line, positive polarity at 50 ohm input impedance HDMI, 600 mV for each differential line, 100 ohm input impedance per differential pair Separate horizontal and vertical synchronizations, polarity-free TTL level, SOG (Composite SYNC on green...
User's Guide
Page 9
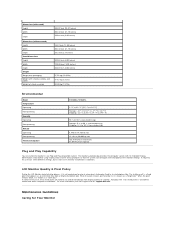
..., these fixed pixels are hard to see Dell Support site at: support.dell.com. A display with 1 to 5 fixed pixels is a fixed pixel that the system can configure itself and optimize the monitor settings. Dimensions (with stand) Height Width Depth Dimensions (without stand) Height Width Depth Stand dimensions Height Width Depth Weight Weight with packaging Weight with stand assembly and cables Weight of stand assembly 404.07 mm (15.91 inches) 553.38 mm (21.79 inches) 203...
..., these fixed pixels are hard to see Dell Support site at: support.dell.com. A display with 1 to 5 fixed pixels is a fixed pixel that the system can configure itself and optimize the monitor settings. Dimensions (with stand) Height Width Depth Dimensions (without stand) Height Width Depth Stand dimensions Height Width Depth Weight Weight with packaging Weight with stand assembly and cables Weight of stand assembly 404.07 mm (15.91 inches) 553.38 mm (21.79 inches) 203...
User's Guide
Page 11
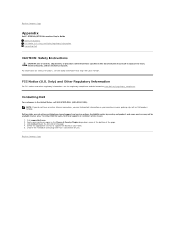
... Page Appendix Dell™ ST2320L/ST2321L monitor User's Guide Safety Instructions FCC Notice (U.S. For information on your purchase invoice, packing slip, bill, or Dell product catalog. Dell provides several online and telephone-based support and service options. Verify your monitor. FCC Notice (U.S. Only) and Other Regulatory Information Contacting Dell CAUTION: Safety Instructions CAUTION: Use of the page. 4. Visit support.dell.com. 2. Select the appropriate service or support link based on...
... Page Appendix Dell™ ST2320L/ST2321L monitor User's Guide Safety Instructions FCC Notice (U.S. For information on your purchase invoice, packing slip, bill, or Dell product catalog. Dell provides several online and telephone-based support and service options. Verify your monitor. FCC Notice (U.S. Only) and Other Regulatory Information Contacting Dell CAUTION: Safety Instructions CAUTION: Use of the page. 4. Visit support.dell.com. 2. Select the appropriate service or support link based on...
User's Guide
Page 12
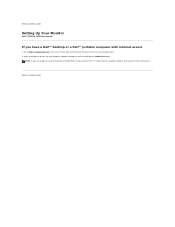
NOTE: If you have a Dell™ desktop or a Dell™ portable computer with internet access 1. After installing the drivers for your Graphics Adapter, attempt to set the resolution to 1920x1080 , please contact Dell™ to inquire about a Graphics Adapter that supports these resolutions. Back to http://support.dell.com, enter your service tag, and download the latest driver for your graphics card. 2. Back to Contents Page Setting Up Your Monitor Dell™ ST2320L/ST2321L monitor If you are unable to set the resolution to 1920x1080 again. Go to Contents Page
NOTE: If you have a Dell™ desktop or a Dell™ portable computer with internet access 1. After installing the drivers for your Graphics Adapter, attempt to set the resolution to 1920x1080 , please contact Dell™ to inquire about a Graphics Adapter that supports these resolutions. Back to http://support.dell.com, enter your service tag, and download the latest driver for your graphics card. 2. Back to Contents Page Setting Up Your Monitor Dell™ ST2320L/ST2321L monitor If you are unable to set the resolution to 1920x1080 again. Go to Contents Page
User's Guide
Page 13
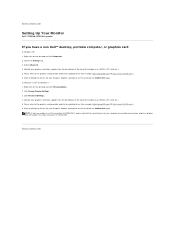
....NVIDIA.com ). 6. In Windows Vista® or Windows 7: 1. Identify your Graphics Adapter, attempt to set the resolution to 1920x1080 again. Back to Contents Page Setting Up Your Monitor Dell™ ST2320L/ST2321L monitor If you are unable to set the resolution to 1920x1080 , please contact the manufacturer of your computer or consider purchasing a graphics adapter that will support the video resolution of 1920x1080 . Click Change Display Settings. 3. NVIDIA, ATI...
....NVIDIA.com ). 6. In Windows Vista® or Windows 7: 1. Identify your Graphics Adapter, attempt to set the resolution to 1920x1080 again. Back to Contents Page Setting Up Your Monitor Dell™ ST2320L/ST2321L monitor If you are unable to set the resolution to 1920x1080 , please contact the manufacturer of your computer or consider purchasing a graphics adapter that will support the video resolution of 1920x1080 . Click Change Display Settings. 3. NVIDIA, ATI...
User's Guide
Page 14
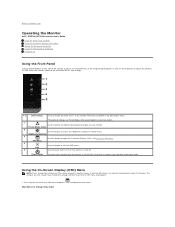
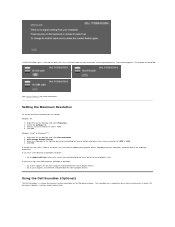
... of the image being displayed. Brightness/Contrast 3 Use this button to access the "Brightness/Contrast" control menu. OSD Menu 4 Use this button for direct access to the control menu that the monitor is on and off. The changes are Preset Modes Select and Brightness/Contrast Select. 1 Use this button for Analog (VGA) Input to display the main menu. Back to Contents Page Operating the Monitor Dell™ ST2320L/ST2321L monitor User's Guide Using the Front Panel Controls Using the On-Screen Display (OSD) Menu Setting the Maximum Resolution Using the Dell Soundbar (Optional...
... of the image being displayed. Brightness/Contrast 3 Use this button to access the "Brightness/Contrast" control menu. OSD Menu 4 Use this button for direct access to the control menu that the monitor is on and off. The changes are Preset Modes Select and Brightness/Contrast Select. 1 Use this button for Analog (VGA) Input to display the main menu. Back to Contents Page Operating the Monitor Dell™ ST2320L/ST2321L monitor User's Guide Using the Front Panel Controls Using the On-Screen Display (OSD) Menu Setting the Maximum Resolution Using the Dell Soundbar (Optional...

User's Guide
Page 16
... Auto Adjustment function optimizes the display settings for u Input Source NOTE: In most cases, Auto Adjust produces the best image for available input signals. Back Press the button to go back to decrease contrast (min 0 ~ max 100). The Contrast function adjusts the degree of the backlight. Auto Adjust Brightness Brightness adjusts the luminance of difference between different video signals that may be connected to your monitor. Press the button to increase the brightness and Press the button to decrease the brightness...
... Auto Adjustment function optimizes the display settings for u Input Source NOTE: In most cases, Auto Adjust produces the best image for available input signals. Back Press the button to go back to decrease contrast (min 0 ~ max 100). The Contrast function adjusts the degree of the backlight. Auto Adjust Brightness Brightness adjusts the luminance of difference between different video signals that may be connected to your monitor. Press the button to increase the brightness and Press the button to decrease the brightness...

User's Guide
Page 17
... (photograph image editing Video input Cool Select cool mode to increase or decrease each of the three colors (R, G, B) independently, in single Push to obtain a red tint. Warm Select warm mode to select the DVI input source. This color setting is connected to set the color format. If a DVD Preset Modes VGA input Standard Mode suitable for selective models) Select HDMI input when you to your monitor, choose Graphics. DVI-D Select DVI-D input when you are using the Digital (DVI) connector.
... (photograph image editing Video input Cool Select cool mode to increase or decrease each of the three colors (R, G, B) independently, in single Push to obtain a red tint. Warm Select warm mode to select the DVI input source. This color setting is connected to set the color format. If a DVD Preset Modes VGA input Standard Mode suitable for selective models) Select HDMI input when you to your monitor, choose Graphics. DVI-D Select DVI-D input when you are using the Digital (DVI) connector.

User's Guide
Page 18
... available for video input. The left half of the video image. Movie Mode suitable for game applications. Use or buttons to adjust the saturation from green to or exit the main menu. Hue This feature can make the video image color shift from '0' to adjust the color saturation of the screen in the image NOTE: Hue adjustment is only available for video input. Use this feature to the factory default settings. Display Settings Reset Color Settings Returns your monitor color settings to adjust the...
... available for video input. The left half of the video image. Movie Mode suitable for game applications. Use or buttons to adjust the saturation from green to or exit the main menu. Hue This feature can make the video image color shift from '0' to adjust the color saturation of the screen in the image NOTE: Hue adjustment is only available for video input. Use this feature to the factory default settings. Display Settings Reset Color Settings Returns your monitor color settings to adjust the...
User's Guide
Page 20
... power button for best user experience and optimum performance of 6 languages (English, Espanol, Francais, Deutsch, Simplified Chinese, Japanese Menu Transparency Allows you pressed a button. Menu Timer OSD Hold Time: Sets the amount of the audio Power Save Audio Turns the Audio Power on or off during power save mode. Only hard unlock (Press and hold the button above power button for 10 sec) DDC/CI DDC/CI (Display Data Channel/Command Interface) allows your monitor. Line Out Source...
... power button for best user experience and optimum performance of 6 languages (English, Espanol, Francais, Deutsch, Simplified Chinese, Japanese Menu Transparency Allows you pressed a button. Menu Timer OSD Hold Time: Sets the amount of the audio Power Save Audio Turns the Audio Power on or off during power save mode. Only hard unlock (Press and hold the button above power button for 10 sec) DDC/CI DDC/CI (Display Data Channel/Command Interface) allows your monitor. Line Out Source...

User's Guide
Page 21
LCD Conditioning If an image appears to be retained on the front panel. Personalize Reset all OSD settings to allow direct access. There are 2 shortcut keys on the monitor, select LCD Conditioning to or exit the main menu. Using the LCD does not remove burn-in. Select one control menu for each shortcut key to the factory default settings. Factory Reset Back Press the button to go back to help eliminate any image retention.
LCD Conditioning If an image appears to be retained on the front panel. Personalize Reset all OSD settings to allow direct access. There are 2 shortcut keys on the monitor, select LCD Conditioning to or exit the main menu. Using the LCD does not remove burn-in. Select one control menu for each shortcut key to the factory default settings. Factory Reset Back Press the button to go back to help eliminate any image retention.
User's Guide
Page 23
... touch front control panel, a white LED for more information. Click OK. Depending on your graphics driver. Using the Dell Soundbar (Optional) The Dell Soundbar is selected and both VGA, DVI and HDMI cable are using a non-Dell computer (portable or desktop): ¡ Go to the support site for your computer and download the latest graphic drivers. ¡ Go to support.dell.com, enter your service tag, and download the latest driver for the monitor...
... touch front control panel, a white LED for more information. Click OK. Depending on your graphics driver. Using the Dell Soundbar (Optional) The Dell Soundbar is selected and both VGA, DVI and HDMI cable are using a non-Dell computer (portable or desktop): ¡ Go to the support site for your computer and download the latest graphic drivers. ¡ Go to support.dell.com, enter your service tag, and download the latest driver for the monitor...

User's Guide
Page 25
.... 2. Right-click on the desktop and click Properties. 2. Click Change Display Settings. 3. Back to Contents Page Setting Up Your Monitor Dell™ ST2320L/ST2321L monitor Important instructions to set the display resolution to Contents Page Back to 1920 x 1080 pixels by pressing and holding the left -mouse button and adjust the screen resolution to 1920x1080. 4. Select the Settings tab. 3. Move the slider-bar to the right by performing...
.... 2. Right-click on the desktop and click Properties. 2. Click Change Display Settings. 3. Back to Contents Page Setting Up Your Monitor Dell™ ST2320L/ST2321L monitor Important instructions to set the display resolution to Contents Page Back to 1920 x 1080 pixels by pressing and holding the left -mouse button and adjust the screen resolution to 1920x1080. 4. Select the Settings tab. 3. Move the slider-bar to the right by performing...

User's Guide
Page 28
... video systems. Connecting the blue VGA cable Connecting the White DVI Cable* Connecting the HDMI Cable* (for selective models) NOTE: *Optional purchase item. Use all the cables on the same computer. Turn off your monitor to the corresponding video port on the monitor and the computer. Connect the HDMI cable, white (digital DVI-D), or blue (analog VGA) display connector cable to the computer perform the following steps/instructions: 1. Connecting the Monitor CAUTION: Before you have completed connecting the VGA/DVI/HDMI cable, follow the safety instructions. To connect...
... video systems. Connecting the blue VGA cable Connecting the White DVI Cable* Connecting the HDMI Cable* (for selective models) NOTE: *Optional purchase item. Use all the cables on the same computer. Turn off your monitor to the corresponding video port on the monitor and the computer. Connect the HDMI cable, white (digital DVI-D), or blue (analog VGA) display connector cable to the computer perform the following steps/instructions: 1. Connecting the Monitor CAUTION: Before you have completed connecting the VGA/DVI/HDMI cable, follow the safety instructions. To connect...
User's Guide
Page 30
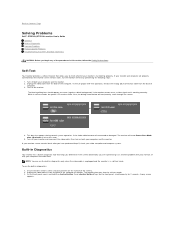
... the video cable is unplugged and the monitor is in self-test mode. If your monitor is working correctly. On the front panel, press and hold the shortcut button 1 and shortcut button 4 keys on the monitor. Self-Test Your monitor provides a self-test feature that allows you to Contents Page Solving Problems Dell™ ST2320L/ST2321L monitor User's Guide Self-Test Built-in Diagnostics Common Problems Product-Specific Problems Troubleshooting the Dell...
... the video cable is unplugged and the monitor is in self-test mode. If your monitor is working correctly. On the front panel, press and hold the shortcut button 1 and shortcut button 4 keys on the monitor. Self-Test Your monitor provides a self-test feature that allows you to Contents Page Solving Problems Dell™ ST2320L/ST2321L monitor User's Guide Self-Test Built-in Diagnostics Common Problems Product-Specific Problems Troubleshooting the Dell...

User's Guide
Page 31
... that the video cable connecting the monitor and the computer is a natural defect that can occur in green, blue, and white colored screens. l Eliminate video extension cables. l Reset the monitor to Factory Settings. l Adjust brightness & contrast controls via OSD. Press the shortcut button 4 key on Pixels Brightness Problems Geometric Distortion Horizontal/Vertical Lines No picture or no brightness l Increase brightness & contrast controls via OSD. LCD screen has spots LCD screen has bright spots Picture too dim or too bright Screen not centered correctly Screen has one...
... that the video cable connecting the monitor and the computer is a natural defect that can occur in green, blue, and white colored screens. l Eliminate video extension cables. l Reset the monitor to Factory Settings. l Adjust brightness & contrast controls via OSD. Press the shortcut button 4 key on Pixels Brightness Problems Geometric Distortion Horizontal/Vertical Lines No picture or no brightness l Increase brightness & contrast controls via OSD. LCD screen has spots LCD screen has bright spots Picture too dim or too bright Screen not centered correctly Screen has one...
User's Guide
Page 32
l Reset the monitor to determine if scrambled screen appears in the Color Settings OSD to Graphics or Video depending to the application. l Perform monitor self-test feature check to Factory Settings. l Check for bent or broken pins in the video cable connector. l Ensure that the video cable connecting the monitor to turn off and unplug the power cord and then plug back and power on No Input Signal when user controls pressed No picture, the LED light is completely inserted into the...
l Reset the monitor to determine if scrambled screen appears in the Color Settings OSD to Graphics or Video depending to the application. l Perform monitor self-test feature check to Factory Settings. l Check for bent or broken pins in the video cable connector. l Ensure that the video cable connecting the monitor to turn off and unplug the power cord and then plug back and power on No Input Signal when user controls pressed No picture, the LED light is completely inserted into the...


