User Guide
Page 3
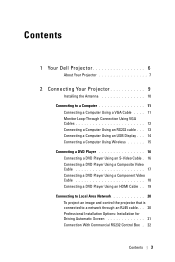
... Computer Using an RS232 cable . . . 13 Connecting a Computer Using an USB Display . . . 14 Connecting a Computer Using Wireless 15 Connecting a DVD Player 16 Connecting a DVD Player Using an S-Video Cable . 16 Connecting a DVD Player Using a Composite Video Cable 17 Connecting a DVD Player Using a Component Video Cable 18 Connecting a DVD Player Using an HDMI Cable . . 19 Connecting to Local Area Network 20 To project an image and control the projector that is connected to a network through an RJ45 cable. . . 20 Professional Installation Options: Installation for Driving Automatic Screen...
... Computer Using an RS232 cable . . . 13 Connecting a Computer Using an USB Display . . . 14 Connecting a Computer Using Wireless 15 Connecting a DVD Player 16 Connecting a DVD Player Using an S-Video Cable . 16 Connecting a DVD Player Using a Composite Video Cable 17 Connecting a DVD Player Using a Component Video Cable 18 Connecting a DVD Player Using an HDMI Cable . . 19 Connecting to Local Area Network 20 To project an image and control the projector that is connected to a network through an RJ45 cable. . . 20 Professional Installation Options: Installation for Driving Automatic Screen...
User Guide
Page 4
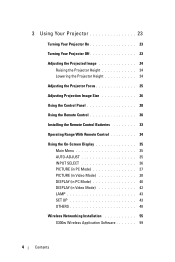
... Your Projector Off 23 Adjusting the Projected Image 24 Raising the Projector Height 24 Lowering the Projector Height 24 Adjusting the Projector Focus 25 Adjusting Projection Image Size 26 Using the Control Panel 28 Using the Remote Control 30 Installing the Remote Control Batteries 33 Operating Range With Remote Control 34 Using the On-Screen Display 35 Main Menu 35 AUTO-ADJUST 35 INPUT SELECT 36 PICTURE (in PC Mode 37 PICTURE (in Video Mode 38 DISPLAY (in PC Mode 40 DISPLAY (in Video Mode 42 LAMP 43 SET UP 43 OTHERS 48 Wireless Networking Installation 55 S300w Wireless...
... Your Projector Off 23 Adjusting the Projected Image 24 Raising the Projector Height 24 Lowering the Projector Height 24 Adjusting the Projector Focus 25 Adjusting Projection Image Size 26 Using the Control Panel 28 Using the Remote Control 30 Installing the Remote Control Batteries 33 Operating Range With Remote Control 34 Using the On-Screen Display 35 Main Menu 35 AUTO-ADJUST 35 INPUT SELECT 36 PICTURE (in PC Mode 37 PICTURE (in Video Mode 38 DISPLAY (in PC Mode 40 DISPLAY (in Video Mode 42 LAMP 43 SET UP 43 OTHERS 48 Wireless Networking Installation 55 S300w Wireless...
User Guide
Page 23
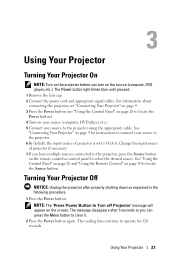
Change the input source of projector is set to VGA-A. See "Connecting Your Projector" on page 30 to locate the Source button. The cooling fans continue to operate for instructions to connect your source to the projector using the appropriate cable. Turning Your Projector Off NOTICE: Unplug the projector after 5 seconds or you can press the Menu button to clear it. 2 Press the Power button again. The Power button light blinks blue until pressed. 1 Remove the lens cap. 2 Connect the power cord and appropriate signal cables. NOTE: The "Press...
Change the input source of projector is set to VGA-A. See "Connecting Your Projector" on page 30 to locate the Source button. The cooling fans continue to operate for instructions to connect your source to the projector using the appropriate cable. Turning Your Projector Off NOTICE: Unplug the projector after 5 seconds or you can press the Menu button to clear it. 2 Press the Power button again. The Power button light blinks blue until pressed. 1 Remove the lens cap. 2 Connect the power cord and appropriate signal cables. NOTE: The "Press...
User Guide
Page 28
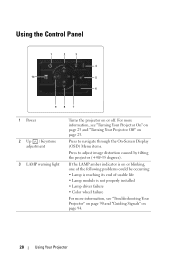
... properly installed • Lamp driver failure • Color wheel failure For more information, see "Troubleshooting Your Projector" on page 90 and "Guiding Signals" on or off. Using the Control Panel 1 2 3 4 10 5 6 9 8 7 1 Power 2 Up / Keystone adjustment 3 LAMP warning light Turns the projector on page 94. 28 Using Your Projector For more information, see "Turning Your Projector On" on page 23 and "Turning Your Projector Off" on page 23. Press to navigate through the On-Screen Display (OSD) Menu items. Press to adjust image distortion...
... properly installed • Lamp driver failure • Color wheel failure For more information, see "Troubleshooting Your Projector" on page 90 and "Guiding Signals" on or off. Using the Control Panel 1 2 3 4 10 5 6 9 8 7 1 Power 2 Up / Keystone adjustment 3 LAMP warning light Turns the projector on page 94. 28 Using Your Projector For more information, see "Turning Your Projector On" on page 23 and "Turning Your Projector Off" on page 23. Press to navigate through the On-Screen Display (OSD) Menu items. Press to adjust image distortion...
User Guide
Page 29
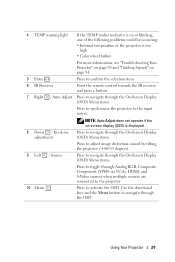
Using Your Projector 29 4 TEMP warning light If the TEMP amber indicator is on or blinking, one of the following problems could be occurring: • Internal temperature of the projector is too high • Color wheel failure For more information, see "Troubleshooting Your Projector" on page 90 and "Guiding Signals" on -screen display (OSD) is displayed. 8 Down / Keystone adjustment Press to navigate through the On-Screen Display (OSD) Menu items. Press to adjust image distortion caused by tilting the projector (+40...
Using Your Projector 29 4 TEMP warning light If the TEMP amber indicator is on or blinking, one of the following problems could be occurring: • Internal temperature of the projector is too high • Color wheel failure For more information, see "Troubleshooting Your Projector" on page 90 and "Guiding Signals" on -screen display (OSD) is displayed. 8 Down / Keystone adjustment Press to navigate through the On-Screen Display (OSD) Menu items. Press to adjust image distortion caused by tilting the projector (+40...
User Guide
Page 36
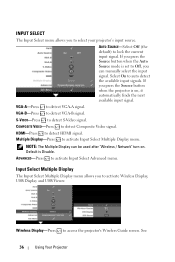
AUTO SOURCE-Select Off (the default) to detect VGA-A signal. VGA-A-Press to lock the current input signal. S-VIDEO-Press to access the projector's Wireless Guide screen. NOTE: The Multiple Display can manually select the input signal. Wireless Display-Press to detect S-Video signal. HDMI-Press to detect Composite Video signal. If you press the Source button when the Auto Source mode is on . If you press the Source button when the projector is set to Off, you can be used after "Wireless / Network" turn on , it automatically finds...
AUTO SOURCE-Select Off (the default) to detect VGA-A signal. VGA-A-Press to lock the current input signal. S-VIDEO-Press to access the projector's Wireless Guide screen. NOTE: The Multiple Display can manually select the input signal. Wireless Display-Press to detect S-Video signal. HDMI-Press to detect Composite Video signal. If you press the Source button when the Auto Source mode is on . If you press the Source button when the projector is set to Off, you can be used after "Wireless / Network" turn on , it automatically finds...
User Guide
Page 39
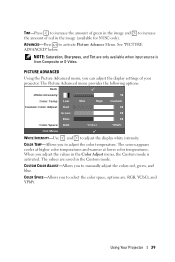
... colors red, green, and blue. See "PICTURE ADVANCED" below. The values are only available when input source is activated. CUSTOM COLOR ADJUST-Allows you adjust the values in the Color Adjust menu, the Custom mode is from Composite or S-Video. Using Your Projector 39 ADVANCED-Press to adjust the display white intensity. PICTURE ADVANCED Using the Picture Advanced menu, you to adjust the color temperature. COLOR TEMP-Allows you can adjust the display settings of red in the image (available for NTSC only). The screen...
... colors red, green, and blue. See "PICTURE ADVANCED" below. The values are only available when input source is activated. CUSTOM COLOR ADJUST-Allows you adjust the values in the Color Adjust menu, the Custom mode is from Composite or S-Video. Using Your Projector 39 ADVANCED-Press to adjust the display white intensity. PICTURE ADVANCED Using the Picture Advanced menu, you to adjust the color temperature. COLOR TEMP-Allows you can adjust the display settings of red in the image (available for NTSC only). The screen...
User Guide
Page 55
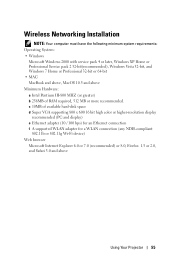
... Service pack 2 32-bit(recommended), Windows Vista 32-bit, and Windows 7 Home or Professional 32-bit or 64-bit • MAC MacBook and above, MacOS 10.5 and above Using Your Projector 55 c 10MB of available hard-disk space d Super VGA supporting 800 x 600 16 bit high color or higher-resolution display recommended (PC and display) e Ethernet adapter (10 / 100 bps) for an Ethernet connection f A supported WLAN adapter for a WLAN connection...
... Service pack 2 32-bit(recommended), Windows Vista 32-bit, and Windows 7 Home or Professional 32-bit or 64-bit • MAC MacBook and above, MacOS 10.5 and above Using Your Projector 55 c 10MB of available hard-disk space d Super VGA supporting 800 x 600 16 bit high color or higher-resolution display recommended (PC and display) e Ethernet adapter (10 / 100 bps) for an Ethernet connection f A supported WLAN adapter for a WLAN connection...
User Guide
Page 77
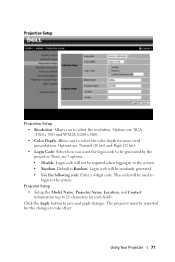
... how you to select the resolution. Using Your Projector 77 Click the Apply button to the system. • Random: Default is Random. Projection Setup Projection Setup • Resolution: Allows you want the login code to be generated by the projector. There are 3 options: • Disable: Login code will be randomly generated. • Use the following code: Enter a 4-digit code. Projector Setup • Setup the Model Name, Projector Name, Location, and Contact information (up...
... how you to select the resolution. Using Your Projector 77 Click the Apply button to the system. • Random: Default is Random. Projection Setup Projection Setup • Resolution: Allows you want the login code to be generated by the projector. There are 3 options: • Disable: Login code will be randomly generated. • Use the following code: Enter a 4-digit code. Projector Setup • Setup the Model Name, Projector Name, Location, and Contact information (up...
User Guide
Page 82
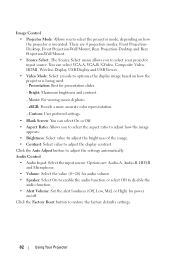
... to adjust the brightness of the image. • Contrast: Select value to disable the audio function. • Alert Volume: Set the alert loudness (Off, Low, Mid, or High) for presentation slides. - Custom: User preferred settings. • Blank Screen: You can select VGA-A, VGA-B, S-Video, Composite Video, HDMI, Wireless Display, USB Display and USB Viewer. • Video Mode: Select a mode to select your projector input source. Bright: Maximum brightness and contrast. - Audio Control • Audio Input: Select the input source. You...
... to adjust the brightness of the image. • Contrast: Select value to disable the audio function. • Alert Volume: Set the alert loudness (Off, Low, Mid, or High) for presentation slides. - Custom: User preferred settings. • Blank Screen: You can select VGA-A, VGA-B, S-Video, Composite Video, HDMI, Wireless Display, USB Display and USB Viewer. • Video Mode: Select a mode to select your projector input source. Bright: Maximum brightness and contrast. - Audio Control • Audio Input: Select the input source. You...
User Guide
Page 90
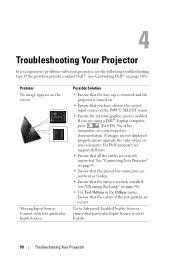
... installed (see the following troubleshooting tips. If images are using a Dell™ Laptop computer, press (Fn+F8). Problem No image appears on the screen Missing Input Source. For other computers, see Contacting Dell™ on page 103). If you are not displayed properly, please upgrade the video driver of your computer. Go to Advanced Enable/Disable Sources, ensure that the colors of the connectors are correct. See "Connecting Your Projector...
... installed (see the following troubleshooting tips. If images are using a Dell™ Laptop computer, press (Fn+F8). Problem No image appears on the screen Missing Input Source. For other computers, see Contacting Dell™ on page 103). If you are not displayed properly, please upgrade the video driver of your computer. Go to Advanced Enable/Disable Sources, ensure that the colors of the connectors are correct. See "Connecting Your Projector...
User Guide
Page 91
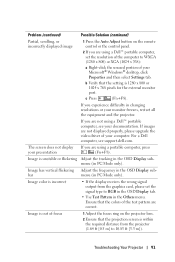
... monitor port. If you are not using a Dell™ portable computer, see support.dell.com. Image has vertical flickering Adjust the frequency in PC Mode only). Image is out of your presentation (Fn+F8). c Press (Fn+F8). Problem (continued) Possible Solution (continued) Partial, scrolling, or incorrectly displayed image 1 Press the Auto Adjust button on the projector lens. 2 Ensure that the projection screen is incorrect • If the display receives the wrong signal...
... monitor port. If you are not using a Dell™ portable computer, see support.dell.com. Image has vertical flickering Adjust the frequency in PC Mode only). Image is out of your presentation (Fn+F8). c Press (Fn+F8). Problem (continued) Possible Solution (continued) Partial, scrolling, or incorrectly displayed image 1 Press the Auto Adjust button on the projector lens. 2 Ensure that the projection screen is incorrect • If the display receives the wrong signal...
User Guide
Page 92
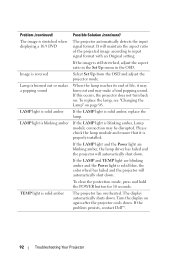
... and hold the POWER button for 10 seconds. The display automatically shuts down . If the image is properly installed. If the LAMP and TEMP light are blinking amber, the lamp driver has failed and the projector will automatically shut down . Select Set Up from the OSD and adjust the projector mode. If the LAMP light is solid blue, the color wheel has failed and the projector will maintain the aspect ratio of life, it is...
... and hold the POWER button for 10 seconds. The display automatically shuts down . If the image is properly installed. If the LAMP and TEMP light are blinking amber, the lamp driver has failed and the projector will automatically shut down . Select Set Up from the OSD and adjust the projector mode. If the LAMP light is solid blue, the color wheel has failed and the projector will maintain the aspect ratio of life, it is...
User Guide
Page 94
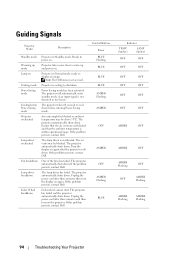
... Power Saving mode. The projector takes 60 seconds to shutdown. The projector automatically shuts down before Power Saving mode Projector overheated Lamp driver overheated Fan breakdown Lamp driver breakdown Color Wheel breakdown Projector in Normal mode, ready to warm up mode Lamp on . If the problem persists, contact Dell. Unplug the power cord after three minutes and then turn on again after three minutes then turn the display on . Control Buttons Power BLUE Flashing BLUE BLUE BLUE AMBER Flashing AMBER OFF AMBER ÒFF AMBER Flashing BLUE Indicator TEMP...
... Power Saving mode. The projector takes 60 seconds to shutdown. The projector automatically shuts down before Power Saving mode Projector overheated Lamp driver overheated Fan breakdown Lamp driver breakdown Color Wheel breakdown Projector in Normal mode, ready to warm up mode Lamp on . If the problem persists, contact Dell. Unplug the power cord after three minutes and then turn on again after three minutes then turn the display on . Control Buttons Power BLUE Flashing BLUE BLUE BLUE AMBER Flashing AMBER OFF AMBER ÒFF AMBER Flashing BLUE Indicator TEMP...
User Guide
Page 95
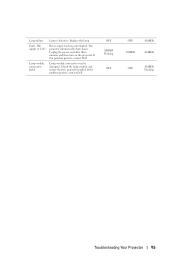
Lamp failure Fault - Replace the lamp. If this problem persists, contact Dell. Check the lamp module and ensure that it is defective. Power supply has been interrupted. If the problem persists, contact Dell. Unplug the power cord after three minutes and then turn on the projector. Lamp module connection may be disrupted. The projector automatically shuts down. DC supply (+12V) Lamp module connection failed Lamp is properly installed. OFF AMBER Flashing OFF OFF AMBER AMBER AMBER OFF AMBER Flashing Troubleshooting Your Projector 95
Lamp failure Fault - Replace the lamp. If this problem persists, contact Dell. Check the lamp module and ensure that it is defective. Power supply has been interrupted. If the problem persists, contact Dell. Unplug the power cord after three minutes and then turn on the projector. Lamp module connection may be disrupted. The projector automatically shuts down. DC supply (+12V) Lamp module connection failed Lamp is properly installed. OFF AMBER Flashing OFF OFF AMBER AMBER AMBER OFF AMBER Flashing Troubleshooting Your Projector 95
User Guide
Page 96
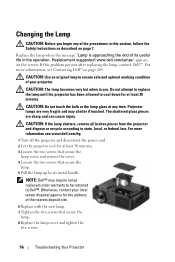
..., see www.dell.com/hg. 1 Turn off the projector and disconnect the power cord. 2 Let the projector cool for the address of the nearest deposit site. 6 Replace with the new lamp. 7 Tighten the two screws that secure the lamp. 5 Pull the lamp up by its useful life in the operation. CAUTION: The lamp becomes very hot when in use. Otherwise, contact your projector. Replace the lamp when the message "Lamp is approaching the...
..., see www.dell.com/hg. 1 Turn off the projector and disconnect the power cord. 2 Let the projector cool for the address of the nearest deposit site. 6 Replace with the new lamp. 7 Tighten the two screws that secure the lamp. 5 Pull the lamp up by its useful life in the operation. CAUTION: The lamp becomes very hot when in use. Otherwise, contact your projector. Replace the lamp when the message "Lamp is approaching the...
User Guide
Page 100
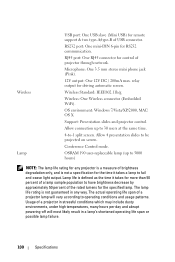
... automatic screen. Wireless Standard: IEEE802.11b/g Wireless: One Wireless connector (Embedded WiFi). The actual operating life span of USB connector. Allow connection up to 5000 hours) NOTE: The lamp life rating for more than 50 percent of a lamp sample population to fail and cease light output. The lamp life rating is not guaranteed in a lamp's shortened operating life span or possible lamp failure. 100 Specifications OS environment: Windows 7/Vista/XP/2000, MAC OS X Support...
... automatic screen. Wireless Standard: IEEE802.11b/g Wireless: One Wireless connector (Embedded WiFi). The actual operating life span of USB connector. Allow connection up to 5000 hours) NOTE: The lamp life rating for more than 50 percent of a lamp sample population to fail and cease light output. The lamp life rating is not guaranteed in a lamp's shortened operating life span or possible lamp failure. 100 Specifications OS environment: Windows 7/Vista/XP/2000, MAC OS X Support...
User Guide
Page 106
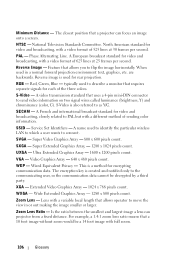
... between the smallest and largest image a lens can focus an image onto a screen. A video transmission standard that allows operator to send video information on two signal wires called luminance (brightness, Y) and chrominance (color, C). WEP - NTSC - Service Set Identifiers - Super Video Graphics Array - 800 x 600 pixels count. UXGA - National Television Standards Committee. When used to identify the particular wireless LAN to which a user wants to as Y/C. SXGA - SVGA...
... between the smallest and largest image a lens can focus an image onto a screen. A video transmission standard that allows operator to send video information on two signal wires called luminance (brightness, Y) and chrominance (color, C). WEP - NTSC - Service Set Identifiers - Super Video Graphics Array - 800 x 600 pixels count. UXGA - National Television Standards Committee. When used to identify the particular wireless LAN to which a user wants to as Y/C. SXGA - SVGA...
User Guide
Page 107
Index A Adjusting the Projected Image 24 Adjusting the Projector Height 24 lower the projector Front tilt adjustment wheel 24 Tilt adjustment wheel 24 Adjusting the Projector Zoom and Focus 25 Focus ring 25 Audio Input 49 Audio Settings 49 C Capture Screen 49 Changing the Lamp 96 Closed Caption 53 Connecting the Projector Composite Video cable 17 Connecting a Computer with a RS232 cable 13, 14 Connecting with a Component Cable 18 Connecting with a Composite Cable 17 Connecting with an HDMI Cable 19 Connecting with an S-video Cable 16 HDMI cable 19, 20, 22 Power cord 11...
Index A Adjusting the Projected Image 24 Adjusting the Projector Height 24 lower the projector Front tilt adjustment wheel 24 Tilt adjustment wheel 24 Adjusting the Projector Zoom and Focus 25 Focus ring 25 Audio Input 49 Audio Settings 49 C Capture Screen 49 Changing the Lamp 96 Closed Caption 53 Connecting the Projector Composite Video cable 17 Connecting a Computer with a RS232 cable 13, 14 Connecting with a Component Cable 18 Connecting with a Composite Cable 17 Connecting with an HDMI Cable 19 Connecting with an S-video Cable 16 HDMI cable 19, 20, 22 Power cord 11...
User Guide
Page 108
... Control Panel 28 D Dell contacting 103 M Main Unit 7 Antenna 7 Control panel 7 Focus tab 7 IR receivers 7 Lens 7 Lens cap 7 Menu Position 48 Menu Settings 48 Menu Timeout 48 Menu Transparency 48 Mute 49 O On-Screen Display 35 Auto-Adjust 37 Display (in PC Mode) 40 Display (in Video Mode) 42 Input Select 36 Lamp 43 Main Menu 35 Others 48 Picture (in PC Mode) 37 Picture (in Video Mode) 38 Set Up 43 P Password 51 phone numbers 103 Power Saving 50 Power Settings 50 Powering On/Off the Projector Powering...
... Control Panel 28 D Dell contacting 103 M Main Unit 7 Antenna 7 Control panel 7 Focus tab 7 IR receivers 7 Lens 7 Lens cap 7 Menu Position 48 Menu Settings 48 Menu Timeout 48 Menu Transparency 48 Mute 49 O On-Screen Display 35 Auto-Adjust 37 Display (in PC Mode) 40 Display (in Video Mode) 42 Input Select 36 Lamp 43 Main Menu 35 Others 48 Picture (in PC Mode) 37 Picture (in Video Mode) 38 Set Up 43 P Password 51 phone numbers 103 Power Saving 50 Power Settings 50 Powering On/Off the Projector Powering...


