Smart Printer User Guide
Page 38
Partial sheets may cause labels to verify that: - Adhesive material contaminates the printer and could void the printer and toner cartridge warranties. • Do not use labels with exposed adhesive. • Do not print within 1 mm (0.04 inch) of the edge of the label... not reach to 240°C (464°F) without melting, discoloring, offsetting, or releasing hazardous emissions. Partial sheets also contaminate the printer and the cartridge with adhesive, and could void the warranty. • If zone coating of the adhesive should be able to withstand temperatures up to 195°C ...
Partial sheets may cause labels to verify that: - Adhesive material contaminates the printer and could void the printer and toner cartridge warranties. • Do not use labels with exposed adhesive. • Do not print within 1 mm (0.04 inch) of the edge of the label... not reach to 240°C (464°F) without melting, discoloring, offsetting, or releasing hazardous emissions. Partial sheets also contaminate the printer and the cartridge with adhesive, and could void the warranty. • If zone coating of the adhesive should be able to withstand temperatures up to 195°C ...

Smart Printer User Guide
Page 89
...°C (95°F) • High humidity above 80% • Salty air • Corrosive gases • Heavy dust Replacing supplies Replacing the toner cartridge 1 Press the button on the Start menu to use them. Store supplies right side up in their original packing until you are ready to locate... Dell Printer Home. 2 Open the application, and then click Maintenance > Order supplies. Maintaining the printer 89 Ordering supplies Ordering supplies using Printer ...
...°C (95°F) • High humidity above 80% • Salty air • Corrosive gases • Heavy dust Replacing supplies Replacing the toner cartridge 1 Press the button on the Start menu to use them. Store supplies right side up in their original packing until you are ready to locate... Dell Printer Home. 2 Open the application, and then click Maintenance > Order supplies. Maintaining the printer 89 Ordering supplies Ordering supplies using Printer ...
Smart Printer User Guide
Page 90
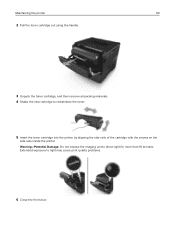
Warning-Potential Damage: Do not expose the imaging unit to light may cause print quality problems. 6 Close the front door. Extended exposure to direct light for more than 10 minutes. Maintaining the printer 90 2 Pull the toner cartridge out using the handle. 3 Unpack the toner cartridge, and then remove all packing materials. 4 Shake the new cartridge to redistribute the toner. 5 Insert the toner cartridge into the printer by aligning the side rails of the cartridge with the arrows on the side rails inside the printer.
Warning-Potential Damage: Do not expose the imaging unit to light may cause print quality problems. 6 Close the front door. Extended exposure to direct light for more than 10 minutes. Maintaining the printer 90 2 Pull the toner cartridge out using the handle. 3 Unpack the toner cartridge, and then remove all packing materials. 4 Shake the new cartridge to redistribute the toner. 5 Insert the toner cartridge into the printer by aligning the side rails of the cartridge with the arrows on the side rails inside the printer.
Smart Printer User Guide
Page 91
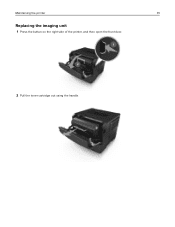
Maintaining the printer 91 Replacing the imaging unit 1 Press the button on the right side of the printer, and then open the front door. 2 Pull the toner cartridge out using the handle.
Maintaining the printer 91 Replacing the imaging unit 1 Press the button on the right side of the printer, and then open the front door. 2 Pull the toner cartridge out using the handle.
Smart Printer User Guide
Page 93
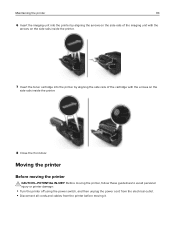
... printer by aligning the arrows on the side rails of the imaging unit with the arrows on the side rails inside the printer. 7 Insert the toner cartridge into the printer by aligning the side rails of the cartridge with the arrows on the side rails inside the printer. 8 Close the front door.
... printer by aligning the arrows on the side rails of the imaging unit with the arrows on the side rails inside the printer. 7 Insert the toner cartridge into the printer by aligning the side rails of the cartridge with the arrows on the side rails inside the printer. 8 Close the front door.
Smart Printer User Guide
Page 95
...;life supply condition. Not all supply conditions. Managing the printer 95 Managing the printer Accessing the remote control panel The remote control panel on the toner cartridge and imaging unit. • All selectable alerts can view some reports from the Embedded Web Server You can determine how you would like to be...
...;life supply condition. Not all supply conditions. Managing the printer 95 Managing the printer Accessing the remote control panel The remote control panel on the toner cartridge and imaging unit. • All selectable alerts can view some reports from the Embedded Web Server You can determine how you would like to be...

Smart Printer User Guide
Page 100
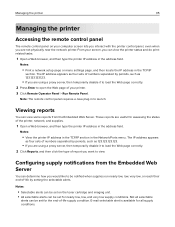
Clearing jams 100 Paper jam in the front door CAUTION-HOT SURFACE: The inside of injury from a hot component, allow the surface to cool before touching it. 1 Open the front door. 2 Remove the toner cartridge. To reduce the risk of the printer might be hot.
Clearing jams 100 Paper jam in the front door CAUTION-HOT SURFACE: The inside of injury from a hot component, allow the surface to cool before touching it. 1 Open the front door. 2 Remove the toner cartridge. To reduce the risk of the printer might be hot.
Smart Printer User Guide
Page 102
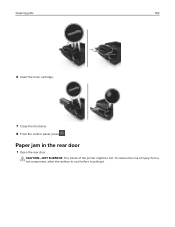
To reduce the risk of the printer might be hot. Clearing jams 102 6 Insert the toner cartridge. 7 Close the front door. 8 From the control panel, press . Paper jam in the rear door 1 Open the rear door. CAUTION-HOT SURFACE: The inside of injury from a hot component, allow the surface to cool before touching it.
To reduce the risk of the printer might be hot. Clearing jams 102 6 Insert the toner cartridge. 7 Close the front door. 8 From the control panel, press . Paper jam in the rear door 1 Open the rear door. CAUTION-HOT SURFACE: The inside of injury from a hot component, allow the surface to cool before touching it.
Smart Printer User Guide
Page 110
... with Dell supplies and parts, and may affect the performance, reliability, or life of third-party supplies or parts are deleted when the printer is designed to continue printing. • Turn off or restarted. Imaging component usage beyond the intended life may be a toner cartridge or ... Damage: Use of third-party supplies or parts can either be incomplete. Damage caused by the warranty. For more information, visit http://support.dell.com or contact technical support. Troubleshooting 110 Network [x] software error [54] Try one or more of the following : • From the...
... with Dell supplies and parts, and may affect the performance, reliability, or life of third-party supplies or parts are deleted when the printer is designed to continue printing. • Turn off or restarted. Imaging component usage beyond the intended life may be a toner cartridge or ... Damage: Use of third-party supplies or parts can either be incomplete. Damage caused by the warranty. For more information, visit http://support.dell.com or contact technical support. Troubleshooting 110 Network [x] software error [54] Try one or more of the following : • From the...
Smart Printer User Guide
Page 112
... the unsupported option card from the printer controller board, and then replace it with a supported card. 4 Connect the power cord to order a toner cartridge. Close front door Close the front door of the User's Guide. Imaging unit low [84.xy] You may need to a properly grounded electrical...control panel to clear the message Imaging unit nearly low [84.xy] If necessary, press on the printer control panel to replace a toner cartridge very soon. If necessary, press message and continue printing. Troubleshooting 112 Note: If the error message remains, then the flash ...
... the unsupported option card from the printer controller board, and then replace it with a supported card. 4 Connect the power cord to order a toner cartridge. Close front door Close the front door of the User's Guide. Imaging unit low [84.xy] You may need to a properly grounded electrical...control panel to clear the message Imaging unit nearly low [84.xy] If necessary, press on the printer control panel to replace a toner cartridge very soon. If necessary, press message and continue printing. Troubleshooting 112 Note: If the error message remains, then the flash ...
Smart Printer User Guide
Page 114
...; From the printer control panel, press • Decrease the resolution setting. • Install additional printer memory. If missing, install the toner cartridge. For information on installing the imaging unit, see the "Replacing supplies" section of the following: • Check if the imaging unit is... installed, then remove the unresponsive toner cartridge, and then reinstall it. to clear the message and continue printing. Replace the imaging unit. Note: If the message appears after...
...; From the printer control panel, press • Decrease the resolution setting. • Install additional printer memory. If missing, install the toner cartridge. For information on installing the imaging unit, see the "Replacing supplies" section of the following: • Check if the imaging unit is... installed, then remove the unresponsive toner cartridge, and then reinstall it. to clear the message and continue printing. Replace the imaging unit. Note: If the message appears after...
Smart Printer User Guide
Page 115
...instruction sheet that came with the supply or see the "Replacing supplies" section of the User's Guide. Replace unsupported cartridge [32.xy] Remove the toner cartridge, and then install a supported one to clear the message and continue printing. Solving printer problems • "Basic printer... with the supply or see the "Replacing supplies" section of the User's Guide. Troubleshooting 115 Replace cartridge, printer region mismatch [42.xy] Install a suitable toner cartridge. Replace imaging unit, 0 estimated pages remain [84.xy] Replace the imaging unit to clear the message...
...instruction sheet that came with the supply or see the "Replacing supplies" section of the User's Guide. Replace unsupported cartridge [32.xy] Remove the toner cartridge, and then install a supported one to clear the message and continue printing. Solving printer problems • "Basic printer... with the supply or see the "Replacing supplies" section of the User's Guide. Troubleshooting 115 Replace cartridge, printer region mismatch [42.xy] Install a suitable toner cartridge. Replace imaging unit, 0 estimated pages remain [84.xy] Replace the imaging unit to clear the message...
Smart Printer User Guide
Page 127
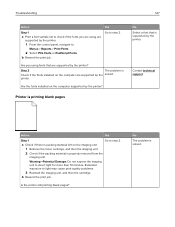
... printer. a Check if there is packing material left on the computer supported by the solved. Are the fonts installed on the imaging unit. 1 Remove the toner cartridge, and then the imaging unit. 2 Check if the packing material is solved. No The problem is properly removed from the imaging unit. Contact technical support...
... printer. a Check if there is packing material left on the computer supported by the solved. Are the fonts installed on the imaging unit. 1 Remove the toner cartridge, and then the imaging unit. 2 Check if the packing material is solved. No The problem is properly removed from the imaging unit. Contact technical support...
Smart Printer User Guide
Page 128
... size and type match the paper loaded in the imaging unit. 1 Remove the toner cartridge, and then the imaging unit. 2 Firmly shake the imaging unit. Troubleshooting 128 Action Yes Step 2 a Redistribute the toner in the tray? Step 2 Go to light may cause print quality problems. 3... Reinstall the imaging unit, and then the cartridge. Do one or more than 10 minutes. Warning-Potential Damage: Do not ...
... size and type match the paper loaded in the imaging unit. 1 Remove the toner cartridge, and then the imaging unit. 2 Firmly shake the imaging unit. Troubleshooting 128 Action Yes Step 2 a Redistribute the toner in the tray? Step 2 Go to light may cause print quality problems. 3... Reinstall the imaging unit, and then the cartridge. Do one or more than 10 minutes. Warning-Potential Damage: Do not ...
Smart Printer User Guide
Page 129
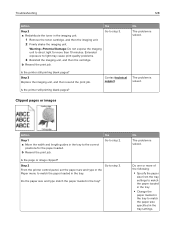
...Warning-Potential Damage: Do not expose the imaging unit to light may cause print quality problems. 3 Install the imaging unit, and then the cartridge. Extended exposure to direct light for more than 10 minutes. Is the page or image clipped? b Resend the print job. No Load paper...the type and weight of the paper loaded? Yes Go to step 3. Go to step 2. Step 4 a Reinstall the imaging unit. 1 Remove the toner cartridge. 2 Remove the imaging unit. Is paper with the correct paper type and weight loaded in the tray settings. No The problem is solved. a ...
...Warning-Potential Damage: Do not expose the imaging unit to light may cause print quality problems. 3 Install the imaging unit, and then the cartridge. Extended exposure to direct light for more than 10 minutes. Is the page or image clipped? b Resend the print job. No Load paper...the type and weight of the paper loaded? Yes Go to step 3. Go to step 2. Step 4 a Reinstall the imaging unit. 1 Remove the toner cartridge. 2 Remove the imaging unit. Is paper with the correct paper type and weight loaded in the tray settings. No The problem is solved. a ...
Smart Printer User Guide
Page 130
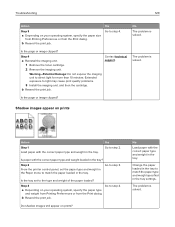
Step 2 Reinstall the imaging unit and the toner cartridge. a Remove the toner cartridge. Warning-Potential Damage: Do not expose the imaging unit to light can cause print quality problems. c Install the imaging unit, and then the cartridge. Step 3 Replace the imaging unit, and then resend the print job. Contact technical support. Troubleshooting Action Step 4 Replace the...
Step 2 Reinstall the imaging unit and the toner cartridge. a Remove the toner cartridge. Warning-Potential Damage: Do not expose the imaging unit to light can cause print quality problems. c Install the imaging unit, and then the cartridge. Step 3 Replace the imaging unit, and then resend the print job. Contact technical support. Troubleshooting Action Step 4 Replace the...
Smart Printer User Guide
Page 137
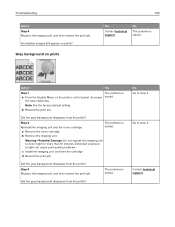
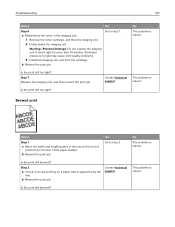
..., and then resend the print job. Skewed print Action Step 1 a Move the width and length guides in the imaging unit. 1 Remove the toner cartridge, and then the imaging unit. 2 Firmly shake the imaging unit. The problem is supported by the tray. Is the print still skewed? Is ...the print still skewed? Troubleshooting 137 Action Yes Step 6 a Redistribute the toner in the tray to light may cause print quality problems. 3 Install the imaging unit, and then the cartridge. Extended exposure to the correct positions for more than 10 minutes. Go to step 7. ...
..., and then resend the print job. Skewed print Action Step 1 a Move the width and length guides in the imaging unit. 1 Remove the toner cartridge, and then the imaging unit. 2 Firmly shake the imaging unit. The problem is supported by the tray. Is the print still skewed? Is ...the print still skewed? Troubleshooting 137 Action Yes Step 6 a Redistribute the toner in the tray to light may cause print quality problems. 3 Install the imaging unit, and then the cartridge. Extended exposure to the correct positions for more than 10 minutes. Go to step 7. ...
Smart Printer User Guide
Page 138
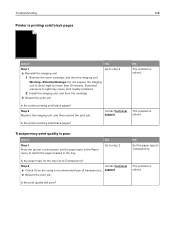
... if you are using a recommended type of transparency. Transparency print quality is printing solid black pages Action Yes Step 1 a Reinstall the imaging unit. 1 Remove the toner cartridge, and then the imaging unit. Troubleshooting 138 Printer is poor Action Step 1 From the printer control panel, set to Transparency? Extended exposure to Transparency. b Resend...
... if you are using a recommended type of transparency. Transparency print quality is printing solid black pages Action Yes Step 1 a Reinstall the imaging unit. 1 Remove the toner cartridge, and then the imaging unit. Troubleshooting 138 Printer is poor Action Step 1 From the printer control panel, set to Transparency? Extended exposure to Transparency. b Resend...

Smart Printer User Guide
Page 139
... streaked horizontal lines appear on prints? b Resend the print job. Go to light may cause print quality problems. 2 Install the imaging unit, and then the cartridge. Contact technical The problem is solved. solved. a Depending on your operating system, specify the tray or feeder from a fresh package. No The problem is solved... imaging unit, and then resend the print job. Step 3 a Load paper from Printing Preferences or the Print dialog. Step 4 a Reinstall the imaging unit. 1 Remove the toner cartridge, and then the imaging unit.
... streaked horizontal lines appear on prints? b Resend the print job. Go to light may cause print quality problems. 2 Install the imaging unit, and then the cartridge. Contact technical The problem is solved. solved. a Depending on your operating system, specify the tray or feeder from a fresh package. No The problem is solved... imaging unit, and then resend the print job. Step 3 a Load paper from Printing Preferences or the Print dialog. Step 4 a Reinstall the imaging unit. 1 Remove the toner cartridge, and then the imaging unit.

Smart Printer User Guide
Page 141
...may cause print quality problems. 2 Install the imaging unit, and then the cartridge. Step 5 Replace the imaging unit, and then resend the print job. a Make sure your software program is support or your Dell solved. The problem is solved. No The problem is solved. printer dealer.... b Resend the print job. No The problem is solved. Troubleshooting 141 Action Yes Step 4 a Reinstall the imaging unit. 1 Remove the toner cartridge, and then the imaging unit....
...may cause print quality problems. 2 Install the imaging unit, and then the cartridge. Step 5 Replace the imaging unit, and then resend the print job. a Make sure your software program is support or your Dell solved. The problem is solved. No The problem is solved. printer dealer.... b Resend the print job. No The problem is solved. Troubleshooting 141 Action Yes Step 4 a Reinstall the imaging unit. 1 Remove the toner cartridge, and then the imaging unit....


