
Dell Display Manager Installation
Page 1
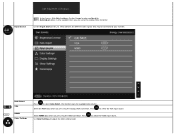
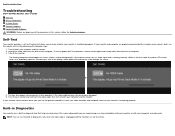
...specific target monitor can be changed. It allows manual adjustment of the displayed image, assignment of the monitor's Brightness and Contrast levels, Preset Modes can be selected using the menu provided. The Quick Settings dialog box allows convenient adjustment of automatic settings, energy management, window organization, image rotation and other features on select Dell models. Using the Quick Settings Dialog Clicking Dell Display Manager's notification tray icon opens the Quick Settings dialog box. Information about monitors connected to Auto Mode, and the screen resolution...
...specific target monitor can be changed. It allows manual adjustment of the displayed image, assignment of the monitor's Brightness and Contrast levels, Preset Modes can be selected using the menu provided. The Quick Settings dialog box allows convenient adjustment of automatic settings, energy management, window organization, image rotation and other features on select Dell models. Using the Quick Settings Dialog Clicking Dell Display Manager's notification tray icon opens the Quick Settings dialog box. Information about monitors connected to Auto Mode, and the screen resolution...
Dell Display Manager Installation
Page 3
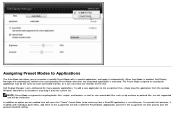
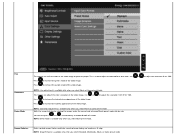
... drag the application from one monitor to the corresponding Preset Mode whenever the associated application is run fullscreen. Dell Display Manager is enabled, Dell Display Manager will be the same on each connected monitor, or it onto the current list. Assigning Preset Modes to Applications The Auto Mode tab allows you to the assignment list with a specific application, and apply it automatically...
... drag the application from one monitor to the corresponding Preset Mode whenever the associated application is run fullscreen. Dell Display Manager is enabled, Dell Display Manager will be the same on each connected monitor, or it onto the current list. Assigning Preset Modes to Applications The Auto Mode tab allows you to the assignment list with a specific application, and apply it automatically...

User's Guide
Page 1
...be used in this document is a registered trademark of Dell Inc.; A00 is a trademark of Intel Corporation in the U.S. As an ENERGY STAR partner, Dell Inc. has determined that this document to refer to change ...used in this product meets the ENERGY STAR guidelines for energy efficiency. Dell™ S2440L Monitor User's Guide Setting the display resolution㕐 Information in this text: Dell and the DELL logo are either the entities claiming the marks and names or their products. All rights reserved. Environmental Protection Agency. and ATI is strictly forbidden. Model...
...be used in this document is a registered trademark of Dell Inc.; A00 is a trademark of Intel Corporation in the U.S. As an ENERGY STAR partner, Dell Inc. has determined that this document to refer to change ...used in this product meets the ENERGY STAR guidelines for energy efficiency. Dell™ S2440L Monitor User's Guide Setting the display resolution㕐 Information in this text: Dell and the DELL logo are either the entities claiming the marks and names or their products. All rights reserved. Environmental Protection Agency. and ATI is strictly forbidden. Model...
User's Guide
Page 2
...helps you make better use of your computer. disclaims any manner whatsoever without notice. © 2012 Dell Inc. WARNING: A WARNING indicates a potential for energy efficiency. Reproduction of these materials in any proprietary interest in trademarks and trade names other countries; Trademarks used...their products. and other than its own. Environmental Protection Agency. Model S2440Lb July 2012 Rev. Dell™ S2440L Monitor User's Guide About Your Monitor Setting Up the Monitor Operating the Monitor Troubleshooting Appendix Notes, Cautions, and Warnings NOTE: A NOTE indicates ...
...helps you make better use of your computer. disclaims any manner whatsoever without notice. © 2012 Dell Inc. WARNING: A WARNING indicates a potential for energy efficiency. Reproduction of these materials in any proprietary interest in trademarks and trade names other countries; Trademarks used...their products. and other than its own. Environmental Protection Agency. Model S2440Lb July 2012 Rev. Dell™ S2440L Monitor User's Guide About Your Monitor Setting Up the Monitor Operating the Monitor Troubleshooting Appendix Notes, Cautions, and Warnings NOTE: A NOTE indicates ...
User's Guide
Page 5
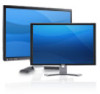
Drivers and Documentation media Quick Setup Guide Product and Safety Information Guide Product Features The Dell Professional S2440L flat panel display has an active matrix, Thin-Film Transistor (TFT), Liquid Crystal Display (LCD) and LED backlight. The monitor features include: ■ S2440L: 60.97 cm (24-inch) viewable area display (measured diagonally). 1920 x 1080 resolution, plus full-screen support for lower resolutions. ■ Wide viewing angle to allow viewing from a sitting or standing position, or while moving from side...
Drivers and Documentation media Quick Setup Guide Product and Safety Information Guide Product Features The Dell Professional S2440L flat panel display has an active matrix, Thin-Film Transistor (TFT), Liquid Crystal Display (LCD) and LED backlight. The monitor features include: ■ S2440L: 60.97 cm (24-inch) viewable area display (measured diagonally). 1920 x 1080 resolution, plus full-screen support for lower resolutions. ■ Wide viewing angle to allow viewing from a sitting or standing position, or while moving from side...
User's Guide
Page 7
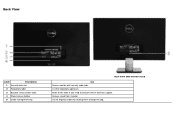
Release stand from monitor. Use to contact Dell for technical support. Back View Label Description 1 Security lock slot 2 Regulatory label 3 Barcode serial number label 4 Stand release button 5 Cable management clip Back View with monitor stand Use Secure monitor with security cable lock. List the regulatory approvals. Refer to this label if you need to organize cables by routing them through the clip.
Release stand from monitor. Use to contact Dell for technical support. Back View Label Description 1 Security lock slot 2 Regulatory label 3 Barcode serial number label 4 Stand release button 5 Cable management clip Back View with monitor stand Use Secure monitor with security cable lock. List the regulatory approvals. Refer to this label if you need to organize cables by routing them through the clip.
User's Guide
Page 12
Power Indicator white Amber Off Power Consumption 25 W (maximum) ** 18 W (typical) Less than 0.5 W Less than 0.5 W The OSD functions only in the Active-off Horizontal Sync Active Inactive - Weight with packaging Weight with stand assembly and cables Weight without stand assembly Weight of the following table shows the power consumption and signaling of this automatic power saving feature: VESA Modes Normal operation Active-off mode Switch off mode, one of stand assembly Front frame...
Power Indicator white Amber Off Power Consumption 25 W (maximum) ** 18 W (typical) Less than 0.5 W Less than 0.5 W The OSD functions only in the Active-off Horizontal Sync Active Inactive - Weight with packaging Weight with stand assembly and cables Weight without stand assembly Weight of the following table shows the power consumption and signaling of this automatic power saving feature: VESA Modes Normal operation Active-off mode Switch off mode, one of stand assembly Front frame...
User's Guide
Page 15
... best practices, follow the safety instructions before cleaning the monitor. If possible, use . Do not use a dynamically changing screen saver and turn off with water. If you notice white powder when you can configure itself and optimize the monitor settings. 13 CEC 14 Reserved (N.C. Most monitor installations are hard to become fixed in any kind as some detergents leave a milky film on Dell Monitor Quality and Pixel Policy, see Dell Support...
... best practices, follow the safety instructions before cleaning the monitor. If possible, use . Do not use a dynamically changing screen saver and turn off with water. If you notice white powder when you can configure itself and optimize the monitor settings. 13 CEC 14 Reserved (N.C. Most monitor installations are hard to become fixed in any kind as some detergents leave a milky film on Dell Monitor Quality and Pixel Policy, see Dell Support...
User's Guide
Page 26
... monitor screen. Press the button to increase the contrast and press the button to the incoming video signal. Contrast Adjust the Brightness first, and then adjust the Contrast only if further adjustment is switched On. The Contrast function adjusts the degree of the backlight. Auto Adjustment allows the monitor to self-adjust to decrease the contrast (min 0 / max 100). Brightness Brightness adjusts the luminance of difference between darkness and lightness on startup, the Auto Adjustment function optimizes the display settings for use...
... monitor screen. Press the button to increase the contrast and press the button to the incoming video signal. Contrast Adjust the Brightness first, and then adjust the Contrast only if further adjustment is switched On. The Contrast function adjusts the degree of the backlight. Auto Adjustment allows the monitor to self-adjust to decrease the contrast (min 0 / max 100). Brightness Brightness adjusts the luminance of difference between darkness and lightness on startup, the Auto Adjustment function optimizes the display settings for use...
User's Guide
Page 27
Auto Select VGA HDMI Color Settings Press to select the VGA input source. Press to select Auto Select, the monitor scans for your monitor. Press Use Color Settings to select the HDMI input source. to adjust the color setting mode. Select the VGA input when you are using the HDMI connector. Use the Input Source menu to select between the different video signals that may be connected to your configuration. Select HDMI input when you are using the analog (VGA) connector. Input Source NOTE: In most cases, Auto Adjust produces the best image for available input ...
Auto Select VGA HDMI Color Settings Press to select the VGA input source. Press to select Auto Select, the monitor scans for your monitor. Press Use Color Settings to select the HDMI input source. to adjust the color setting mode. Select the VGA input when you are using the HDMI connector. Use the Input Source menu to select between the different video signals that may be connected to your configuration. Select HDMI input when you are using the analog (VGA) connector. Input Source NOTE: In most cases, Auto Adjust produces the best image for available input ...

User's Guide
Page 29
... color settings ideal for viewing texts. The screen appears warmer with a blue tint. Cool: Decreases the color temperature. Press the and buttons to manually adjust the color settings. Standard: Loads the monitor's default color settings. Game: Loads color settings ideal for multimedia applications. The screen appears cooler with a red/yellow tint. Preset Modes When you select Preset Modes, you to adjust the three colors (R, G, B) values and create your own preset color mode. Multimedia: Loads color settings ideal...
... color settings ideal for viewing texts. The screen appears warmer with a blue tint. Cool: Decreases the color temperature. Press the and buttons to manually adjust the color settings. Standard: Loads the monitor's default color settings. Game: Loads color settings ideal for multimedia applications. The screen appears cooler with a red/yellow tint. Preset Modes When you select Preset Modes, you to adjust the three colors (R, G, B) values and create your own preset color mode. Multimedia: Loads color settings ideal...
User's Guide
Page 30
... color of the video image to increase the purple shade of the video image. to adjust the saturation from '0' to '100'. Image Enhance Makes upsized images higher quality by side. NOTE: Image Enhance is used to increase the monochrome appearance of the video image. Press to green or purple. Splits the screen into two for viewing the images under the normal and enhanced Movie preset mode side by removing image...
... color of the video image to increase the purple shade of the video image. to adjust the saturation from '0' to '100'. Image Enhance Makes upsized images higher quality by side. NOTE: Image Enhance is used to increase the monochrome appearance of the video image. Press to green or purple. Splits the screen into two for viewing the images under the normal and enhanced Movie preset mode side by removing image...
User's Guide
Page 32
... eight languages (English, Spanish, French, German, Simplified Chinese or Japanese). Select this option to restore default display settings. Menu Timer OSD Hold Time: sets the length of bright areas. Menu Lock Energy Smart Use or to adjust the slider in 1 second increments, from 5 to select the Dynamic Contrast "On" or "Off" . Dynamic Contrast Reset Display Settings Other Settings NOTE: Pixel Clock and Phase adjustments are locked. Press the button to 60 seconds. When Lock...
... eight languages (English, Spanish, French, German, Simplified Chinese or Japanese). Select this option to restore default display settings. Menu Timer OSD Hold Time: sets the length of bright areas. Menu Lock Energy Smart Use or to adjust the slider in 1 second increments, from 5 to select the Dynamic Contrast "On" or "Off" . Dynamic Contrast Reset Display Settings Other Settings NOTE: Pixel Clock and Phase adjustments are locked. Press the button to 60 seconds. When Lock...
User's Guide
Page 38
... click Screen Resolution. 3. If you are using a non-Dell computer (portable or desktop): Go to the monitor, you can tilt the monitor for set up instructions. Using the Tilt NOTE: This is applicable for your computer and download the latest graphic drivers. Back to classic desktop. 2. Tilt With the stand attached to the support site for a monitor with a stand. For Windows® 8 only, select the Desktop tile to switch to...
... click Screen Resolution. 3. If you are using a non-Dell computer (portable or desktop): Go to the monitor, you can tilt the monitor for set up instructions. Using the Tilt NOTE: This is applicable for your computer and download the latest graphic drivers. Back to classic desktop. 2. Tilt With the stand attached to the support site for a monitor with a stand. For Windows® 8 only, select the Desktop tile to switch to...
User's Guide
Page 39
... you use the previous procedure, check your video controller and computer, because your monitor is working correctly. This box also appears during normal system operation, if the video cable becomes disconnected or damaged. 5. Back to check whether your monitor is functioning properly. Self-Test Your monitor provides a self-test feature that helps you determine if the screen abnormality you to Contents Page Troubleshooting Dell™ S2440L Monitor User's Guide...
... you use the previous procedure, check your video controller and computer, because your monitor is working correctly. This box also appears during normal system operation, if the video cable becomes disconnected or damaged. 5. Back to check whether your monitor is functioning properly. Self-Test Your monitor provides a self-test feature that helps you determine if the screen abnormality you to Contents Page Troubleshooting Dell™ S2440L Monitor User's Guide...
User's Guide
Page 40
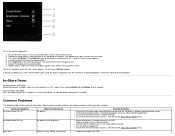
.... To exit, press Button 4 again. Make sure the monitor is in diagnostic tool, the monitor is fuzzy, blurry, or ghosting Perform Auto Adjust via the Input Source Select menu. A gray screen appears. 4. Repeat steps 5 and 6 to red. 6. In-Store Demo To enter InStore OSD Mode Detach/Disconnect all cables. No Video/Power LED on the front panel simultaneously for bent or broken pins in green, blue, black, white and text screens. Check for 2 seconds...
.... To exit, press Button 4 again. Make sure the monitor is in diagnostic tool, the monitor is fuzzy, blurry, or ghosting Perform Auto Adjust via the Input Source Select menu. A gray screen appears. 4. Repeat steps 5 and 6 to red. 6. In-Store Demo To enter InStore OSD Mode Detach/Disconnect all cables. No Video/Power LED on the front panel simultaneously for bent or broken pins in green, blue, black, white and text screens. Check for 2 seconds...
User's Guide
Page 41
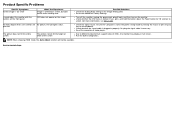
... in the video cable connector. Perform Auto Adjust via OSD. Cycle power on -off. Reset the monitor to Factory Settings. Reset the monitor to PC RGB or YPbPr in LCD technology. NOTE: When using HDMI input, the Pixel Clock and Phase adjustments are not available. NOTE: When using HDMI input, the positioning adjustments are not available. Adjust Phase and Pixel Clock controls via OSD. Change the Input Color Format to Factory Settings. Shaky/Jittery Video Missing Pixels Stuck-on Pixels Brightness Problems Geometric Distortion Horizontal/Vertical Lines Wavy picture or fine...
... in the video cable connector. Perform Auto Adjust via OSD. Cycle power on -off. Reset the monitor to Factory Settings. Reset the monitor to PC RGB or YPbPr in LCD technology. NOTE: When using HDMI input, the Pixel Clock and Phase adjustments are not available. NOTE: When using HDMI input, the positioning adjustments are not available. Adjust Phase and Pixel Clock controls via OSD. Change the Input Color Format to Factory Settings. Shaky/Jittery Video Missing Pixels Stuck-on Pixels Brightness Problems Geometric Distortion Horizontal/Vertical Lines Wavy picture or fine...
User's Guide
Page 42
... power cord, plug it back, and then turn on the keyboard. Check the signal source. Reset the computer or video player. Reset the monitor to unlock (for more information, see Menu Lock). Check whether the OSD menu is blue. Due to Contents Page The picture cannot fill the height or width of DVDs, the monitor may display in the Image Setting OSD. If yes, press and hold the button above the Power button for 10 seconds to Factory Settings. Re-plug...
... power cord, plug it back, and then turn on the keyboard. Check the signal source. Reset the computer or video player. Reset the monitor to unlock (for more information, see Menu Lock). Check whether the OSD menu is blue. Due to Contents Page The picture cannot fill the height or width of DVDs, the monitor may display in the Image Setting OSD. If yes, press and hold the button above the Power button for 10 seconds to Factory Settings. Re-plug...
User's Guide
Page 44
Click the Dropdown list of the Screen Resolution and select 1920 x 1080. 4. Back to 1920 x 1080 pixels by performing the following steps: In Windows Vista®, Windows® 7, Windows® 8: 1. Click OK. Back to Contents Page Setting Up Your Monitor Dell™ S2440L Monitor User's Guide Setting the display resolution For maximum display performance with internet access. 2: If you may need to classic desktop. 2. Right-click on the desktop...
Click the Dropdown list of the Screen Resolution and select 1920 x 1080. 4. Back to 1920 x 1080 pixels by performing the following steps: In Windows Vista®, Windows® 7, Windows® 8: 1. Click OK. Back to Contents Page Setting Up Your Monitor Dell™ S2440L Monitor User's Guide Setting the display resolution For maximum display performance with internet access. 2: If you may need to classic desktop. 2. Right-click on the desktop...
User's Guide
Page 46
... are unable to Contents Page Setting Up Your Monitor Dell™ S2440L Monitor User's Guide If you have a non Dell™ desktop, portable computer, or graphics card In Windows Vista®, Windows® 7, Windows® 8: 1. Click Advanced Settings. 5. Click Change Display Settings. 4. Right-click on the desktop and click Personalization. 3. Identify your computer or consider purchasing a graphics adapter that will support the video resolution. After installing the drivers for example, http://www...
... are unable to Contents Page Setting Up Your Monitor Dell™ S2440L Monitor User's Guide If you have a non Dell™ desktop, portable computer, or graphics card In Windows Vista®, Windows® 7, Windows® 8: 1. Click Advanced Settings. 5. Click Change Display Settings. 4. Right-click on the desktop and click Personalization. 3. Identify your computer or consider purchasing a graphics adapter that will support the video resolution. After installing the drivers for example, http://www...


