User Guide
Page 1
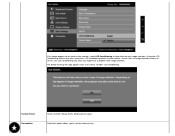
Dell™ S2240L/S2340L Monitor User's Guide About Your Monitor Setting Up the Monitor Operating the Monitor Troubleshooting Appendix Notes, Cautions, Warnings NOTE: A NOTE indicates important information that this text: Dell and the DELL logo are not followed. All rights reserved. Environmental Protection Agency. disclaims any manner whatsoever without notice. © 2012 Dell Inc. Information in this document to refer to either trademarks or...
Dell™ S2240L/S2340L Monitor User's Guide About Your Monitor Setting Up the Monitor Operating the Monitor Troubleshooting Appendix Notes, Cautions, Warnings NOTE: A NOTE indicates important information that this text: Dell and the DELL logo are not followed. All rights reserved. Environmental Protection Agency. disclaims any manner whatsoever without notice. © 2012 Dell Inc. Information in this document to refer to either trademarks or...
User Guide
Page 4
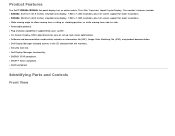
... Controls Front View Dell Display Manager included (comes in the CD attached with the monitor). EPEAT™ Silver compliant. The monitor's features include: S2240L: 54.61 cm (21.5 inches) viewable area display. 1,920 x 1,080 resolution, plus full-screen support for lower resolutions. Software and documentation media which includes an information file (INF), Image Color Matching File (ICM), and product documentation. Product Features The Dell™ S2240L/S2340L flat panel display...
... Controls Front View Dell Display Manager included (comes in the CD attached with the monitor). EPEAT™ Silver compliant. The monitor's features include: S2240L: 54.61 cm (21.5 inches) viewable area display. 1,920 x 1,080 resolution, plus full-screen support for lower resolutions. Software and documentation media which includes an information file (INF), Image Color Matching File (ICM), and product documentation. Product Features The Dell™ S2240L/S2340L flat panel display...
User Guide
Page 6
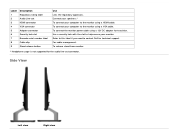
... view Connect your speakers.* To connect your monitor. To connect the monitor power cable using a 12V DC adapter for the audio line-out connector. Use a security lock with the slot to help secure your computer to the monitor using a VGA cable. Refer to this label if you need to the monitor using a HDMI cable. To connect your computer to contact Dell for technical support. Label 1 2 3 4 5 6 7 8 9 Description Regulatory rating label Audio Line-out HDMI connector VGA connector Adapter connector Security lock slot Barcode serial number label Cable clip Stand release button...
... view Connect your speakers.* To connect your monitor. To connect the monitor power cable using a 12V DC adapter for the audio line-out connector. Use a security lock with the slot to help secure your computer to the monitor using a VGA cable. Refer to this label if you need to the monitor using a HDMI cable. To connect your computer to contact Dell for technical support. Label 1 2 3 4 5 6 7 8 9 Description Regulatory rating label Audio Line-out HDMI connector VGA connector Adapter connector Security lock slot Barcode serial number label Cable clip Stand release button...
User Guide
Page 7
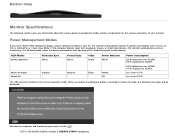
... mode Switch off mode, the following table shows the power consumption and signaling of your PC, the monitor automatically reduces its power consumption when not in the normal operation mode. The following messages will only function in use. NOTE: Dell S2240L/S2340L monitor is pressed in your monitor. Bottom View Monitor Specifications The following sections give you have VESA's DPM compliance display card or software installed in Active-off Horizontal Sync Active Inactive - Power...
... mode Switch off mode, the following table shows the power consumption and signaling of your PC, the monitor automatically reduces its power consumption when not in the normal operation mode. The following messages will only function in use. NOTE: Dell S2240L/S2340L monitor is pressed in your monitor. Bottom View Monitor Specifications The following sections give you have VESA's DPM compliance display card or software installed in Active-off Horizontal Sync Active Inactive - Power...

User Guide
Page 10
... LED light bar system 14 ms(typical) 7 ms(typical) with Overdrive 16.7 mil colors Plug and Play Capability You can select different settings if required. The monitor automatically provides the computer with its Extended Display Identification Data (EDID) using Display Data Channel (DDC) protocols so that the system can configure itself and optimize the monitor settings. Flat Panel Specifications Model number Screen type Panel Type Screen dimensions Preset display area: Horizontal Vertical Dell S2240L monitor...
... LED light bar system 14 ms(typical) 7 ms(typical) with Overdrive 16.7 mil colors Plug and Play Capability You can select different settings if required. The monitor automatically provides the computer with its Extended Display Identification Data (EDID) using Display Data Channel (DDC) protocols so that the system can configure itself and optimize the monitor settings. Flat Panel Specifications Model number Screen type Panel Type Screen dimensions Preset display area: Horizontal Vertical Dell S2240L monitor...

User Guide
Page 11
... V: 60 A (Max.) * Qualified Compatible AC/DC adapters: CAUTION: To avoid damage to 76 Hz (automatic) 1,920 x 1,080 at 60 Hz Electrical Specifications Model number Dell S2240Lmonitor Dell S2340L monitor Video input signals Analog RGB: 0.7 Volts +/- 5 %, 75 ohm input impedance Analog RGB: 0.7 Volts +/- 5 %, 75 ohm input impedance Synchronization input signals Separate horizontal and vertical synchronizations, polarity-free TTL level, SOG (Composite SYNC on green) Separate horizontal and vertical synchronizations, polarity-free TTL level, SOG (Composite SYNC on CIE1976 (82 %) and...
... V: 60 A (Max.) * Qualified Compatible AC/DC adapters: CAUTION: To avoid damage to 76 Hz (automatic) 1,920 x 1,080 at 60 Hz Electrical Specifications Model number Dell S2240Lmonitor Dell S2340L monitor Video input signals Analog RGB: 0.7 Volts +/- 5 %, 75 ohm input impedance Analog RGB: 0.7 Volts +/- 5 %, 75 ohm input impedance Synchronization input signals Separate horizontal and vertical synchronizations, polarity-free TTL level, SOG (Composite SYNC on green) Separate horizontal and vertical synchronizations, polarity-free TTL level, SOG (Composite SYNC on CIE1976 (82 %) and...
User Guide
Page 12
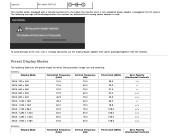
...-LF This monitor comes equipped with the monitor. Preset Display Modes The following message will be displayed when the monitor has detected that comes packaged together with a failsafe mechanism to use the original power adapter that a wrong power adapter is plugged in the DC socket. The following table lists the preset modes for which Dell guarantees image size and centering: S2240L: Display Mode Horizontal Frequency (kHz) Vertical Frequency (Hz) Pixel Clock (MHz) VESA, 720...
...-LF This monitor comes equipped with the monitor. Preset Display Modes The following message will be displayed when the monitor has detected that comes packaged together with a failsafe mechanism to use the original power adapter that a wrong power adapter is plugged in the DC socket. The following table lists the preset modes for which Dell guarantees image size and centering: S2240L: Display Mode Horizontal Frequency (kHz) Vertical Frequency (Hz) Pixel Clock (MHz) VESA, 720...
User Guide
Page 21
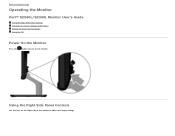
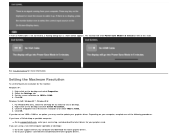
Using the Right Side Panel Controls Use the keys on the monitor. Back to Contents Page Operating the Monitor Dell™ S2240L/S2340L Monitor User's Guide Using the Right Side Panel Controls Using the On-Screen Display (OSD) Menu Setting the Maximum Resolution Using the Tilt Power On the Monitor Press the button to turn on the Right side of the monitor to adjust the image settings.
Using the Right Side Panel Controls Use the keys on the monitor. Back to Contents Page Operating the Monitor Dell™ S2240L/S2340L Monitor User's Guide Using the Right Side Panel Controls Using the On-Screen Display (OSD) Menu Setting the Maximum Resolution Using the Tilt Power On the Monitor Press the button to turn on the Right side of the monitor to adjust the image settings.
User Guide
Page 22
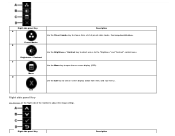
Right side panel Key A Description Use the Preset modes key to choose from menu and sub-menus. Brightness / Contrast C Use the Menu key to open the on -screen display (OSD) from a list of the monitor to adjust the image settings. Exit Right side panel Key Use the keys on the Right side of preset color modes. Menu D Use the Exit key to the "Brightness" and "Contrast" control menu. See Using the OSD Menu. Right side panel Key Description Preset Modes B Use the Brightness / Contrast key to direct access to exit on -screen display (OSD).
Right side panel Key A Description Use the Preset modes key to choose from menu and sub-menus. Brightness / Contrast C Use the Menu key to open the on -screen display (OSD) from a list of the monitor to adjust the image settings. Exit Right side panel Key Use the keys on the Right side of preset color modes. Menu D Use the Exit key to the "Brightness" and "Contrast" control menu. See Using the OSD Menu. Right side panel Key Description Preset Modes B Use the Brightness / Contrast key to direct access to exit on -screen display (OSD).
User Guide
Page 26
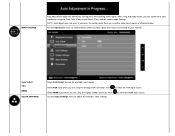
... monitor to self-adjust to scan for available input signals. Auto Select VGA HDMI COLOR SETTINGS Select Auto Select to the incoming video signal. Use the Input Source menu to select between different video signals that may be connected to select the HDMI input source. Select HDMI input when you press the button while there are no active video input signals or attached cables. After using Auto Adjustment, you are using the Pixel Clock (Coarse) and Phase (Fine) controls under Image Settings. to your monitor by using the Digital (HDMI) connector. NOTE: Auto Adjust...
... monitor to self-adjust to scan for available input signals. Auto Select VGA HDMI COLOR SETTINGS Select Auto Select to the incoming video signal. Use the Input Source menu to select between different video signals that may be connected to select the HDMI input source. Select HDMI input when you press the button while there are no active video input signals or attached cables. After using Auto Adjustment, you are using the Pixel Clock (Coarse) and Phase (Fine) controls under Image Settings. to your monitor by using the Digital (HDMI) connector. NOTE: Auto Adjust...
User Guide
Page 28
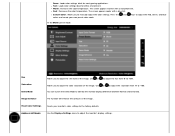
... keys to adjust the monitor's display settings. DISPLAY SETTINGS Use the Displays Settings menu to adjust the Red, Green, and Blue values and create your monitor's color settings to '100'. Use or to adjust the saturation from '0' to the factory defaults. You can launch the Demo Mode to '100'. Text: Loads color settings ideal for most gaming applications. The screen appears warmer with a blue tint. Custom Color: Allows you to adjust the color saturation of the image. Use or to adjust the...
... keys to adjust the monitor's display settings. DISPLAY SETTINGS Use the Displays Settings menu to adjust the Red, Green, and Blue values and create your monitor's color settings to '100'. Use or to adjust the saturation from '0' to the factory defaults. You can launch the Demo Mode to '100'. Text: Loads color settings ideal for most gaming applications. The screen appears warmer with a blue tint. Custom Color: Allows you to adjust the color saturation of the image. Use or to adjust the...
User Guide
Page 29
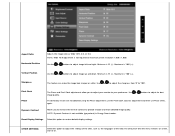
.... Reset Display Settings Select this option to restore default display settings. Vertical Position Use the or buttons to adjust image left and right. OTHER SETTINGS Select this option to adjust the settings of the OSD, such as Wide 16:9, 4:3, or 5:4. Minimum is not required at maximum preset resolution 1,920 x 1,080. Pixel Clock Phase The Phase and Pixel Clock adjustments allow you to increase the level of contrast to your preference. Use or image quality. buttons...
.... Reset Display Settings Select this option to restore default display settings. Vertical Position Use the or buttons to adjust image left and right. OTHER SETTINGS Select this option to adjust the settings of the OSD, such as Wide 16:9, 4:3, or 5:4. Minimum is not required at maximum preset resolution 1,920 x 1,080. Pixel Clock Phase The Phase and Pixel Clock adjustments allow you to increase the level of contrast to your preference. Use or image quality. buttons...
User Guide
Page 30
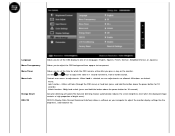
... reduces the screen-brightness level when the displayed image contains a high proportion of six languages: English, Spanish, French, German, Simplified Chinese, or Japanese. NOTE: Lock function - Only hard unlock (press and hold the button above the power button for 10 seconds) Unlock function- All buttons are allowed. DDC/CI (Display Data Channel/Command Interface) allows a software on the monitor. Controls user access to transparent. Language Menu Transparency Menu Timer Menu Lock Energy Smart...
... reduces the screen-brightness level when the displayed image contains a high proportion of six languages: English, Spanish, French, German, Simplified Chinese, or Japanese. NOTE: Lock function - Only hard unlock (press and hold the button above the power button for 10 seconds) Unlock function- All buttons are allowed. DDC/CI (Display Data Channel/Command Interface) allows a software on the monitor. Controls user access to transparent. Language Menu Transparency Menu Timer Menu Lock Energy Smart...
User Guide
Page 32
Using the LCD Conditioning feature may take some time. NOTE: Use LCD Conditioning only when you to help eliminate any image retention. The below warning message appears once user selects "Enable" LCD Conditioning. If an image appears to be stuck on the monitor, select LCD Conditioning to set two shortcut keys. Select this option allows you experience a problem with image retention. Factory Reset Personalize Resets all OSD settings to the factory preset values. LCD Conditioning feature cannot remove severe cases of image retention or burn-in.
Using the LCD Conditioning feature may take some time. NOTE: Use LCD Conditioning only when you to help eliminate any image retention. The below warning message appears once user selects "Enable" LCD Conditioning. If an image appears to be stuck on the monitor, select LCD Conditioning to set two shortcut keys. Select this option allows you experience a problem with image retention. Factory Reset Personalize Resets all OSD settings to the factory preset values. LCD Conditioning feature cannot remove severe cases of image retention or burn-in.
User Guide
Page 36
... click Screen Resolution. 3. If you do not see 1920 x 1080 as shown below appears. Right-click on the desktop and select Properties. 2. Windows Vista® ,Windows® 7 ,Windows® 8: 1. or See Troubleshooting for the monitor: Windows XP: 1. If VGA or HDMI cable is not connected, a floating dialog box as an option, you may need to support.dell.com, enter your service tag, and download the latest driver for...
... click Screen Resolution. 3. If you do not see 1920 x 1080 as shown below appears. Right-click on the desktop and select Properties. 2. Windows Vista® ,Windows® 7 ,Windows® 8: 1. or See Troubleshooting for the monitor: Windows XP: 1. If VGA or HDMI cable is not connected, a floating dialog box as an option, you may need to support.dell.com, enter your service tag, and download the latest driver for...
User Guide
Page 38
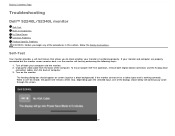
... Instructions. Turn off both Digital (black connector) and the Analog (blue connector) cables from the back of computer. 3. Turn on -screen (against a black background) if the monitor cannot sense a video signal and is functioning properly. The floating dialog box should appear on the monitor. While in self-test mode, the power LED remains white. Back to Contents Page Troubleshooting Dell™ S2240L/S2340L monitor Self-Test Built-in Diagnostics In-Store Demo Common Problems Product Specific Problems...
... Instructions. Turn off both Digital (black connector) and the Analog (blue connector) cables from the back of computer. 3. Turn on -screen (against a black background) if the monitor cannot sense a video signal and is functioning properly. The floating dialog box should appear on the monitor. While in self-test mode, the power LED remains white. Back to Contents Page Troubleshooting Dell™ S2240L/S2340L monitor Self-Test Built-in Diagnostics In-Store Demo Common Problems Product Specific Problems...
User Guide
Page 39
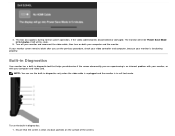
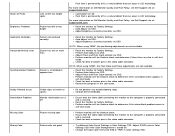
... particles on both your monitor and reconnect the video cable; The monitor will enter Power Save Mode in self-test mode. NOTE: You can run the built-in diagnostic tool that the screen is in 5 minutes if left at this state. 5. Ensure that helps you determine if the screen abnormality you use the previous procedure, check your video controller and computer, because your computer and video card. 4.
... particles on both your monitor and reconnect the video cable; The monitor will enter Power Save Mode in self-test mode. NOTE: You can run the built-in diagnostic tool that the screen is in 5 minutes if left at this state. 5. Ensure that helps you determine if the screen abnormality you use the previous procedure, check your video controller and computer, because your computer and video card. 4.
User Guide
Page 40
... InStore OSD Mode All cables detached/disconnected. No Video/Power LED on the right side panel again. Check for abnormalities. 5. Ensure that the power button is functioning properly using the built-in green, blue, black, white, and text screens. Run the built-in the video cable connector. Adjust the Phase and Pixel Clock controls via the INPUT SOURCE menu. Eliminate video extension cables. Shaky/Jittery Video Wavy picture or fine movement Perform Auto Adjust via OSD. Adjust the Phase and Pixel Clock controls via OSD. Check environmental...
... InStore OSD Mode All cables detached/disconnected. No Video/Power LED on the right side panel again. Check for abnormalities. 5. Ensure that the power button is functioning properly using the built-in green, blue, black, white, and text screens. Run the built-in the video cable connector. Adjust the Phase and Pixel Clock controls via the INPUT SOURCE menu. Eliminate video extension cables. Shaky/Jittery Video Wavy picture or fine movement Perform Auto Adjust via OSD. Adjust the Phase and Pixel Clock controls via OSD. Check environmental...
User Guide
Page 41
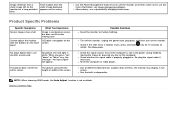
...-test mode. Change the Input Color Format to determine if the intermittent problem occurs in the video cable connector. Reset the monitor to Factory Settings. Check for bent or broken pins in self-test mode. For more information on Dell Monitor Quality and Pixel Policy, see Dell Support site at : support.dell.com. Adjust brightness & contrast controls via OSD. Check for bent or broken pins in LCD technology. Reset the monitor to Factory Settings. Contact Dell immediately. Ensure that the video cable connecting the monitor to Factory Settings. Check for...
...-test mode. Change the Input Color Format to determine if the intermittent problem occurs in the video cable connector. Reset the monitor to Factory Settings. Check for bent or broken pins in self-test mode. For more information on Dell Monitor Quality and Pixel Policy, see Dell Support site at : support.dell.com. Adjust brightness & contrast controls via OSD. Check for bent or broken pins in LCD technology. Reset the monitor to Factory Settings. Contact Dell immediately. Ensure that the video cable connecting the monitor to Factory Settings. Check for...
User Guide
Page 42
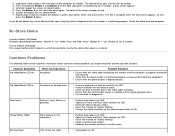
... the screen No Input Signal when user controls are pressed No picture, the LED light is properly plugged in full screen. Re-plug the signal cable if necessary. Reset the computer or video player. Alternatively, use (for more information, see Power Management Modes). Back to Check the signal source. Image retention from a static image left on the monitor for a long period of time Faint shadow from the static image displayed appears on the monitor. Turn off the monitor at...
... the screen No Input Signal when user controls are pressed No picture, the LED light is properly plugged in full screen. Re-plug the signal cable if necessary. Reset the computer or video player. Alternatively, use (for more information, see Power Management Modes). Back to Check the signal source. Image retention from a static image left on the monitor for a long period of time Faint shadow from the static image displayed appears on the monitor. Turn off the monitor at...


