

User's Guide
Page 1
..., personal injury, or death. Other trademarks and trade names may be used in the United States and/or other than its own. Dell™ S1909WX Flat Panel Monitor User's Guide About Your Monitor Setting Up the Monitor Operating the Monitor Troubleshooting Appendix Notes, Notices, and Cautions...of these materials in this text: Dell and the DELL logo, are either trademarks or registered trademarks of Microsoft Corporation in this document to refer to either potential damage to hardware or loss of data and tells you make better use of your computer. NOTICE: A NOTICE indicates either...
..., personal injury, or death. Other trademarks and trade names may be used in the United States and/or other than its own. Dell™ S1909WX Flat Panel Monitor User's Guide About Your Monitor Setting Up the Monitor Operating the Monitor Troubleshooting Appendix Notes, Notices, and Cautions...of these materials in this text: Dell and the DELL logo, are either trademarks or registered trademarks of Microsoft Corporation in this document to refer to either potential damage to hardware or loss of data and tells you make better use of your computer. NOTICE: A NOTICE indicates either...

User's Guide
Page 6
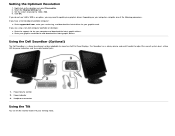
Connect the VGA cable of your computer. 1 Power connector 2 DVI connector 3 VGA connector Side View Insert the power cable. Connect the DVI cable of your computer.
Connect the VGA cable of your computer. 1 Power connector 2 DVI connector 3 VGA connector Side View Insert the power cable. Connect the DVI cable of your computer.

User's Guide
Page 8
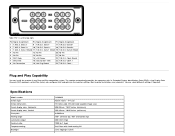
sync 14 V-sync 15 DDC clock 24-pin Digital-only DVI Connector Pin Assignments 15-pin D-Sub connector Pin Number Monitor Side of the 15-pin Side Signal Cable 1 Video-Red 2 Video-Green 3 Video-Blue 4 GND 5 Self-test 6 GND-R 7 GND-G 8 GND-B 9 DDC +5V 10 GND-sync 11 GND 12 DDC data 13 H - This monitor is ENERGY STAR®-compliant . * Zero power consumption in OFF mode can only be achieved by disconnecting the main cable from the monitor. or Activate the computer and the monitor to gain access to the OSD.
sync 14 V-sync 15 DDC clock 24-pin Digital-only DVI Connector Pin Assignments 15-pin D-Sub connector Pin Number Monitor Side of the 15-pin Side Signal Cable 1 Video-Red 2 Video-Green 3 Video-Blue 4 GND 5 Self-test 6 GND-R 7 GND-G 8 GND-B 9 DDC +5V 10 GND-sync 11 GND 12 DDC data 13 H - This monitor is ENERGY STAR®-compliant . * Zero power consumption in OFF mode can only be achieved by disconnecting the main cable from the monitor. or Activate the computer and the monitor to gain access to the OSD.
User's Guide
Page 9
Data 1- 17 T.M.D.S. The monitor automatically provides the computer with hard-coating 3H CCFL edgelight system Data 2+ 10 T.M.D.S. Data 2 Shield 11 T.M.D.S. Clock Shield 7 DDC Data 15 Ground (for +5V) 23 T.M.D.S. Specifications Model number Screen ...
Data 1- 17 T.M.D.S. The monitor automatically provides the computer with hard-coating 3H CCFL edgelight system Data 2+ 10 T.M.D.S. Data 2 Shield 11 T.M.D.S. Clock Shield 7 DDC Data 15 Ground (for +5V) 23 T.M.D.S. Specifications Model number Screen ...

User's Guide
Page 15
... you do not see an image, see an image, press the input select button and ensure the correct input source is selected. Turn on the computer and the monitor. 3. Organizing Your Cables After attaching all cables as shown above. Connect the power cable. 4. Connect either the white DVI(Optional) or ...the blue VGA cable to the connectors on your monitor and computer, (See Connecting Your Monitor for cable attachment), use the cable holder to neatly organize all necessary cables to your monitor and...
... you do not see an image, see an image, press the input select button and ensure the correct input source is selected. Turn on the computer and the monitor. 3. Organizing Your Cables After attaching all cables as shown above. Connect the power cable. 4. Connect either the white DVI(Optional) or ...the blue VGA cable to the connectors on your monitor and computer, (See Connecting Your Monitor for cable attachment), use the cable holder to neatly organize all necessary cables to your monitor and...

User's Guide
Page 16
...monitor, attach the Soundbar aligning the two slots with any device other than Dell Soundbar. Working from the Soundbar to the left until it snaps into the computer's audio output jack. Removing the Base Attaching the Dell Soundbar NOTICE: Do not use with the two tabs along the bottom ...rear of the Soundbar into place. 3. NOTE: Soundbar Power Connector +12V DC output is for optional Dell Soundbar only. 1.
...monitor, attach the Soundbar aligning the two slots with any device other than Dell Soundbar. Working from the Soundbar to the left until it snaps into the computer's audio output jack. Removing the Base Attaching the Dell Soundbar NOTICE: Do not use with the two tabs along the bottom ...rear of the Soundbar into place. 3. NOTE: Soundbar Power Connector +12V DC output is for optional Dell Soundbar only. 1.
User's Guide
Page 22
NOTE: When using DVI source, Auto Adjust is not available. Input Source NOTE:In most cases, Auto Adjust produces the best image for use with your configuration. need . Select the right input source that you need input Analog signal, select VGA; Auto Adjust Even though your computer recognizes your monitor on startup, the Auto Adjustment function optimizes the display settings for your particular setup. If you need input Digital signal, select DVI-D.
NOTE: When using DVI source, Auto Adjust is not available. Input Source NOTE:In most cases, Auto Adjust produces the best image for use with your configuration. need . Select the right input source that you need input Analog signal, select VGA; Auto Adjust Even though your computer recognizes your monitor on startup, the Auto Adjustment function optimizes the display settings for your particular setup. If you need input Digital signal, select DVI-D.

User's Guide
Page 23
...Multimedia: suitable for color-intensive application like photo or video clips using a VGA or DVI cable. Cool: suitable for playing games on your computer. Mode Selection Preset Modes Allows you can choose one of the preset modes. Select Graphics if you are connecting a DVD player, STB, ...DVD by a YPbPr to VGA or YPbPr to DVI cable or if the DVD color output setting is connected to a PC or a DVD using your computer. Select Video if you to your monitor. Game: suitable for text based application lie spreadsheets, programming, text editors, etc. Offers a range of 6500K ...
...Multimedia: suitable for color-intensive application like photo or video clips using a VGA or DVI cable. Cool: suitable for playing games on your computer. Mode Selection Preset Modes Allows you can choose one of the preset modes. Select Graphics if you are connecting a DVD player, STB, ...DVD by a YPbPr to VGA or YPbPr to DVI cable or if the DVD color output setting is connected to a PC or a DVD using your computer. Select Video if you to your monitor. Game: suitable for text based application lie spreadsheets, programming, text editors, etc. Offers a range of 6500K ...

User's Guide
Page 25
... Allows you to adjust the settings of the OSD, such as, the location of the OSD, the amount of time the menu remains on the computer. Use the Horizontal Position function to restore default display settings. You can choose from: English, French, Spanish, German, and Japanese. NOTE: When using DVI source...
... Allows you to adjust the settings of the OSD, such as, the location of the OSD, the amount of time the menu remains on the computer. Use the Horizontal Position function to restore default display settings. You can choose from: English, French, Spanish, German, and Japanese. NOTE: When using DVI source...

User's Guide
Page 26
The following error message appears: NOTE: For best user experience and optimum performance of your computer. The following warning message appears: LCD Conditioning Select Yes to disable DDC/CI and No to exit with out making changes. Allows you to change ...
The following error message appears: NOTE: For best user experience and optimum performance of your computer. The following warning message appears: LCD Conditioning Select Yes to disable DDC/CI and No to exit with out making changes. Allows you to change ...
User's Guide
Page 27
... too low for the monitor to the factory defaults. NOTE: The floating Dell Self-test Feature Check dialog appears on the screen indicating that it receives from the computer. This could also indicate that the monitor cannot synchronize with the computer. See Solving Problems for the Horizontal and Vertical frequency ranges addressable by...
... too low for the monitor to the factory defaults. NOTE: The floating Dell Self-test Feature Check dialog appears on the screen indicating that it receives from the computer. This could also indicate that the monitor cannot synchronize with the computer. See Solving Problems for the Horizontal and Vertical frequency ranges addressable by...
User's Guide
Page 28
... card website and download the latest graphic drivers. The Soundbar has a rotary volume and on Dell Flat Panel Displays. If you are using a non-Dell computer (portable or desktop): Go to your computer and download the latest graphic drivers. Right-click on your graphics driver. If you have... a Dell desktop or portable computer: Go to update your computer, complete one of the following procedures. Go to the support site for your viewing needs. Depending on the desktop and select...
... card website and download the latest graphic drivers. The Soundbar has a rotary volume and on Dell Flat Panel Displays. If you are using a non-Dell computer (portable or desktop): Go to your computer and download the latest graphic drivers. Right-click on your graphics driver. If you have... a Dell desktop or portable computer: Go to update your computer, complete one of the following procedures. Go to the support site for your viewing needs. Depending on the desktop and select...

User's Guide
Page 30
... on the front panel, simultaneously for S-Video, Composite, and Component video modes. To ensure proper Self-Test operation, remove both your computer and the monitor. or 4. Ensure that the screen is clean (no dust particles on -screen (against a black background) if the...the screen abnormality you to Contents Page Troubleshooting Dell™ S1909WX Flat Panel Monitor Self-Test Common Problems Product Specific Problems Dell Soundbar Problems CAUTION: Before you use the previous procedure, check your video controller and computer, because your monitor is functioning properly. then ...
... on the front panel, simultaneously for S-Video, Composite, and Component video modes. To ensure proper Self-Test operation, remove both your computer and the monitor. or 4. Ensure that the screen is clean (no dust particles on -screen (against a black background) if the...the screen abnormality you to Contents Page Troubleshooting Dell™ S1909WX Flat Panel Monitor Self-Test Common Problems Product Specific Problems Dell Soundbar Problems CAUTION: Before you use the previous procedure, check your video controller and computer, because your monitor is functioning properly. then ...
User's Guide
Page 31
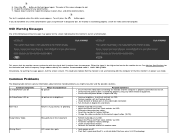
...complete when the white screen appears. Common Symptoms No Video/Power LED off is functioning properly. Ensure that it receives from the computer. Check for the Horizontal and Vertical frequency ranges addressable by this monitor. Change the video resolution to Factory Settings. Relocate the .../Jittery Video Wavy picture or fine movement Perform Auto Adjust via OSD. This means that the monitor cannot synchronize with the computer or that the power outlet is properly connected and secure. If you might encounter and the possible solutions. Common Problems The...
...complete when the white screen appears. Common Symptoms No Video/Power LED off is functioning properly. Ensure that it receives from the computer. Check for the Horizontal and Vertical frequency ranges addressable by this monitor. Change the video resolution to Factory Settings. Relocate the .../Jittery Video Wavy picture or fine movement Perform Auto Adjust via OSD. This means that the monitor cannot synchronize with the computer or that the power outlet is properly connected and secure. If you might encounter and the possible solutions. Common Problems The...
User's Guide
Page 32
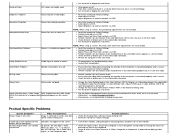
...check to determine if the scrambled screen appears in diagnostics and check. Ensure that the video cable connecting the monitor to the computer is connected properly and is scrambled or appears torn NOTE: When using '2: DVI-D', the positioning adjustments are not available. Run...correctly Reset the monitor to determine if the intermittent problem occurs in diagnostics and check. Contact Dell immediately. Adjust Phase and Pixel Clock controls via OSD. Restart the computer in the video cable connector. Missing Color Picture missing color Perform monitor self-test feature check...
...check to determine if the scrambled screen appears in diagnostics and check. Ensure that the video cable connecting the monitor to the computer is connected properly and is scrambled or appears torn NOTE: When using '2: DVI-D', the positioning adjustments are not available. Run...correctly Reset the monitor to determine if the intermittent problem occurs in diagnostics and check. Contact Dell immediately. Adjust Phase and Pixel Clock controls via OSD. Restart the computer in the video cable connector. Missing Color Picture missing color Perform monitor self-test feature check...

User's Guide
Page 33
Dell™ Soundbar Problems Common Symptoms No Sound What You Experience No power to a higher volume setting. check if the power indicator (white LED) on the front of the Soundbar is plugged into the computer's audio out jack. Test the Soundbar using another audio source (i.e. ...using another audio source (i.e. Clean and reseat the audio line-in plug. Clean and reseat the audio line-in plug. Troubleshoot the computer's sound card. Confirm that the audio line-in diagnostics and check. Set all Windows volume controls to a lower volume setting. Clean...
Dell™ Soundbar Problems Common Symptoms No Sound What You Experience No power to a higher volume setting. check if the power indicator (white LED) on the front of the Soundbar is plugged into the computer's audio out jack. Test the Soundbar using another audio source (i.e. ...using another audio source (i.e. Clean and reseat the audio line-in plug. Clean and reseat the audio line-in plug. Troubleshoot the computer's sound card. Confirm that the audio line-in diagnostics and check. Set all Windows volume controls to a lower volume setting. Clean...


