

User's Guide
Page 1
..., personal injury, or death. Trademarks used in this text: Dell and the DELL logo, are either potential damage to hardware or loss of Dell Inc.; A00 Other trademarks and trade names may be used in trademarks and trade names other countries. Dell™ S1909WX Flat Panel Monitor User's Guide About Your Monitor Setting Up the Monitor Operating the Monitor Troubleshooting Appendix Notes, Notices, and Cautions NOTE...
..., personal injury, or death. Trademarks used in this text: Dell and the DELL logo, are either potential damage to hardware or loss of Dell Inc.; A00 Other trademarks and trade names may be used in trademarks and trade names other countries. Dell™ S1909WX Flat Panel Monitor User's Guide About Your Monitor Setting Up the Monitor Operating the Monitor Troubleshooting Appendix Notes, Notices, and Cautions NOTE...
User's Guide
Page 3
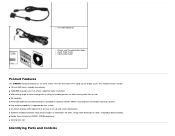
... mounting solutions. ■ Plug and play capability if supported by your system. ■ On-Screen Display (OSD) adjustments for ease of set-up and screen optimization. ■ Software and documentation media which includes an information file (INF), Image color Matching File (ICM), and product documentation. ■ Energy Saver feature for ENERGY STAR® compliance. ■ Security lock slot. Identifying Parts and Controls DVI Cable(Optional) Drivers and Documentation Media Quick Setup Guide...
... mounting solutions. ■ Plug and play capability if supported by your system. ■ On-Screen Display (OSD) adjustments for ease of set-up and screen optimization. ■ Software and documentation media which includes an information file (INF), Image color Matching File (ICM), and product documentation. ■ Energy Saver feature for ENERGY STAR® compliance. ■ Security lock slot. Identifying Parts and Controls DVI Cable(Optional) Drivers and Documentation Media Quick Setup Guide...

User's Guide
Page 7
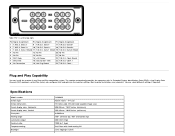
... modes and pin assignments for various connectors of this automatic power saving feature: VESA Modes Horizontal Sync Vertical Sync Video Power Indicator Power Consumption Normal operation Active Active Active White 37 W (maximun) Active-off mode Inactive Inactive Blanked Amber Less than 1 W NOTE: The OSD only functions in the normal operation mode. One of the following messages appears when the Menu or Plus buttons are pressed when in use. or The monitor...
... modes and pin assignments for various connectors of this automatic power saving feature: VESA Modes Horizontal Sync Vertical Sync Video Power Indicator Power Consumption Normal operation Active Active Active White 37 W (maximun) Active-off mode Inactive Inactive Blanked Amber Less than 1 W NOTE: The OSD only functions in the normal operation mode. One of the following messages appears when the Menu or Plus buttons are pressed when in use. or The monitor...
User's Guide
Page 9
... select different settings if required. Most monitor installations are automatic. Data 1+ 18 T.M.D.S. You can install the monitor in any Plug and Play-compatible system. Clock - The monitor automatically provides the computer with hard-coating 3H CCFL edgelight system Specifications Model number Screen type Screen dimensions Preset display area: Horizontal Preset display area: Vertical Pixel pitch Viewing angle Luminance output Contrast ratio Faceplate coating Backlight S1909WX Active matrix - TFT LCD 19 inches wide (19-inch wide viewable image size) 408...
... select different settings if required. Most monitor installations are automatic. Data 1+ 18 T.M.D.S. You can install the monitor in any Plug and Play-compatible system. Clock - The monitor automatically provides the computer with hard-coating 3H CCFL edgelight system Specifications Model number Screen type Screen dimensions Preset display area: Horizontal Preset display area: Vertical Pixel pitch Viewing angle Luminance output Contrast ratio Faceplate coating Backlight S1909WX Active matrix - TFT LCD 19 inches wide (19-inch wide viewable image size) 408...

User's Guide
Page 10
....7M colors 85% typical *Dell S1909WX Flat Panel monitor color gamut (typical) is based on green) 100 to 75 Hz (automatic) 1440 x 900 at 60 Hz 1440 x 900 at 75 Hz 480i/576i/1080i/480p/576p/720p/1080p (Supports HDCP) Analog RGB, 0.7 Volts +/-5%, positive polarity at 75 ohm input impedance Digital DVI-D TMDS, 600mV for which Dell guarantees image size and centering: Display Mode Horizontal Frequency (kHz) Vertical Frequency (Hz) VESA, 720 x 400 VESA, 640 x 480 VESA...
....7M colors 85% typical *Dell S1909WX Flat Panel monitor color gamut (typical) is based on green) 100 to 75 Hz (automatic) 1440 x 900 at 60 Hz 1440 x 900 at 75 Hz 480i/576i/1080i/480p/576p/720p/1080p (Supports HDCP) Analog RGB, 0.7 Volts +/-5%, positive polarity at 75 ohm input impedance Digital DVI-D TMDS, 600mV for which Dell guarantees image size and centering: Display Mode Horizontal Frequency (kHz) Vertical Frequency (Hz) VESA, 720 x 400 VESA, 640 x 480 VESA...

User's Guide
Page 12
... or bright discolored spot. CAUTION: Before cleaning the monitor, unplug the monitor power cable from display quality or usability. If you notice a white powder when you unpack your antistatic screen, slightly dampen a soft, clean cloth with care as some detergents leave a milky film on your monitor, use a dynamically changing screen saver and power off with 1 to see Dell Support site at: support.dell.com. The visible result is a fixed pixel that...
... or bright discolored spot. CAUTION: Before cleaning the monitor, unplug the monitor power cable from display quality or usability. If you notice a white powder when you unpack your antistatic screen, slightly dampen a soft, clean cloth with care as some detergents leave a milky film on your monitor, use a dynamically changing screen saver and power off with 1 to see Dell Support site at: support.dell.com. The visible result is a fixed pixel that...
User's Guide
Page 13
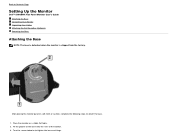
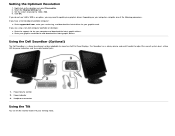
... of the monitor. 3. Fit the groove on a stable flat table. 2. Turn the screw clockwise to Contents Page Setting Up the Monitor Dell™ S1909WX Flat Panel Monitor User's Guide Attaching the Base Connecting Your Monitor Organizing Your Cables Attaching the Dell Soundbar (Optional) Removing the Base Attaching the Base NOTE: The base is detached when the monitor is shipped from the factory. Back to tighten the base and hinge. After placing the monitor panel on soft...
... of the monitor. 3. Fit the groove on a stable flat table. 2. Turn the screw clockwise to Contents Page Setting Up the Monitor Dell™ S1909WX Flat Panel Monitor User's Guide Attaching the Base Connecting Your Monitor Organizing Your Cables Attaching the Dell Soundbar (Optional) Removing the Base Attaching the Base NOTE: The base is detached when the monitor is shipped from the factory. Back to tighten the base and hinge. After placing the monitor panel on soft...

User's Guide
Page 15
... white DVI(Optional) or the blue VGA cable to your monitor. If you do not see an image, see an image, press the input select button and ensure the correct input source is selected. If you still do not see Troubleshooting your monitor and computer, (See Connecting Your Monitor for cable attachment), use the cable holder to neatly organize all necessary cables to the connectors on your computer and disconnect the power cable. 2. 1. Turn...
... white DVI(Optional) or the blue VGA cable to your monitor. If you do not see an image, see an image, press the input select button and ensure the correct input source is selected. If you still do not see Troubleshooting your monitor and computer, (See Connecting Your Monitor for cable attachment), use the cable holder to neatly organize all necessary cables to the connectors on your computer and disconnect the power cable. 2. 1. Turn...

User's Guide
Page 18
... table describes the front panel buttons: Front panel Button A Description Use the Menu button to open and exit the on the front of the monitor to adjust the image settings. Brightness/Contrast OSD menu B Use this button for direct access to the "Brightness" and "Contrast" control menu. Back to Contents Page Operating the Monitor Dell™ S1909WX Flat Panel Monitor User's Guide Using the Front Panel Using the OSD Menu Setting the Optimal Resolution Using the Dell Soundbar (Optional) Using the Tilt Using the Front Panel Use the buttons on -screen display (OSD), and exit from...
... table describes the front panel buttons: Front panel Button A Description Use the Menu button to open and exit the on the front of the monitor to adjust the image settings. Brightness/Contrast OSD menu B Use this button for direct access to the "Brightness" and "Contrast" control menu. Back to Contents Page Operating the Monitor Dell™ S1909WX Flat Panel Monitor User's Guide Using the Front Panel Using the OSD Menu Setting the Optimal Resolution Using the Dell Soundbar (Optional) Using the Tilt Using the Front Panel Use the buttons on -screen display (OSD), and exit from...

User's Guide
Page 19
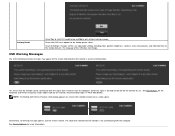
... be connected to your monitor by using the Pixel Clock and Phase controls under Image Settings. Auto Adjust Auto Adjustment allows the monitor to self-adjust to the incoming video signal. Depending upon the selected input, one of the selected menu option. C Use this button to activate automatic setup/adjustment or to decrease the values of the dialogs shown below appears. Input select VGA input DVI-D input NOTE: The floating 'Dell Self-test Feature Check' dialog appears on a black screen...
... be connected to your monitor by using the Pixel Clock and Phase controls under Image Settings. Auto Adjust Auto Adjustment allows the monitor to self-adjust to the incoming video signal. Depending upon the selected input, one of the selected menu option. C Use this button to activate automatic setup/adjustment or to decrease the values of the dialogs shown below appears. Input select VGA input DVI-D input NOTE: The floating 'Dell Self-test Feature Check' dialog appears on a black screen...

User's Guide
Page 20
... exit the OSD menu, the monitor automatically saves those changes. Main Menu for Analog (VGA) Input Main Menu for the OSD menu to open the OSD menu and display the main menu. E Use the Power button to turn the monitor on , and fully functional. Press the Menu button to disappear. 1. An amber light indicates power save mode. The white light indicates the monitor is Power Button and Indicator on and off. The changes are also saved if you change the settings and then wait for Digital (DVI) Input or or...
... exit the OSD menu, the monitor automatically saves those changes. Main Menu for Analog (VGA) Input Main Menu for the OSD menu to open the OSD menu and display the main menu. E Use the Power button to turn the monitor on , and fully functional. Press the Menu button to disappear. 1. An amber light indicates power save mode. The white light indicates the monitor is Power Button and Indicator on and off. The changes are also saved if you change the settings and then wait for Digital (DVI) Input or or...

User's Guide
Page 23
... colors. Color Settings: Input Color Format Use the Color Settings menu to the input signal. Warm: suitable for text based application lie spreadsheets, programming, text editors, etc. Mode Selection Preset Modes Allows you are connecting a computer to 100. Multimedia: suitable for playing games on your computer. Game: suitable for viewing media applications like image editing, movies, etc. Choose YPbPr option if monitor is not RGB. Choose RGB if monitor is connected to DVI cable...
... colors. Color Settings: Input Color Format Use the Color Settings menu to the input signal. Warm: suitable for text based application lie spreadsheets, programming, text editors, etc. Mode Selection Preset Modes Allows you are connecting a computer to 100. Multimedia: suitable for playing games on your computer. Game: suitable for viewing media applications like image editing, movies, etc. Choose YPbPr option if monitor is not RGB. Choose RGB if monitor is connected to DVI cable...

User's Guide
Page 24
Demo Mode Reset Color Settings Display Settings: Horizontal Position Vertical Position Sharpness Pixel Clock and Phase Vertically splits the screen into two segments. Use the and buttons to make the adjustments (Minimum: 0 ~ Maximum: 100). Allows you to adjust the horizontal position of the image. Nature: suitable for playing a sports program. Allows you to finely adjust your monitor to your preference. Allows you to restore the default (factory) Color settings. You can choose one of the following preset modes: Movie...
Demo Mode Reset Color Settings Display Settings: Horizontal Position Vertical Position Sharpness Pixel Clock and Phase Vertically splits the screen into two segments. Use the and buttons to make the adjustments (Minimum: 0 ~ Maximum: 100). Allows you to adjust the horizontal position of the image. Nature: suitable for playing a sports program. Allows you to finely adjust your monitor to your preference. Allows you to restore the default (factory) Color settings. You can choose one of the following preset modes: Movie...

User's Guide
Page 26
... also lock or unlock the OSD by pressing the and buttons (Minimum: 0 ~ Maximum: 100). Helps reduce minor cases of your computer. The OSD stays active for 15 seconds. You can enable this feature by selecting Enable. NOTE: For best user experience and optimum performance of image retention. You can disable this feature by selecting Disable. Use the and buttons to the OSD settings menu. When "Lock" is...
... also lock or unlock the OSD by pressing the and buttons (Minimum: 0 ~ Maximum: 100). Helps reduce minor cases of your computer. The OSD stays active for 15 seconds. You can enable this feature by selecting Enable. NOTE: For best user experience and optimum performance of image retention. You can disable this feature by selecting Disable. Use the and buttons to the OSD settings menu. When "Lock" is...
User's Guide
Page 27
Resets the OSD menu options to the factory defaults. Reset All Setings: Changes all the user-adjustable settings including color, position, brightness, contrast, menu transparency, and OSD hold time to the factory preset values. Recommended mode is not synchronizing with the signal that the monitor cannot synchronize with the computer. See Solving Problems for the Horizontal and Vertical frequency ranges addressable by this monitor. The language of synchronization. See Specifications for more information. NOTE: The floating Dell Self-test Feature...
Resets the OSD menu options to the factory defaults. Reset All Setings: Changes all the user-adjustable settings including color, position, brightness, contrast, menu transparency, and OSD hold time to the factory preset values. Recommended mode is not synchronizing with the signal that the monitor cannot synchronize with the computer. See Solving Problems for the Horizontal and Vertical frequency ranges addressable by this monitor. The language of synchronization. See Specifications for more information. NOTE: The floating Dell Self-test Feature...
User's Guide
Page 28
...: Go to update your graphics card. Power/volume control 2. Right-click on your viewing needs. Using the Dell Soundbar (Optional) The Dell Soundbar is a stereo two channel system adaptable to 1440 x 900. 4. The Soundbar has a rotary volume and on Dell Flat Panel Displays. Depending on the desktop and select Personalize. 2. Headphone connectors Using the Tilt You can tilt the monitor to adjust the overall system level, a blue LED for your graphics driver. Setting the Optimum Resolution 1. Power indicator 3.
...: Go to update your graphics card. Power/volume control 2. Right-click on your viewing needs. Using the Dell Soundbar (Optional) The Dell Soundbar is a stereo two channel system adaptable to 1440 x 900. 4. The Soundbar has a rotary volume and on Dell Flat Panel Displays. Depending on the desktop and select Personalize. 2. Headphone connectors Using the Tilt You can tilt the monitor to adjust the overall system level, a blue LED for your graphics driver. Setting the Optimum Resolution 1. Power indicator 3.

User's Guide
Page 30
... turn on -screen (against a black background) if the monitor cannot sense a video signal and is working correctly. NOTE: Self test feature check is clean (no dust particles on the surface of the dialogs shown below will continuously scroll through the screen. Ensure that allows you to Contents Page Troubleshooting Dell™ S1909WX Flat Panel Monitor Self-Test Common Problems Product Specific Problems Dell Soundbar Problems CAUTION: Before you are properly connected...
... turn on -screen (against a black background) if the monitor cannot sense a video signal and is working correctly. NOTE: Self test feature check is clean (no dust particles on the surface of the dialogs shown below will continuously scroll through the screen. Ensure that allows you to Contents Page Troubleshooting Dell™ S1909WX Flat Panel Monitor Self-Test Common Problems Product Specific Problems Dell Soundbar Problems CAUTION: Before you are properly connected...
User's Guide
Page 31
... No Video/Power LED off What You Experience No picture Possible Solutions Ensure that the video cable connecting the monitor and the computer is functioning properly. Reset the monitor to inspect the display in green, blue, and white colored screens. The color of synchronization. If you might encounter and the possible solutions. Check the video card and computer. Either the signal is fuzzy, blurry, or ghosting Perform Auto Adjust via OSD. No Video/Power LED on the screen...
... No Video/Power LED off What You Experience No picture Possible Solutions Ensure that the video cable connecting the monitor and the computer is functioning properly. Reset the monitor to inspect the display in green, blue, and white colored screens. The color of synchronization. If you might encounter and the possible solutions. Check the video card and computer. Either the signal is fuzzy, blurry, or ghosting Perform Auto Adjust via OSD. No Video/Power LED on the screen...
User's Guide
Page 32
...Color Settings OSD if the Color Management is scrambled or appears torn NOTE: When using '2: DVI-D', the positioning adjustments are also in the video cable connector. Perform monitor self-test feature check to the computer is connected properly and is secure. Adjust R/G/B value in self-test mode. Adjust brightness & contrast controls via OSD. Geometric Distortion Screen not centered correctly Reset the monitor to Factory Settings. Auto Adjust via OSD. Adjust brightness & contrast controls via OSD. Horizontal/Vertical Lines Screen has one or more information, see Power...
...Color Settings OSD if the Color Management is scrambled or appears torn NOTE: When using '2: DVI-D', the positioning adjustments are also in the video cable connector. Perform monitor self-test feature check to the computer is connected properly and is secure. Adjust R/G/B value in self-test mode. Adjust brightness & contrast controls via OSD. Geometric Distortion Screen not centered correctly Reset the monitor to Factory Settings. Auto Adjust via OSD. Adjust brightness & contrast controls via OSD. Horizontal/Vertical Lines Screen has one or more information, see Power...

User's Guide
Page 33
... monitor may display in properly. Turn the Power/Volume knob on the Soundbar clockwise to a lower volume setting. Clean and reseat the audio line-in plug. Clear any obstructions between the Soundbar and the user. Test the Soundbar using another audio source (i.e. Re-plug the signal cable if necessary. Reset the computer or video player. Test the Soundbar using another audio source (i.e.portable CD player). Troubleshoot the computer's sound card. Run the built-in plug. power indicator...
... monitor may display in properly. Turn the Power/Volume knob on the Soundbar clockwise to a lower volume setting. Clean and reseat the audio line-in plug. Clear any obstructions between the Soundbar and the user. Test the Soundbar using another audio source (i.e. Re-plug the signal cable if necessary. Reset the computer or video player. Test the Soundbar using another audio source (i.e.portable CD player). Troubleshoot the computer's sound card. Run the built-in plug. power indicator...


