
Dell PowerEdge R720 and R720xd Owner's Manual
Page 3
... Warnings 2 1 About Your System...9 Front-Panel Features And Indicators...9 LCD Panel Features...12 Home Screen...13 Setup Menu...13 View Menu...13 Diagnostic Indicators...14 Hard-Drive Indicator Patterns...16 Back-Panel Features And Indicators...17 NIC Indicator Codes...18 Power Indicator Codes...19 Other Information You May Need...20 2 Using The...
... Warnings 2 1 About Your System...9 Front-Panel Features And Indicators...9 LCD Panel Features...12 Home Screen...13 Setup Menu...13 View Menu...13 Diagnostic Indicators...14 Hard-Drive Indicator Patterns...16 Back-Panel Features And Indicators...17 NIC Indicator Codes...18 Power Indicator Codes...19 Other Information You May Need...20 2 Using The...

Dell PowerEdge R720 and R720xd Owner's Manual
Page 4
... Memory Modules...50 Hard Drives...51 Removing A 2.5 Inch Hard-Drive Blank...51 Installing A 2.5 Inch Hard-Drive Blank...52 Removing A 2.5 Inch Hard-Drive Blank (Back 52 Installing A 2.5 Inch Hard-Drive Blank (Back 53 Removing A 3.5 Inch Hard-Drive Blank...53 Installing A 3.5 Inch Hard-Drive Blank...53 Removing A Hot-Swap Hard Drive...53 Installing A Hot-Swap Hard Drive...54 Removing A Hard Drive From A Hard-Drive Carrier 55 Installing A Hard Drive Into A Hard-Drive Carrier 56 Optical Drive (Optional)...56 Removing...
... Memory Modules...50 Hard Drives...51 Removing A 2.5 Inch Hard-Drive Blank...51 Installing A 2.5 Inch Hard-Drive Blank...52 Removing A 2.5 Inch Hard-Drive Blank (Back 52 Installing A 2.5 Inch Hard-Drive Blank (Back 53 Removing A 3.5 Inch Hard-Drive Blank...53 Installing A 3.5 Inch Hard-Drive Blank...53 Removing A Hot-Swap Hard Drive...53 Installing A Hot-Swap Hard Drive...54 Removing A Hard Drive From A Hard-Drive Carrier 55 Installing A Hard Drive Into A Hard-Drive Carrier 56 Optical Drive (Optional)...56 Removing...

Dell PowerEdge R720 and R720xd Owner's Manual
Page 6
... Hard-Drive Backplane...99 Installing The Hard-Drive Backplane...112 Removing The Optional Hard-Drive Backplane (Back 113 Installing The Optional Hard-Drive Backplane (Back 115 Control Panel...116 Removing The Control Panel (PowerEdge R720 116 Installing The Control Panel (PowerEdge R720 118 Removing The Control Panel (PowerEdge R720xd 118 Installing The Control Panel (PowerEdge R720xd 119 Removing The I/O Panel (PowerEdge R720xd 120 Installing The I/O Panel (PowerEdge R720xd...
... Hard-Drive Backplane...99 Installing The Hard-Drive Backplane...112 Removing The Optional Hard-Drive Backplane (Back 113 Installing The Optional Hard-Drive Backplane (Back 115 Control Panel...116 Removing The Control Panel (PowerEdge R720 116 Installing The Control Panel (PowerEdge R720 118 Removing The Control Panel (PowerEdge R720xd 118 Installing The Control Panel (PowerEdge R720xd 119 Removing The I/O Panel (PowerEdge R720xd 120 Installing The I/O Panel (PowerEdge R720xd...
Dell PowerEdge R720 and R720xd Owner's Manual
Page 7
...USB Key...130 Troubleshooting An SD Card...130 Troubleshooting An Optical Drive...131 Troubleshooting A Tape Backup Unit...131 Troubleshooting A Hard Drive...132 Troubleshooting A Storage Controller...132 Troubleshooting Expansion Cards...133 Troubleshooting Processors...134 5 Using System Diagnostics...135 Dell Online Diagnostics...135 Dell Embedded System Diagnostics...135 When To Use The Embedded System Diagnostics......147 Removing LCD Messages...147 System Error Messages...147 Warning Messages...163 Diagnostic Messages...163 Alert Messages...163 9 Getting Help...165 Contacting Dell...165
...USB Key...130 Troubleshooting An SD Card...130 Troubleshooting An Optical Drive...131 Troubleshooting A Tape Backup Unit...131 Troubleshooting A Hard Drive...132 Troubleshooting A Storage Controller...132 Troubleshooting Expansion Cards...133 Troubleshooting Processors...134 5 Using System Diagnostics...135 Dell Online Diagnostics...135 Dell Embedded System Diagnostics...135 When To Use The Embedded System Diagnostics......147 Removing LCD Messages...147 System Error Messages...147 Warning Messages...163 Diagnostic Messages...163 Alert Messages...163 9 Getting Help...165 Contacting Dell...165
Dell PowerEdge R720 and R720xd Owner's Manual
Page 10
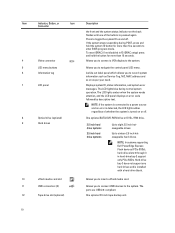
... lights amber when the system needs attention, and the LCD panel displays an error code followed by descriptive text. NOTE: In systems supporting Dell PowerEdge Express Flash devices (PCIe SSDs), hard-drive slots 0 through 3 in F2 iDRAC setup) press and hold the system ID button for more than 15 seconds. 4 Video connector Allows you...
... lights amber when the system needs attention, and the LCD panel displays an error code followed by descriptive text. NOTE: In systems supporting Dell PowerEdge Express Flash devices (PCIe SSDs), hard-drive slots 0 through 3 in F2 iDRAC setup) press and hold the system ID button for more than 15 seconds. 4 Video connector Allows you...

Dell PowerEdge R720 and R720xd Owner's Manual
Page 12
...can be turned on by the cursor. Item Indicator, Button, or Icon Description Connector 5 Hard drives 3.5 inch hard drive systems Up to twelve 3.5 inch hotswappable hard drives. 2.5 inch hard drive systems Up to twenty-four 2.5 inch hotswappable hard drives. 6 Video connector Allows you to connect a VGA display to the system. 7 USB connector...messaging is turned off when the system is present only on as Service Tag, NIC, MAC address, and so on PowerEdge R720. The port is operating correctly or when the system needs attention. LCD Panel Features NOTE: The LCD panel is in...
...can be turned on by the cursor. Item Indicator, Button, or Icon Description Connector 5 Hard drives 3.5 inch hard drive systems Up to twelve 3.5 inch hotswappable hard drives. 2.5 inch hard drive systems Up to twenty-four 2.5 inch hotswappable hard drives. 6 Video connector Allows you to connect a VGA display to the system. 7 USB connector...messaging is turned off when the system is present only on as Service Tag, NIC, MAC address, and so on PowerEdge R720. The port is operating correctly or when the system needs attention. LCD Panel Features NOTE: The LCD panel is in...

Dell PowerEdge R720 and R720xd Owner's Manual
Page 14
...these indicators: Health indicator Condition Corrective Action If the system is on or in BTU/hr or Watts. If the hard drives are present only on the system front panel display error status during system startup. The display format can be configured... a working power source and press the power button. Hard-drive indicator Condition Corrective Action The indicator blinks amber if a hard drive experiences an error. None required. Run the appropriate Online Diagnostics test. The diagnostic indicators on PowerEdge R720xd. Displays the power output of the system in Celsius...
...these indicators: Health indicator Condition Corrective Action If the system is on or in BTU/hr or Watts. If the hard drives are present only on the system front panel display error status during system startup. The display format can be configured... a working power source and press the power button. Hard-drive indicator Condition Corrective Action The indicator blinks amber if a hard drive experiences an error. None required. Run the appropriate Online Diagnostics test. The diagnostic indicators on PowerEdge R720xd. Displays the power output of the system in Celsius...

Dell PowerEdge R720 and R720xd Owner's Manual
Page 16
... four times per second Off Condition Identifying drive or preparing for removal Drive ready for insertion or removal during this time. Hard-Drive Indicator Patterns Figure 6. hard-drive activity indicator (green) 2. Drive-Status Indicator Pattern (RAID Only) Blinks green two times per second Drive failed Blinks green slowly Drive rebuilding Steady green Drive online Blinks green three Rebuild aborted seconds...
... four times per second Off Condition Identifying drive or preparing for removal Drive ready for insertion or removal during this time. Hard-Drive Indicator Patterns Figure 6. hard-drive activity indicator (green) 2. Drive-Status Indicator Pattern (RAID Only) Blinks green two times per second Drive failed Blinks green slowly Drive rebuilding Steady green Drive online Blinks green three Rebuild aborted seconds...

Dell PowerEdge R720 and R720xd Owner's Manual
Page 18
...to connect a VGA display to three PCI Express expansion cards. Allows you to connect up to two hot-swappable 2.5 inch hard drives. Allows you to connect a serial device to the system. Allows you to connect USB devices to the system. Item Indicator...connector 7 USB connectors (2) 8 Ethernet connectors 9 PCIe expansion card slots full height (4) (PowerEdge R720) PCIe expansion card slots full height (3) (PowerEdge R720xd) 10 Power supply (PSU1) 11 Power supply (PSU2) 12 Hard drives (2) (back) 13 vFlash media card slot NIC Indicator Codes Description NOTE: The port ...
...to connect a VGA display to three PCI Express expansion cards. Allows you to connect up to two hot-swappable 2.5 inch hard drives. Allows you to connect a serial device to the system. Allows you to connect USB devices to the system. Item Indicator...connector 7 USB connectors (2) 8 Ethernet connectors 9 PCIe expansion card slots full height (4) (PowerEdge R720) PCIe expansion card slots full height (3) (PowerEdge R720xd) 10 Power supply (PSU1) 11 Power supply (PSU2) 12 Hard drives (2) (back) 13 vFlash media card slot NIC Indicator Codes Description NOTE: The port ...

Dell PowerEdge R720 and R720xd Owner's Manual
Page 40
cable securing bracket 3. cooling shroud 5. expansion-card riser 2 8. Figure 14. network daughter card 7. expansion-card riser 1 9. PCIe card holder 4. DIMMs (24) 12. Inside the System-PowerEdge R720 1. cooling fans (6) 13. heat sink for processor 1 10. cooling-fan assembly 2. heat sink for processor 2 11. expansion-card riser 3 6. hard-drive backplane 40
cable securing bracket 3. cooling shroud 5. expansion-card riser 2 8. Figure 14. network daughter card 7. expansion-card riser 1 9. PCIe card holder 4. DIMMs (24) 12. Inside the System-PowerEdge R720 1. cooling fans (6) 13. heat sink for processor 1 10. cooling-fan assembly 2. heat sink for processor 2 11. expansion-card riser 3 6. hard-drive backplane 40

Dell PowerEdge R720 and R720xd Owner's Manual
Page 41
cooling-fan assembly 2. vFlash media slot 6. expansion-card riser 2 10. DIMMs (24) 14. Inside the System-PowerEdge R720xd 1. cable securing bracket 3. hard drives (back) (2) 7. expansion-card riser 1 11. cooling shroud 4. network daughter card Cooling Shroud 9. You should only perform troubleshooting and simple repairs as authorized in your...Cooling Shroud CAUTION: Many repairs may only be done by a certified service technician. Read and follow the safety instructions that is not authorized by Dell is not covered by the online or telephone service and support team. Figure 15.
cooling-fan assembly 2. vFlash media slot 6. expansion-card riser 2 10. DIMMs (24) 14. Inside the System-PowerEdge R720xd 1. cable securing bracket 3. hard drives (back) (2) 7. expansion-card riser 1 11. cooling shroud 4. network daughter card Cooling Shroud 9. You should only perform troubleshooting and simple repairs as authorized in your...Cooling Shroud CAUTION: Many repairs may only be done by a certified service technician. Read and follow the safety instructions that is not authorized by Dell is not covered by the online or telephone service and support team. Figure 15.

Dell PowerEdge R720 and R720xd Owner's Manual
Page 43
... bus operating frequency can be 1600 MT/s, 1333 MT/s, 1066 MT/s, or 800 MT/s depending on: • DIMM type (UDIMM, RDIMM, or LRDIMM) NOTE: PowerEdge R720xd with 3.5 inch hard-drive configuration does not support LRDIMMs due to processor 2. 43 System Memory Your system supports DDR3 unbuffered ECC DIMMs (ECC UDIMMs), registered DIMMs (RDIMMs), and...
... bus operating frequency can be 1600 MT/s, 1333 MT/s, 1066 MT/s, or 800 MT/s depending on: • DIMM type (UDIMM, RDIMM, or LRDIMM) NOTE: PowerEdge R720xd with 3.5 inch hard-drive configuration does not support LRDIMMs due to processor 2. 43 System Memory Your system supports DDR3 unbuffered ECC DIMMs (ECC UDIMMs), registered DIMMs (RDIMMs), and...

Dell PowerEdge R720 and R720xd Owner's Manual
Page 51
... the memory module in the socket, the levers on the memory module socket align with the hard-drive backplane. Hard Drives All hard drives connect to the system board through step 7 of this procedure, checking to format. NOTE: Use only hard drives that have been tested and approved for the formatting to its electrical outlet and turn off...
... the memory module in the socket, the levers on the memory module socket align with the hard-drive backplane. Hard Drives All hard drives connect to the system board through step 7 of this procedure, checking to format. NOTE: Use only hard drives that have been tested and approved for the formatting to its electrical outlet and turn off...

Dell PowerEdge R720 and R720xd Owner's Manual
Page 52
... installed, remove the front bezel. 2. Pull the hard-drive blank out until the release button clicks into the hard-drive slot until it is free of the hard-drive slot. release button Installing A 2.5 Inch Hard-Drive Blank 1. Removing and Installing a 2.5 Inch Hard-Drive Blank (Back) 1. Removing A 2.5 Inch Hard-Drive Blank (Back) NOTE: This procedure applies only to PowerEdge R720xd. hard-drive blank (back) 52 Figure 19.
... installed, remove the front bezel. 2. Pull the hard-drive blank out until the release button clicks into the hard-drive slot until it is free of the hard-drive slot. release button Installing A 2.5 Inch Hard-Drive Blank 1. Removing and Installing a 2.5 Inch Hard-Drive Blank (Back) 1. Removing A 2.5 Inch Hard-Drive Blank (Back) NOTE: This procedure applies only to PowerEdge R720xd. hard-drive blank (back) 52 Figure 19.

Dell PowerEdge R720 and R720xd Owner's Manual
Page 53
... your operating system. 1. Insert the hard-drive blank into the hard-drive slot until it clicks into place. 3. From the management software, prepare the hard drive for the storage controller. 53 Figure 21. Removing and Installing a 3.5 Inch Hard-Drive Blank 1. Installing A 2.5 Inch Hard-Drive Blank (Back) NOTE: This procedure applies only to PowerEdge R720xd. Removing A 3.5 Inch Hard-Drive Blank CAUTION: To maintain proper system...
... your operating system. 1. Insert the hard-drive blank into the hard-drive slot until it clicks into place. 3. From the management software, prepare the hard drive for the storage controller. 53 Figure 21. Removing and Installing a 3.5 Inch Hard-Drive Blank 1. Installing A 2.5 Inch Hard-Drive Blank (Back) NOTE: This procedure applies only to PowerEdge R720xd. Removing A 3.5 Inch Hard-Drive Blank CAUTION: To maintain proper system...

Dell PowerEdge R720 and R720xd Owner's Manual
Page 54
... partially installed carrier's shield spring and make it is turned off , the hard drive is ready for use with the product. CAUTION: Use only hard drives that is not authorized by Dell is not supported. Read and follow the safety instructions that your operating system.... 54 Inserting a hard-drive carrier and attempting to lock its handle next to open the hard-drive carrier release handle. 3. Slide the hard-drive carrier out until...
... partially installed carrier's shield spring and make it is turned off , the hard drive is ready for use with the product. CAUTION: Use only hard drives that is not authorized by Dell is not supported. Read and follow the safety instructions that your operating system.... 54 Inserting a hard-drive carrier and attempting to lock its handle next to open the hard-drive carrier release handle. 3. Slide the hard-drive carrier out until...

Dell PowerEdge R720 and R720xd Owner's Manual
Page 55
... wish to lock the hard drive in place. Lift the hard drive out of the hard-drive carrier and open the hard-drive carrier handle. 4. hard-drive carrier 2. Figure 23. hard drive 3. Remove the screws from the slide rails on the front of the hard-drive carrier. Removing A Hard Drive From A Hard-Drive Carrier 1. Removing and Installing a Hard Drive Into a Hard-Drive Carrier 1. CAUTION: When a replacement hot-swappable hard drive is installed and the...
... wish to lock the hard drive in place. Lift the hard drive out of the hard-drive carrier and open the hard-drive carrier handle. 4. hard-drive carrier 2. Figure 23. hard drive 3. Remove the screws from the slide rails on the front of the hard-drive carrier. Removing A Hard Drive From A Hard-Drive Carrier 1. Removing and Installing a Hard Drive Into a Hard-Drive Carrier 1. CAUTION: When a replacement hot-swappable hard drive is installed and the...
Dell PowerEdge R720 and R720xd Owner's Manual
Page 56
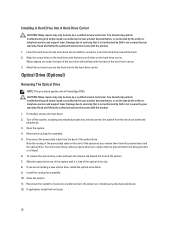
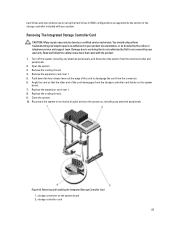
...drive. Note the routing of the hard drive will be done by the online or telephone service and support team. Slide the optical drive out of the system until it is free of the optical drive. Reconnect the system to prevent them from being pinched or crimped. 6. Damage due to PowerEdge... that is not authorized by Dell is not covered by a certified service technician. Installing A Hard Drive Into A Hard-Drive Carrier CAUTION: Many repairs may only be flush with the connector end of the hard drive toward the front of the hard-drive carrier. 3. Disconnect the power...
...drive. Note the routing of the hard drive will be done by the online or telephone service and support team. Slide the optical drive out of the system until it is free of the optical drive. Reconnect the system to prevent them from being pinched or crimped. 6. Damage due to PowerEdge... that is not authorized by Dell is not covered by a certified service technician. Installing A Hard Drive Into A Hard-Drive Carrier CAUTION: Many repairs may only be flush with the connector end of the hard drive toward the front of the hard-drive carrier. 3. Disconnect the power...

Dell PowerEdge R720 and R720xd Owner's Manual
Page 82
Read and follow the safety instructions that is not authorized by Dell is keyed to servicing that came with the product. 1. Replace the expansion-card riser 3 and if applicable, replace the card(s) in the riser. 7. Damage due ... by a certified service technician. Installing An Internal SD Card CAUTION: Many repairs may only be done by your system's internal hard drives. Read and follow the safety instructions that is not authorized by Dell is enabled in the riser. 4. Reconnect the system to its electrical outlet and turn the system on , including any...
Read and follow the safety instructions that is not authorized by Dell is keyed to servicing that came with the product. 1. Replace the expansion-card riser 3 and if applicable, replace the card(s) in the riser. 7. Damage due ... by a certified service technician. Installing An Internal SD Card CAUTION: Many repairs may only be done by your system's internal hard drives. Read and follow the safety instructions that is not authorized by Dell is enabled in the riser. 4. Reconnect the system to its electrical outlet and turn the system on , including any...
Dell PowerEdge R720 and R720xd Owner's Manual
Page 83
...RAID configurations as directed by the online or telephone service and support team. Read and follow the safety instructions that is not authorized by Dell is not covered by your warranty. Remove the expansion-card riser 1. 5. Replace the expansion-card riser 1. 8. Figure 43. Removing ... at the edge of the card disengages from the electrical outlet and peripherals. 2. Remove the cooling shroud. 4. hard drives and also enables you to set up the hard drives in your product documentation, or as supported by the version of the storage controller included with the product. 1....
...RAID configurations as directed by the online or telephone service and support team. Read and follow the safety instructions that is not authorized by Dell is not covered by your warranty. Remove the expansion-card riser 1. 5. Replace the expansion-card riser 1. 8. Figure 43. Removing ... at the edge of the card disengages from the electrical outlet and peripherals. 2. Remove the cooling shroud. 4. hard drives and also enables you to set up the hard drives in your product documentation, or as supported by the version of the storage controller included with the product. 1....


