
Getting Started Guide
Page 5
... access controller (RAC) card. • One 3.5-inch CD, DVD, or combination CD-RW/DVD in your system include: • 1U/1S rack-mountable chassis with support for static rails and sliding rails. NOTE: Use the System Setup program to two internal, 1-inch high optional Serial-Attached SCSI (SAS) hard drives with support for...
... access controller (RAC) card. • One 3.5-inch CD, DVD, or combination CD-RW/DVD in your system include: • 1U/1S rack-mountable chassis with support for static rails and sliding rails. NOTE: Use the System Setup program to two internal, 1-inch high optional Serial-Attached SCSI (SAS) hard drives with support for...
Getting Started Guide
Page 9
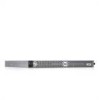
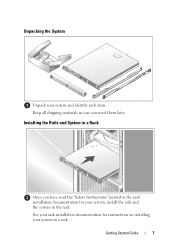
Keep all shipping materials in a rack. See your rack installation documentation for your system, install the rails and the system in the rack. Installing the Rails and System in a Rack Once you have read the "Safety Instructions" located in the rack installation documentation for instructions on installing your system and identify each item. Unpacking the System Unpack your system in case you need them later. Getting Started Guide 7
Keep all shipping materials in a rack. See your rack installation documentation for your system, install the rails and the system in the rack. Installing the Rails and System in a Rack Once you have read the "Safety Instructions" located in the rack installation documentation for instructions on installing your system and identify each item. Unpacking the System Unpack your system in case you need them later. Getting Started Guide 7
Hardware Owner's Manual (PDF)
Page 54
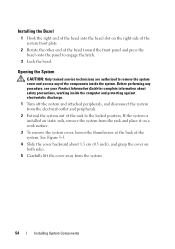
... peripherals, and disconnect the system from the electrical outlet and peripherals. 2 Extend the system out of the rack to engage the latch. 3 Lock the bezel. If the system is installed on static rails, remove the system from the system. 54 Installing System Components Installing the Bezel 1 Hook the right end ... your Product Information Guide for complete information about 1.3 cm (0.5 inch), and grasp the cover on both sides. 5 Carefully lift the cover away from the rack and place it on a work surface. 3 To remove the system cover, loosen the thumbscrew at the back of the system.
... peripherals, and disconnect the system from the electrical outlet and peripherals. 2 Extend the system out of the rack to engage the latch. 3 Lock the bezel. If the system is installed on static rails, remove the system from the system. 54 Installing System Components Installing the Bezel 1 Hook the right end ... your Product Information Guide for complete information about 1.3 cm (0.5 inch), and grasp the cover on both sides. 5 Carefully lift the cover away from the rack and place it on a work surface. 3 To remove the system cover, loosen the thumbscrew at the back of the system.

