
Getting Started Guide
Page 14
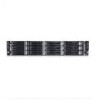
... PCIe Mezzanine PCIe PCI Express Generation 2 One x16, half-length, half-height One x8, custom slot Memory (Per System Board) Architecture Memory module sockets Memory module capacities Minimum RAM Maximum RAM 1066 and 1333 MHz DDR3 registered memory modules with ECC Twelve 240-pin DIMMs 2 GB, 4 GB, or 8 GB 12 GB 96 GB Drives...
... PCIe Mezzanine PCIe PCI Express Generation 2 One x16, half-length, half-height One x8, custom slot Memory (Per System Board) Architecture Memory module sockets Memory module capacities Minimum RAM Maximum RAM 1066 and 1333 MHz DDR3 registered memory modules with ECC Twelve 240-pin DIMMs 2 GB, 4 GB, or 8 GB 12 GB 96 GB Drives...

Getting Started Guide
Page 15
...) 75.1 cm (29.6 in) 36.5 kg (80.5 lb) 20 kg (44.1 lb) Getting Started With Your System 13 Video (Per System Board) Video type Video memory AST2050 video controller;
...) 75.1 cm (29.6 in) 36.5 kg (80.5 lb) 20 kg (44.1 lb) Getting Started With Your System 13 Video (Per System Board) Video type Video memory AST2050 video controller;

Hardware Owner's Manual
Page 4
AMIBIOS Settings 38 Processor Settings 38 System Memory Settings 38 Advanced Menu 39 CPU Configuration 39 Memory Configuration 40 IDE Configuration 41 Primary IDE Master 41 USB Configuration 43 PCI Configuration 44 Boot Menu 45 Boot Settings Configuration 45 Security Menu 45 ...
AMIBIOS Settings 38 Processor Settings 38 System Memory Settings 38 Advanced Menu 39 CPU Configuration 39 Memory Configuration 40 IDE Configuration 41 Primary IDE Master 41 USB Configuration 43 PCI Configuration 44 Boot Menu 45 Boot Settings Configuration 45 Security Menu 45 ...
Hardware Owner's Manual
Page 6
... 74 Installing the SAS Mezzanine Card 75 Removing the Infiniband Mezzanine Card . . . . . 76 Installing the Infiniband Mezzanine Card. . . . . . 77 System Memory 77 Supported DIMM Configuration 77 Removing Memory Modules 79 Installing Memory Modules 80 Interposer Extenders 82 Removing the Interposer Extender 82 Installing the Interposer Extender 83 System Battery 84 Replacing the System...
... 74 Installing the SAS Mezzanine Card 75 Removing the Infiniband Mezzanine Card . . . . . 76 Installing the Infiniband Mezzanine Card. . . . . . 77 System Memory 77 Supported DIMM Configuration 77 Removing Memory Modules 79 Installing Memory Modules 80 Interposer Extenders 82 Removing the Interposer Extender 82 Installing the Interposer Extender 83 System Battery 84 Replacing the System...

Hardware Owner's Manual
Page 8
... System 117 Troubleshooting a Damaged System 118 Troubleshooting the System Battery 118 Troubleshooting Power Supplies 119 Troubleshooting System Cooling Problems 120 Troubleshooting a Fan 120 Troubleshooting System Memory 121 Troubleshooting a Hard Drive 123 Troubleshooting a Storage Controller 124 Troubleshooting Expansion Cards 125 Troubleshooting Processors 126 IRQ Assignment Conflicts 127 5 Jumpers and Connectors 129 System...
... System 117 Troubleshooting a Damaged System 118 Troubleshooting the System Battery 118 Troubleshooting Power Supplies 119 Troubleshooting System Cooling Problems 120 Troubleshooting a Fan 120 Troubleshooting System Memory 121 Troubleshooting a Hard Drive 123 Troubleshooting a Storage Controller 124 Troubleshooting Expansion Cards 125 Troubleshooting Processors 126 IRQ Assignment Conflicts 127 5 Jumpers and Connectors 129 System...

Hardware Owner's Manual
Page 14
NOTE: When powering on the system, the video monitor can be used to display an image, depending on the amount of memory installed in the system. When the button is pushed, the blue system status indicator on the front and the back blink until the button is ...
NOTE: When powering on the system, the video monitor can be used to display an image, depending on the amount of memory installed in the system. When the button is pushed, the blue system status indicator on the front and the back blink until the button is ...

Hardware Owner's Manual
Page 17
... Power-on indicator/ power button (system board 1) The power-on indicator lights when the system power is on. NOTE: When powering on the amount of memory installed in the system. Enumeration-Four System Boards 3 1 4 2 Figure 1-10. The power button controls the DC power supply output to display an image, depending on...
... Power-on indicator/ power button (system board 1) The power-on indicator lights when the system power is on. NOTE: When powering on the amount of memory installed in the system. Enumeration-Four System Boards 3 1 4 2 Figure 1-10. The power button controls the DC power supply output to display an image, depending on...

Hardware Owner's Manual
Page 23
... BIOS and the BMC setup for 10 seconds and restart the system. If the problem persists, see "Getting Help" on page 143. 000Bh Yes CMOS Memory Size Error Remove AC power to the IP address of the BMC.
... BIOS and the BMC setup for 10 seconds and restart the system. If the problem persists, see "Getting Help" on page 143. 000Bh Yes CMOS Memory Size Error Remove AC power to the IP address of the BMC.

Hardware Owner's Manual
Page 24
... Help" on page 121. If the problem persists, see "Getting Help" on page 143. 0046h Yes DMAC2 Channel Register Error See "Troubleshooting System Memory" on page 118. If the problem persists, see "Getting Help" on page 143. 24 About Your System If the problem persists, see "Getting... Help" on page 143. 0045h Yes DMAC1 Channel Register Error See "Troubleshooting System Memory" on page 121. If the problem persists, see "Getting Help" on page 143. 0012h Yes CMOS Date Time Error See "Troubleshooting the System...
... Help" on page 121. If the problem persists, see "Getting Help" on page 143. 0046h Yes DMAC2 Channel Register Error See "Troubleshooting System Memory" on page 118. If the problem persists, see "Getting Help" on page 143. 24 About Your System If the problem persists, see "Getting... Help" on page 143. 0045h Yes DMAC1 Channel Register Error See "Troubleshooting System Memory" on page 121. If the problem persists, see "Getting Help" on page 143. 0012h Yes CMOS Date Time Error See "Troubleshooting the System...
Hardware Owner's Manual
Page 25
Code Log in BMC Cause Corrective Actions 0047h Yes PMM Memory Allocation Error See "Troubleshooting System Memory" on page 139. See "Jumper Settings" on page 121. If the problem persists, see "Getting Help" on page 143. 0060h Yes HDD 0 Error See "Troubleshooting a ...
Code Log in BMC Cause Corrective Actions 0047h Yes PMM Memory Allocation Error See "Troubleshooting System Memory" on page 139. See "Jumper Settings" on page 121. If the problem persists, see "Getting Help" on page 143. 0060h Yes HDD 0 Error See "Troubleshooting a ...

Hardware Owner's Manual
Page 32
...the problem persists, see "Getting Help" on page 143. If the problem persists, see "Getting Help" on page 143. 8400h Yes Redirect Memory Error See "Troubleshooting System Memory" on page 143. If the problem persists, see "Getting Help" on page 121. If the problem persists, see "Getting Help" on ...page 143. 8302h No SMBIOS Not Enough Space In See "Troubleshooting F000 System Memory" on page 143. F004h No BMC FRU Internal Area checksum bad Remove AC power to the system for 10 seconds and restart the system. ...
...the problem persists, see "Getting Help" on page 143. If the problem persists, see "Getting Help" on page 143. 8400h Yes Redirect Memory Error See "Troubleshooting System Memory" on page 143. If the problem persists, see "Getting Help" on page 121. If the problem persists, see "Getting Help" on ...page 143. 8302h No SMBIOS Not Enough Space In See "Troubleshooting F000 System Memory" on page 143. F004h No BMC FRU Internal Area checksum bad Remove AC power to the system for 10 seconds and restart the system. ...

Hardware Owner's Manual
Page 35
Hard drives, diskette drives, and peripherals - Using the System Setup Program 35 The Flash memory supports the Plug and Play specification, and contains a System Setup program, the Power On Self Test (POST) routine, and the PCI auto-configuration utility... system and you are display only. This system board supports system BIOS shadowing, enabling the BIOS to the security setup NOTE: Only items in Flash memory. Power management features • When a configuration error is stored in brackets [ ] can be executed under the following conditions: • When changing the system ...
Hard drives, diskette drives, and peripherals - Using the System Setup Program 35 The Flash memory supports the Plug and Play specification, and contains a System Setup program, the Power On Self Test (POST) routine, and the PCI auto-configuration utility... system and you are display only. This system board supports system BIOS shadowing, enabling the BIOS to the security setup NOTE: Only items in Flash memory. Power management features • When a configuration error is stored in brackets [ ] can be executed under the following conditions: • When changing the system ...

Hardware Owner's Manual
Page 38
... manufacturer. AMIBIOS Settings Option Version Build Date ID Description Displays the BIOS version. Displays the date the BIOS was created. Displays the BIOS ID. System Memory Settings Option Size System Time System Date Description Displays how much...
... manufacturer. AMIBIOS Settings Option Version Build Date ID Description Displays the BIOS version. Displays the date the BIOS was created. Displays the BIOS ID. System Memory Settings Option Size System Time System Date Description Displays how much...

Hardware Owner's Manual
Page 40
CState: CPU idle is in each processor package. When CPU is set to C2/C3/C4. Memory Configuration Option Memory Frequency (Auto default) Memory Mode (Independent default) NUMA Support (Enabled default) Description Forces a DDR3 frequency slower than the common tck ...enable in idle mode. Enables or disables NUMA: • Enabled: efficiently executes software for NUMA aware operating system. • Disabled: better memory access performance for non-NUMA operating system. 40 Using the System Setup Program Option Active Processor Cores (All default) Frequency Ratio Intel(R) C-STATE...
CState: CPU idle is in each processor package. When CPU is set to C2/C3/C4. Memory Configuration Option Memory Frequency (Auto default) Memory Mode (Independent default) NUMA Support (Enabled default) Description Forces a DDR3 frequency slower than the common tck ...enable in idle mode. Enables or disables NUMA: • Enabled: efficiently executes software for NUMA aware operating system. • Disabled: better memory access performance for non-NUMA operating system. 40 Using the System Setup Program Option Active Processor Cores (All default) Frequency Ratio Intel(R) C-STATE...

Hardware Owner's Manual
Page 43
Option DMA Mode (Auto default) S.M.A.R.T. (Auto default) 32Bit Data Transfer (Enabled default) Description Selects the devices DMA (Direct Memory Access) mode, which transfers data from channel to channel without using the processor, resulting in SETUP screen when USB Mass Storage is plugged. Auto option ...
Option DMA Mode (Auto default) S.M.A.R.T. (Auto default) 32Bit Data Transfer (Enabled default) Description Selects the devices DMA (Direct Memory Access) mode, which transfers data from channel to channel without using the processor, resulting in SETUP screen when USB Mass Storage is plugged. Auto option ...

Hardware Owner's Manual
Page 52
... settings default values are not demanding so a system should be able to operate with the fails safe settings even if it is installed with slower memory chips or other kinds of lowperformance components. 52 Using the System Setup Program Select [OK] to indicate Yes, and then press Enter to install the... fail-safe settings. If you select this item and press Enter, a dialog box asks if you are using slower memory chips or other kinds of low-performance components.
... settings default values are not demanding so a system should be able to operate with the fails safe settings even if it is installed with slower memory chips or other kinds of lowperformance components. 52 Using the System Setup Program Select [OK] to indicate Yes, and then press Enter to install the... fail-safe settings. If you select this item and press Enter, a dialog box asks if you are using slower memory chips or other kinds of low-performance components.

Hardware Owner's Manual
Page 59
...: The system requires one power supply to two hard drives, and six memory modules * Full configuration denotes support for the maximum number of processors, hard drives, and memory modules. Read and follow the safety instructions that is not authorized by Dell is not covered by your product documentation, or as directed by a certified...
...: The system requires one power supply to two hard drives, and six memory modules * Full configuration denotes support for the maximum number of processors, hard drives, and memory modules. Read and follow the safety instructions that is not authorized by Dell is not covered by your product documentation, or as directed by a certified...

Hardware Owner's Manual
Page 77
...mezzanine card. 6 Reconnect the system to support processor 0 and processor 1. Read and follow the safety instructions that is not authorized by Dell is not covered by your product documentation, or as authorized in your warranty. When you insert the DIMM(s), always start with the product.... 1 Place the mezzanine card on page 129 for possible memory configurations. Installing the Infiniband Mezzanine Card CAUTION: Many repairs may only be done by the online or telephone service and support team. ...
...mezzanine card. 6 Reconnect the system to support processor 0 and processor 1. Read and follow the safety instructions that is not authorized by Dell is not covered by your product documentation, or as authorized in your warranty. When you insert the DIMM(s), always start with the product.... 1 Place the mezzanine card on page 129 for possible memory configurations. Installing the Infiniband Mezzanine Card CAUTION: Many repairs may only be done by the online or telephone service and support team. ...

Hardware Owner's Manual
Page 78
Memory Module Configurations DIMM DIMM0 DIMM1 DIMM0 DIMM1 DIMM0 DIMM1 Processor 0 CH A CH B CH C 1 - - - - - 4 - - - - 78 Installing System Components Figure 3-15. Memory Slot Locations 1 23 4 56 1 DIMM0_CHC 3 DIMM0_CHB 5 DIMM0_CHA 7 DIMM1_CHA 9 DIMM1_CHB 11 DIMM1_CHC 12 11 10 9 8 7 2 DIMM1_CHC 4 DIMM1_CHB 6 DIMM1_CHA 8 DIMM0_CHA 10 DIMM0_CHB 12 DIMM0_CHC Table 3-2.
Memory Module Configurations DIMM DIMM0 DIMM1 DIMM0 DIMM1 DIMM0 DIMM1 Processor 0 CH A CH B CH C 1 - - - - - 4 - - - - 78 Installing System Components Figure 3-15. Memory Slot Locations 1 23 4 56 1 DIMM0_CHC 3 DIMM0_CHB 5 DIMM0_CHA 7 DIMM1_CHA 9 DIMM1_CHB 11 DIMM1_CHC 12 11 10 9 8 7 2 DIMM1_CHC 4 DIMM1_CHB 6 DIMM1_CHA 8 DIMM0_CHA 10 DIMM0_CHB 12 DIMM0_CHC Table 3-2.

Hardware Owner's Manual
Page 79
... product. 1 Turn off the system, including any attached peripherals, and disconnect the system from the same manufacturer. See "Removing a System-Board Assembly" on the memory module. Table 3-2. Memory Module Configurations DIMM DIMM0 DIMM1 DIMM0 DIMM1 DIMM0 DIMM1 6 - - - 12 Processor 1 CH A CH B CH C 1 - - - - - - 4 - - - -... safety instructions that is not authorized by a certified service technician. For best performance, all the memory modules installed must be done by Dell is marked as directed by the card edges and avoid touching the components on page 61. 3...
... product. 1 Turn off the system, including any attached peripherals, and disconnect the system from the same manufacturer. See "Removing a System-Board Assembly" on the memory module. Table 3-2. Memory Module Configurations DIMM DIMM0 DIMM1 DIMM0 DIMM1 DIMM0 DIMM1 6 - - - 12 Processor 1 CH A CH B CH C 1 - - - - - - 4 - - - -... safety instructions that is not authorized by a certified service technician. For best performance, all the memory modules installed must be done by Dell is marked as directed by the card edges and avoid touching the components on page 61. 3...


