
Installation and Troubleshooting Guide (.htm)
Page 3
... Control Panel Assembly and Front Panel 12 Replacing the Control Panel Assembly Metal Bracket 14 Removing the Trim Panel 15 Installing the Optional Rack Bezel 16 Contents 3 Figure 1-7. Figure 1-4. Figure 1-6. Figure 1-8. Figure 1-3. Contents Safety Instructions 5 Installation Instructions 6 Before You Begin 6 ... Tower-to-Rack Kit 7 Tower-to-Rack Kit Contents 8 Recommended Tools and Supplies 8 Conversion Tasks 8 Removing the Optional Tower Bezel, Metal Feet, and Cover 9 Removing the Control Panel Assembly and Tower Front Panel 11 Installing the Rack Front Panel and Control ...
... Control Panel Assembly and Front Panel 12 Replacing the Control Panel Assembly Metal Bracket 14 Removing the Trim Panel 15 Installing the Optional Rack Bezel 16 Contents 3 Figure 1-7. Figure 1-4. Figure 1-6. Figure 1-8. Figure 1-3. Contents Safety Instructions 5 Installation Instructions 6 Before You Begin 6 ... Tower-to-Rack Kit 7 Tower-to-Rack Kit Contents 8 Recommended Tools and Supplies 8 Conversion Tasks 8 Removing the Optional Tower Bezel, Metal Feet, and Cover 9 Removing the Control Panel Assembly and Tower Front Panel 11 Installing the Rack Front Panel and Control ...
Installation and Troubleshooting Guide (.htm)
Page 8
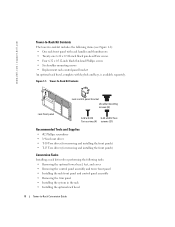
...Phillips screws • Six shoulder mounting screws • Replacement rack control-panel bracket An optional rack bezel, complete with keylock and keys, is available separately. www.dell.com | support.dell.com Tower-to-Rack Kit Contents The tower-to-rack kit includes the following tasks: • ...Removing the optional tower bezel, feet, and cover • Removing the control panel assembly and tower front panel &#...
...Phillips screws • Six shoulder mounting screws • Replacement rack control-panel bracket An optional rack bezel, complete with keylock and keys, is available separately. www.dell.com | support.dell.com Tower-to-Rack Kit Contents The tower-to-rack kit includes the following tasks: • ...Removing the optional tower bezel, feet, and cover • Removing the control panel assembly and tower front panel &#...

Installation and Troubleshooting Guide (.htm)
Page 9
Removing the Optional Tower Bezel keylock bezel Tower-to-Rack Conversion Guide 9 Removing the Optional Tower Bezel, Metal Feet, and Cover 1 To remove the tower bezel, orient the system as shown in Figure 1-2 and perform the following steps: a Unlock the keylock. See Figure 1-2. b Rotate the keylock end of the bezel and pull the bezel away from the front panel. c Unhook the other end of the bezel away from the system. Figure 1-2.
Removing the Optional Tower Bezel keylock bezel Tower-to-Rack Conversion Guide 9 Removing the Optional Tower Bezel, Metal Feet, and Cover 1 To remove the tower bezel, orient the system as shown in Figure 1-2 and perform the following steps: a Unlock the keylock. See Figure 1-2. b Rotate the keylock end of the bezel and pull the bezel away from the front panel. c Unhook the other end of the bezel away from the system. Figure 1-2.

Installation and Troubleshooting Guide (.htm)
Page 16
Secure the bezel with the keylock. Installing the Optional Rack Bezel keylock rack bezel 16 Tower-to-Rack Conversion Guide See Figure 1-8. Figure 1-8. Installing the Optional Rack Bezel To install the rack bezel, hook the right end of the bezel onto the chassis, then fit the free end of the bezel onto the system. www.dell.com | support.dell.com Installing the System in a Rack For information on installing the system in a rack, including installing the cable-management arm and routing the system cables, see the system Rack Installation Guide.
Secure the bezel with the keylock. Installing the Optional Rack Bezel keylock rack bezel 16 Tower-to-Rack Conversion Guide See Figure 1-8. Figure 1-8. Installing the Optional Rack Bezel To install the rack bezel, hook the right end of the bezel onto the chassis, then fit the free end of the bezel onto the system. www.dell.com | support.dell.com Installing the System in a Rack For information on installing the system in a rack, including installing the cable-management arm and routing the system cables, see the system Rack Installation Guide.


