
Rack Installation Guide
Page 6
... allows it, do not remove enclosure covers, attempt to have the final combination of Dell systems and rack kits for use in Dell's rack cabinet using the Dell customer rack kit. The weight of more than one time. It is the customer's responsibility to override the safety ...stops and uneven surfaces. Servers, storage systems, and appliances are firmly con- Thus, "component" refers to any safety agencies. WARNING: Installing Dell system components in a rack, never pull more than one component out of producing hazardous energy levels. • When connecting or disconnecting power ...
... allows it, do not remove enclosure covers, attempt to have the final combination of Dell systems and rack kits for use in Dell's rack cabinet using the Dell customer rack kit. The weight of more than one time. It is the customer's responsibility to override the safety ...stops and uneven surfaces. Servers, storage systems, and appliances are firmly con- Thus, "component" refers to any safety agencies. WARNING: Installing Dell system components in a rack, never pull more than one component out of producing hazardous energy levels. • When connecting or disconnecting power ...
Rack Installation Guide
Page 7
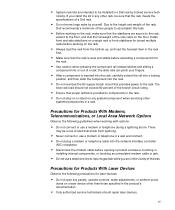
... Do not use a modem or telephone during a lightning storm. There may be installed in a Dell rack by yourself. vii Due to the height and weight of the rack, Dell recommends a minimum of a Dell rack. • Do not move large racks by trained service tech- The total rack load should...the component rail release latches and sliding a component into the rack. • Do not overload the AC supply branch circuit that the full weight of a rack; nicians. dures on a laser device other than those specified in the product's documentation. • Only authorized service technicians ...
... Do not use a modem or telephone during a lightning storm. There may be installed in a Dell rack by yourself. vii Due to the height and weight of the rack, Dell recommends a minimum of a Dell rack. • Do not move large racks by trained service tech- The total rack load should...the component rail release latches and sliding a component into the rack. • Do not overload the AC supply branch circuit that the full weight of a rack; nicians. dures on a laser device other than those specified in the product's documentation. • Only authorized service technicians ...
Rack Installation Guide
Page 10
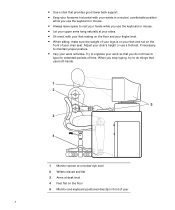
... lower back support. • Keep your forearms horizontal with your feet resting on the floor and your thighs level. • When sitting, make sure the weight of your legs is on your feet and not on the floor 5 Monitor and keyboard positioned directly in a neutral, comfortable position while you use the...
... lower back support. • Keep your forearms horizontal with your feet resting on the floor and your thighs level. • When sitting, make sure the weight of your legs is on your feet and not on the floor 5 Monitor and keyboard positioned directly in a neutral, comfortable position while you use the...
Rack Installation Guide
Page 15
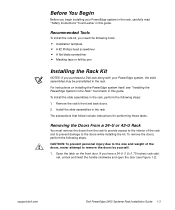
..., perform the following steps: 1. CAUTION: To prevent personal injury due to the size and weight of the rack and to prevent damage to remove the doors by yourself. 1. Remove the rack's front and back doors. 2. support.dell.com Dell PowerEdge 2400 Systems Rack Installation Guide 1-3 Removing the Doors From a 24-U or 42-U Rack You must...
..., perform the following steps: 1. CAUTION: To prevent personal injury due to the size and weight of the rack and to prevent damage to remove the doors by yourself. 1. Remove the rack's front and back doors. 2. support.dell.com Dell PowerEdge 2400 Systems Rack Installation Guide 1-3 Removing the Doors From a 24-U or 42-U Rack You must...
Rack Installation Guide
Page 26
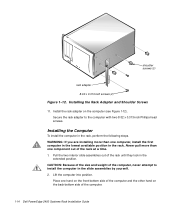
Install the rack adapter on the back-bottom side of the computer. 1-14 Dell PowerEdge 2400 Systems Rack Installation Guide Secure the rack adapter to install the computer in the rack, perform the following steps. Installing the Computer To install the ... into position. Place one component out of the computer and the other hand on the computer (see Figure 1-12). CAUTION: Because of the size and weight of the rack until they lock in the rack. WARNING: If you are installing more than one computer, install the first computer in the lowest...
Install the rack adapter on the back-bottom side of the computer. 1-14 Dell PowerEdge 2400 Systems Rack Installation Guide Secure the rack adapter to install the computer in the rack, perform the following steps. Installing the Computer To install the ... into position. Place one component out of the computer and the other hand on the computer (see Figure 1-12). CAUTION: Because of the size and weight of the rack until they lock in the rack. WARNING: If you are installing more than one computer, install the first computer in the lowest...
Rack Installation Guide
Page 29
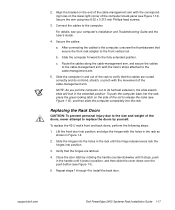
Replacing the Rack Doors CAUTION: To prevent personal injury due to the size and weight of the doors, never attempt to the computer, unscrew the thumbscrews that the cables are latched. 4. Connect the cables to install the back door. After ... attached to the cable-management arm with the holes in the rack as shown in the extended position. Close the door latch by yourself. support.dell.com Dell PowerEdge 2400 Systems Rack Installation Guide 1-17 Route the cables along the cable-management arm, and secure the cables to the cable-management arm. 5. 2. Lift the...
Replacing the Rack Doors CAUTION: To prevent personal injury due to the size and weight of the doors, never attempt to the computer, unscrew the thumbscrews that the cables are latched. 4. Connect the cables to install the back door. After ... attached to the cable-management arm with the holes in the rack as shown in the extended position. Close the door latch by yourself. support.dell.com Dell PowerEdge 2400 Systems Rack Installation Guide 1-17 Route the cables along the cable-management arm, and secure the cables to the cable-management arm. 5. 2. Lift the...
Rack Installation Guide
Page 31
Index C cable management arm, 1-16 cables, 1-17 cautions, iii computer installing in rack, 1-11, 1-14 weight, 1-11 D doors removing, 1-3 replacing, 1-17 E electrostatic discharge. See ESD ESD, ix I installing cable management arm, 1-16 computer, 1-11, 1-14 rack adapters, 1-14 slide assemblies, 1-7 K kit contents illustrated, 1-2 list of, 1-1 N notational conventions, iii notes, iii R rack adapters, 1-14 rack doors removing, 1-3 replacing, 1-17 rack kit contents illustrated, 1-2 list of, 1-1 rack kit installation slide assemblies, 1-7 removing doors, 1-3 support.dell.com Index 1
Index C cable management arm, 1-16 cables, 1-17 cautions, iii computer installing in rack, 1-11, 1-14 weight, 1-11 D doors removing, 1-3 replacing, 1-17 E electrostatic discharge. See ESD ESD, ix I installing cable management arm, 1-16 computer, 1-11, 1-14 rack adapters, 1-14 slide assemblies, 1-7 K kit contents illustrated, 1-2 list of, 1-1 N notational conventions, iii notes, iii R rack adapters, 1-14 rack doors removing, 1-3 replacing, 1-17 rack kit contents illustrated, 1-2 list of, 1-1 rack kit installation slide assemblies, 1-7 removing doors, 1-3 support.dell.com Index 1


