
User's Guide (.htm)
Page 10
...PowerConnect 3424 and PowerConnect 3424P . . . 21 PowerConnect 3448 and PowerConnect 3448P . . . 22 Stacking Ring Topology 23 PowerConnect 3448/P replaces PowerConnect 3448/P 26 PowerConect 3424/P port replaces PowerConnect 3448/P port 26 PowerConnect 3448/P port replaces PowerConect 3424/P Port 27 PowerConnect 3424 Front Panel 37 PowerConnect 3424 Back Panel 38 PowerConnect 3448 Front Panel 38 PowerConnect 3448 Back Panel 39 Console...Connector 54 Stacking Cable Diagram 55 Stacking Configuration and Identification Panel . . . 56 Connecting to PowerConnect 3400 Series Console Port 58 ...
...PowerConnect 3424 and PowerConnect 3424P . . . 21 PowerConnect 3448 and PowerConnect 3448P . . . 22 Stacking Ring Topology 23 PowerConnect 3448/P replaces PowerConnect 3448/P 26 PowerConect 3424/P port replaces PowerConnect 3448/P port 26 PowerConnect 3448/P port replaces PowerConect 3424/P Port 27 PowerConnect 3424 Front Panel 37 PowerConnect 3424 Back Panel 38 PowerConnect 3448 Front Panel 38 PowerConnect 3448 Back Panel 39 Console...Connector 54 Stacking Cable Diagram 55 Stacking Configuration and Identification Panel . . . 56 Connecting to PowerConnect 3400 Series Console Port 58 ...
User's Guide (.htm)
Page 50
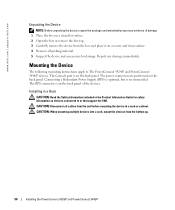
... the box and place it on a secure and clean surface. 4 Remove all cables from the bottom up. 50 Installing the PowerConnect 3424/P and PowerConnect 3448/P www.dell.com | support.dell.com Unpacking the Device NOTE: Before unpacking the device, inspect the package and immediately... Information included in a rack or cabinet. The Console port is recommended. CAUTION: Disconnect all packing material. 5 Inspect the device and accessories for safety information on devices connected to The PowerConnect 3424/P and PowerConnect 3448/P devices. The power connectors are positioned on the...
... the box and place it on a secure and clean surface. 4 Remove all cables from the bottom up. 50 Installing the PowerConnect 3424/P and PowerConnect 3448/P www.dell.com | support.dell.com Unpacking the Device NOTE: Before unpacking the device, inspect the package and immediately... Information included in a rack or cabinet. The Console port is recommended. CAUTION: Disconnect all packing material. 5 Inspect the device and accessories for safety information on devices connected to The PowerConnect 3424/P and PowerConnect 3448/P devices. The power connectors are positioned on the...
User's Guide (.htm)
Page 54
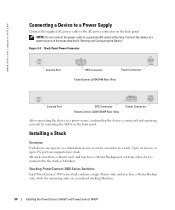
....dell.com Connecting a Device to a Power Supply Connect the supplied AC power cable to a grounded AC outlet at this time. Connect the device to the stack as a stand-alone device or can operate as Members. Back-Panel Power Connector Console Port RPS Connector Power Connector PowerConnect 3424/3448 Rear View Console Port EPS Connector PowerConnect 3424P/3448P Rear...
....dell.com Connecting a Device to a Power Supply Connect the supplied AC power cable to a grounded AC outlet at this time. Connect the device to the stack as a stand-alone device or can operate as Members. Back-Panel Power Connector Console Port RPS Connector Power Connector PowerConnect 3424/3448 Rear View Console Port EPS Connector PowerConnect 3424P/3448P Rear...
User's Guide (.htm)
Page 56
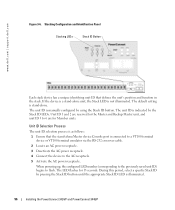
...Each stack device has a unique identifying unit ID that the stand-alone/Master device Console port is not illuminated. The unit ID is stand-alone. When powering up, the...is indicated by using the Stack ID button. The unit ID is illuminated. 56 Installing the PowerConnect 3424/P and PowerConnect 3448/P Unit ID 1 and 2 are reserved for 15 seconds. During this period, select a...LED is connected to a VT100 terminal device or VT100 terminal emulator via the RS-232 crossover cable. 2 Locate an AC power receptacle. 3 Deactivate the AC power receptacle. 4 Connect the device to...
...Each stack device has a unique identifying unit ID that the stand-alone/Master device Console port is not illuminated. The unit ID is stand-alone. When powering up, the...is indicated by using the Stack ID button. The unit ID is illuminated. 56 Installing the PowerConnect 3424/P and PowerConnect 3448/P Unit ID 1 and 2 are reserved for 15 seconds. During this period, select a...LED is connected to a VT100 terminal device or VT100 terminal emulator via the RS-232 crossover cable. 2 Locate an AC power receptacle. 3 Deactivate the AC power receptacle. 4 Connect the device to...
User's Guide (.htm)
Page 57
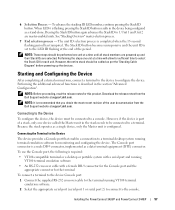
... as per the "Stacking Cable Diagram" before powering up and their Stack IDs are selected. Installing the PowerConnect 3424/P and PowerConnect 3448/P 57 See "Stacking Overview" master-election process. 7 End selection process - To use the Console port, the following is set to a console. To advance the stacking ID...for monitoring and configuring the device. Connecting the Terminal to the Device The device provides a Console port that you obtain the most recent revision of the user documentation from the Dell Support website at the end of a stack, only one unit at a time until all ...
... as per the "Stacking Cable Diagram" before powering up and their Stack IDs are selected. Installing the PowerConnect 3424/P and PowerConnect 3448/P 57 See "Stacking Overview" master-election process. 7 End selection process - To use the Console port, the following is set to a console. To advance the stacking ID...for monitoring and configuring the device. Connecting the Terminal to the Device The device provides a Console port that you obtain the most recent revision of the user documentation from the Dell Support website at the end of a stack, only one unit at a time until all ...

User's Guide (.htm)
Page 58
www.dell.com | support.dell.com 3 Set the data rate to 9600 baud. 4 Set the data format to 8 data bits, 1 stop ... of the RS-232 crossover cable directly to the device Console port on the Master unit/stand-alone device, and tighten the captive retaining screws. Connecting to PowerConnect 3400 Series Console Port To VT100 Terminal Back Panel NOTE: A console can be connected to www.microsoft...setting is performed only from the stack master (unit ID 1 or 2). 58 Installing the PowerConnect 3424/P and PowerConnect 3448/P Ensure that you have Windows 2000 Service Pack 2 or later installed.
www.dell.com | support.dell.com 3 Set the data rate to 9600 baud. 4 Set the data format to 8 data bits, 1 stop ... of the RS-232 crossover cable directly to the device Console port on the Master unit/stand-alone device, and tighten the captive retaining screws. Connecting to PowerConnect 3400 Series Console Port To VT100 Terminal Back Panel NOTE: A console can be connected to www.microsoft...setting is performed only from the stack master (unit ID 1 or 2). 58 Installing the PowerConnect 3424/P and PowerConnect 3448/P Ensure that you have Windows 2000 Service Pack 2 or later installed.


