Maintenance Guide
Page 1
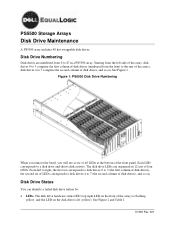
PS5500 Storage Arrays Disk Drive Maintenance A PS5500 array includes 48 hot-swappable disk drives. Each LED corresponds to 7 (the second column of disk drives), and so on. The disk drive hardware status LED (top right LED on the front of disk drives, and so on the disk drive is lit (yellow). Starting from the left to right, the first set corresponds to disk drives 0 to 3 (the first column of disk drives), the second set of LEDs corresponds to disk drives 4 to a disk drive and shows disk activity. See...
PS5500 Storage Arrays Disk Drive Maintenance A PS5500 array includes 48 hot-swappable disk drives. Each LED corresponds to 7 (the second column of disk drives), and so on. The disk drive hardware status LED (top right LED on the front of disk drives, and so on the disk drive is lit (yellow). Starting from the left to right, the first set corresponds to disk drives 0 to 3 (the first column of disk drives), the second set of LEDs corresponds to disk drives 4 to a disk drive and shows disk activity. See...
Maintenance Guide
Page 2
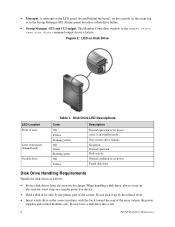
... Off Yellow Flashing yellow Off Green Flashing green Off Yellow Description Normal operation or no power. The Member Controllers window or the member select name show disks command output shows a failure. No power. Do not force a disk drive into a slot. 2 PS5500 Disk Drive Maintenance Disk Drive Handling Requirements Handle the disk drives as follows: • Protect disk drives from electrostatic discharge. Normal condition or no power. Figure 2: LED on the console, in the event log, or in standby mode. Do...
... Off Yellow Flashing yellow Off Green Flashing green Off Yellow Description Normal operation or no power. The Member Controllers window or the member select name show disks command output shows a failure. No power. Do not force a disk drive into a slot. 2 PS5500 Disk Drive Maintenance Disk Drive Handling Requirements Handle the disk drives as follows: • Protect disk drives from electrostatic discharge. Normal condition or no power. Figure 2: LED on the console, in the event log, or in standby mode. Do...
Maintenance Guide
Page 3
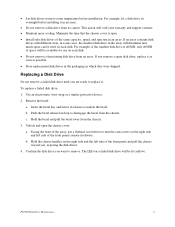
... same capacity, speed, and spin rate in an array. Push the bezel release latch up to remove. b. PS5500 Disk Drive Maintenance 3 Use an electrostatic wrist strap or a similar protective device. 2. b. For example, let a disk drive sit overnight before installation. • Let disk drives warm to room temperature before installing it in an array. • Do not remove a disk drive from its carrier. For example, if the smallest disk drive is open the chassis cover: a. Facing...
... same capacity, speed, and spin rate in an array. Push the bezel release latch up to remove. b. PS5500 Disk Drive Maintenance 3 Use an electrostatic wrist strap or a similar protective device. 2. b. For example, let a disk drive sit overnight before installation. • Let disk drives warm to room temperature before installing it in an array. • Do not remove a disk drive from its carrier. For example, if the smallest disk drive is open the chassis cover: a. Facing...
Maintenance Guide
Page 4
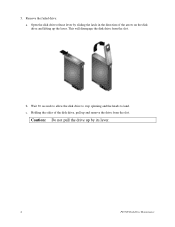
Open the disk drive release lever by its lever. 4 PS5500 Disk Drive Maintenance b. Remove the failed drive: a. Holding the sides of the arrow on the disk drive and lifting up and remove the drive from the slot. 5. Caution: Do not pull the drive up by sliding the latch in the direction of the disk drive, pull up the lever. This will disengage the disk drive from the slot. Wait 30 seconds to allow the disk drive to stop spinning and the heads to land. c.
Open the disk drive release lever by its lever. 4 PS5500 Disk Drive Maintenance b. Remove the failed drive: a. Holding the sides of the arrow on the disk drive and lifting up and remove the drive from the slot. 5. Caution: Do not pull the drive up by sliding the latch in the direction of the disk drive, pull up the lever. This will disengage the disk drive from the slot. Wait 30 seconds to allow the disk drive to stop spinning and the heads to land. c.
Maintenance Guide
Page 5
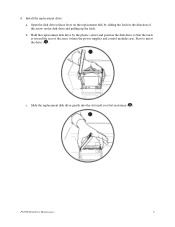
Hold the replacement disk drive by sliding the latch in the direction of the array (where the power supplies and control modules are). PS5500 Disk Drive Maintenance 5 Slide the replacement disk drive gently into the slot until you feel resistance ( ). b. Start to insert the drive ( ). Open the disk drive release lever on the replacement disk by the plastic carrier and position the disk drive so that the latch is toward the rear of the arrow on the disk drive and pulling up the latch. Install the replacement drive: a. 6. c.
Hold the replacement disk drive by sliding the latch in the direction of the array (where the power supplies and control modules are). PS5500 Disk Drive Maintenance 5 Slide the replacement disk drive gently into the slot until you feel resistance ( ). b. Start to insert the drive ( ). Open the disk drive release lever on the replacement disk by the plastic carrier and position the disk drive so that the latch is toward the rear of the arrow on the disk drive and pulling up the latch. Install the replacement drive: a. 6. c.
Maintenance Guide
Page 6
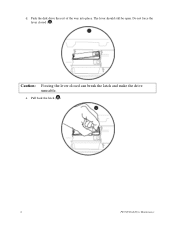
Pull back the latch ( ). 6 PS5500 Disk Drive Maintenance d. e. Do not force the lever closed can break the latch and make the drive unusable. Caution: Forcing the lever closed ( ). Push the disk drive the rest of the way into place. The lever should still be open.
Pull back the latch ( ). 6 PS5500 Disk Drive Maintenance d. e. Do not force the lever closed can break the latch and make the drive unusable. Caution: Forcing the lever closed ( ). Push the disk drive the rest of the way into place. The lever should still be open.
Maintenance Guide
Page 7
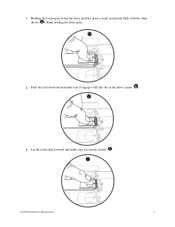
Holding the latch open . Push the latch forward and make sure it engages with the other drives ( ). g. h. f. PS5500 Disk Drive Maintenance 7 Let the latch slide forward and make sure it is fully seated and flush with the slot in the drive carrier ( ). Keep holding the latch open , lower the lever until the drive is firmly closed ( ).
Holding the latch open . Push the latch forward and make sure it engages with the other drives ( ). g. h. f. PS5500 Disk Drive Maintenance 7 Let the latch slide forward and make sure it is fully seated and flush with the slot in the drive carrier ( ). Keep holding the latch open , lower the lever until the drive is firmly closed ( ).
Maintenance Guide
Page 8
... chassis into the rack. Contacting Dell You can access Dell Support through the following websites: • support.dell.com • support.dell.com/EqualLogic • support.jp.dell.com (Japan only) • support.euro.dell.com (Europe only) 8 PS5500 Disk Drive Maintenance If the cover does not close completely, make sure the cam screws are turned counter-clockwise before you replace a failed disk drive, return the drive in the packaging in which the replacement card was shipped. Use...
... chassis into the rack. Contacting Dell You can access Dell Support through the following websites: • support.dell.com • support.dell.com/EqualLogic • support.jp.dell.com (Japan only) • support.euro.dell.com (Europe only) 8 PS5500 Disk Drive Maintenance If the cover does not close completely, make sure the cam screws are turned counter-clockwise before you replace a failed disk drive, return the drive in the packaging in which the replacement card was shipped. Use...

