Dell Monitor Display Manager Users Guide
Page 1
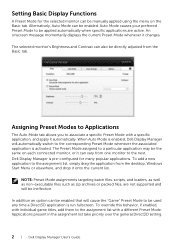
... select Dell models. Using the Quick Settings Dialog Clicking Dell Display Manager's notification tray icon opens the Quick Settings dialog box. When more than one supported Dell model is used to the system is always available when hovering over the notification tray icon. It allows manual adjustment of the displayed image, assignment of the monitor's Brightness and Contrast levels, Preset Modes can be manually selected or set to Auto Mode, and the screen resolution can be changed. The Quick Settings dialog...
... select Dell models. Using the Quick Settings Dialog Clicking Dell Display Manager's notification tray icon opens the Quick Settings dialog box. When more than one supported Dell model is used to the system is always available when hovering over the notification tray icon. It allows manual adjustment of the displayed image, assignment of the monitor's Brightness and Contrast levels, Preset Modes can be manually selected or set to Auto Mode, and the screen resolution can be changed. The Quick Settings dialog...
Dell Monitor Display Manager Users Guide
Page 2
... is enabled, Dell Display Manager will automatically switch to associate a specific Preset Mode with a different Preset Mode. The selected monitor's Brightness and Contrast can be enabled that will be directly adjusted from the desktop, Windows Start Menu or elsewhere, and drop it changes. When Auto Mode is activated. Applications present in the assignment list take priority over the general Direct3D setting. 2 | Dell Display Manager User's Guide NOTE: Preset Mode assignments targeting batch...
... is enabled, Dell Display Manager will automatically switch to associate a specific Preset Mode with a different Preset Mode. The selected monitor's Brightness and Contrast can be enabled that will be directly adjusted from the desktop, Windows Start Menu or elsewhere, and drop it changes. When Auto Mode is activated. Applications present in the assignment list take priority over the general Direct3D setting. 2 | Dell Display Manager User's Guide NOTE: Preset Mode assignments targeting batch...
Dell User Guide
Page 3
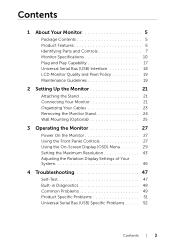
... Parts and Controls 7 Monitor Specifications 10 Plug and Play Capability 17 Universal Serial Bus (USB) Interface 18 LCD Monitor Quality and Pixel Policy 19 Maintenance Guidelines 19 2 Setting Up the Monitor 21 Attaching the Stand 21 Connecting Your Monitor 21 Organizing Your Cables 23 Removing the Monitor Stand 24 Wall Mounting (Optional 25 3 Operating the Monitor 27 Power On the Monitor 27 Using the Front Panel Controls 27 Using the On-Screen Display (OSD) Menu 29 Setting the Maximum Resolution 43 Adjusting the Rotation Display Settings of...
... Parts and Controls 7 Monitor Specifications 10 Plug and Play Capability 17 Universal Serial Bus (USB) Interface 18 LCD Monitor Quality and Pixel Policy 19 Maintenance Guidelines 19 2 Setting Up the Monitor 21 Attaching the Stand 21 Connecting Your Monitor 21 Organizing Your Cables 23 Removing the Monitor Stand 24 Wall Mounting (Optional 25 3 Operating the Monitor 27 Power On the Monitor 27 Using the Front Panel Controls 27 Using the On-Screen Display (OSD) Menu 29 Setting the Maximum Resolution 43 Adjusting the Rotation Display Settings of...
Dell User Guide
Page 6
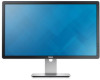
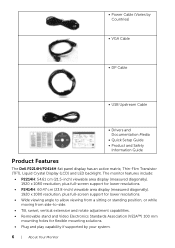
...-to-side. • Tilt, swivel, vertical extension and rotate adjustment capabilities. • Removable stand and Video Electronics Standards Association (VESA™) 100 mm mounting holes for flexible mounting solutions. • Plug and play capability if supported by Countries) • VGA Cable • DP Cable • USB Upstream Cable • Drivers and Documentation Media • Quick Setup Guide • Product and Safety Information Guide Product Features The Dell P2214H/P2414H flat panel display has an active matrix...
...-to-side. • Tilt, swivel, vertical extension and rotate adjustment capabilities. • Removable stand and Video Electronics Standards Association (VESA™) 100 mm mounting holes for flexible mounting solutions. • Plug and play capability if supported by Countries) • VGA Cable • DP Cable • USB Upstream Cable • Drivers and Documentation Media • Quick Setup Guide • Product and Safety Information Guide Product Features The Dell P2214H/P2414H flat panel display has an active matrix...
Dell User Guide
Page 7
... panel only. • High Dynamic Contrast Ratio (2,000,000:1). • 0.3 W standby power when in the sleep mode. • Energy Gauge shows the energy level being consumed by the monitor in real time. • On-Screen Display (OSD) adjustments for ease of set-up and screen optimization. • Software and documentation media includes an Information File (INF), Image Color Matching File (ICM), and product documentation. • Dell Display Manager Software...
... panel only. • High Dynamic Contrast Ratio (2,000,000:1). • 0.3 W standby power when in the sleep mode. • Energy Gauge shows the energy level being consumed by the monitor in real time. • On-Screen Display (OSD) adjustments for ease of set-up and screen optimization. • Software and documentation media includes an Information File (INF), Image Color Matching File (ICM), and product documentation. • Dell Display Manager Software...
Dell User Guide
Page 10
... (72%) test standards. **[P2414H] color gamut (typical) is based on the monitor. 7 Stand lock feature To lock the stand to the computer and USB upstream connector on CIE1976 (86%) and CIE1931 (72%) test standards. 10 | About Your Monitor 6 USB downstream port Connect your USB device. Monitor Specifications Flat Panel Specifications Model Screen type Panel type Screen dimensions Viewable image dimension • Horizontal • Vertical Pixel pitch Viewing angle Luminance output Contrast ratio Faceplate coating Backlight Response time Color depth Color gamut P2214H Active...
... (72%) test standards. **[P2414H] color gamut (typical) is based on the monitor. 7 Stand lock feature To lock the stand to the computer and USB upstream connector on CIE1976 (86%) and CIE1931 (72%) test standards. 10 | About Your Monitor 6 USB downstream port Connect your USB device. Monitor Specifications Flat Panel Specifications Model Screen type Panel type Screen dimensions Viewable image dimension • Horizontal • Vertical Pixel pitch Viewing angle Luminance output Contrast ratio Faceplate coating Backlight Response time Color depth Color gamut P2214H Active...
Dell User Guide
Page 23
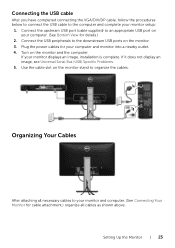
... not display an image, see Universal Serial Bus (USB) Specific Problems. 5. Connecting the USB cable After you have completed connecting the VGA/DVI/DP cable, follow the procedures below to connect the USB cable to the computer and complete your monitor displays an image, installation is complete. If your monitor setup: 1. Connect the upstream USB port (cable supplied) to the downstream USB ports on your computer and monitor into a nearby outlet. 4. Connect the USB peripherals to an appropriate USB port on the monitor. 3. Plug the power cables for...
... not display an image, see Universal Serial Bus (USB) Specific Problems. 5. Connecting the USB cable After you have completed connecting the VGA/DVI/DP cable, follow the procedures below to connect the USB cable to the computer and complete your monitor displays an image, installation is complete. If your monitor setup: 1. Connect the upstream USB port (cable supplied) to the downstream USB ports on your computer and monitor into a nearby outlet. 4. Connect the USB peripherals to an appropriate USB port on the monitor. 3. Plug the power cables for...

Dell User Guide
Page 28
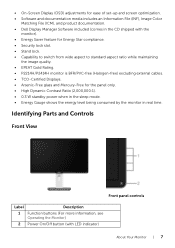
... Brightness/Contrast menu. Front Panel Button Use the buttons on the front of the monitor to adjust (increase ranges) items in the OSD menu. 28 | Operating the Monitor Front Panel Button 1 Up 2 Down Description Use the Up button to adjust the image settings. A breathing white light indicates the power save mode. Shortcut key/ Brightness/ Contrast 3 Use the MENU button to turn the monitor On and Off. Exit 5 Use the Power button to launch the On-Screen Display (OSD) and select the OSD Menu. Use the Down button to adjust (decrease ranges) items in the OSD menu. 2 Use...
... Brightness/Contrast menu. Front Panel Button Use the buttons on the front of the monitor to adjust (increase ranges) items in the OSD menu. 28 | Operating the Monitor Front Panel Button 1 Up 2 Down Description Use the Up button to adjust the image settings. A breathing white light indicates the power save mode. Shortcut key/ Brightness/ Contrast 3 Use the MENU button to turn the monitor On and Off. Exit 5 Use the Power button to launch the On-Screen Display (OSD) and select the OSD Menu. Use the Down button to adjust (decrease ranges) items in the OSD menu. 2 Use...

Dell User Guide
Page 32
... video signal. Auto Adjust Even though your computer recognizes your particular setup. Icon Menu and Submenus Description Brightness/ Use this menu to decrease the contrast (min. 0 / max 100). NOTE: Manual adjustment of Brightness is disabled when Energy Smart or Dynamic Contrast is switched on startup, the Auto Adjustment function optimizes the display settings for your monitor by using the analog (VGA) connector. 32 | Operating the Monitor Press the button to increase the contrast and press the button to activate Brightness/Contrast adjustment. Contrast Adjust...
... video signal. Auto Adjust Even though your computer recognizes your particular setup. Icon Menu and Submenus Description Brightness/ Use this menu to decrease the contrast (min. 0 / max 100). NOTE: Manual adjustment of Brightness is disabled when Energy Smart or Dynamic Contrast is switched on startup, the Auto Adjustment function optimizes the display settings for your monitor by using the analog (VGA) connector. 32 | Operating the Monitor Press the button to increase the contrast and press the button to activate Brightness/Contrast adjustment. Contrast Adjust...
Dell User Guide
Page 35
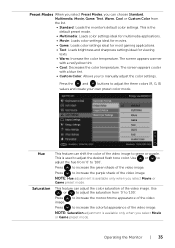
... the monitor's default color settings. This is the default preset mode. • Multimedia: Loads color settings ideal for multimedia applications. • Movie: Loads color settings ideal for movies. • Game: Loads color settings ideal for most gaming applications. • Text: Loads brightness and sharpness settings ideal for viewing texts. • Warm: Increase the color temperature. Press the and buttons to increase the green shade of the video image. NOTE: Saturation adjustment...
... the monitor's default color settings. This is the default preset mode. • Multimedia: Loads color settings ideal for multimedia applications. • Movie: Loads color settings ideal for movies. • Game: Loads color settings ideal for most gaming applications. • Text: Loads brightness and sharpness settings ideal for viewing texts. • Warm: Increase the color temperature. Press the and buttons to increase the green shade of the video image. NOTE: Saturation adjustment...

Dell User Guide
Page 36
.... Horizontal Use or to the factory settings. Vertical Position Use or to restore default display settings. Reset Display Select this option to adjust the image up or down. Settings Display Use the Display Settings to '100'. Minimum is '100' (+). Use or to adjust the sharpness from '0' to adjust image. Minimum is available only when you to adjust your monitor to provide sharper and more detailed image quality. Image Enhance Makes upsized images higher quality by removing image fading and roughness of contrast...
.... Horizontal Use or to the factory settings. Vertical Position Use or to restore default display settings. Reset Display Select this option to adjust the image up or down. Settings Display Use the Display Settings to '100'. Minimum is '100' (+). Use or to adjust the sharpness from '0' to adjust image. Minimum is available only when you to adjust your monitor to provide sharper and more detailed image quality. Image Enhance Makes upsized images higher quality by removing image fading and roughness of contrast...

Dell User Guide
Page 38
... your Display Rotation. Either soft lock (through the OSD menu) or hard lock (press and hold the button above the power button for 10 seconds) Reset Menu Reset all OSD settings to change the menu transparency by 90 degrees counter-clockwise. Settings 38 | Operating the Monitor Only hard unlock (press and hold the button above the power button for 10 seconds) Unlock function- Timer OSD Hold Time: sets the length of the eight languages (English, Spanish...
... your Display Rotation. Either soft lock (through the OSD menu) or hard lock (press and hold the button above the power button for 10 seconds) Reset Menu Reset all OSD settings to change the menu transparency by 90 degrees counter-clockwise. Settings 38 | Operating the Monitor Only hard unlock (press and hold the button above the power button for 10 seconds) Unlock function- Timer OSD Hold Time: sets the length of the eight languages (English, Spanish...
Dell User Guide
Page 43
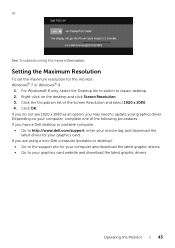
... http://www.dell.com/support, enter your service tag, and download the latest driver for the monitor: Windows® 7 or Windows® 8: 1. Click the Dropdown list of the following procedures: If you may need to classic desktop. 2. Click OK. Depending on the desktop and click Screen Resolution. 3. Setting the Maximum Resolution To set the maximum resolution for your computer, complete one of the Screen Resolution and select...
... http://www.dell.com/support, enter your service tag, and download the latest driver for the monitor: Windows® 7 or Windows® 8: 1. Click the Dropdown list of the following procedures: If you may need to classic desktop. 2. Click OK. Depending on the desktop and click Screen Resolution. 3. Setting the Maximum Resolution To set the maximum resolution for your computer, complete one of the Screen Resolution and select...

Dell User Guide
Page 47
... and the monitor. 2. To ensure proper Self-Test operation, remove all Digital (white connector) and the Analog (blue connector) cables from the back of computer. 3. Turn off both your monitor and computer are properly connected but the monitor screen remains dark, run the monitor self-test by performing the following steps: 1. Also, depending upon the selected input, one of the procedures in self-test mode, the power LED remains white.
... and the monitor. 2. To ensure proper Self-Test operation, remove all Digital (white connector) and the Analog (blue connector) cables from the back of computer. 3. Turn off both your monitor and computer are properly connected but the monitor screen remains dark, run the monitor self-test by performing the following steps: 1. Also, depending upon the selected input, one of the procedures in self-test mode, the power LED remains white.

Dell User Guide
Page 48
... inherent problem with your monitor, or with your monitor is clean (no dust particles on both your monitor and reconnect the video cable; Ensure that helps you determine if the screen abnormality you use the previous procedure, check your video controller and computer, because your computer and video card. NOTE: You can run the built-in diagnostics: 1. or 4. The monitor then goes into the self-test mode. 48 | Troubleshooting...
... inherent problem with your monitor, or with your monitor is clean (no dust particles on both your monitor and reconnect the video cable; Ensure that helps you determine if the screen abnormality you use the previous procedure, check your video controller and computer, because your computer and video card. NOTE: You can run the built-in diagnostics: 1. or 4. The monitor then goes into the self-test mode. 48 | Troubleshooting...

Dell User Guide
Page 49
... Input Source menu. • Increase brightness & contrast controls via OSD. • Reset the monitor to Factory Settings. • Check environmental factors. • Relocate the monitor and test in diagnostics. • Ensure that the power outlet is functioning properly using the built-in green, blue, black, white and text screens. Repeat steps 5 and 6 to red. 6. If you might encounter and the possible solutions: Common Symptoms What You Experience No Video/Power No picture LED off No Video/Power...
... Input Source menu. • Increase brightness & contrast controls via OSD. • Reset the monitor to Factory Settings. • Check environmental factors. • Relocate the monitor and test in diagnostics. • Ensure that the power outlet is functioning properly using the built-in green, blue, black, white and text screens. Repeat steps 5 and 6 to red. 6. If you might encounter and the possible solutions: Common Symptoms What You Experience No Video/Power No picture LED off No Video/Power...

Dell User Guide
Page 50
... controls via OSD. • Perform monitor self-test feature check to Factory Settings. • Auto Adjust via OSD. • Adjust brightness & contrast controls via OSD. Issues smoke or sparks • Contact Dell immediately. Brightness Problems Picture too dim or too bright • Reset the monitor to determine if the scrambled screen appears in self-test mode. • Check for bent or broken pins in the video cable connector. • Run the built-in diagnostics. NOTE: When using DVI-D/DisplayPort input...
... controls via OSD. • Perform monitor self-test feature check to Factory Settings. • Auto Adjust via OSD. • Adjust brightness & contrast controls via OSD. Issues smoke or sparks • Contact Dell immediately. Brightness Problems Picture too dim or too bright • Reset the monitor to determine if the scrambled screen appears in self-test mode. • Check for bent or broken pins in the video cable connector. • Run the built-in diagnostics. NOTE: When using DVI-D/DisplayPort input...

Dell User Guide
Page 51
... any key on the screen No Input Signal No picture, the when user LED light is blue. Adjust R/G/B value in Color Settings OSD if the Color Management is turned off. • Change the Input Color Format to PC RGB or YPbPr in the Advance Setting OSD. • Run the built-in diagnostics. • Use the Power Management feature to unlock (for more information, see "Lock"). • Check the signal source. NOTE: When choosing DVI-D mode, the Auto Adjust function will not...
... any key on the screen No Input Signal No picture, the when user LED light is blue. Adjust R/G/B value in Color Settings OSD if the Color Management is turned off. • Change the Input Color Format to PC RGB or YPbPr in the Advance Setting OSD. • Run the built-in diagnostics. • Use the Power Management feature to unlock (for more information, see "Lock"). • Check the signal source. NOTE: When choosing DVI-D mode, the Auto Adjust function will not...
Dell User Guide
Page 53
... Your Monitor Setting the display resolution For maximum display performance with Microsoft® Windows® operating systems, set the display resolution to shock, electrical hazards, and/or mechanical hazards. FCC Notices (U.S. To contact Dell for you can find contact information on your area. Select the appropriate service Sor support link based on your country or region in the Choose A Country/Region drop-down menu...
... Your Monitor Setting the display resolution For maximum display performance with Microsoft® Windows® operating systems, set the display resolution to shock, electrical hazards, and/or mechanical hazards. FCC Notices (U.S. To contact Dell for you can find contact information on your area. Select the appropriate service Sor support link based on your country or region in the Choose A Country/Region drop-down menu...

Dell User Guide
Page 54
... you may need to www.dell.com/support, enter your service tag, and download the latest driver for example, http://www.ATI.com OR http://www.NVIDIA.com). 7. Refer to classic desktop. 2. Click Change Display Settings. 4. Right-click on the desktop and click Screen Resolution. 3. Click the Dropdown list of the window (e.g. After installing the drivers for your graphics adapter, attempt to set the resolution to 1920...
... you may need to www.dell.com/support, enter your service tag, and download the latest driver for example, http://www.ATI.com OR http://www.NVIDIA.com). 7. Refer to classic desktop. 2. Click Change Display Settings. 4. Right-click on the desktop and click Screen Resolution. 3. Click the Dropdown list of the window (e.g. After installing the drivers for your graphics adapter, attempt to set the resolution to 1920...


