User's Guide
Page 2
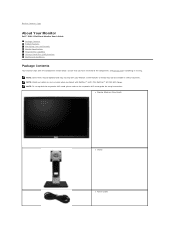
...Dell™ P1911 Flat Panel Monitor User's Guide Package Contents Product Features Identifying Parts and Controls Monitor Specifications Plug and Play Capability Universal Serial Bus (USB) Interface Maintenance Guidelines Package Contents Your monitor ships with the respective AIO stand, please refer to the respective AIO stand... in certain countries. NOTE: To set up with the components shown below. l Monitor (Black or Silver Bezel) l Stand l Power Cable NOTE: Stand and cables are not included when purchased with your Monitor. NOTE: Some items may not ship with OptiPlex™ USFF ...
...Dell™ P1911 Flat Panel Monitor User's Guide Package Contents Product Features Identifying Parts and Controls Monitor Specifications Plug and Play Capability Universal Serial Bus (USB) Interface Maintenance Guidelines Package Contents Your monitor ships with the respective AIO stand, please refer to the respective AIO stand... in certain countries. NOTE: To set up with the components shown below. l Monitor (Black or Silver Bezel) l Stand l Power Cable NOTE: Stand and cables are not included when purchased with your Monitor. NOTE: Some items may not ship with OptiPlex™ USFF ...
User's Guide
Page 3
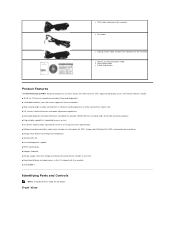
...) . ■ 1440x900 resolution, plus full-screen support for lower resolutions. ■ Wide viewing angle to allow viewing from a sitting or standing position, or while moving from side-to the monitor) l DVI Cable l USB up and screen optimization. ■ Software and documentation media ...up stream cable (enables the USB ports on the monitor) l Drivers and Documentation media l Quick Setup Guide l Safety Information Product Features The Dell Professional P1911 flat panel display has an active matrix, thin-film transistor (TFT), liquid crystal display (LCD). l VGA Cable (attached to -side. ...
...) . ■ 1440x900 resolution, plus full-screen support for lower resolutions. ■ Wide viewing angle to allow viewing from a sitting or standing position, or while moving from side-to the monitor) l DVI Cable l USB up and screen optimization. ■ Software and documentation media ...up stream cable (enables the USB ports on the monitor) l Drivers and Documentation media l Quick Setup Guide l Safety Information Product Features The Dell Professional P1911 flat panel display has an active matrix, thin-film transistor (TFT), liquid crystal display (LCD). l VGA Cable (attached to -side. ...

User's Guide
Page 4
...3 Menu 4 Exit 5 Power button (with power light indicator) Back View Front panel controls Back view Back View with monitor stand Label Description Use VESA mounting holes (100mm) 1 (Behind attached base plate) To mount the monitor. 2 Security lock slot To help secure your... monitor. 3 Dell Soundbar mounting brackets To attach the optional Dell Soundbar. 4 Stand Release Button To press to release the stand. 5 Cable management slot To organize cables by placing them through the slot. 6 label ...
...3 Menu 4 Exit 5 Power button (with power light indicator) Back View Front panel controls Back view Back View with monitor stand Label Description Use VESA mounting holes (100mm) 1 (Behind attached base plate) To mount the monitor. 2 Security lock slot To help secure your... monitor. 3 Dell Soundbar mounting brackets To attach the optional Dell Soundbar. 4 Stand Release Button To press to release the stand. 5 Cable management slot To organize cables by placing them through the slot. 6 label ...
User's Guide
Page 31
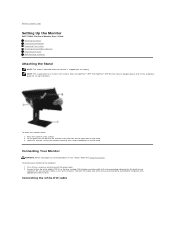
... the white DVI cable Back to Contents Page Setting Up the Monitor Dell™ P1911 Flat Panel Monitor User's Guide Attaching the Stand Connecting the Monitor Organizing Your Cables Attaching the Soundbar (optional) Removing the Stand Wall Mounting (Optional) Attaching the Stand NOTE: The stand is detached when the monitor is applicable for set up instructions...
... the white DVI cable Back to Contents Page Setting Up the Monitor Dell™ P1911 Flat Panel Monitor User's Guide Attaching the Stand Connecting the Monitor Organizing Your Cables Attaching the Soundbar (optional) Removing the Stand Wall Mounting (Optional) Attaching the Stand NOTE: The stand is detached when the monitor is applicable for set up instructions...

User's Guide
Page 32
... (side or bottom) on your computer and monitor into a nearby outlet. 4. Use the cable holder on the monitor and the computer. Turn on the monitor stand to the computer and complete your monitor displays an image, installation is complete. Appearance of illustration only.
... (side or bottom) on your computer and monitor into a nearby outlet. 4. Use the cable holder on the monitor and the computer. Turn on the monitor stand to the computer and complete your monitor displays an image, installation is complete. Appearance of illustration only.
User's Guide
Page 33
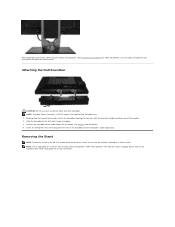
...place. 3. Insert the lime-green mini stereo plug from the rear of the monitor. 2. Attaching the Dell Soundbar CAUTION: Do not use the cable management slot to the respective AIO stand setup guide for set up instructions. Slide the Soundbar to the Audio Power DC-out socket (see ...Connect the soundbar to the left until it snaps into the computer's audio output jack. Removing the Stand NOTE: To prevent scratches on the LCD screen while removing the stand, ensure that the monitor is for optional Dell Soundbar only. 1. When the OptiPlex™ USFF 780/ OptiPlex™ SFF 980 AIO...
...place. 3. Insert the lime-green mini stereo plug from the rear of the monitor. 2. Attaching the Dell Soundbar CAUTION: Do not use the cable management slot to the respective AIO stand setup guide for set up instructions. Slide the Soundbar to the Audio Power DC-out socket (see ...Connect the soundbar to the left until it snaps into the computer's audio output jack. Removing the Stand NOTE: To prevent scratches on the LCD screen while removing the stand, ensure that the monitor is for optional Dell Soundbar only. 1. When the OptiPlex™ USFF 780/ OptiPlex™ SFF 980 AIO...

User's Guide
Page 34
... kit. Attach the mounting bracket from the monitor. Back to remove the four screws securing the plastic cover. 4. Lift the stand up and away from the wall mounting kit to the stand release button. 2. Wall Mounting (Optional) (Screw dimension: M4 x 10 mm). Use a screwdriver to Contents Page NOTE: For... use only with UL Listed Wall Mount Bracket with the VESA-compatible base mounting kit. 1. Rotate the stand to allow access to the LCD. 5. Place the monitor panel on a soft cloth or cushion on the wall by following the instructions that come ...
... kit. Attach the mounting bracket from the monitor. Back to remove the four screws securing the plastic cover. 4. Lift the stand up and away from the wall mounting kit to the stand release button. 2. Wall Mounting (Optional) (Screw dimension: M4 x 10 mm). Use a screwdriver to Contents Page NOTE: For... use only with UL Listed Wall Mount Bracket with the VESA-compatible base mounting kit. 1. Rotate the stand to allow access to the LCD. 5. Place the monitor panel on a soft cloth or cushion on the wall by following the instructions that come ...


