User's Guide
Page 1
... trademarks and trade names may be used in the United States and/or other than its own. A00 is a trademark of Dell Inc. has determined that helps you how to change without the written permission of Advanced Micro Devices, Inc. Dell Inc. Dell™ P1911 Flat Panel Monitor User's Guide About Your Monitor Setting Up the Monitor Operating the Monitor Troubleshooting Appendix Notes, Notices, and Cautions NOTE...
... trademarks and trade names may be used in the United States and/or other than its own. A00 is a trademark of Dell Inc. has determined that helps you how to change without the written permission of Advanced Micro Devices, Inc. Dell Inc. Dell™ P1911 Flat Panel Monitor User's Guide About Your Monitor Setting Up the Monitor Operating the Monitor Troubleshooting Appendix Notes, Notices, and Cautions NOTE...
User's Guide
Page 2
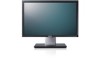
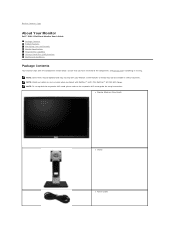
... below. NOTE: To set up with the respective AIO stand, please refer to Contents Page About Your Monitor Dell™ P1911 Flat Panel Monitor User's Guide Package Contents Product Features Identifying Parts and Controls Monitor Specifications Plug and Play Capability Universal Serial Bus (USB) Interface Maintenance Guidelines Package Contents Your monitor ships with OptiPlex™ USFF 780/ OptiPlex™ SFF 980 AIO Stands. Back to the respective AIO stand guide for setup instructions.
... below. NOTE: To set up with the respective AIO stand, please refer to Contents Page About Your Monitor Dell™ P1911 Flat Panel Monitor User's Guide Package Contents Product Features Identifying Parts and Controls Monitor Specifications Plug and Play Capability Universal Serial Bus (USB) Interface Maintenance Guidelines Package Contents Your monitor ships with OptiPlex™ USFF 780/ OptiPlex™ SFF 980 AIO Stands. Back to the respective AIO stand guide for setup instructions.
User's Guide
Page 3
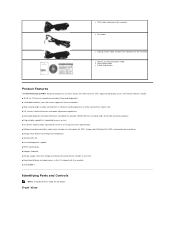
... lock slot. ■ Asset Management Capable. ■ EPEAT Gold Rating. ■ Halogen Reduced. ■ Energy Gauge shows the energy level being consumed by your system. ■ On-Screen Display (OSD) adjustments for illustration Front View Identifying Parts and Controls NOTE: Using Black bezel model for ease of set-up stream cable (enables the USB ports on the monitor) l Drivers and Documentation media l Quick Setup Guide l Safety Information Product Features The Dell Professional P1911 flat panel display...
... lock slot. ■ Asset Management Capable. ■ EPEAT Gold Rating. ■ Halogen Reduced. ■ Energy Gauge shows the energy level being consumed by your system. ■ On-Screen Display (OSD) adjustments for illustration Front View Identifying Parts and Controls NOTE: Using Black bezel model for ease of set-up stream cable (enables the USB ports on the monitor) l Drivers and Documentation media l Quick Setup Guide l Safety Information Product Features The Dell Professional P1911 flat panel display...

User's Guide
Page 4
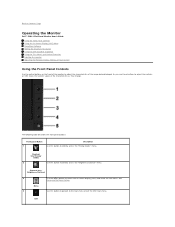
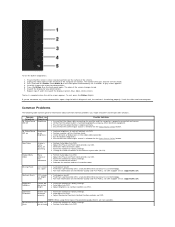
... View Label Description 1 Energy Modes (default, but configurable) 2 Brightness & Contrast (default, but configurable) 3 Menu 4 Exit 5 Power button (with power light indicator) Back View Front panel controls Back view Back View with monitor stand Label Description Use VESA mounting holes (100mm) 1 (Behind attached base plate) To mount the monitor. 2 Security lock slot To help secure your monitor. 3 Dell Soundbar mounting brackets To attach the optional Dell Soundbar. 4 Stand Release Button To press to release the stand. 5 Cable management slot To organize cables...
... View Label Description 1 Energy Modes (default, but configurable) 2 Brightness & Contrast (default, but configurable) 3 Menu 4 Exit 5 Power button (with power light indicator) Back View Front panel controls Back view Back View with monitor stand Label Description Use VESA mounting holes (100mm) 1 (Behind attached base plate) To mount the monitor. 2 Security lock slot To help secure your monitor. 3 Dell Soundbar mounting brackets To attach the optional Dell Soundbar. 4 Stand Release Button To press to release the stand. 5 Cable management slot To organize cables...
User's Guide
Page 12
... online and telephone-based support and service options. Availability varies by country and product, and some services may result in your purchase invoice, packing slip, bill, or Dell product catalog. Back to Contents Page Appendix Dell™ P1911 Flat Panel Monitor User's Guide Safety Instructions FCC Notice (U.S. FCC Notices (U.S. NOTE: If you do not have an active Internet connection, you . To contact Dell for you...
... online and telephone-based support and service options. Availability varies by country and product, and some services may result in your purchase invoice, packing slip, bill, or Dell product catalog. Back to Contents Page Appendix Dell™ P1911 Flat Panel Monitor User's Guide Safety Instructions FCC Notice (U.S. FCC Notices (U.S. NOTE: If you do not have an active Internet connection, you . To contact Dell for you...
User's Guide
Page 15
... Advanced. 4. Refer to the graphic card provider website for updated driver (for example, http://www.ATI.com OR http://www.NVIDIA.com ). 6. Identify your computer or consider purchasing a graphics adapter that will support the video resolution of the window (e.g. Back to Contents Page Setting Up Your Monitor Dell™ P1911 Flat Panel Monitor If you are unable to set the resolution to 1440 x 900, please contact the...
... Advanced. 4. Refer to the graphic card provider website for updated driver (for example, http://www.ATI.com OR http://www.NVIDIA.com ). 6. Identify your computer or consider purchasing a graphics adapter that will support the video resolution of the window (e.g. Back to Contents Page Setting Up Your Monitor Dell™ P1911 Flat Panel Monitor If you are unable to set the resolution to 1440 x 900, please contact the...
User's Guide
Page 16
... modes" menu. Shortcut key / Brightness/Contrast 3 Use the MENU button to launch the on the front of the monitor to adjust the characteristics of the image being displayed. Exit Back to Contents Page Operating the Monitor Dell™ P1911 Flat Panel Monitor User's Guide Using the Front Panel Controls Using the On-Screen Display (OSD) Menu PowerNap Software Setting the Maximum Resolution Using the Dell Soundbar (Optional) Using the Tilt, Swivel, and Vertical Extension Rotating the monitor Adjusting the Rotation Display Settings of Your System Using the Front Panel Controls Use the...
... modes" menu. Shortcut key / Brightness/Contrast 3 Use the MENU button to launch the on the front of the monitor to adjust the characteristics of the image being displayed. Exit Back to Contents Page Operating the Monitor Dell™ P1911 Flat Panel Monitor User's Guide Using the Front Panel Controls Using the On-Screen Display (OSD) Menu PowerNap Software Setting the Maximum Resolution Using the Dell Soundbar (Optional) Using the Tilt, Swivel, and Vertical Extension Rotating the monitor Adjusting the Rotation Display Settings of Your System Using the Front Panel Controls Use the...

User's Guide
Page 17
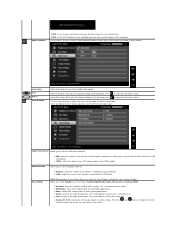
Press the MENU button to make your changes. 6. An amber LED indicates DPMS power save mode. Main Menu for Analog (VGA) Input or Main Menu for the OSD menu to disappear. 1. Press to enter the slide bar and then use the analog (VGA) connector. 2. Power (with power light indicator) The Blue LED indicates the monitor is highlighted. The changes are also saved if you change the settings and then either proceed to exit from the OSD menu. Press the and buttons to move...
Press the MENU button to make your changes. 6. An amber LED indicates DPMS power save mode. Main Menu for Analog (VGA) Input or Main Menu for the OSD menu to disappear. 1. Press to enter the slide bar and then use the analog (VGA) connector. 2. Power (with power light indicator) The Blue LED indicates the monitor is highlighted. The changes are also saved if you change the settings and then either proceed to exit from the OSD menu. Press the and buttons to move...
User's Guide
Page 25
... using the VGA and DVI cable or the HDMI to DVI adapter. Use the Color Settings to adjust the Red, Green, and Blue values and create your own preset color mode. l Game: Loads color settings ideal for your monitor is connected to scan for multimedia applications. l Cool: Decreases the color temperature. Select DVI-D input when you are using the analog (VGA) connector. Input Color Format Allows you can choose Standard, Multimedia, Game, Warm, Cool, or Custom (RGB): l Standard: Loads the monitor's default color settings. l RGB...
... using the VGA and DVI cable or the HDMI to DVI adapter. Use the Color Settings to adjust the Red, Green, and Blue values and create your own preset color mode. l Game: Loads color settings ideal for your monitor is connected to scan for multimedia applications. l Cool: Decreases the color temperature. Select DVI-D input when you are using the analog (VGA) connector. Input Color Format Allows you can choose Standard, Multimedia, Game, Warm, Cool, or Custom (RGB): l Standard: Loads the monitor's default color settings. l RGB...

User's Guide
Page 26
... colorful appearance of the video image NOTE: Saturation adjustment is available only for video input. Reset Color Setting s DISPLAY SETTINGS Resets your monitor's color settings to adjust image. When you select Video, you can shift color of video image to green or purple. This feature can adjust the color saturation of the video image. This is the default preset mode. Display Setting submenu for sports. l Sports: Loads color settings ideal for VGA input to adjust the saturation from '0' to adjust the desired flesh tone color. This is used...
... colorful appearance of the video image NOTE: Saturation adjustment is available only for video input. Reset Color Setting s DISPLAY SETTINGS Resets your monitor's color settings to adjust image. When you select Video, you can shift color of video image to green or purple. This feature can adjust the color saturation of the video image. This is the default preset mode. Display Setting submenu for sports. l Sports: Loads color settings ideal for VGA input to adjust the saturation from '0' to adjust the desired flesh tone color. This is used...

User's Guide
Page 27
... "VGA" input. Dynamic Contrast The Dynamic Contrast adjustment helps the user to disable the Dynamic Contrast adjustment. Reset Display Setti ngs OTHER SETTINGS Select this option to restore default display settings. Sharpness Pixel Clock NOTE: When using a DVI source, the Vertical Position setting is not available. This feature can make the image look sharper or softer. Use the button to get a higher contrast if you to adjust your monitor to enable the Dynamic Contrast adjustment. Use the and buttons to adjust for best image quality. Phase Use the...
... "VGA" input. Dynamic Contrast The Dynamic Contrast adjustment helps the user to disable the Dynamic Contrast adjustment. Reset Display Setti ngs OTHER SETTINGS Select this option to restore default display settings. Sharpness Pixel Clock NOTE: When using a DVI source, the Vertical Position setting is not available. This feature can make the image look sharper or softer. Use the button to get a higher contrast if you to adjust your monitor to enable the Dynamic Contrast adjustment. Use the and buttons to adjust for best image quality. Phase Use the...
User's Guide
Page 29
... pixels by pressing and holding the left-mouse button and adjust the screen resolution to 1440 X 900. 4. Right-click on the desktop and click Properties. 2. Please choose the scenario below that best describes the computer system you are using the Microsoft Windows operating systems, set the display resolution to 1440 X 900. 4. Click OK. Click Change Display Settings. 3. Back to Contents Page Setting Up Your Monitor Dell™ P1911 Flat Panel Monitor Setting...
... pixels by pressing and holding the left-mouse button and adjust the screen resolution to 1440 X 900. 4. Right-click on the desktop and click Properties. 2. Please choose the scenario below that best describes the computer system you are using the Microsoft Windows operating systems, set the display resolution to 1440 X 900. 4. Click OK. Click Change Display Settings. 3. Back to Contents Page Setting Up Your Monitor Dell™ P1911 Flat Panel Monitor Setting...

User's Guide
Page 30
...subject to change without the written permission of Dell Inc. Model P1911b, P1911t. Trademarks used in this text: Dell and the DELL logo are trademarks of Advanced Micro Devices, Inc. and other countries, Intel is a trademark of Dell Inc; Microsoft a n d Windows are ...169; 2010 Dell Inc. Dell™ P1911 Flat Panel Monitor User Guide Setting the display resolution to 1440 X 900 (maximum) Information in this product meets the ENERGY STAR guidelines for energy efficiency. ENERGY STAR is strictly forbidden. Other trademarks and trade names may be used in this ...
...subject to change without the written permission of Dell Inc. Model P1911b, P1911t. Trademarks used in this text: Dell and the DELL logo are trademarks of Advanced Micro Devices, Inc. and other countries, Intel is a trademark of Dell Inc; Microsoft a n d Windows are ...169; 2010 Dell Inc. Dell™ P1911 Flat Panel Monitor User Guide Setting the display resolution to 1440 X 900 (maximum) Information in this product meets the ENERGY STAR guidelines for energy efficiency. ENERGY STAR is strictly forbidden. Other trademarks and trade names may be used in this ...
User's Guide
Page 31
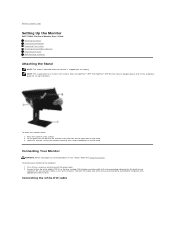
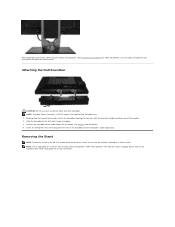
...: 1. To connect your monitor to the respective AIO guide for a monitor with appropriate video systems. Connecting the white DVI cable Do not use both the cables only when they are connected to Contents Page Setting Up the Monitor Dell™ P1911 Flat Panel Monitor User's Guide Attaching the Stand Connecting the Monitor Organizing Your Cables Attaching the Soundbar (optional) Removing the Stand Wall Mounting (Optional) Attaching the Stand NOTE: The stand is detached when the monitor is applicable for set up instructions. Back to...
...: 1. To connect your monitor to the respective AIO guide for a monitor with appropriate video systems. Connecting the white DVI cable Do not use both the cables only when they are connected to Contents Page Setting Up the Monitor Dell™ P1911 Flat Panel Monitor User's Guide Attaching the Stand Connecting the Monitor Organizing Your Cables Attaching the Soundbar (optional) Removing the Stand Wall Mounting (Optional) Attaching the Stand NOTE: The stand is detached when the monitor is applicable for set up instructions. Back to...

User's Guide
Page 32
... computer (see Solving Problems. 5. Use the cable holder on the monitor and the computer. Plug the power cables for details). 2. Connect USB peripherals to the appropriate USB port on the monitor. (See side or bottom view for the purpose of the computer may vary. Turn on the monitor stand to the computer and complete your monitor displays an image, installation is complete. Appearance of illustration only. Connecting the blue VGA cable NOTE: The Graphics...
... computer (see Solving Problems. 5. Use the cable holder on the monitor and the computer. Plug the power cables for details). 2. Connect USB peripherals to the appropriate USB port on the monitor. (See side or bottom view for the purpose of the computer may vary. Turn on the monitor stand to the computer and complete your monitor displays an image, installation is complete. Appearance of illustration only. Connecting the blue VGA cable NOTE: The Graphics...
User's Guide
Page 33
... respective AIO stand setup guide for set up instructions. Connect the soundbar to the Audio Power DC-out socket (see bottom view for a monitor with the two tabs along the bottom rear of the monitor. 2. Insert the lime-green mini stereo plug from the rear of the Soundbar into place. 3. After attaching all necessary cables to your monitor and computer, (See Connecting Your Monitor for cable attachment,) use with...
... respective AIO stand setup guide for set up instructions. Connect the soundbar to the Audio Power DC-out socket (see bottom view for a monitor with the two tabs along the bottom rear of the monitor. 2. Insert the lime-green mini stereo plug from the rear of the Soundbar into place. 3. After attaching all necessary cables to your monitor and computer, (See Connecting Your Monitor for cable attachment,) use with...

User's Guide
Page 35
... video cable is unplugged and the monitor is in self-test mode. If your monitor screen remains blank after 15 minutes if left at this section, follow the Safety Instructions Troubleshooting Your Monitor Self-Test Feature Check Your monitor provides a self-test feature that helps you determine if the screen abnormality you to Contents Page Troubleshooting Dell™ P1911 Flat Panel Monitor User's Guide Troubleshooting Your Monitor Built-in Diagnostics Common Problems Product Specific Problems Universal Serial...
... video cable is unplugged and the monitor is in self-test mode. If your monitor screen remains blank after 15 minutes if left at this section, follow the Safety Instructions Troubleshooting Your Monitor Self-Test Feature Check Your monitor provides a self-test feature that helps you determine if the screen abnormality you to Contents Page Troubleshooting Dell™ P1911 Flat Panel Monitor User's Guide Troubleshooting Your Monitor Built-in Diagnostics Common Problems Product Specific Problems Universal Serial...
User's Guide
Page 36
...Inspect the display for 2 seconds. To exit, press the Button 4 again. Check the video card and computer. l Verify that can occur in green, blue, black, white screens. l Check for abnormalities. 5. Poor Focus Picture is complete when the white screen appears. l Relocate the monitor and test in diagnostics: 1. Stuck-on Pixels LCD screen has bright spots l Cycle power on Dell Monitor Quality and Pixel Policy, see Dell Support site at : support.dell.com. l Adjust brightness & contrast controls via OSD. l Adjust Horizontal Position& Vertical Position controls via OSD. Press...
...Inspect the display for 2 seconds. To exit, press the Button 4 again. Check the video card and computer. l Verify that can occur in green, blue, black, white screens. l Check for abnormalities. 5. Poor Focus Picture is complete when the white screen appears. l Relocate the monitor and test in diagnostics: 1. Stuck-on Pixels LCD screen has bright spots l Cycle power on Dell Monitor Quality and Pixel Policy, see Dell Support site at : support.dell.com. l Adjust brightness & contrast controls via OSD. l Adjust Horizontal Position& Vertical Position controls via OSD. Press...
User's Guide
Page 37
... front panel screen No Input Signal when user controls are not available. Ensure that the video cable connecting the monitor to the computer is connected properly and is USB 2.0-capable. l Reboot the computer. Synchronization Problems Screen is scrambled or appears torn NOTE: When using DVI-D input, the Pixel Clock and Phase adjustments are pressed No picture, the LED light is secure. l Reset the monitor to PC RGB or YPbPr in the video cable connector. NOTE: When choosing DVI-D mode, the Auto Adjust...
... front panel screen No Input Signal when user controls are not available. Ensure that the video cable connecting the monitor to the computer is connected properly and is USB 2.0-capable. l Reboot the computer. Synchronization Problems Screen is scrambled or appears torn NOTE: When using DVI-D input, the Pixel Clock and Phase adjustments are pressed No picture, the LED light is secure. l Reset the monitor to PC RGB or YPbPr in the video cable connector. NOTE: When choosing DVI-D mode, the Auto Adjust...

User's Guide
Page 38
check if the power indicator (Blue LED) on the front of the audio source. l Set all Windows volume controls to their midpoints. l Clean and reseat the audio line-in plug. l Decrease the volume of the Soundbar is illuminated. l Clear any obstructions between the Soundbar and the user. l Clean and reseat the audio line-in plug. l Troubleshoot the computer's sound card. l Clear any obstructions between the Soundbar and the user. l Turn the Power/Volume knob on the...
check if the power indicator (Blue LED) on the front of the audio source. l Set all Windows volume controls to their midpoints. l Clean and reseat the audio line-in plug. l Decrease the volume of the Soundbar is illuminated. l Clear any obstructions between the Soundbar and the user. l Clean and reseat the audio line-in plug. l Troubleshoot the computer's sound card. l Clear any obstructions between the Soundbar and the user. l Turn the Power/Volume knob on the...


