User Guide
Page 3
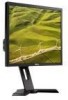
... a graphics adapter that will support the video resolution of the window (e.g. Identify your Graphics Adapter, attempt to set the resolution to the graphics card provider website for updated driver (for your graphics controller supplier from the description at the top of 1280x1024 . NOTE: If you are unable to set the resolution to Contents Page Setting Up Your Monitor Dell™ P170S/P190S Flat Panel Monitor If you have a non Dell™ desktop...
... a graphics adapter that will support the video resolution of the window (e.g. Identify your Graphics Adapter, attempt to set the resolution to the graphics card provider website for updated driver (for your graphics controller supplier from the description at the top of 1280x1024 . NOTE: If you are unable to set the resolution to Contents Page Setting Up Your Monitor Dell™ P170S/P190S Flat Panel Monitor If you have a non Dell™ desktop...
User Guide
Page 4
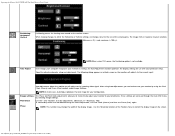
.../P190S Flat Panel Monitor User's Guide Using the Front Panel Controls Using the On-Screen Display (OSD) Menu Setting the Maximum Resolution Using the Dell Soundbar (Optional) Using the Tilt, Swivel, and Vertical Extension Changing the Rotation of Your Monitor Using the Front Panel Controls Use the control buttons on a black background if the monitor cannot sense a video signal. Using the input select button, select the desired input to be connected to your monitor. Whichever mouse is operating correctly. As you use these buttons to the exact times. If both VGA and DVI cables...
.../P190S Flat Panel Monitor User's Guide Using the Front Panel Controls Using the On-Screen Display (OSD) Menu Setting the Maximum Resolution Using the Dell Soundbar (Optional) Using the Tilt, Swivel, and Vertical Extension Changing the Rotation of Your Monitor Using the Front Panel Controls Use the control buttons on a black background if the monitor cannot sense a video signal. Using the input select button, select the desired input to be connected to your monitor. Whichever mouse is operating correctly. As you use these buttons to the exact times. If both VGA and DVI cables...
User Guide
Page 5
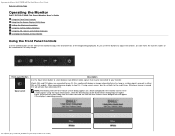
... light indicates power save mode. Use the power button to turn the monitor on a black screen as the monitor self-adjusts to the current input: Auto Adjust Auto Adjustment button allows the monitor to self-adjust to the incoming video signal. After using the Pixel Clock (Coarse), Phase (Fine) controls in the OSD menu. The following dialog appears on and off. Power Button and Indicator Using the On-Screen Display (OSD) Menu file:///S|/SSA_Proposal/P170S_P190S/UG/operate.htm[7/8/2011 4:48:31 PM] Operating the Monitor:Dell P170S/P190S Flat Panel Monitor User's Guide...
... light indicates power save mode. Use the power button to turn the monitor on a black screen as the monitor self-adjusts to the current input: Auto Adjust Auto Adjustment button allows the monitor to self-adjust to the incoming video signal. After using the Pixel Clock (Coarse), Phase (Fine) controls in the OSD menu. The following dialog appears on and off. Power Button and Indicator Using the On-Screen Display (OSD) Menu file:///S|/SSA_Proposal/P170S_P190S/UG/operate.htm[7/8/2011 4:48:31 PM] Operating the Monitor:Dell P170S/P190S Flat Panel Monitor User's Guide...
User Guide
Page 8
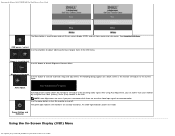
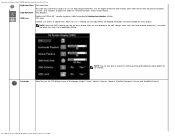
... best image for use Phase (fine), again. and + buttons to your monitor to the size of the display image. Minimum is 0 (-) and maximum is not available. After using DVI source, the Positioning option is 100 (+). Image settings: The Phase and Pixel Clock adjustments allow you can further tune your preference. When making changes to either the Horizontal or Vertical settings, no changes occur to your monitor by selecting Image Settings. Operating the Monitor:Dell P170S/P190S Flat Panel Monitor User's Guide Positioning: Horizontal Vertical Positioning moves the viewing...
... best image for use Phase (fine), again. and + buttons to your monitor to the size of the display image. Minimum is 0 (-) and maximum is not available. After using DVI source, the Positioning option is 100 (+). Image settings: The Phase and Pixel Clock adjustments allow you can further tune your preference. When making changes to either the Horizontal or Vertical settings, no changes occur to your monitor by selecting Image Settings. Operating the Monitor:Dell P170S/P190S Flat Panel Monitor User's Guide Positioning: Horizontal Vertical Positioning moves the viewing...
User Guide
Page 10
... time you pressed a button. file:///S|/SSA_Proposal/P170S_P190S/UG/operate.htm[7/8/2011 4:48:31 PM] All buttons are allowed. When Yes (+) is in use. Language Select to have the OSD display in 5 second increments, from 5 to adjustments. Adjust according to Rotating Your Monitor setction OSD Lock: Controls user access to 60 seconds. Operating the Monitor:Dell P170S/P190S Flat Panel Monitor User's Guide OSD Hold Time OSD Hold Time: OSD Rotation The OSD stays active for...
... time you pressed a button. file:///S|/SSA_Proposal/P170S_P190S/UG/operate.htm[7/8/2011 4:48:31 PM] All buttons are allowed. When Yes (+) is in use. Language Select to have the OSD display in 5 second increments, from 5 to adjustments. Adjust according to Rotating Your Monitor setction OSD Lock: Controls user access to 60 seconds. Operating the Monitor:Dell P170S/P190S Flat Panel Monitor User's Guide OSD Hold Time OSD Hold Time: OSD Rotation The OSD stays active for...
User Guide
Page 12
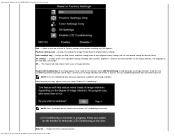
... control function. Operating the Monitor:Dell P170S/P190S Flat Panel Monitor User's Guide Exit - The language of image retention. Below warning message appears once user select "Enable LCD Conditioning": NOTE: Press any button on the monitor, select LCD Conditioning to the factory defaults. Position settings only - Change the settings for Normal Preset. All settings - This feature will help eliminate any time. Enable LCD Conditioning: If an image appears to be stuck on the monitor to Factory Settings menu without resetting any OSD...
... control function. Operating the Monitor:Dell P170S/P190S Flat Panel Monitor User's Guide Exit - The language of image retention. Below warning message appears once user select "Enable LCD Conditioning": NOTE: Press any button on the monitor, select LCD Conditioning to the factory defaults. Position settings only - Change the settings for Normal Preset. All settings - This feature will help eliminate any time. Enable LCD Conditioning: If an image appears to be stuck on the monitor to Factory Settings menu without resetting any OSD...

User Guide
Page 14
... on Dell flat panel displays. Operating the Monitor:Dell P170S/P190S Flat Panel Monitor User's Guide or Occasionally, no warning message appears, but the screen is not synchronizing with the computer. Using the Dell Soundbar (Optional) The Dell Soundbar is a stereo two channel system adaptable to your graphics driver. See Solving Problems Setting the Maximum Resolution To set the maximum resolution for your computer and download the latest graphic drivers. The Soundbar has a rotary volume and...
... on Dell flat panel displays. Operating the Monitor:Dell P170S/P190S Flat Panel Monitor User's Guide or Occasionally, no warning message appears, but the screen is not synchronizing with the computer. Using the Dell Soundbar (Optional) The Dell Soundbar is a stereo two channel system adaptable to your graphics driver. See Solving Problems Setting the Maximum Resolution To set the maximum resolution for your computer and download the latest graphic drivers. The Soundbar has a rotary volume and...
User Guide
Page 18
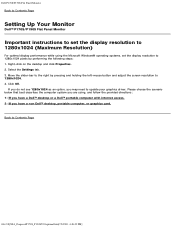
.... 2: If you may need to 1280x1024 pixels by pressing and holding the left-mouse button and adjust the screen resolution to Contents Page file:///S|/SSA_Proposal/P170S_P190S/UG/optimal.htm[7/8/2011 4:48:49 PM] Select the Settings tab. 3. Dell P170S/P190S Flat Panel Monitor Back to Contents Page Setting Up Your Monitor Dell™ P170S/P190S Flat Panel Monitor Important instructions to set the display resolution to 1280x1024 (Maximum Resolution) For optimal display performance while using , and follow the...
.... 2: If you may need to 1280x1024 pixels by pressing and holding the left-mouse button and adjust the screen resolution to Contents Page file:///S|/SSA_Proposal/P170S_P190S/UG/optimal.htm[7/8/2011 4:48:49 PM] Select the Settings tab. 3. Dell P170S/P190S Flat Panel Monitor Back to Contents Page Setting Up Your Monitor Dell™ P170S/P190S Flat Panel Monitor Important instructions to set the display resolution to 1280x1024 (Maximum Resolution) For optimal display performance while using , and follow the...
User Guide
Page 19
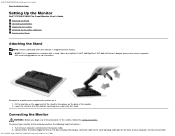
... the power cable. 2. Do not connect both file:///S|/SSA_Proposal/P170S_P190S/UG/setup.htm[7/8/2011 4:49:17 PM] Lower the stand so that the monitor mounting area snaps onto the stand. Remove the monitor cover and place the monitor on it. 1. Turn off your monitor to Contents Page Setting Up the Monitor Dell™ P170S/P190S Flat Panel Monitor User's Guide Attaching the Stand Connecting the Monitor Organizing Your Cables Attaching the Soundbar (Optional) Removing the Stand Attaching the Stand NOTE: Stand...
... the power cable. 2. Do not connect both file:///S|/SSA_Proposal/P170S_P190S/UG/setup.htm[7/8/2011 4:49:17 PM] Lower the stand so that the monitor mounting area snaps onto the stand. Remove the monitor cover and place the monitor on it. 1. Turn off your monitor to Contents Page Setting Up the Monitor Dell™ P170S/P190S Flat Panel Monitor User's Guide Attaching the Stand Connecting the Monitor Organizing Your Cables Attaching the Soundbar (Optional) Removing the Stand Attaching the Stand NOTE: Stand...
User Guide
Page 21
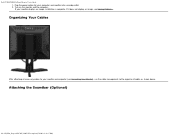
Plug the power cables for your monitor and computer (see Connecting Your Monitor), use the cable management slot to organize all cables as shown above. If it does not display an image, see Solving Problems. Organizing Your Cables After attaching all necessary cables to your computer and monitor into a nearby outlet. 2. Attaching the Soundbar (Optional) file:///S|/SSA_Proposal/P170S_P190S/UG/setup.htm[7/8/2011 4:49:17 PM] Dell P170S/P190S Flat Panel Monitor User's Guide 1. If your monitor displays an image, installation is complete. Turn on the monitor and the computer.
Plug the power cables for your monitor and computer (see Connecting Your Monitor), use the cable management slot to organize all cables as shown above. If it does not display an image, see Solving Problems. Organizing Your Cables After attaching all necessary cables to your computer and monitor into a nearby outlet. 2. Attaching the Soundbar (Optional) file:///S|/SSA_Proposal/P170S_P190S/UG/setup.htm[7/8/2011 4:49:17 PM] Dell P170S/P190S Flat Panel Monitor User's Guide 1. If your monitor displays an image, installation is complete. Turn on the monitor and the computer.
User Guide
Page 24
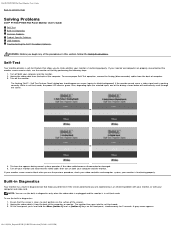
... Solving Problems Dell™ P170S/P190S Flat Panel Monitor User's Guide Self-Test Built-in self-test mode, the power LED remains green. To ensure proper Self-Test operation, remove the Analog (blue connector) cables from the back of the dialogs shown below will continuously scroll through the screen. Self-Test Your monitor provides a self-test feature that helps you determine if the screen abnormality you are properly connected but the monitor screen remains...
... Solving Problems Dell™ P170S/P190S Flat Panel Monitor User's Guide Self-Test Built-in self-test mode, the power LED remains green. To ensure proper Self-Test operation, remove the Analog (blue connector) cables from the back of the dialogs shown below will continuously scroll through the screen. Self-Test Your monitor provides a self-test feature that helps you determine if the screen abnormality you are properly connected but the monitor screen remains...
User Guide
Page 25
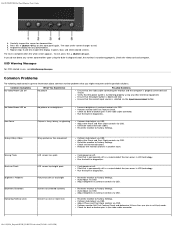
... the video cable connector. Check for abnormalities. 5. Reset the monitor to Factory Settings. Perform monitor Self Test Feature Check and determine if these lines are also in diagnostics. The test is depressed fully. Auto Adjust via OSD. OSD Warning Messages For OSD-related issues, see OSD Warning Messages. No Video/Power LED on Pixels Brightness Problems Geometric Distortion Horizontal/Vertical Lines Wavy picture or fine movement LCD screen has spots LCD screen has bright spots Picture too dim or too bright Screen not...
... the video cable connector. Check for abnormalities. 5. Reset the monitor to Factory Settings. Perform monitor Self Test Feature Check and determine if these lines are also in diagnostics. The test is depressed fully. Auto Adjust via OSD. OSD Warning Messages For OSD-related issues, see OSD Warning Messages. No Video/Power LED on Pixels Brightness Problems Geometric Distortion Horizontal/Vertical Lines Wavy picture or fine movement LCD screen has spots LCD screen has bright spots Picture too dim or too bright Screen not...
User Guide
Page 26
... mode. Dell P170S/P190S Flat Panel Monitor User's Guide Synchronization Problems Screen is USB 2.0 capable. Ensure that the video cable connecting the monitor to their maximum. Re-plug the signal cable if necessary. or width of DVDs, the monitor may not show the full screen pictures. Verify USB 2.0 source on "Factory Reset" Turn the monitor off the monitor at all. Ensure that the computer is not working What You Experience USB peripherals are not working slowly or not slow at all Windows volume controls...
... mode. Dell P170S/P190S Flat Panel Monitor User's Guide Synchronization Problems Screen is USB 2.0 capable. Ensure that the video cable connecting the monitor to their maximum. Re-plug the signal cable if necessary. or width of DVDs, the monitor may not show the full screen pictures. Verify USB 2.0 source on "Factory Reset" Turn the monitor off the monitor at all. Ensure that the computer is not working What You Experience USB peripherals are not working slowly or not slow at all Windows volume controls...
User Guide
Page 27
Dell P170S/P190S Flat Panel Monitor User's Guide Distorted Sound Computer's sound card is used as the audio source. Distorted Sound Other audio source is used . Unbalanced Sound Output Sound from only one side of the sound card. Set all Windows volume controls to their midpoints. Troubleshoot the computer's sound card. Test the Soundbar using another audio source (i.e., portable CD player). Set all Windows volume controls to a lower volume setting. Test the Soundbar using another audio source (i.e., portable CD player). Confirm that the audio line-in plug is completely ...
Dell P170S/P190S Flat Panel Monitor User's Guide Distorted Sound Computer's sound card is used as the audio source. Distorted Sound Other audio source is used . Unbalanced Sound Output Sound from only one side of the sound card. Set all Windows volume controls to their midpoints. Troubleshoot the computer's sound card. Test the Soundbar using another audio source (i.e., portable CD player). Set all Windows volume controls to a lower volume setting. Test the Soundbar using another audio source (i.e., portable CD player). Confirm that the audio line-in plug is completely ...
User Guide
Page 28
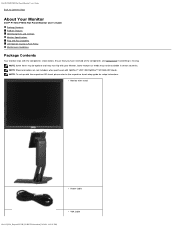
.... NOTE: To set up with the respective AIO stand, please refer to Contents Page About Your Monitor Dell™ P170S/P190S Flat Panel Monitor User's Guide Package Contents Product Features Identifying Parts and Controls Monitor Specifications Plug and Play Capability LCD Monitor Quality & Pixel Policy Maintenance Guidelines Package Contents Your monitor ships with OptiPlex™ USFF 780/OptiPlex™ SFF 980 AIO Stands. Monitor with your Monitor. NOTE: Stand and cables are not included...
.... NOTE: To set up with the respective AIO stand, please refer to Contents Page About Your Monitor Dell™ P170S/P190S Flat Panel Monitor User's Guide Package Contents Product Features Identifying Parts and Controls Monitor Specifications Plug and Play Capability LCD Monitor Quality & Pixel Policy Maintenance Guidelines Package Contents Your monitor ships with OptiPlex™ USFF 780/OptiPlex™ SFF 980 AIO Stands. Monitor with your Monitor. NOTE: Stand and cables are not included...
User Guide
Page 29
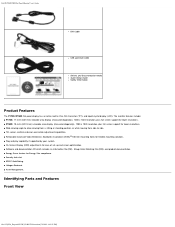
.../P190S Flat Panel Monitor User's Guide DVI Cable USB upstream cable Drivers and Documentation media Quick Setup Guide Safety Information Product Features The P170S/P190S flat panel display has an active matrix, thin-film transistor (TFT), and liquid crystal display (LCD). Identifying Parts and Features Front View file:///S|/SSA_Proposal/P170S_P190S/UG/about.htm[7/8/2011 4:49:51 PM] The monitor features include: ■ P170S: 17-inch (432 mm) viewable area display (measured diagonally). 1280 x 1024 resolution, plus full-screen support...
.../P190S Flat Panel Monitor User's Guide DVI Cable USB upstream cable Drivers and Documentation media Quick Setup Guide Safety Information Product Features The P170S/P190S flat panel display has an active matrix, thin-film transistor (TFT), and liquid crystal display (LCD). Identifying Parts and Features Front View file:///S|/SSA_Proposal/P170S_P190S/UG/about.htm[7/8/2011 4:49:51 PM] The monitor features include: ■ P170S: 17-inch (432 mm) viewable area display (measured diagonally). 1280 x 1024 resolution, plus full-screen support...
User Guide
Page 30
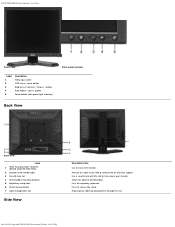
... the stand. Press to contact Dell for technical support. Dell P170S/P190S Flat Panel Monitor User's Guide Front View Label 1 2 3 4 5 Description Video input select OSD menu / select button Brightness & Contrast / Down (-) button Auto-Adjust / Up (+) button Power button (with the slot to help secure your monitor. Lists the regulatory approvals. Attach the optional Dell Soundbar. file:///S|/SSA_Proposal/P170S_P190S/UG/about.htm[7/8/2011 4:49:51 PM] Use a security lock with power light indicator) Front panel controls Back View Back view Label 1 VESA mounting holes...
... the stand. Press to contact Dell for technical support. Dell P170S/P190S Flat Panel Monitor User's Guide Front View Label 1 2 3 4 5 Description Video input select OSD menu / select button Brightness & Contrast / Down (-) button Auto-Adjust / Up (+) button Power button (with the slot to help secure your monitor. Lists the regulatory approvals. Attach the optional Dell Soundbar. file:///S|/SSA_Proposal/P170S_P190S/UG/about.htm[7/8/2011 4:49:51 PM] Use a security lock with power light indicator) Front panel controls Back View Back view Label 1 VESA mounting holes...
User Guide
Page 32
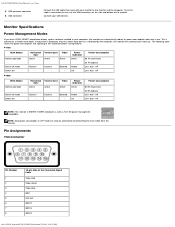
... VESA's DPMS™ compliance display card or software installed in use the USB connectors on the side and bottom of the monitor. Inactive - The following table shows the power consumption and signaling of the Connected Signal Cable Video-Red Video-Green Video-Blue GND Self-test GND-R GND-G GND-B file:///S|/SSA_Proposal/P170S_P190S/UG/about.htm[7/8/2011 4:49:51 PM] Once this automatic power-saving feature: P170S VESA Modes Normal operation Active-off mode Switch off Horizontal Sync Active Vertical Sync Video...
... VESA's DPMS™ compliance display card or software installed in use the USB connectors on the side and bottom of the monitor. Inactive - The following table shows the power consumption and signaling of the Connected Signal Cable Video-Red Video-Green Video-Blue GND Self-test GND-R GND-G GND-B file:///S|/SSA_Proposal/P170S_P190S/UG/about.htm[7/8/2011 4:49:51 PM] Once this automatic power-saving feature: P170S VESA Modes Normal operation Active-off mode Switch off Horizontal Sync Active Vertical Sync Video...
User Guide
Page 34
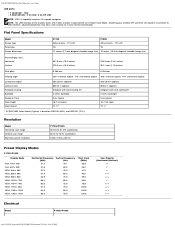
... 3H 2 CCFLs backlight 5 ms typical 16.7 mil colors 72 %* * P170S/P190S Color Gamut (Typical) is powered ON (or in Power Save Mode). Flat Panel Specifications Model Screen type Panel type Screen dimensions P170S P190S Active matrix - rear 4 downstream - 2 on rear; 2 on CIE1976 (85%) and CIE1931 (72%). NOTE: The USB interface of the monitor works ONLY when monitor is based on left side NOTE: USB 2.0 capability requires 2.0-capable computer. TFT LCD Active matrix - Dell P170S/P190S Flat Panel Monitor User's Guide USB ports: 1 upstream...
... 3H 2 CCFLs backlight 5 ms typical 16.7 mil colors 72 %* * P170S/P190S Color Gamut (Typical) is powered ON (or in Power Save Mode). Flat Panel Specifications Model Screen type Panel type Screen dimensions P170S P190S Active matrix - rear 4 downstream - 2 on rear; 2 on CIE1976 (85%) and CIE1931 (72%). NOTE: The USB interface of the monitor works ONLY when monitor is based on left side NOTE: USB 2.0 capability requires 2.0-capable computer. TFT LCD Active matrix - Dell P170S/P190S Flat Panel Monitor User's Guide USB ports: 1 upstream...
User Guide
Page 36
... are hard to see Dell Support site at: support.dell.com. For best practices, follow the Safety Instructions before cleaning the monitor. If you notice a white powder when you unpack your antistatic screen, lightly dampen a soft, clean cloth with its Extended Display Identification Data (EDID) using detergent of any Plug and Play-compatible system. If required, the user can configure itself and optimize the monitor settings. The monitor automatically provides the...
... are hard to see Dell Support site at: support.dell.com. For best practices, follow the Safety Instructions before cleaning the monitor. If you notice a white powder when you unpack your antistatic screen, lightly dampen a soft, clean cloth with its Extended Display Identification Data (EDID) using detergent of any Plug and Play-compatible system. If required, the user can configure itself and optimize the monitor settings. The monitor automatically provides the...


