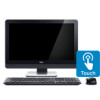
Dell OptiPlex 9010 All-In-One Touch Owner's Manual
Page 3
... Converter Board...14 Removing the System-Board Shield...15 Installing the System-Board Shield...15 Removing the Coin-Cell Battery...15 Installing the Coin-Cell Battery...16 Removing the Optical Drive...16 Installing the Optical Drive...18 Removing the Hard Drive...18 Installing the Hard Drive...19 Removing the Intrusion Switch...19 Installing the Intrusion Switch...20 Removing the Wireless Local Area Network (WLAN) Card 21 Installing the WLAN Card...21 Removing the Power-Supply Fan...21 Installing the Power-Supply Fan...22 Removing the Power Supply Unit (PSU)...23 Installing the Power Supply...
... Converter Board...14 Removing the System-Board Shield...15 Installing the System-Board Shield...15 Removing the Coin-Cell Battery...15 Installing the Coin-Cell Battery...16 Removing the Optical Drive...16 Installing the Optical Drive...18 Removing the Hard Drive...18 Installing the Hard Drive...19 Removing the Intrusion Switch...19 Installing the Intrusion Switch...20 Removing the Wireless Local Area Network (WLAN) Card 21 Installing the WLAN Card...21 Removing the Power-Supply Fan...21 Installing the Power-Supply Fan...22 Removing the Power Supply Unit (PSU)...23 Installing the Power Supply...
Dell OptiPlex 9010 All-In-One Touch Owner's Manual
Page 4
...Processor Fan...29 Removing the Processor...29 Installing the Processor...29 Removing the Speakers...30 Installing the Speakers...31 Removing the System Board...31 System Board Layout...32 Installing the System Board...33 Jumper Settings...34 Clearing the CMOS Password...34 Disabling the Password...34 Removing the Display Panel...35 Installing the Display Panel...39 Removing the Antenna Modules...39 Installing the Antenna Modules...40 Removing the Camera...40 Installing the Camera...41 3 System Setup...43 Boot Sequence...43 Navigation Keys...43 System Setup Options - BIOS Setup...44 Updating...
...Processor Fan...29 Removing the Processor...29 Installing the Processor...29 Removing the Speakers...30 Installing the Speakers...31 Removing the System Board...31 System Board Layout...32 Installing the System Board...33 Jumper Settings...34 Clearing the CMOS Password...34 Disabling the Password...34 Removing the Display Panel...35 Installing the Display Panel...39 Removing the Antenna Modules...39 Installing the Antenna Modules...40 Removing the Camera...40 Installing the Camera...41 3 System Setup...43 Boot Sequence...43 Navigation Keys...43 System Setup Options - BIOS Setup...44 Updating...
Dell OptiPlex 9010 All-In-One Touch Owner's Manual
Page 7
... not covered by its pins. CAUTION: To avoid electrostatic discharge, ground yourself by using a wrist grounding strap or by periodically touching an unpainted metal surface, such as a processor by its metal mounting bracket. Turn off your computer and certain components may only be replaced or--if purchased separately--installed by the online or telephone service and support team. Hold a card...
... not covered by its pins. CAUTION: To avoid electrostatic discharge, ground yourself by using a wrist grounding strap or by periodically touching an unpainted metal surface, such as a processor by its metal mounting bracket. Turn off your computer and certain components may only be replaced or--if purchased separately--installed by the online or telephone service and support team. Hold a card...
Dell OptiPlex 9010 All-In-One Touch Owner's Manual
Page 8
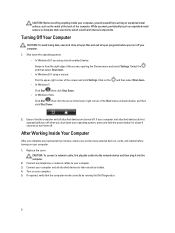
.... 1. Connect any external devices, cards, and cables before you using a mouse: Point to their electrical outlets. 4. Connect your computer and attached devices did not automatically turn them off. Turn on the - In Windows 8: If you turn off your operating system, press and hold the power button for about 6 seconds to dissipate static electricity, which could harm internal components. Click on your computer, ground yourself by running the Dell Diagnostics. 8 Ensure...
.... 1. Connect any external devices, cards, and cables before you using a mouse: Point to their electrical outlets. 4. Connect your computer and attached devices did not automatically turn them off. Turn on the - In Windows 8: If you turn off your operating system, press and hold the power button for about 6 seconds to dissipate static electricity, which could harm internal components. Click on your computer, ground yourself by running the Dell Diagnostics. 8 Ensure...
Dell OptiPlex 9010 All-In-One Touch Owner's Manual
Page 34
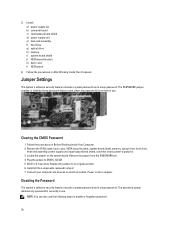
...After Working Inside Your Computer. NOTE: You can also use . Jumper Settings The system's software security features include a system password and a setup password. Power on the system board. Install: a) power-supply fan b) converter board c) input/output board shield d) power supply unit e) heat-sink assembly f) hard drive g) optical drive h) memory i) system-board shield j) VESA mount bracket k) back cover l) VESA stand 4. Locate the jumper on the computer. The PASSWORD jumper enables or disables these password features and clears any password(s) currently in use the...
...After Working Inside Your Computer. NOTE: You can also use . Jumper Settings The system's software security features include a system password and a setup password. Power on the system board. Install: a) power-supply fan b) converter board c) input/output board shield d) power supply unit e) heat-sink assembly f) hard drive g) optical drive h) memory i) system-board shield j) VESA mount bracket k) back cover l) VESA stand 4. Locate the jumper on the computer. The PASSWORD jumper enables or disables these password features and clears any password(s) currently in use the...
Dell OptiPlex 9010 All-In-One Touch Owner's Manual
Page 35
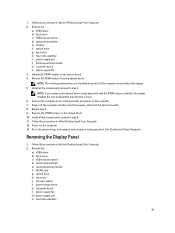
... removed in Before Working Inside Your Computer. 2. Power-on the system board. 4. Remove the PSWD jumper from the electrical outlet. 8. NOTE: If you assign a new system and/or setup password with the PSWD jumper installed, the system disables the new password(s) the next time it boots. 6. See System and Setup Password. 1. Remove the: a) VESA stand b) back cover c) VESA mount bracket d) system-board shield e) input/output board shield f) WLAN card g) optical drive h) hard drive i) intrusion switch j) power-button board k) converter board l) power-supply fan m) power supply...
... removed in Before Working Inside Your Computer. 2. Power-on the system board. 4. Remove the PSWD jumper from the electrical outlet. 8. NOTE: If you assign a new system and/or setup password with the PSWD jumper installed, the system disables the new password(s) the next time it boots. 6. See System and Setup Password. 1. Remove the: a) VESA stand b) back cover c) VESA mount bracket d) system-board shield e) input/output board shield f) WLAN card g) optical drive h) hard drive i) intrusion switch j) power-button board k) converter board l) power-supply fan m) power supply...
Dell OptiPlex 9010 All-In-One Touch Owner's Manual
Page 41
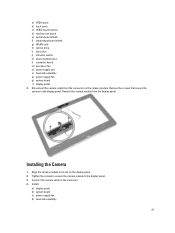
... card h) optical drive i) hard drive j) intrusion switch k) power button board l) converter board m) processor fan n) power supply unit o) heat-sink assembly p) power-supply fan q) system board r) display panel 3. Remove the camera module from the connector on the display panel. 2. Remove the screws that secure the camera to the display panel. 3. Installing the Camera 1. Tighten the screws to secure the camera module to the display panel. Install: a) display panel b) system board c) power-supply fan d) heat-sink assembly 41 Disconnect the camera cable from the display panel. Align...
... card h) optical drive i) hard drive j) intrusion switch k) power button board l) converter board m) processor fan n) power supply unit o) heat-sink assembly p) power-supply fan q) system board r) display panel 3. Remove the camera module from the connector on the display panel. 2. Remove the screws that secure the camera to the display panel. 3. Installing the Camera 1. Tighten the screws to secure the camera module to the display panel. Install: a) display panel b) system board c) power-supply fan d) heat-sink assembly 41 Disconnect the camera cable from the display panel. Align...
Dell OptiPlex 9010 All-In-One Touch Owner's Manual
Page 43
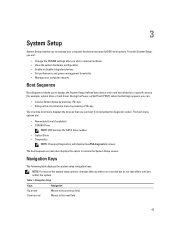
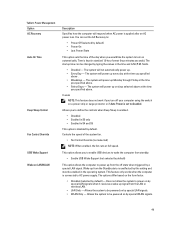
... Power-on Self Test (POST), when the Dell logo appears, you can: • Access System Setup by pressing key • Bring up the one-time boot menu by pressing key The one-time boot menu displays the devices that you make are : • Removable Drive (if available) • STXXXX Drive NOTE: XXX denotes the SATA drive number. • Optical Drive • Diagnostics NOTE: Choosing Diagnostics, will display the ePSA diagnostics screen. 3 System Setup System Setup enables you can boot from including the diagnostic option. Navigation Keys Keys...
... Power-on Self Test (POST), when the Dell logo appears, you can: • Access System Setup by pressing key • Bring up the one-time boot menu by pressing key The one-time boot menu displays the devices that you make are : • Removable Drive (if available) • STXXXX Drive NOTE: XXX denotes the SATA drive number. • Optical Drive • Diagnostics NOTE: Choosing Diagnostics, will display the ePSA diagnostics screen. 3 System Setup System Setup enables you can boot from including the diagnostic option. Navigation Keys Keys...
Dell OptiPlex 9010 All-In-One Touch Owner's Manual
Page 44
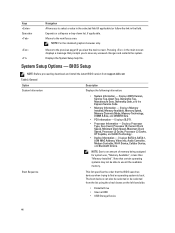
... Drive • Internal HDD • USB Storage Device 44 Displays SLOT1. • Processor Information - Note that the BIOS searches devices when trying to find an operating system to an amount of memory being assigned for system use all the available memory. Displays the System Setup help file. Boot Sequence This list specifies the order that certain operating systems may not be selected or de-selected from support.dell.com Table 2. Displays Processor Type...
... Drive • Internal HDD • USB Storage Device 44 Displays SLOT1. • Processor Information - Note that the BIOS searches devices when trying to find an operating system to an amount of memory being assigned for system use all the available memory. Displays the System Setup help file. Boot Sequence This list specifies the order that certain operating systems may not be selected or de-selected from support.dell.com Table 2. Displays Processor Type...

Dell OptiPlex 9010 All-In-One Touch Owner's Manual
Page 45
... option is enabled (with the percent charged, charging state, Health, and AC adapter information. Changes to support RAID mode (Intel Rapid Restore Technology). The internal LAN is enabled (with ImageServer boot). This technology is configured for AHCI. • RAID On - SATA is part of the integrated SATA hard drive controller. • Disabled - configured to the date and time take effect immediately. • MM /DD /YY • HH: MM: SS: A/P Displays each battery graphically with PXE boot...
... option is enabled (with the percent charged, charging state, Health, and AC adapter information. Changes to support RAID mode (Intel Rapid Restore Technology). The internal LAN is enabled (with ImageServer boot). This technology is configured for AHCI. • RAID On - SATA is part of the integrated SATA hard drive controller. • Disabled - configured to the date and time take effect immediately. • MM /DD /YY • HH: MM: SS: A/P Displays each battery graphically with PXE boot...
Dell OptiPlex 9010 All-In-One Touch Owner's Manual
Page 46
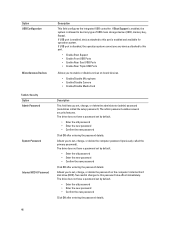
... entering the password details. The drive does not have a password set , change , or delete the administrator (admin) password (sometimes called the primary password). If Boot Support is enabled, the system is disabled, the operation system cannot see any type of USB mass storage devices (HDD, memory key, floppy). If USB port is allowed to enable or disable various on the computer's internal hard disk drive (HDD). Allows you to boot any device attached to this port. • Enable Boot Support • Enable Front USB Ports • Enable Rear Dual USB Ports • Enable Rear...
... entering the password details. The drive does not have a password set , change , or delete the administrator (admin) password (sometimes called the primary password). If Boot Support is enabled, the system is disabled, the operation system cannot see any type of USB mass storage devices (HDD, memory key, floppy). If USB port is allowed to enable or disable various on the computer's internal hard disk drive (HDD). Allows you to boot any device attached to this port. • Enable Boot Support • Enable Front USB Ports • Enable Rear Dual USB Ports • Enable Rear...
Dell OptiPlex 9010 All-In-One Touch Owner's Manual
Page 47
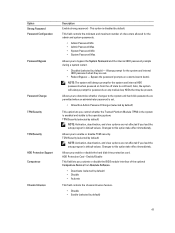
...deactivation, and clear options are set . • Allow Non-Admin Password Changes (selected by default) - HDD Protection Card - This option is set . • Reboot Bypass - Changes to bypass the System Password and the internal HDD password prompts during a system restart. • Disabled (selected by default) This option lets you load the setup program's default values. Option Strong Password Password Configuration Password Bypass Password Change TPM Security TCM Security HDD Protection Support Computrace Chassis Intrusion Description Enable strong password - TCM Security...
...deactivation, and clear options are set . • Allow Non-Admin Password Changes (selected by default) - HDD Protection Card - This option is set . • Reboot Bypass - Changes to bypass the System Password and the internal HDD password prompts during a system restart. • Disabled (selected by default) This option lets you load the setup program's default values. Option Strong Password Password Configuration Password Bypass Password Change TPM Security TCM Security HDD Protection Support Computrace Chassis Intrusion Description Enable strong password - TCM Security...
Dell OptiPlex 9010 All-In-One Touch Owner's Manual
Page 49
...; Fan Control Override (not selected) NOTE: When enabled, the fan runs at the time you to enable USB devices to be powered on by this setting and must be changed by a special LAN signal. Power Management Option AC Recovery Auto On Time Deep Sleep Control Fan Control Override USB Wake Support Wake on a power strip or surge protector or if Auto Power is unaffected by special LAN signals when it receives a wake-up . • Every Day - fields. • Disabled...
...; Fan Control Override (not selected) NOTE: When enabled, the fan runs at the time you to enable USB devices to be powered on by this setting and must be changed by a special LAN signal. Power Management Option AC Recovery Auto On Time Deep Sleep Control Fan Control Override USB Wake Support Wake on a power strip or surge protector or if Auto Power is unaffected by special LAN signals when it receives a wake-up . • Every Day - fields. • Disabled...

Dell OptiPlex 9010 All-In-One Touch Owner's Manual
Page 52
The default IP port is set to support.dell.com/support/downloads. 3. NOTE: This field is only relevant when the Integrated NIC control in the System Configuration group is available. The default setting is 255.255.255.255. Description Displays the system event log and allows you to clear the log. • Clear Log Updating the BIOS It is recommended to communicate. Specifies how the client obtains...
The default IP port is set to support.dell.com/support/downloads. 3. NOTE: This field is only relevant when the Integrated NIC control in the System Configuration group is available. The default setting is 255.255.255.255. Description Displays the system event log and allows you to clear the log. • Clear Log Updating the BIOS It is recommended to communicate. Specifies how the client obtains...
Dell OptiPlex 9010 All-In-One Touch Owner's Manual
Page 53
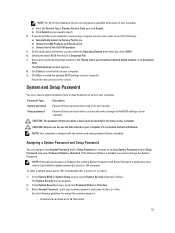
... instructions on or reboot. 1. The System Security screen appears. 2. Select System Password , enter your download method below window; Password Type System password Setup password Description Password that Password Status is Locked, you must enter to access and make changes to save the file on to the computer. If the Password Status is Unlocked. 3. The File Download window appears. 8. Click Run to step 5. 4. On the application and drivers screen, under the Operating System drop-down list, select BIOS...
... instructions on or reboot. 1. The System Security screen appears. 2. Select System Password , enter your download method below window; Password Type System password Setup password Description Password that Password Status is Locked, you must enter to access and make changes to save the file on to the computer. If the Password Status is Unlocked. 3. The File Download window appears. 8. Click Run to step 5. 4. On the application and drivers screen, under the Operating System drop-down list, select BIOS...
Dell OptiPlex 9010 All-In-One Touch Owner's Manual
Page 55
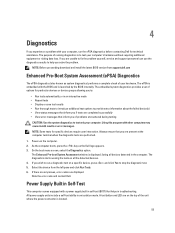
... the BIOS and is displayed, listing all the detected devices. 4. The Enhanced Pre-boot System Assessment window is launched by the BIOS internally. Select the device from support.dell.com Enhanced Pre-Boot System Assessment (ePSA) Diagnostics The ePSA diagnostics (also known as the Dell logo appears. 3. Power Supply Built in self-test (BIST) that you of problems encountered during testing CAUTION: Use the system diagnostics to run the ePSA diagnostics before contacting Dell for technical...
... the BIOS and is displayed, listing all the detected devices. 4. The Enhanced Pre-boot System Assessment window is launched by the BIOS internally. Select the device from support.dell.com Enhanced Pre-Boot System Assessment (ePSA) Diagnostics The ePSA diagnostics (also known as the Dell logo appears. 3. Power Supply Built in self-test (BIST) that you of problems encountered during testing CAUTION: Use the system diagnostics to run the ePSA diagnostics before contacting Dell for technical...
Dell OptiPlex 9010 All-In-One Touch Owner's Manual
Page 57
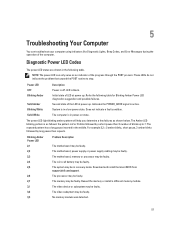
... 7. The Amber LED blinking pattern is as shown below. The motherboard, memory or processor may be faulty. The video device or subsystem may be faulty. The motherboard, power supply or power supply cabling may be faulty. No memory module was detected. 57 5 Troubleshooting Your Computer You can only serve as an indicator of blinks up to stop. Blinking Amber Power LED 2,1 2,2 2,3 2,4 2,5 2,6 2,7 3,1 3,2 3,3 Problem Description The motherboard may be in recovery mode. The system may...
... 7. The Amber LED blinking pattern is as shown below. The motherboard, memory or processor may be faulty. The video device or subsystem may be faulty. The motherboard, power supply or power supply cabling may be faulty. No memory module was detected. 57 5 Troubleshooting Your Computer You can only serve as an indicator of blinks up to stop. Blinking Amber Power LED 2,1 2,2 2,3 2,4 2,5 2,6 2,7 3,1 3,2 3,3 Problem Description The motherboard may be in recovery mode. The system may...
Dell OptiPlex 9010 All-In-One Touch Owner's Manual
Page 58
... failure Possible fan failure CPU fan failure Possible CPU fan failure Hard-disk drive failure Possible hard drive failure during boot test. failure Keyboard failure A cable or connector may be loose, or the keyboard or keyboard/mouse controller may be faulty. Blinking Amber Power LED 3,4 3,5 3,6 3,7 Problem Description The storage device may fix the beep code errors. The computer failed to complete the boot routine three consecutive times for the same error. No boot device available No bootable partition on the hard drive, a cable or connector is reset, BIOS Setup...
... failure Possible fan failure CPU fan failure Possible CPU fan failure Hard-disk drive failure Possible hard drive failure during boot test. failure Keyboard failure A cable or connector may be loose, or the keyboard or keyboard/mouse controller may be faulty. Blinking Amber Power LED 3,4 3,5 3,6 3,7 Problem Description The storage device may fix the beep code errors. The computer failed to complete the boot routine three consecutive times for the same error. No boot device available No bootable partition on the hard drive, a cable or connector is reset, BIOS Setup...
Dell OptiPlex 9010 All-In-One Touch Owner's Manual
Page 63
...-pin VGA connector one 19-pin output port one 8-in-1 slot Specification 50 Hz - 60 Hz 100 VAC - 240 VAC maximum 2.90 A maximum 1.45 A 3 V CR2032 lithium coin cell Specification 1.3 megapixel HD (720p) 60 degrees +1 degree to -10 degrees Specification -5 degrees to 30 degrees -5 degrees to 60 degrees 63 Camera (optional) Feature Image resolution Video resolution Diagonal viewing angle Rotational angle Table 24. Ports and Connectors Feature Audio: Network adapter USB 2.0 USB 3.0 Video HDMI Media card reader...
...-pin VGA connector one 19-pin output port one 8-in-1 slot Specification 50 Hz - 60 Hz 100 VAC - 240 VAC maximum 2.90 A maximum 1.45 A 3 V CR2032 lithium coin cell Specification 1.3 megapixel HD (720p) 60 degrees +1 degree to -10 degrees Specification -5 degrees to 30 degrees -5 degrees to 60 degrees 63 Camera (optional) Feature Image resolution Video resolution Diagonal viewing angle Rotational angle Table 24. Ports and Connectors Feature Audio: Network adapter USB 2.0 USB 3.0 Video HDMI Media card reader...
Dell Optiplex 9010 Setup And Features Information
Page 3
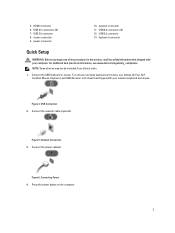
... any of the procedures in this section, read the safety information that shipped with your wireless keyboard and mouse. USB Connection 2. USB 2.0 connectors (2) 12. USB 3.0 connector 8. keyboard connector Quick Setup WARNING: Before you did not order. 1. Connect the power cable(s). Press the power button on the computer. 3 Connect the USB keyboard or mouse. Network Connection 3. 5. HDMI connector 6. For additional best practices information, see Setting Up Your Dell Cordless Mouse, Keyboard, and USB Receiver tech sheet that shipped with your computer.
... any of the procedures in this section, read the safety information that shipped with your wireless keyboard and mouse. USB Connection 2. USB 2.0 connectors (2) 12. USB 3.0 connector 8. keyboard connector Quick Setup WARNING: Before you did not order. 1. Connect the power cable(s). Press the power button on the computer. 3 Connect the USB keyboard or mouse. Network Connection 3. 5. HDMI connector 6. For additional best practices information, see Setting Up Your Dell Cordless Mouse, Keyboard, and USB Receiver tech sheet that shipped with your computer.


